《Python程序设计(第3版)》[美] 约翰·策勒(John Zelle) 第 4 章 答案
判断对错
1、利用 grAphiCs.py 可以在 Python 的 shell 窗口中绘制图形。
2、传统上,图形窗口的左上角坐标为(0,0)。
3、图形屏幕上的单个点称为像素。
4、创建类的新实例的函数称为取值方法。
5、实例变量用于在对象内存储数据。
6、语句 myShApe.move(10,20) 将 myShApe 移动到点(10,20)。
7、如果两个变量引用同一个对象,就产生了别名。
8、提供 Copy 方法是用于生成图形对象的副本。
9、图形窗口的标题总是“GrAphiCs WinDow”。
10、grAphiCs 库中,用于获取鼠标点击的方法是 reADMouse。
解答
- F(是在 GrAphWin() 函数创建的窗口中绘制图形)
- T(p.55 “(传统上,图形程序员将点定位在窗口的左上角。”)
- T(p.55 “图形窗口实际上是一些小点的集合,这些小点称为“像素”(“图像元素”的缩写)”)
- F(p.57 “要创建一个类的新实例,我们使用一个特殊操作,称为“构造函数”,p.58 “这些方法有时被称为“取值方法”,因为它们允许我们从对象的实例变量访问信息。” p.76 “取值方法返回有关对象的实例变量的信息。”)
- T(p.57 “这些值作为“实例变量”存储在对象内。”)
- F(p.58 “。所有图形对象都有 move 方法。下面是规格说明:move(Dx,Dy):让对象在 x 方向上移动 Dx 单位,在 y 方向上移动 Dy 单位。”)
- T(p.59 “……两个变量引用同一个对象称为“别名”……”,p.76 “两个变量引用同一对象的情况称为别名。”)
- F(p.59 “grAphiCs 库提供了更好的解决方案,所有图形对象都支持复制对象的 Clone 方法。”)
- F(p.61 “……GrAphWin 构造函数允许一个可选参数指定窗口的标题。”)
- F(p.67 “如果在 GrAphWin 上调用 getMouse,程序将暂停,并等待用户在图形窗口中某处单击鼠标。”,p.71 “getMouse() 暂停等待用户在窗口中单击鼠标,并用 Point 对象返回鼠标单击的位置。”)
多项选择
1、返回对象的实例变量的值的方法称为____。
A. 设值方法
B. 函数
C. 构造方法
D. 取值方法
2、改变对象状态的方法称为____。
A. 状态方法
B. 设值方法
C. 构造方法
D. 变更方法
3、____图形类最适合绘制一个正方形。
A. Square
B. Polygon
C. Line
D. Rectangle
4、____命令会将 win 的坐标设置变为左下角是(0,0),右上角是(10,10)。
A. win.setCoords(Point(0,0), Point(10,10))
B. win.setCoords((0,0), (10,10))
C. win.setCoords(0, 0, 10, 10)
D. win.setCoords(Point(10,10), Point(0,0))
5、表达式____将创建从(2,3)到(4,5)的线段。
A. Line(2, 3, 4, 5)
B. Line((2,3), (4,5))
C. Line(2, 4, 3, 5)
D. Line(Point(2,3), Point(4,5))
6、命令____可以将图形对象 shApe 绘制到图形窗口 win 中。
A. win.draw(shape)
B. win.show(shape)
C. shape.draw()
D. shape.draw(win)
7、表达式____计算点 p1 和 p2 之间的水平距离。
A. abs(p1-p2)
B. p2.getX() - p1.getX()
C. abs(p1.getY() - p2.getY())
D. abs(p1.getX() - p2.getX())
8、对象____可以用来在图形窗口中获取文本输入。
A. Text
B. Entry
C. Input
D. Keyboard
9、围绕视觉元素和用户动作组织的用户界面被称为____。
A. GUI
B. Application
C. windower
D. API
10、Color_rgb(0,255,255) 是____。
A. 黄色
B. 青色
C. 品红色
D. 橙色
解答
- D
- B
- D
- C
- D
- D
- D
- B
- A
- B
讨论
- 选择一个有趣的现实世界对象的例子,通过列出它的数据(属性,它“知道什么”)及方法(行为,它可以“做什么”),将它描述为一个编程对象。
解答
- 冰箱
- 数据:容积
- 方法:开门()、放入()、关门()
- 要往冰箱里放入大象:
- 冰箱.开门()
- 冰箱.放入(大象)
- 冰箱.关门()
2、用你自己的话描述 graphics 模块的下列操作产生的每个对象,尽可能精确。务必描述各种对象的大小、位置和外观等。如果需要,可以画草图。
- a. Point(130,130)
- b. c = Circle(Point(30,40),25)
- c.setFill("blue")
- c.setOutline("red")
- c. r = Rectangle(Point(20,20), Point(40,40))
- r.setFill(color_rgb(0,255,150))
- r.setWidth(3)
- d. l = Line(Point(100,100), Point(100,200))
- l.setOutline("red4")
- l.setArrow("first")
- e. Oval(Point(50,50), Point(60,100))
- f. shape = Polygon(Point(5,5), Point(10,10), Point(5,10), Point(10,5))
- shape.setFill("orange")
- g. t = Text(Point(100,100), "Hello World!")
- t.setFace("courier")
- t.setSize(16)
- t.setStyle("italic")
解答
- a. 一个坐标为 (130,130) 的点
- b. 一个圆心为 (30,40)、半径为 25 像素的红色轮廓的蓝色圆圈
- c. 一个边长为 20 像素、中心点为 (30,30)、有 3 像素宽的黑色轮廓的蓝绿色正方形
- d. 一条底部位于点 (100,200)、长度为 100 像素的暗红色线,其;上端有一个向上指的箭头
- e. 一个宽度为 10、高度为 50、中心为 (55,75) 的未填充的 “竖立的” 椭圆形
- f. 一个以点 (7.5,7.5) 为中心、黑色轮廓的橙色沙漏
- g. 一个以 (100,100) 为中心、以 16 点式斜体字形显示的 “Hello World!” 文本
3、描述以下交互式图形程序运行时会发生什么:
- from graphics import *
- def main():
- win = GraphWin()
- shape = Circle(Point(50,50), 20)
- shape.setOutline("red")
- shape.setFill("red")
- shape.draw(win)
- for i in range(10):
- p = win.getMouse()
- c = shape.getCenter()
- dx = p.getX() - c.getX()
- dy = p.getY() - c.getY()
- shape.move(dx,dy)
- win.close()
- main()
解答
- 程序在默认图形窗口中绘制一个圆心在 (50,50)、半径为 20 像素的红色圆圈,然后等待用户单击鼠标 10 次。每次用户点击时,圆圈都会移动到点击的点(以其为圆心)。点击 10 次后,窗口消失。
编程练习
1、修改上一个讨论问题的程序,做到:
a.使它绘制正方形而不是圆。
b.每次连续点击在屏幕上绘制一个额外的方块(而不是移动已有的方块)。
解答
- from graphics import *
- def main():
- win = GraphWin()
- shape = Rectangle(Point(30,30), Point(70,70))
- shape.setOutline("red")
- shape.setFill("red")
- shape.draw(win)
- for _ in range(10):
- p = win.getMouse()
- c = shape.getCenter()
- dx = p.getX() - c.getX()
- dy = p.getY() - c.getY()
- shape = shape.clone()
- shape.move(dx,dy)
- shape.draw(win)
- win.close()
- main()
2、箭靶的中心圆为黄色,围绕着红色、蓝色、黑色和白色的同心环。每个环具有相同
的宽度,与黄色圆的半径相同。编写一个绘制这种箭靶的程序。(提示:稍后绘制的对象将
出现在先前绘制的对象的上面。)
解答
- from graphics import *
- def main():
- win = GraphWin("Archery Target", 360, 360)
- win.setCoords(-6, -6, 6, 6)
- win.setBackground("gray")
- center = Point(0,0)
- c1 = Circle(center, 5)
- c1.setFill("white")
- c1.draw(win)
- c2 = Circle(center, 4)
- c2.setFill("black")
- c2.draw(win)
- c3 = Circle(center, 3)
- c3.setFill("blue")
- c3.draw(win)
- c4 = Circle(center, 2)
- c4.setFill("red")
- c4.draw(win)
- c5 = Circle(center, 1)
- c5.setFill("yellow")
- c5.draw(win)
- win.getMouse()
- win.close()
- main()

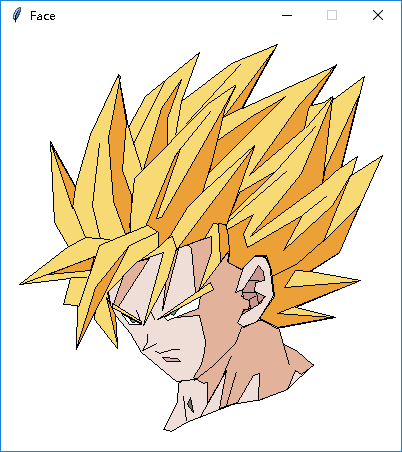
- 编写一个绘制某种面孔的程序。
解答
- # Author: Cody Leistikow (10/4/02)
- from graphics import *
- def main():
- win=GraphWin('Face',400,420)
- win.setBackground("white")
- neck = Polygon(Point(177,352),Point(176,371),Point(162,398),Point(170,400),Point(185,391),Point(231,373),Point(260,368),Point(287,357),Point(312,333),Point(235,311))
- neck.setFill(color_rgb(239,222,215))
- head = Polygon(Point(136,228),Point(107,260),Point(110,279),Point(129,302),Point(140,321),Point(175,350),Point(193,348),Point(234,312),Point(238,296),Point(255,291),Point(272,266),Point(271,240),Point(264,226),Point(253,224),Point(239,239),Point(243,193))
- head.setFill(color_rgb(239,222,215))
- headdark1 = Polygon(Point(184,212),Point(190,217),Point(194,261),Point(173,286),Point(198,284),Point(204,310),Point(203,321),Point(200,333),Point(192,346),Point(202,352),Point(206,351),Point(206,372),Point(225,339),Point(218,377),Point(236,371),Point(252,344),Point(258,342),Point(257,369),Point(286,358),Point(294,339),Point(300,343),Point(312,334),Point(295,319),Point(282,313),Point(276,292),Point(258,289),Point(242,296),Point(236,291),Point(240,284),Point(242,278),Point(247,278),Point(249,268),Point(240,265),Point(242,258),Point(234,261),Point(258,185))
- headdark1.setFill(color_rgb(226,179,154))
- headdark2 = Polygon(Point(133,231),Point(123,241),Point(112,273),Point(117,275),Point(148,227))
- headdark2.setFill(color_rgb(226,179,154))
- headdark3 = Polygon(Point(177,218),Point(161,279),Point(168,221))
- headdark3.setFill(color_rgb(226,179,154))
- neckline1 = Line(Point(182,365),Point(185,390))
- neckline2 = Line(Point(199,385),Point(219,350))
- neckline3 = Line(Point(219,350),Point(230,324))
- neckline4 = Line(Point(225,374),Point(235,340))
- neckline5 = Line(Point(282,313),Point(288,334))
- throat = Polygon(Point(189,366),Point(192,381),Point(186,373))
- throat.setFill(color_rgb(117,110,105))
- headline1 = Line(Point(193,349),Point(212,334))
- headline2 = Line(Point(212,334),Point(234,312))
- headline3 = Line(Point(234,312),Point(241,294))
- headline4 = Line(Point(135,279),Point(140,292))
- headline5 = Line(Point(149,279),Point(154,289))
- innerear = Polygon(Point(263,249),Point(262,240),Point(257,234),Point(241,259),Point(242,267),Point(248,269),Point(249,277),Point(242,279),Point(241,283),Point(260,271),Point(263,265),Point(253,260),Point(254,251))
- innerear.setFill(color_rgb(201,153,145))
- earline1 = Line(Point(247,249),Point(258,249))
- earline2 = Line(Point(248,268),Point(255,264))
- earline3 = Line(Point(241,261),Point(255,261))
- earline4 = Line(Point(255,261),Point(257,272))
- earline5 = Line(Point(257,272),Point(265,264))
- chin = Polygon(Point(161,326),Point(176,327),Point(179,330),Point(165,330))
- chin.setFill(color_rgb(215,178,182))
- mouthline1 = Line(Point(154,320),Point(158,322))
- mouthline2 = Line(Point(158,322),Point(171,318))
- mouthline3 = Line(Point(171,318),Point(179,318))
- noseline1 = Line(Point(146,303),Point(146,311))
- noseline2 = Line(Point(146,311),Point(141,319))
- noseline3 = Line(Point(141,319),Point(156,312))
- lefteye = Polygon(Point(120,282),Point(140,293),Point(128,293))
- lefteye.setFill(color_rgb(255,255,255))
- righteye = Polygon(Point(163,286),Point(166,289),Point(197,277),Point(199,264))
- righteye.setFill(color_rgb(255,255,255))
- leftiris = Polygon(Point(128,287),Point(131,291),Point(137,290))
- leftiris.setFill(color_rgb(100,150,131))
- rightiris = Polygon(Point(168,282),Point(172,284),Point(179,275))
- rightiris.setFill(color_rgb(100,150,131))
- lefteyebrow = Polygon(Point(111,272),Point(140,290),Point(140,292),Point(111,276))
- lefteyebrow.setFill(color_rgb(247,218,116))
- righteyebrow = Polygon(Point(156,288),Point(209,251),Point(212,258),Point(157,288))
- righteyebrow.setFill(color_rgb(247,218,116))
- hairbg = Polygon(Point(49,110),Point(74,155),Point(89,103),Point(117,43),Point(127,96),Point(144,65),Point(198,21),Point(180,70),Point(230,32),Point(276,13),Point(241,77),Point(335,34),Point(310,74),Point(323,71),Point(331,65),Point(332,68),Point(363,45),Point(340,136),Point(356,125),Point(350,144),Point(381,124),Point(337,222),Point(309,240),Point(359,249),Point(294,276),Point(334,286),Point(275,297),Point(258,287),Point(272,264),Point(268,233),Point(264,225),Point(252,225),Point(239,238),Point(226,230),Point(228,219),Point(197,260),Point(210,221),Point(210,205),Point(175,217),Point(166,248),Point(142,294),Point(162,221),Point(136,230),Point(106,261),Point(110,277),Point(114,289),Point(116,317),Point(93,288),Point(94,278),Point(75,318),Point(76,274),Point(62,273),Point(69,247),Point(18,253),Point(67,215),Point(53,191))
- hairbg.setFill(color_rgb(247,218,116))
- hairdark1 = Polygon(Point(50,114),Point(74,156),Point(71,177))
- hairdark1.setFill(color_rgb(235,161,56))
- hairdark2 = Polygon(Point(47,243),Point(93,225),Point(89,239))
- hairdark2.setFill(color_rgb(235,161,56))
- hairdark3 = Polygon(Point(128,214),Point(94,256),Point(75,317),Point(99,270))
- hairdark3.setFill(color_rgb(235,161,56))
- hairdark4 = Polygon(Point(105,266),Point(116,313),Point(114,283))
- hairdark4.setFill(color_rgb(235,161,56))
- hairdark5 = Polygon(Point(119,45),Point(107,106),Point(112,170),Point(124,203),Point(129,200),Point(130,164),Point(121,139),Point(125,91),Point(117,43))
- hairdark5.setFill(color_rgb(235,161,56))
- hairdark6 = Polygon(Point(173,126),Point(145,193),Point(157,201),Point(157,216),Point(169,204),Point(186,176),Point(201,161),Point(213,122),Point(223,79),Point(234,55),Point(204,109),Point(160,186),Point(155,187),Point(179,117))
- hairdark6.setFill(color_rgb(235,161,56))
- hairdark7 = Polygon(Point(176,217),Point(253,115),Point(225,194),Point(212,192),Point(203,207))
- hairdark7.setFill(color_rgb(235,161,56))
- hairdark8 = Polygon(Point(222,86),Point(272,19),Point(240,77))
- hairdark8.setFill(color_rgb(235,161,56))
- hairdark9 = Polygon(Point(217,111),Point(284,65),Point(209,138))
- hairdark9.setFill(color_rgb(235,161,56))
- hairdark10 = Polygon(Point(217,192),Point(219,230),Point(230,216),Point(224,193))
- hairdark10.setFill(color_rgb(235,161,56))
- hairdark11 = Polygon(Point(216,109),Point(252,84),Point(283,66),Point(208,141))
- hairdark11.setFill(color_rgb(235,161,56))
- hairdark12 = Polygon(Point(238,161),Point(274,140),Point(228,185))
- hairdark12.setFill(color_rgb(235,161,56))
- hairdark13 = Polygon(Point(248,144),Point(298,73),Point(335,33),Point(307,77),Point(303,97))
- hairdark13.setFill(color_rgb(235,161,56))
- hairdark14 = Polygon(Point(249,205),Point(300,142),Point(331,67),Point(321,152))
- hairdark14.setFill(color_rgb(235,161,56))
- hairdark15 = Polygon(Point(321,152),Point(324,137),Point(357,65),Point(340,135))
- hairdark15.setFill(color_rgb(235,161,56))
- hairdark16 = Polygon(Point(142,138),Point(160,77),Point(180,48),Point(166,87),Point(166,114))
- hairdark16.setFill(color_rgb(235,161,56))
- hairdark17 = Polygon(Point(226,198),Point(252,183),Point(242,203),Point(246,216),Point(301,184),Point(282,219),Point(331,174),Point(349,144),Point(322,210),Point(358,174),Point(338,221),Point(308,240),Point(294,239),Point(283,256),Point(357,250),Point(276,282),Point(331,286),Point(276,296),Point(258,287),Point(273,265),Point(270,239),Point(265,224),Point(254,224),Point(240,238),Point(227,231),Point(228,220),Point(227,207))
- hairdark17.setFill(color_rgb(235,161,56))
- hairline1 = Line(Point(72,176),Point(84,206))
- hairline2 = Line(Point(68,215),Point(84,206))
- hairline3 = Line(Point(84,206),Point(109,208))
- hairline4 = Line(Point(70,246),Point(86,246))
- hairline5 = Line(Point(98,214),Point(77,276))
- hairline6 = Line(Point(98,214),Point(146,194))
- hairline7 = Line(Point(128,196),Point(133,147))
- hairline8 = Line(Point(133,147),Point(207,72))
- hairline9 = Line(Point(207,72),Point(235,53))
- hairline10 = Line(Point(137,230),Point(158,215))
- hairline11 = Line(Point(127,95),Point(141,140))
- hairline12 = Line(Point(180,70),Point(174,104))
- hairline13 = Line(Point(22,252),Point(94,225))
- hairline14 = Line(Point(202,160),Point(254,113))
- hairline15 = Line(Point(173,125),Point(210,79))
- hairline16 = Line(Point(175,217),Point(171,205))
- hairline17 = Line(Point(171,205),Point(165,208))
- hairline18 = Line(Point(305,96),Point(332,64))
- hairline19 = Line(Point(275,139),Point(315,94))
- hairline20 = Line(Point(98,112),Point(91,174))
- hairline21 = Line(Point(91,174),Point(99,208))
- hairline22 = Line(Point(128,214),Point(156,201))
- hairline23 = Line(Point(132,113),Point(163,50))
- hairline24 = Line(Point(185,92),Point(240,32))
- hairline25 = Line(Point(271,245),Point(295,233))
- hairline26 = Line(Point(295,233),Point(322,209))
- hairline27 = Line(Point(227,190),Point(286,139))
- hairline28 = Line(Point(302,183),Point(326,164))
- neck.draw(win)
- head.draw(win)
- headdark1.draw(win)
- headdark2.draw(win)
- headdark3.draw(win)
- headline1.draw(win)
- headline2.draw(win)
- headline3.draw(win)
- headline4.draw(win)
- headline5.draw(win)
- neckline1.draw(win)
- neckline2.draw(win)
- neckline3.draw(win)
- neckline4.draw(win)
- neckline5.draw(win)
- throat.draw(win)
- innerear.draw(win)
- earline1.draw(win)
- earline2.draw(win)
- earline3.draw(win)
- earline4.draw(win)
- earline5.draw(win)
- chin.draw(win)
- mouthline1.draw(win)
- mouthline2.draw(win)
- mouthline3.draw(win)
- noseline1.draw(win)
- noseline2.draw(win)
- noseline3.draw(win)
- lefteye.draw(win)
- righteye.draw(win)
- leftiris.draw(win)
- rightiris.draw(win)
- lefteyebrow.draw(win)
- righteyebrow.draw(win)
- hairbg.draw(win)
- hairdark1.draw(win)
- hairdark2.draw(win)
- hairdark3.draw(win)
- hairdark4.draw(win)
- hairdark5.draw(win)
- hairdark6.draw(win)
- hairdark7.draw(win)
- hairdark8.draw(win)
- hairdark9.draw(win)
- hairdark10.draw(win)
- hairdark11.draw(win)
- hairdark12.draw(win)
- hairdark13.draw(win)
- hairdark14.draw(win)
- hairdark15.draw(win)
- hairdark16.draw(win)
- hairdark17.draw(win)
- hairline1.draw(win)
- hairline2.draw(win)
- hairline3.draw(win)
- hairline4.draw(win)
- hairline5.draw(win)
- hairline6.draw(win)
- hairline7.draw(win)
- hairline8.draw(win)
- hairline9.draw(win)
- hairline10.draw(win)
- hairline11.draw(win)
- hairline12.draw(win)
- hairline13.draw(win)
- hairline14.draw(win)
- hairline15.draw(win)
- hairline16.draw(win)
- hairline17.draw(win)
- hairline18.draw(win)
- hairline19.draw(win)
- hairline20.draw(win)
- hairline21.draw(win)
- hairline22.draw(win)
- hairline23.draw(win)
- hairline24.draw(win)
- hairline25.draw(win)
- hairline26.draw(win)
- hairline27.draw(win)
- hairline28.draw(win)
- win.getMouse()
- main()
4、编写一个用圣诞树和雪人绘制冬季场景的程序。
解答
- # By: Megan Neuendorf
- from graphics import *
- def main():
- win=GraphWin("Winter Scene",500,500)
- win.setCoords(0,0,200,200)
- win.setBackground("blue")
- # Body of the snowman
- c1 = Circle(Point(50,40),40)
- c1.draw(win)
- c1.setFill("white")
- c1.setOutline("white")
- c2 = Circle(Point(50,100),30)
- c2.draw(win)
- c2.setFill("white")
- c2.setOutline("white")
- c3 = Circle(Point(50,145),20)
- c3.draw(win)
- c3.setFill("white")
- c3.setOutline("white")
- # Top Hat of Snowman
- r1 = Rectangle(Point(30,160),Point(70,165))
- r1.draw(win)
- r1.setFill("black")
- r2 = Rectangle(Point(40,165),Point(60,185))
- r2.draw(win)
- r2.setFill("black")
- # Eyes of the Snowman
- e1 = Circle(Point(42.5,150),2.5)
- e1.draw(win)
- e1.setFill("black")
- e2 = Circle(Point(57.5,150),2.5)
- e2.draw(win)
- e2.setFill("black")
- # Nose of the Snowman
- n = Polygon(Point(50,142.5),Point(50,137.5),Point(57.5,140))
- n.draw(win)
- n.setOutline("orange")
- n.setFill("orange")
- # Mouth of the Snowman
- m1 = Circle(Point(40,135),1)
- m1.draw(win)
- m1.setFill("black")
- m2 = Circle(Point(45,130),1)
- m2.draw(win)
- m2.setFill("black")
- m3 = Circle(Point(50,127.5),1)
- m3.draw(win)
- m3.setFill("black")
- m4 = Circle(Point(55,130),1)
- m4.draw(win)
- m4.setFill("black")
- m5 = Circle(Point(60,135),1)
- m5.draw(win)
- m5.setFill("black")
- # Buttons on the Snowman
- b1 = Circle(Point(50,115),3)
- b1.draw(win)
- b1.setFill("black")
- b2 = Circle(Point(50,105),3)
- b2.draw(win)
- b2.setFill("black")
- b3 = Circle(Point(50,95),3)
- b3.draw(win)
- b3.setFill("black")
- # Christmas Tree
- rect1 = Rectangle(Point(140,0),Point(160,25))
- rect1.draw(win)
- rect1.setOutline("brown")
- rect1.setFill("brown")
- t1 = Polygon(Point(100,25),Point(200,25),Point(150,65))
- t1.draw(win)
- t1.setOutline("forest green")
- t1.setFill("forest green")
- t2 = Polygon(Point(110,60),Point(190,60),Point(150,100))
- t2.draw(win)
- t2.setOutline("forest green")
- t2.setFill("forest green")
- t3 = Polygon(Point(120,90),Point(180,90),Point(150,120))
- t3.draw(win)
- t3.setOutline("forest green")
- t3.setFill("forest green")
- t4 = Polygon(Point(130,115),Point(170,115),Point(150,135))
- t4.draw(win)
- t4.setOutline("forest green")
- t4.setFill("forest green")
- t5 = Polygon(Point(135,132.5),Point(165,132.5),Point(150,155))
- t5.draw(win)
- t5.setOutline("forest green")
- t5.setFill("forest green")
- # Star on the Christmas Tree
- n = Polygon(Point(150,152.5),Point(147.5,160),Point(140,162.5),Point(147.5,165),Point(150,172.5),Point(152.5,165),Point(160,162.5),Point(152.5,160))
- n.draw(win)
- n.setOutline("gold")
- n.setFill("gold")
- # Circular Ornaments on Christmas Tree
- o1 = Circle(Point(150,142.5),2.5)
- o1.draw(win)
- o1.setOutline("red")
- o1.setFill("gold")
- o2 = Circle(Point(135,115),2.5)
- o2.draw(win)
- o2.setOutline("red")
- o2.setFill("gold")
- o3 = Circle(Point(165,115),2.5)
- o3.draw(win)
- o3.setOutline("red")
- o3.setFill("gold")
- o4 = Circle(Point(150,95),2.5)
- o4.draw(win)
- o4.setOutline("red")
- o4.setFill("gold")
- o5 = Circle(Point(135,75),2.5)
- o5.draw(win)
- o5.setOutline("red")
- o5.setFill("gold")
- o6 = Circle(Point(165,75),2.5)
- o6.draw(win)
- o6.setOutline("red")
- o6.setFill("gold")
- o7 = Circle(Point(115,60),2.5)
- o7.draw(win)
- o7.setOutline("red")
- o7.setFill("gold")
- o8 = Circle(Point(185,60),2.5)
- o8.draw(win)
- o8.setOutline("red")
- o8.setFill("gold")
- o9 = Circle(Point(150,30),2.5)
- o9.draw(win)
- o9.setOutline("red")
- o9.setFill("gold")
- # Diamond Ornaments on Christmas Tree
- d1 = Polygon(Point(140,135),Point(142.5,132.5),Point(140,130),Point(137.5,132.5))
- d1.draw(win)
- d1.setOutline("gold")
- d1.setFill("red")
- d2 = Polygon(Point(160,135),Point(162.5,132.5),Point(160,130),Point(157.5,132.5))
- d2.draw(win)
- d2.setOutline("gold")
- d2.setFill("red")
- d3 = Polygon(Point(150,122.5),Point(152.5,120),Point(150,117.5),Point(147.5,120))
- d3.draw(win)
- d3.setOutline("gold")
- d3.setFill("red")
- d4 = Polygon(Point(125,92.5),Point(127.5,90),Point(125,87.5),Point(122.5,90))
- d4.draw(win)
- d4.setOutline("gold")
- d4.setFill("red")
- d5 = Polygon(Point(175,92.5),Point(177.5,90),Point(175,87.5),Point(172.5,90))
- d5.draw(win)
- d5.setOutline("gold")
- d5.setFill("red")
- d6 = Polygon(Point(150,67.5),Point(152.5,65),Point(150,62.5),Point(147.5,65))
- d6.draw(win)
- d6.setOutline("gold")
- d6.setFill("red")
- d7 = Polygon(Point(130,47.5),Point(132.5,45),Point(130,42.5),Point(127.5,45))
- d7.draw(win)
- d7.setOutline("gold")
- d7.setFill("red")
- d8 = Polygon(Point(170,47.5),Point(172.5,45),Point(170,42.5),Point(167.5,45))
- d8.draw(win)
- d8.setOutline("gold")
- d8.setFill("red")
- d9 = Polygon(Point(105,27.5),Point(107.5,25),Point(105,22.5),Point(102.5,25))
- d9.draw(win)
- d9.setOutline("gold")
- d9.setFill("red")
- d10 = Polygon(Point(195,27.5),Point(197.5,25),Point(195,22.5),Point(192.5,25))
- d10.draw(win)
- d10.setOutline("gold")
- d10.setFill("red")
- win.getMouse()
- win.close()
- main()

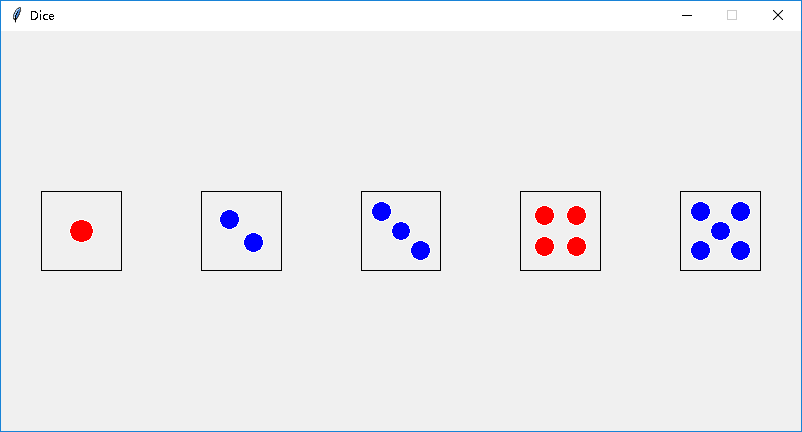
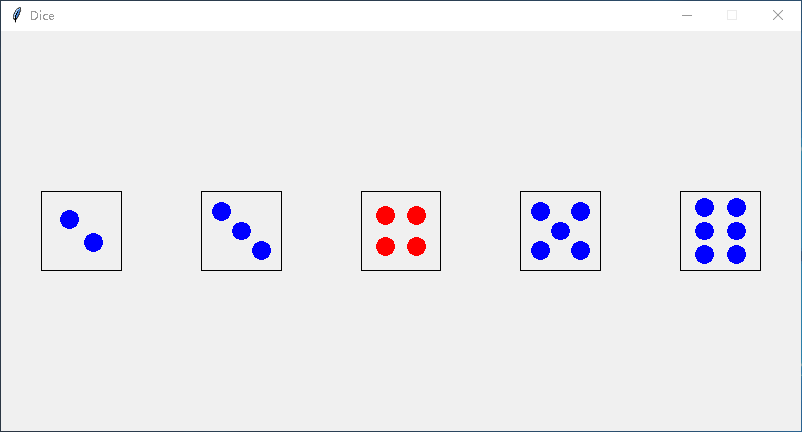
5、编写一个程序,在屏幕上绘制5 个骰子,是一把顺子(1,2,3,4,5 或2,3,4,5,6)。
解答
- from graphics import *
- def main():
- win = GraphWin("Dice", width=800, height=400)
- win.setCoords(-10, -5, 10, 5)
- d1 = Rectangle(Point(-9, -1), Point(-7, 1))
- d1.draw(win)
- c = Circle(Point(-8, 0), 0.3)
- c.setFill("red")
- c.setOutline("white")
- c.draw(win)
- d2 = d1.clone()
- d2.move(4, 0)
- d2.draw(win)
- c = Circle(Point(-4.3, 0.3), 0.25)
- c.setFill("blue")
- c.setOutline("white")
- c.draw(win)
- c = c.clone()
- c.move(0.6, -0.6)
- c.draw(win)
- d3 = d2.clone()
- d3.move(4, 0)
- d3.draw(win)
- c = Circle(Point(-0.5, 0.5), 0.25)
- c.setFill("blue")
- c.setOutline("white")
- c.draw(win)
- c = c.clone()
- c.move(0.5, -0.5)
- c.draw(win)
- c = c.clone()
- c.move(0.5, -0.5)
- c.draw(win)
- d4 = d3.clone()
- d4.move(4, 0)
- d4.draw(win)
- c = Circle(Point(3.6, 0.4), 0.25)
- c.setFill("red")
- c.setOutline("white")
- c.draw(win)
- c = c.clone()
- c.move(0.8, 0)
- c.draw(win)
- c = c.clone()
- c.move(0, -0.8)
- c.draw(win)
- c = c.clone()
- c.move(-0.8, 0)
- c.draw(win)
- d5 = d4.clone()
- d5.move(4, 0)
- d5.draw(win)
- c = Circle(Point(7.5, 0.5), 0.25)
- c.setFill("blue")
- c.setOutline("white")
- c.draw(win)
- c = c.clone()
- c.move(1, 0)
- c.draw(win)
- c = c.clone()
- c.move(0, -1)
- c.draw(win)
- c = c.clone()
- c.move(-1, 0)
- c.draw(win)
- c = c.clone()
- c.move(0.5, 0.5)
- c.draw(win)
- win.getMouse()
- win.close()
- main()
- from graphics import *
- def main():
- win = GraphWin("Dice", width=800, height=400)
- win.setCoords(-10, -5, 10, 5)
- d2 = Rectangle(Point(-9, -1), Point(-7, 1))
- d2.draw(win)
- c = Circle(Point(-8.3, 0.3), 0.25)
- c.setFill("blue")
- c.setOutline(color_rgb(240, 240, 240))
- c.draw(win)
- c = c.clone()
- c.move(0.6, -0.6)
- c.draw(win)
- d3 = d2.clone()
- d3.move(4, 0)
- d3.draw(win)
- c = Circle(Point(-4.5, 0.5), 0.25)
- c.setFill("blue")
- c.setOutline(color_rgb(240, 240, 240))
- c.draw(win)
- c = c.clone()
- c.move(0.5, -0.5)
- c.draw(win)
- c = c.clone()
- c.move(0.5, -0.5)
- c.draw(win)
- d4 = d3.clone()
- d4.move(4, 0)
- d4.draw(win)
- c = Circle(Point(-0.4, 0.4), 0.25)
- c.setFill("red")
- c.setOutline(color_rgb(240, 240, 240))
- c.draw(win)
- c = c.clone()
- c.move(0.8, 0)
- c.draw(win)
- c = c.clone()
- c.move(0, -0.8)
- c.draw(win)
- c = c.clone()
- c.move(-0.8, 0)
- c.draw(win)
- d5 = d4.clone()
- d5.move(4, 0)
- d5.draw(win)
- c = Circle(Point(3.5, 0.5), 0.25)
- c.setFill("blue")
- c.setOutline(color_rgb(240, 240, 240))
- c.draw(win)
- c = c.clone()
- c.move(1, 0)
- c.draw(win)
- c = c.clone()
- c.move(0, -1)
- c.draw(win)
- c = c.clone()
- c.move(-1, 0)
- c.draw(win)
- c = c.clone()
- c.move(0.5, 0.5)
- c.draw(win)
- d6 = d5.clone()
- d6.move(4, 0)
- d6.draw(win)
- c = Circle(Point(7.6, 0.6), 0.25)
- c.setFill("blue")
- c.setOutline(color_rgb(240, 240, 240))
- c.draw(win)
- c = c.clone()
- c.move(0.8, 0)
- c.draw(win)
- c = c.clone()
- c.move(0, -0.6)
- c.draw(win)
- c = c.clone()
- c.move(-0.8, 0)
- c.draw(win)
- c = c.clone()
- c.move(0, -0.6)
- c.draw(win)
- c = c.clone()
- c.move(0.8, 0)
- c.draw(win)
- win.getMouse()
- win.close()
- main()
6、修改图形终值程序,让输入(本金和APR)也用Entry 对象以图形方式完成。
解答
- from graphics import *
- def main():
- win = GraphWin("Investment Growth Chart", 640, 480)
- win.setBackground("white")
- # Set coordinates for easy display of prompts.
- win.setCoords(0,0,10,10)
- # Display prompts
- t1 = Text(Point(5,8), "Plotting a 10 year investment")
- t1.setSize(14)
- t1.draw(win)
- t2 = Text(Point(5,7.5), "Enter the information below and then click anywhere")
- t2.setSize(14)
- t2.draw(win)
- t3 = Text(Point(2,6), "Initial Principal:")
- t3.setSize(14)
- t3.draw(win)
- prinBox = Entry(Point(4.5,6), 6)
- prinBox.draw(win)
- prinBox.setText("")
- t4 = Text(Point(2,4), "Annual Interest Rate:")
- t4.setSize(14)
- t4.draw(win)
- aprBox = Entry(Point(4.5,4), 6)
- aprBox.setText("0.05")
- aprBox.draw(win)
- # wait for mouse click and get values
- win.getMouse()
- principal = float(prinBox.getText())
- apr = float(aprBox.getText())
- # Erase the prompts
- t1.undraw()
- t2.undraw()
- t3.undraw()
- t4.undraw()
- prinBox.undraw()
- aprBox.undraw()
- # Set Window coords for drawing the graph.
- win.setCoords(-1.75,-200, 11.5, 10400)
- # Create a graphics window with labels on left edge
- Text(Point(-1, 0), ' 0.0K').draw(win)
- Text(Point(-1, 2500), ' 2.5K').draw(win)
- Text(Point(-1, 5000), ' 5.0K').draw(win)
- Text(Point(-1, 7500), ' 7.5k').draw(win)
- Text(Point(-1, 10000), '10.0K').draw(win)
- # Draw bar for initial principal
- bar = Rectangle(Point(0, 0), Point(1, principal))
- bar.setFill("green")
- bar.setWidth(2)
- bar.draw(win)
- # Draw a bar for each subsequent year
- for year in range(1, 11):
- principal = principal * (1 + apr)
- bar = Rectangle(Point(year, 0), Point(year+1, principal))
- bar.setFill("green")
- bar.setWidth(2)
- bar.draw(win)
- win.getMouse()
- win.close()
- main()
7、圆的交点。
编写一个计算圆与水平线的交点的程序,并以文本和图形方式显示信息。
输入:圆的半径和线的y 截距。
输出:在坐标为从(−10,−10)到(10,10)的窗口中,以(0, 0)为中心,以给定半径绘制
的圆。
用给定的y 轴截取一根水平线穿过窗口。
以红色绘制两个交点。
打印出交叉点的x 值。
公式:
解答
- from graphics import *
- import math
- def main():
- radius = float(input("Please enter the radius of the circle: "))
- yinter = float(input("Please enter the y-intercept of the line: "))
- win = GraphWin("Circle Intersection")
- win.setCoords(-10, -10, 10, 10)
- Circle(Point(0, 0), radius).draw(win)
- Line(Point(-10, yinter), Point(10, yinter)).draw(win)
- x = math.sqrt(radius * radius - yinter * yinter)
- print("X values of intersection", -x, x)
- p1 = Circle(Point(x, yinter), 0.25)
- p1.setOutline("red")
- p1.setFill("red")
- p1.draw(win)
- p2 = p1.clone()
- p2.move(-2 * x, 0)
- p2.draw(win)
- win.getMouse()
- win.close()
- main()
- # Output:
- # Please enter the radius of the circle: 5
- # Please enter the y-intercept of the line: 3
- # X values of intersection -4.0 4.0

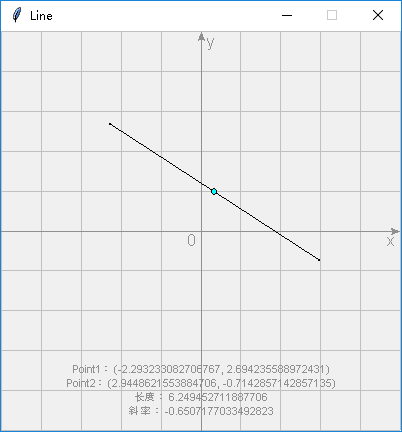
8、线段信息。
该程序允许用户绘制线段,然后显示关于线段的一些图形和文本信息。
输入:两次鼠标点击线段的终点。
输出:以青色绘制线段的中点。
绘制线段。
打印线的长度和斜率。
公式: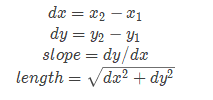
解答
- from graphics import *
- import math
- def main():
- win = GraphWin("Triangle", 400, 400)
- win.setCoords(-5, -5, 5, 5)
- draw_coord(win) # 这个函数定义见文章末尾
- pt1 = win.getMouse()
- pt1.draw(win)
- pt2 = win.getMouse()
- pt2.draw(win)
- line = Line(pt1, pt2)
- line.draw(win)
- mark = Circle(line.getCenter(),0.075)
- mark.setFill("cyan")
- mark.draw(win)
- dx = pt2.getX() - pt1.getX()
- dy = pt2.getY() - pt1.getY()
- slope = dy / dx
- length = math.sqrt(dx * dx + dy * dy)
- message = Text(Point(0, -4), "Point1:({}, {})\nPoint2:({}, {})\n长度:{}\n斜率:{}".format(pt1.getX(), pt1.getY(), pt2.getX(), pt2.getY(), length, slope))
- message.setSize(8)
- message.setTextColor(color_rgb(144, 144, 144))
- message.draw(win)
- win.getMouse()
- win.close()
- main()
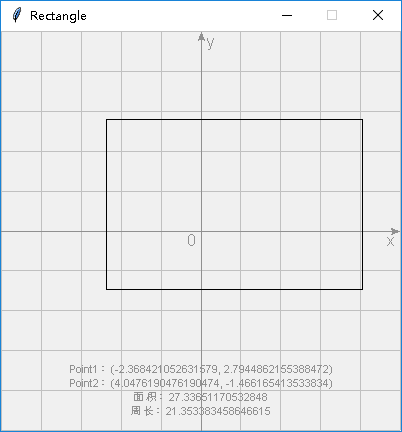
9、矩形信息。
此程序显示有关用户绘制的矩形的信息。
输入:两次鼠标点击作为矩形的对角。
输出:绘制矩形。
打印矩形的周长和面积。
公式:面积=(长度)(宽度)
周长= 2(长度+宽度)
解答
- from graphics import *
- def main():
- win = GraphWin("Rectangle", 400, 400)
- win.setCoords(-5, -5, 5, 5)
- draw_coord(win)
- pt1 = win.getMouse()
- pt2 = win.getMouse()
- rect = Rectangle(pt1, pt2)
- rect.draw(win)
- height = abs(pt2.getY() - pt1.getY())
- length = abs(pt2.getX() - pt1.getX())
- area = height * length
- perimeter = 2 * (height + length)
- message = Text(Point(0, -4), "Point1:({}, {})\nPoint2:({}, {})\n面积:{}\n周长:{}".format(pt1.getX(), pt1.getY(), pt2.getX(), pt2.getY(), area, perimeter))
- message.setSize(8)
- message.setTextColor(color_rgb(144, 144, 144))
- message.draw(win)
- win.getMouse()
- win.close()
- main()
10、三角形信息。
与上一个问题相同,但三角形的顶点有三次点击。
公式:关于周长,可参阅线段问题中的长度。

解答
- from graphics import *
- import math
- def main():
- win = GraphWin("Triangle", 400, 400)
- win.setCoords(-5, -5, 5, 5)
- draw_coord(win)
- pt1 = win.getMouse()
- pt1.draw(win)
- pt2 = win.getMouse()
- pt1.undraw()
- line = Line(pt1, pt2)
- line.draw(win)
- pt3 = win.getMouse()
- line.undraw()
- tri = Polygon(pt1, pt2, pt3)
- tri.draw(win)
- dx1 = pt1.getX() - pt2.getX()
- dy1 = pt1.getY() - pt2.getY()
- dx2 = pt2.getX() - pt3.getX()
- dy2 = pt2.getY() - pt3.getY()
- dx3 = pt3.getX() - pt1.getX()
- dy3 = pt3.getY() - pt1.getY()
- a = math.sqrt(dx1 * dx1 + dy1 * dy1)
- b = math.sqrt(dx2 * dx2 + dy2 * dy2)
- c = math.sqrt(dx3 * dx3 + dy3 * dy3)
- perimeter = a + b + c
- s = perimeter / 2
- area = math.sqrt(s * (s - a) * (s - b) * (s - c))
- message = Text(Point(0, -4), "Point1:({}, {})\nPoint2:({}, {})\nPoint3:({}, {})\n面积:{}\n周长:{}".format(pt1.getX(), pt1.getY(), pt2.getX(), pt2.getY(), pt3.getX(), pt3.getY(), area, perimeter))
- message.setSize(8)
- message.setTextColor(color_rgb(144, 144, 144))
- message.draw(win)
- win.getMouse()
- win.close()
- main()

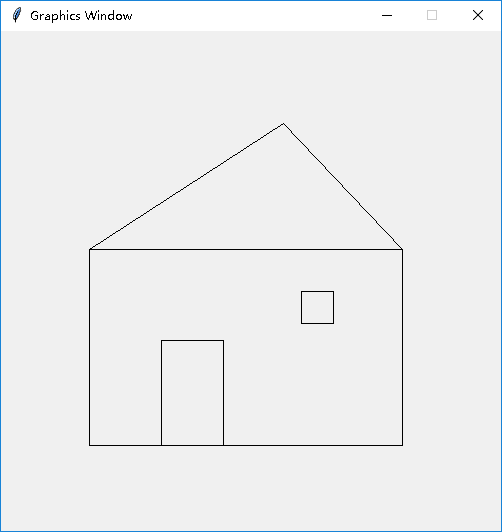
11、五次点击的房子。
编写一个程序,允许用户通过五次鼠标点击,绘制一个简单的房子。前两次点击是房子的矩形框架的对角。第三次点击指出矩形门的顶部边缘的中心。门的宽度应为房屋框架宽度的1/5。门的边框应从顶部的转角延伸到框架的底部。第四次点击指出正方形窗口的中心。窗口的宽度是门的一半。最后一次点击指出屋顶的顶点。屋顶的边缘将从顶点延伸到房屋框架的顶部边缘的转角。
解答
- from graphics import *
- def main():
- win = GraphWin(width=500, height=500)
- frameLL = win.getMouse()
- frameLL.draw(win)
- frameUR = win.getMouse()
- frameLL.undraw()
- Rectangle(frameLL, frameUR).draw(win)
- doorUC = win.getMouse()
- houseWidth = frameUR.getX() - frameLL.getX()
- doorWidth = houseWidth * 0.2
- doorLL = Point(doorUC.getX() - doorWidth / 2, frameLL.getY())
- doorUR = Point(doorUC.getX() + doorWidth / 2, doorUC.getY())
- Rectangle(doorLL, doorUR).draw(win)
- windowCenter = win.getMouse()
- windowWidth = doorWidth / 2
- windowLL = Point(windowCenter.getX() - windowWidth / 2, windowCenter.getY() - windowWidth / 2)
- windowUR = Point(windowCenter.getX() + windowWidth / 2, windowCenter.getY() + windowWidth / 2)
- Rectangle(windowLL, windowUR).draw(win)
- peak = win.getMouse()
- roofL = Line(Point(frameLL.getX(), frameUR.getY()), peak)
- roofR = Line(peak, frameUR)
- roofL.draw(win)
- roofR.draw(win)
- win.getMouse()
- win.close()
- main()
- draw_coord() 实现:
- def draw_coord(win):
- for i in range(5, -6, -1):
- l = Line(Point(-5, i), Point(5, i))
- l.setFill(color_rgb(192, 192, 192))
- l.draw(win)
- for i in range(-5, 6, 1):
- l = Line(Point(i, 5), Point(i, -5))
- l.setFill(color_rgb(192, 192, 192))
- l.draw(win)
- x_axis = Line(Point(-5, 0), Point(5, 0))
- x_axis.setArrow("last")
- x_axis.setFill(color_rgb(144, 144, 144))
- x_axis.draw(win)
- x_text = Text(Point(4.75, -0.25), "x")
- x_text.setFill(color_rgb(144, 144, 144))
- x_text.draw(win)
- y_axis = Line(Point(0, -5), Point(0, 5))
- y_axis.setArrow("last")
- y_axis.setFill(color_rgb(144, 144, 144))
- y_axis.draw(win)
- y_text = Text(Point(0.25, 4.75), "y")
- y_text.setFill(color_rgb(144, 144, 144))
- y_text.draw(win)
- base_point = Text(Point(-0.25, -0.25), "")
- base_point.setFill(color_rgb(144, 144, 144))
- base_point.draw(win)
《Python程序设计(第3版)》[美] 约翰·策勒(John Zelle) 第 4 章 答案的更多相关文章
- 《Python程序设计(第3版)》[美] 约翰·策勒(John Zelle) 第 2 章 答案
判断对错1.编写程序的好方法是立即键入一些代码,然后调试它,直到它工作.2.可以在不使用编程语言的情况下编写算法.3.程序在写入和调试后不再需要修改.4.Python 标识符必须以字母或下划线开头.5 ...
- 《Python程序设计(第3版)》[美] 约翰·策勒(John Zelle) 第 3 章 答案
判断对错 1.由计算机存储和操作的信息称为数据.2.由于浮点数是非常准确的,所以通常应该使用它们,而不是int.3.像加法和减法这样的操作在mAth库中定义.4.n 项的可能排列的数目等于 n!.5. ...
- 《Python程序设计(第3版)》[美] 约翰·策勒(John Zelle) 第 1 章 答案
判断对错1.计算机科学是计算机的研究.2.CPU 是计算机的“大脑”.3.辅助存储器也称为 RAM.4.计算机当前正在处理的所有信息都存储在主存储器中.5.语言的语法是它的意思,语义是它的形式.6.函 ...
- 《Python编程第4版 上》高清PDF|百度网盘免费下载|Python基础编程
<Python编程第4版 上>高清PDF|百度网盘免费下载|Python基础编程 提取码:8qbi 当掌握Python的基础知识后,你要如何使用Python?Python编程(第四版)为 ...
- Python程序设计(第3版)PDF高清完整版免费下载|百度网盘
百度网盘:Python程序设计(第3版)PDF高清完整版免费下载 提取码:48u4 内容简介 本书是面向大学计算机科学专业第一门程的教材.本书以Python语言为工具,采用相当传统的方法,强调解决问题 ...
- python程序设计——基本语言特性
参考<Python程序设计(第2版)> 清华大学出版社 董付国 ##### 除特殊说明外,以下代码示例,均为python 3.6版本 ##### 一.Python语言特性 1.python ...
- 20184302 2019-2020-2 《Python程序设计》实验四报告
20184302 2019-2020-2 <Python程序设计>实验四报告 课程:<Python程序设计> 班级: 1843 姓名: 李新锐 学号:184302 实验教师:王 ...
- 20192113 2020-2021-2 《Python程序设计》实验三报告
20192113 2020-2021-2 <Python程序设计>实验三报告 课程:<Python程序设计> 班级: 1921 姓名: 衣丽莎 学号:20192113 实验教师 ...
- 20204107 孙嘉临 《PYTHON程序设计》实验四报告
课程:<Python程序设计>班级: 2041姓名: 孙嘉临学号: 20204107实验教师:王志强实验日期:2020年6月29日必修/选修: 公选课 ##作为一个轻度游戏玩家,当然是要写 ...
随机推荐
- bzoj4129 Haruna’s Breakfast 莫队
这个思想不难理解了前面几个就能懂 但是代码比较复杂,大概会和之前几次碰到难题的时候一样,一步步思考下去,然后把难点分成好几个板块讲下qwq 首先读入这颗树,预处理下lca,然后就分块,这个时候就会碰到 ...
- Loadrunner之脚本的思考时间(固定/随机)设置、调试、保存、测试服务器监控等(六)
一.思考时间的设置 1)设置固定思考时间: Action(){ // … your code lr_think_time(3); //固定设置此处思考时间3s // … more of your co ...
- tcp3次握手,https加密,ca认证
参考: https://baijiahao.baidu.com/s?id=1570143475599137&wfr=spider&for=pc
- 用SCSS需要小心IE对css的几个限制
IE对CSS的限制主要有两个: 一个页面中引用的CSS只读前32个 一个CSS文件中只读前4095个选择器 关于这个问题的文章有很多,我就不细讲了. 我想讲的是在用SCSS写CSS的时候非常容易超过这 ...
- vue学习之二ECMAScript6标准
一.ECMAScript6标准简述 ECMAScript 6.0(以下简称 ES6)是 JavaScript 语言的下一代标准,已经在 2015 年 6 月正式发布了.它的目标,是使得 JavaScr ...
- Elasticsearch Java API—多条件查询(must)
多条件设置 //多条件设置 MatchPhraseQueryBuilder mpq1 = QueryBuilders .matchPhraseQuery("pointid",&qu ...
- checkbox选择
<!DOCTYPE html PUBLIC "-//W3C//DTD XHTML 1.0 Transitional//EN" "http://www.w3.org/ ...
- ASP.NET Post方式提交
public static string SendMsg(string fxPhone, string fxPassword, string toPhone, string msg) { try { ...
- Vue.Js加入bootstrap及jquery,或加入其他插件vue-resource,vuex等
.引入jquery 项目目录下输入 cnpm install jquery --save-dev 用npm下载jq依赖 若想加入其他js库,如vue-resource,执行命令cnpm in ...
- 面试官说:说一说CommonJs的实现原理
其实刚看到这个题目的时候,我的内心是拒绝的,但是本着对科学的敬畏精神,我开始了 CommonJs 的探索之路. 来来来奉上我这几天的心血,拿走不客气.如有错误欢迎指正,共同进步. 提到CommonJs ...