Java读写分离实现
1、查看源码
AbstractRoutingDataSource类中有个determineTargetDataSource方法
 protected DataSource determineTargetDataSource() {

        Assert.notNull(this.resolvedDataSources, "DataSource router not initialized");

        Object lookupKey = this.determineCurrentLookupKey();

        DataSource dataSource = (DataSource)this.resolvedDataSources.get(lookupKey);

        if (dataSource == null && (this.lenientFallback || lookupKey == null)) {

            dataSource = this.resolvedDefaultDataSource;

        }

        if (dataSource == null) {

            throw new IllegalStateException("Cannot determine target DataSource for lookup key [" + lookupKey + "]");

        } else {

            return dataSource;

        }

    }
determineTargetDataSource会调用抽象方法determineCurrentLookupKey
@Nullable

    protected abstract Object determineCurrentLookupKey();
2、创建类继承AbstractRoutingDataSource
 import org.springframework.jdbc.datasource.lookup.AbstractRoutingDataSource;

 public class DynamicDataSource extends AbstractRoutingDataSource{

     @Override

     protected Object determineCurrentLookupKey() {

         return DynamicDataSourceHolder.getDbType();

     }

 }
DynamicDataSource
 import org.slf4j.Logger;

 import org.slf4j.LoggerFactory;

 public class DynamicDataSourceHolder {

     private static Logger logger = LoggerFactory.getLogger(DynamicDataSourceHolder.class);

     private static ThreadLocal<String> contextHolder = new ThreadLocal<String>();

     public static final String DB_MASTER = "master";

     public static final String DB_SLAVE = "slave";

     public static String getDbType() {

         String db = contextHolder.get();

         if (db == null) {

             db = DB_MASTER;

         }

         return db;

     }

     /**

      * 设置线程的dbType

      *

      * @param str

      */

     public static void setDbType(String str) {

         logger.debug("所使用的数据源为:" + str);

         contextHolder.set(str);

     }

     /**

      * 清理连接类型

      */

     public static void clearDBType() {

         contextHolder.remove();

     }

 }
DynamicDataSourceHolder
3、设置Mybatis拦截器
import java.util.Locale;

import java.util.Properties;

import org.apache.ibatis.executor.Executor;

import org.apache.ibatis.executor.keygen.SelectKeyGenerator;

import org.apache.ibatis.mapping.BoundSql;

import org.apache.ibatis.mapping.MappedStatement;

import org.apache.ibatis.mapping.SqlCommandType;

import org.apache.ibatis.plugin.Interceptor;

import org.apache.ibatis.plugin.Intercepts;

import org.apache.ibatis.plugin.Invocation;

import org.apache.ibatis.plugin.Plugin;

import org.apache.ibatis.plugin.Signature;

import org.apache.ibatis.session.ResultHandler;

import org.apache.ibatis.session.RowBounds;

import org.slf4j.Logger;

import org.slf4j.LoggerFactory;

import org.springframework.transaction.support.TransactionSynchronizationManager;

@Intercepts({ @Signature(type = Executor.class, method = "update", args = { MappedStatement.class, Object.class }),

        @Signature(type = Executor.class, method = "query", args = { MappedStatement.class, Object.class,

                RowBounds.class, ResultHandler.class }) })

public class DynamicDataSourceInterceptor implements Interceptor {

    private static Logger logger = LoggerFactory.getLogger(DynamicDataSourceInterceptor.class);

    private static final String REGEX = ".*insert\\u0020.*|.*delete\\u0020.*|.*update\\u0020.*";

    @Override

    public Object intercept(Invocation invocation) throws Throwable {

        //判断当前是不是事务

        boolean synchronizationActive = TransactionSynchronizationManager.isActualTransactionActive();

        //获取crud操作的参数

        Object[] objects = invocation.getArgs();

        //获取第一个参数可以知道,具体是crud哪个操作

        MappedStatement ms = (MappedStatement) objects[0];

        String lookupKey = DynamicDataSourceHolder.DB_MASTER;

        if (synchronizationActive != true) {

            // 读方法

            if (ms.getSqlCommandType().equals(SqlCommandType.SELECT)) {

                // selectKey 为自增id查询主键(SELECT LAST_INSERT_ID())方法,使用主库

                if (ms.getId().contains(SelectKeyGenerator.SELECT_KEY_SUFFIX)) {

                    lookupKey = DynamicDataSourceHolder.DB_MASTER;

                } else {

                    //获取第二个参数,即sql

                    BoundSql boundSql = ms.getSqlSource().getBoundSql(objects[1]);

                    String sql = boundSql.getSql().toLowerCase(Locale.CHINA).replaceAll("[\\t\\n\\r]", " ");

                    //查看是不是增删改,若是则用主库,查则用从库

                    if (sql.matches(REGEX)) {

                        lookupKey = DynamicDataSourceHolder.DB_MASTER;

                    } else {

                        lookupKey = DynamicDataSourceHolder.DB_SLAVE;

                    }

                }

            }

        } else {

            //若为事务,一般就是写等操作,用主库

            lookupKey = DynamicDataSourceHolder.DB_MASTER;

        }

        logger.debug("设置方法[{}] use [{}] Strategy, SqlCommanType [{}]..", ms.getId(), lookupKey,

                ms.getSqlCommandType().name());

        //最终决定要哪个数据库

        DynamicDataSourceHolder.setDbType(lookupKey);

        return invocation.proceed();

    }

    //若是Excutor就拦截下来

    @Override

    public Object plugin(Object target) {

        //拦截Executor是因为,Execuror支持一系列增删改查

        if (target instanceof Executor) {

            return Plugin.wrap(target, this);

        } else {

            return target;

        }

    }

    @Override

    public void setProperties(Properties arg0) {

        // TODO Auto-generated method stub

    }

}
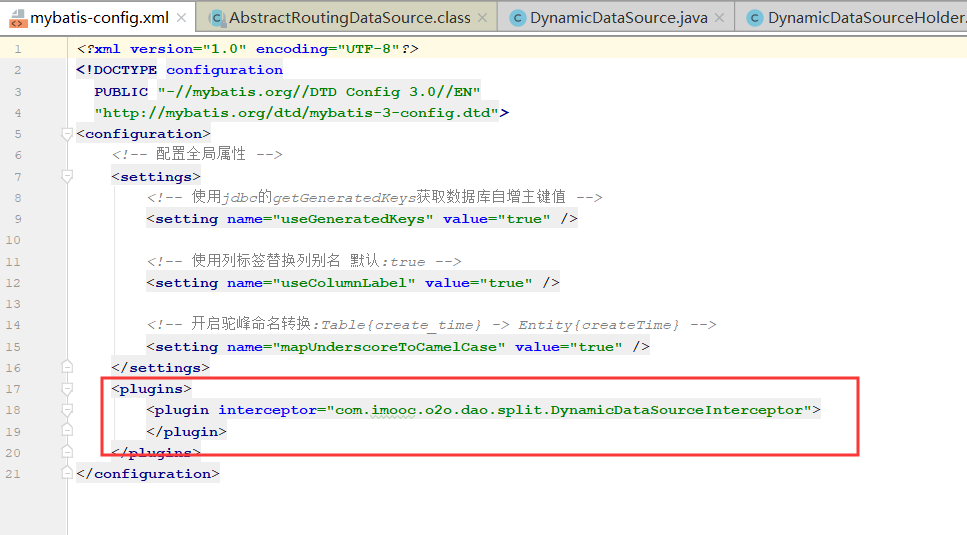
4、修改Mybatis-conf.xml文件
5、修改Spring-dao.xml
<?xml version="1.0" encoding="UTF-8"?>

<beans xmlns="http://www.springframework.org/schema/beans"

    xmlns:xsi="http://www.w3.org/2001/XMLSchema-instance" xmlns:context="http://www.springframework.org/schema/context"

    xsi:schemaLocation="http://www.springframework.org/schema/beans

    http://www.springframework.org/schema/beans/spring-beans.xsd

    http://www.springframework.org/schema/context

    http://www.springframework.org/schema/context/spring-context.xsd">

    <!-- 配置整合mybatis过程 -->

    <!-- 1.配置数据库相关参数properties的属性:${url} -->

    <bean class="com.imooc.o2o.util.EncryptPropertyPlaceholderConfigurer">

        <property name="locations">

            <list>

                <value>classpath:jdbc.properties</value>

                <value>classpath:redis.properties</value>

            </list>

        </property>

        <property name="fileEncoding" value="UTF-8" />

    </bean>

    <!-- 2.数据库连接池 -->

    <bean id="abstractDataSource" abstract="true"

        class="com.mchange.v2.c3p0.ComboPooledDataSource" destroy-method="close">

        <!-- c3p0连接池的私有属性 -->

        <property name="maxPoolSize" value="30" />

        <property name="minPoolSize" value="10" />

        <property name="initialPoolSize" value="10"/>

        <!-- 关闭连接后不自动commit -->

        <property name="autoCommitOnClose" value="false" />

        <!-- 获取连接超时时间 -->

        <property name="checkoutTimeout" value="10000" />

        <!-- 当获取连接失败重试次数 -->

        <property name="acquireRetryAttempts" value="2" />

    </bean>

    <bean id="master" parent="abstractDataSource">

        <!-- 配置连接池属性 -->

        <property name="driverClass" value="${jdbc.driver}" />

        <property name="jdbcUrl" value="${jdbc.master.url}" />

        <property name="user" value="${jdbc.username}" />

        <property name="password" value="${jdbc.password}" />

    </bean>

    <bean id="slave" parent="abstractDataSource">

        <!-- 配置连接池属性 -->

        <property name="driverClass" value="${jdbc.driver}" />

        <property name="jdbcUrl" value="${jdbc.slave.url}" />

        <property name="user" value="${jdbc.username}" />

        <property name="password" value="${jdbc.password}" />

    </bean>

    <!-- 配置动态数据源,这儿targetDataSources就是路由数据源所对应的名称 -->

    <bean id="dynamicDataSource" class="com.imooc.o2o.dao.split.DynamicDataSource">

        <property name="targetDataSources">

            <map>

                <entry value-ref="master" key="master"></entry>

                <entry value-ref="slave" key="slave"></entry>

            </map>

        </property>

    </bean>

    <bean id="dataSource"

        class="org.springframework.jdbc.datasource.LazyConnectionDataSourceProxy">

        <property name="targetDataSource">

            <ref bean="dynamicDataSource" />

        </property>

    </bean>

    <!-- 3.配置SqlSessionFactory对象 -->

    <bean id="sqlSessionFactory" class="org.mybatis.spring.SqlSessionFactoryBean">

        <!-- 注入数据库连接池 -->

        <property name="dataSource" ref="dataSource" />

        <!-- 配置MyBaties全局配置文件:mybatis-config.xml -->

        <property name="configLocation" value="classpath:mybatis-config.xml" />

        <!-- 扫描entity包 使用别名 -->

        <property name="typeAliasesPackage" value="com.imooc.entity" />

        <!-- 扫描sql配置文件:mapper需要的xml文件 -->

        <property name="mapperLocations" value="classpath:mapper/*.xml" />

    </bean>

    <!-- 4.配置扫描Dao接口包,动态实现Dao接口,注入到spring容器中 -->

    <bean class="org.mybatis.spring.mapper.MapperScannerConfigurer">

        <!-- 注入sqlSessionFactory -->

        <property name="sqlSessionFactoryBeanName" value="sqlSessionFactory" />

        <!-- 给出需要扫描Dao接口包 -->

        <property name="basePackage" value="com.imooc.o2o.dao" />

    </bean>

</beans>
Java读写分离实现的更多相关文章
- java读写分离的实现
1. 背景 我们一般应用对数据库而言都是“读多写少”,也就说对数据库读取数据的压力比较大,有一个思路就是说采用数据库集群的方案, 其中一个是主库,负责写入数据,我们称之为:写库: 其它都是从库,负责 ...
- java 读写分离
源码地址:http://git.oschina.net/xiaochangwei 先回答下 1.为啥要读写分离? 大家都知道最初开始,一个项目对应一个数据库,基本是一对一的,但是由于后来用户及数据还有 ...
- 从零开始学 Java - Spring AOP 实现主从读写分离
深刻讨论为什么要读写分离? 为了服务器承载更多的用户?提升了网站的响应速度?分摊数据库服务器的压力?就是为了双机热备又不想浪费备份服务器?上面这些回答,我认为都不是错误的,但也都不是完全正确的.「读写 ...
- java环境下的数据库读写分离
方案很多:阿里的中间件cobar.aop注解方式.com.mysql.jdbc.ReplicationDriver读写分离驱动MySQL数据库的同步. MySQL是开源的关系型数据库系统.主从同步复制 ...
- java 使用spring实现读写分离
最近上线的项目中数据库数据已经临近饱和,最大的一张表数据已经接近3000W,百万数据的表也有几张,项目要求读数据(select)时间不能超过0.05秒,但实际情况已经不符合要求,explain建立索引 ...
- Java多线程之~~~ReadWriteLock 读写分离的多线程实现
在多线程开发中,常常会出现一种情况,我们希望读写分离. 就是对于读取这个动作来说,能够同一时候有多个线程同 时去读取这个资源,可是对于写这个动作来说,仅仅能同一时候有一个线程来操作.并且同一时候,当有 ...
- Java实现数据库的读写分离
引言 1.读写分离:可以通过Spring提供的AbstractRoutingDataSource类,重写determineCurrentLookupKey方法,实现动态切换数据源的功能:读写分离可以有 ...
- Java知识点梳理——读写分离
1.读写分离:可以通过Spring提供的AbstractRoutingDataSource类,重写determineCurrentLookupKey方法,实现动态切换数据源的功能:读写分离可以有效减轻 ...
- mybatis plugins实现项目【全局】读写分离
在之前的文章中讲述过数据库主从同步和通过注解来为部分方法切换数据源实现读写分离 注解实现读写分离: http://www.cnblogs.com/xiaochangwei/p/4961807.html ...
随机推荐
- JSON.parse解决Unexpected token ' in JSON at position 1报错
壹 ❀ 引 我们知道JSON.parse能将JSON字符串转变成JS对象,但在一些转换中可能出现Unexpected token ' in JSON at position 1的错误,这是因为被转换 ...
- 【pat】algorithm常用函数整理
reference is_permutation Test whether range is permutation of another Parameters first1, last1 Input ...
- Xmind软件——xmind 8 pro下载激活推荐!!
亲测有效,在csdn上找到一个. 下载激活xmind 8 pro链接
- Linux系统:Centos7环境搭建Redis单台和哨兵集群环境
本文源码:GitHub·点这里 || GitEE·点这里 一.环境和版本 Linux:centos7 三台 三台Linux服务 192.168.72.129 192.168.72.130 192.16 ...
- 【UR #5】怎样更有力气
Problem Description 大力水手问禅师:"大师,很多事情都需要用很大力气才能完成,而我在吃了菠菜之后力气很大,于是就导致我现在非常依赖菠菜.我很讨厌我的现状,有没有办法少吃点 ...
- C#属性方法 构造函数(不知道自己理解的对不对)
using System; namespace test { class Program { static void Main(string[] args) { Cat kitty = new Cat ...
- Java - IO 内存流和打印流
IO 内存流和打印流操作 字符编码 计算机中所有的信息组成都是二进制数据,所有能够描述的中文文字都是经过处理后的结果:所有的语言文字都会使用编码来进行描述,例如:ASCII码 常见编码 GBK/GB2 ...
- Android 列表对话框 使用数组
添加一个数组 @Override protected void onCreate(Bundle savedInstanceState) { super.onCreate(savedInstanceSt ...
- WordPress疑难问题以及解决方案汇总
版权声明:本文为xing_star原创文章,转载请注明出处! 本文同步自http://javaexception.com/archives/101 WordPress疑难问题以及解决方案汇总: 最近这 ...
- linux中OTG识别到一个U盘后产生一个sg节点的全过程
注:本篇文章暂时不做流程图,如果有需求后续补做. 1. 需要准备的源码文件列表: base部分: kernel\base\core.c kernel\base\bus.c kernel\base\dd ...