从零开始自己搭建复杂网络(以Tensorflow为例)
从零开始自己搭建复杂网络(以MobileNetV2为例)
tensorflow经过这几年的发展,已经成长为最大的神经网络框架。而mobileNetV2在经过Xception的实践与深度可分离卷积的应用之后,相对成熟和复杂,对于我们进行网络搭建的学习有着很大的帮助。
轻量化卷积神经网络MobileNet论文详解(V1&V2)
那么接下来就让我们开始吧!
import tensorflow as tf

from mobilenet_v2.ops import *

def mobilenetv2(inputs, num_classes, is_train=True, reuse=False):

    exp = 6  # expansion ratio

    with tf.variable_scope('mobilenetv2'):

        net = conv2d_block(inputs, 32, 3, 2, is_train, name='conv1_1')  # size/2

        net = res_block(net, 1, 16, 1, is_train, name='res2_1')

        net = res_block(net, exp, 24, 2, is_train, name='res3_1')  # size/4

        net = res_block(net, exp, 24, 1, is_train, name='res3_2')

        net = res_block(net, exp, 32, 2, is_train, name='res4_1')  # size/8

        net = res_block(net, exp, 32, 1, is_train, name='res4_2')

        net = res_block(net, exp, 32, 1, is_train, name='res4_3')

        net = res_block(net, exp, 64, 1, is_train, name='res5_1')

        net = res_block(net, exp, 64, 1, is_train, name='res5_2')

        net = res_block(net, exp, 64, 1, is_train, name='res5_3')

        net = res_block(net, exp, 64, 1, is_train, name='res5_4')

        net = res_block(net, exp, 96, 2, is_train, name='res6_1')  # size/16

        net = res_block(net, exp, 96, 1, is_train, name='res6_2')

        net = res_block(net, exp, 96, 1, is_train, name='res6_3')

        net = res_block(net, exp, 160, 2, is_train, name='res7_1')  # size/32

        net = res_block(net, exp, 160, 1, is_train, name='res7_2')

        net = res_block(net, exp, 160, 1, is_train, name='res7_3')

        net = res_block(net, exp, 320, 1, is_train, name='res8_1', shortcut=False)

        net = pwise_block(net, 1280, is_train, name='conv9_1')

        net = global_avg(net)

        logits = flatten(conv_1x1(net, num_classes, name='logits'))

        pred = tf.nn.softmax(logits, name='prob')

        return logits, pred
MobileNetV2在第一层使用了一个通道数为3×3的卷积进行处理,之后才转入res_block(残差层),在经过res_block叠加之后,使用pwise_block(主要是1×1的卷积调整通道数),然后使用平均池化层,和一个1×1的卷积,将最后输出变为类数。

接着我们来细讲每一个模块:
首先是第一层卷积模块:
卷积模块由下面两个函数组成
卷积模块由卷积层和批正则化(batch_normalization),以及relu6组成
def conv2d(input_, output_dim, k_h, k_w, d_h, d_w, stddev=0.02, name='conv2d', bias=False):

    with tf.variable_scope(name):

        w = tf.get_variable('w', [k_h, k_w, input_.get_shape()[-1], output_dim],

              regularizer=tf.contrib.layers.l2_regularizer(weight_decay),

              initializer=tf.truncated_normal_initializer(stddev=stddev))

        #truncated_normal_initializer生成截断正态分布的随机数

        conv = tf.nn.conv2d(input_, w, strides=[1, d_h, d_w, 1], padding='SAME')

        if bias:

            biases = tf.get_variable('bias', [output_dim], initializer=tf.constant_initializer(0.0))

            conv = tf.nn.bias_add(conv, biases)

        return conv

def conv2d_block(input, out_dim, k, s, is_train, name):

    with tf.name_scope(name), tf.variable_scope(name):

        net = conv2d(input, out_dim, k, k, s, s, name='conv2d')

        net = batch_norm(net, train=is_train, name='bn')

        net = relu(net)

        return net
卷积层首先定义了w(可以把w理解为卷积核,是一个Tensor,w具有[filter_height, filter_width, in_channels, out_channels]这样的形状)(l2正则化之后+初始),然后通过 tf.nn.conv2d来进行卷积操作,之后加上偏置。
relu6和batch_normalization,tensorflow有直接的函数,调用即可。
def relu(x, name='relu6'):

    return tf.nn.relu6(x, name)

def batch_norm(x, momentum=0.9, epsilon=1e-5, train=True, name='bn'):

    return tf.layers.batch_normalization(x,

                      momentum=momentum,

                      epsilon=epsilon,

                      scale=True,

                      training=train,

                      name=name)
接着我们要在卷积层后叠加res_block残差模块
def res_block(input, expansion_ratio, output_dim, stride, is_train, name, bias=False, shortcut=True):

    with tf.name_scope(name), tf.variable_scope(name):

        # pw

        bottleneck_dim=round(expansion_ratio*input.get_shape().as_list()[-1])

        net = conv_1x1(input, bottleneck_dim, name='pw', bias=bias)

        net = batch_norm(net, train=is_train, name='pw_bn')

        net = relu(net)

        # dw

        net = dwise_conv(net, strides=[1, stride, stride, 1], name='dw', bias=bias)

        net = batch_norm(net, train=is_train, name='dw_bn')

        net = relu(net)

        # pw & linear

        net = conv_1x1(net, output_dim, name='pw_linear', bias=bias)

        net = batch_norm(net, train=is_train, name='pw_linear_bn')

        # element wise add, only for stride==1

        if shortcut and stride == 1:

            in_dim=int(input.get_shape().as_list()[-1])

            if in_dim != output_dim:

                ins=conv_1x1(input, output_dim, name='ex_dim')

                net=ins+net

            else:

                net=input+net

        return net
残差模块使用倒置残差结构,如下图所示
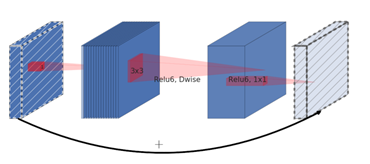
MobileNetv2架构是基于倒置残差结构(inverted residual structure),原本的残差结构的主分支是有三个卷积,两个逐点卷积通道数较多,而倒置的残差结构刚好相反,中间的卷积通道数(依旧使用深度分离卷积结构)较多,旁边的较小。
每个残差结构由一个1×1的卷积和一个3×3的深度卷积和一个1×1的卷积经过线性变换得到。
bottleneck的维度有扩张系数=6来影响。使用1×1的卷积将输入通道转换为扩张系数×输入维度。
dwise_conv深度卷积代码具体如下:
def dwise_conv(input, k_h=3, k_w=3, channel_multiplier= 1, strides=[1,1,1,1],

               padding='SAME', stddev=0.02, name='dwise_conv', bias=False):

    with tf.variable_scope(name):

        in_channel=input.get_shape().as_list()[-1]

        w = tf.get_variable('w', [k_h, k_w, in_channel, channel_multiplier],

                        regularizer=tf.contrib.layers.l2_regularizer(weight_decay),

                        initializer=tf.truncated_normal_initializer(stddev=stddev))

        conv = tf.nn.depthwise_conv2d(input, w, strides, padding, rate=None,name=None,data_format=None)

        if bias:

            biases = tf.get_variable('bias', [in_channel*channel_multiplier], initializer=tf.constant_initializer(0.0))

            conv = tf.nn.bias_add(conv, biases)

        return conv
卷积核大小 k_h, k_w, in_channel, 1
1×1的卷积定义如下:
def conv_1x1(input, output_dim, name, bias=False):

    with tf.name_scope(name):

        return conv2d(input, output_dim, 1,1,1,1, stddev=0.02, name=name, bias=bias)
我们为残差层添加shortcut连接。
       # element wise add, only for stride==1

        if shortcut and stride == 1:

            in_dim=int(input.get_shape().as_list()[-1])

            if in_dim != output_dim:

                ins=conv_1x1(input, output_dim, name='ex_dim')

                net=ins+net

            else:

                net=input+net
只有当stride=1的时候,才启用shortcut链接。
接着叠加res模块
在最后使用全局平均池化:
def global_avg(x):

    with tf.name_scope('global_avg'):

        net=tf.layers.average_pooling2d(x, x.get_shape()[1:-1], 1)

        return net
我们没有使用全连接层,而是使用了1×1的卷积将维度转换为类数,再将其压平。
tf.contrib.layers.flatten(x)
最后使用softmax分类
pred = tf.nn.softmax(logits, name='prob')
好了,MobilenetV2就搭建成功了。
这种网络的搭建模式可以当成一个模板,将其输入输出定好之后,很容易组装到Estimator中,进行网络的更换,以及后期的微调。

本次我们使用了tf.nn搭建网络,下次我们会去尝试slim和tf.layer搭建网络。
从零开始自己搭建复杂网络(以Tensorflow为例)的更多相关文章
- 从零开始自己搭建复杂网络2(以Tensorflow为例)
从零开始自己搭建复杂网络(以DenseNet为例) DenseNet 是一种具有密集连接的卷积神经网络.在该网络中,任何两层之间都有直接的连接,也就是说,网络每一层的输入都是前面所有层输出的并集, 而 ...
- Hyperledger Fabric手动生成CA证书搭建Fabric网络
之前介绍了使用官方脚本自动化启动一个Fabric网络,并且所有的证书都是通过官方的命令行工具cryptogen直接生成网络中的所有节点的证书.在开发环境可以这么简单进行,但是生成环境下还是需要我们自定 ...
- CentOS6.8环境下搭建yum网络仓库
CentOS6.8环境下搭建yum网络仓库 本文利用ftp服务,在CentOS6.8系统下搭建一个yum仓库,然后用另一台虚拟机访问该仓库.并安装程序包 安装ftp服务 查询ftp服务是否安装 [ro ...
- Tensorflow平台快速搭建:Windows 7+TensorFlow 0.12.0
Tensorflow平台快速搭建:Windows 7+TensorFlow 0.12.0 1.TensorFlow 0.12.0下载 2016年11月29日,距离TensorFlow 宣布开源刚刚过去 ...
- 关于路由器漏洞利用,qemu环境搭建,网络配置的总结
FAT 搭建的坑 1 先按照官方步骤进行,完成后进行如下步骤 2 修改 move /firmadyne into /firmware-analysis-toolkit navigate to the ...
- KVM——以桥接的方式搭建虚拟机网络配置
以桥接的方式搭建虚拟机网络,其优势是可以将网络中的虚拟机看作是与主机同等地位的服务器. 在原本的局域网中有两台主机,一台是win7(IP: 192.168.0.236),一台是CentOS7(IP: ...
- 从零开始搭搭建系统3.1——顶级pom制定
从零开始搭搭建系统3.1——顶级pom制定
- 从零开始Windows环境下安装python+tensorflow
从零开始Windows环境下安装python+tensorflow 2017年07月12日 02:30:47 qq_16257817 阅读数:29173 标签: windowspython机器学习te ...
- 【Hadoop离线基础总结】zookeeper的介绍以及集群环境搭建、网络编程和RPC的简单了解
ZooKeeper的介绍以及集群环境搭建.网络编程和RPC的简单了解 ZooKeeper介绍 概述 ZooKeeper是一个分布式协调服务的开源框架,主要用来解决分布式集群中应用系统的一致性问题.例如 ...
随机推荐
- Android Handler 异步调用修改界面与主线程
在Android编程的过程中,如果在Activity中某个操作会运行比较长的时间,比如:下载文件.这个时候如果在主线程中直接下载文件,会造成Activity卡死的现象:而且如果时间超过5秒,会有ANR ...
- delphi 登陆窗口的问题 [问题点数:30分,结帖人tianhuo_soft]
http://bbs.csdn.net/topics/200053917 有两个窗口formLogin是登陆窗口,formMain是主窗口我想让formMain显示出来,并且formLogin窗口关闭 ...
- Entity Framework Plus
ZZZ Project 这家外国公司,有很多关于.NET和数据访问的项目,有收费的,有开源的,我之前介绍过 Z.ExtensionMethods 一个强大的开源扩展库 就出自该名下,其他有 如下 1. ...
- VC++ 常见问题及其解决方法
1. 无法找到“XXX.exe”的调试信息,或者调试信息不匹配: 选择 配置属性->链接器->调试->生成调试信息 改为 是 选择 配置属性->C/C++ ->常规-&g ...
- Ryuji doesn't want to study 2018 徐州赛区网络预赛
题意: 1.区间求 a[l]×L+a[l+1]×(L−1)+⋯+a[r−1]×2+a[r](L is the length of [ l, r ] that equals to r - l + 1) ...
- OI中的莫比乌斯反演
OI中的莫比乌斯反演 莫比乌斯函数 想要学习莫比乌斯反演,首先要学习莫比乌斯函数. 定义 莫比乌斯函数用\(\mu(x)\)表示.如果\(x\)是\(k\)个不同质数的积,则\(\mu(x) = (- ...
- Winform Treeview 排序及图标处理
一.排序 1. 继承 IComparer 2. treeView1.TreeViewNodeSorter = this; 3. 实现IComparer public int Compare(ob ...
- 主机 & 虚拟机 & 开发板 相互通信
@2018年7月10日 成功方法之一: 虚拟机设置为桥接模式,保证三者在同一网段,ping方式测试网络连通性OK
- 遭遇:“传入的表格格式数据流(TDS)远程过程调用(RPC)协议流不正确” 错误
http://www.cnblogs.com/delphinet/archive/2010/03/09/1681777.html 正在写一个类似文章的发表系统.其中记录文章内容的字段Contents设 ...
- oracle之回滚数据表 笔记
alter table [tableName] enable row movement;flashback table [tableName] to timestamp to_timestamp('2 ...