用keras的cnn做人脸分类
keras介绍
Keras是一个简约,高度模块化的神经网络库。采用Python / Theano开发。
使用Keras如果你需要一个深度学习库:
可以很容易和快速实现原型(通过总模块化,极简主义,和可扩展性)
同时支持卷积网络(vision)和复发性的网络(序列数据)。以及两者的组合。
无缝地运行在CPU和GPU上。
keras的资源库网址为https://github.com/fchollet/keras
olivettifaces人脸数据库介绍
Olivetti Faces是纽约大学的一个比较小的人脸库,由 40个人的400张图片构成,即每个人的人脸图片为10张。每张图片的灰度级为8位,每个像素的灰度大小位于0-255之间,每张图片大小为64×64。 如下图,这个图片大小是1140942,一共有2020张人脸,故每张人脸大小是(1140/20)(942/20)即5747=2679:
预处理模块
使用了PIL(Python Imaging Library)模块,是Python平台事实上的图像处理标准库。
预处理流程是:打开文件-》归一化-》将图片转为数据集-》生成label-》使用pickle序列化数据集
numpy.ndarray.flatten函数的功能是将一个矩阵平铺为向量
from PIL import Imageimport numpyimport cPickleimg = Image.open('G:\data\olivettifaces.gif')# numpy supports conversion from image to ndarray and normalization by dividing 255# 1140 * 942 ndarrayimg_ndarray = numpy.asarray(img, dtype='float64') / 255# create numpy array of 400*2679img_rows, img_cols = 57, 47face_data = numpy.empty((400, img_rows*img_cols))# convert 1140*942 ndarray to 400*2679 matrixfor row in range(20):for col in range(20):face_data[row*20+col] = numpy.ndarray.flatten(img_ndarray[row*img_rows:(row+1)*img_rows, col*img_cols:(col+1)*img_cols])# create labelface_label = numpy.empty(400, dtype=int)for i in range(400):face_label[i] = i / 10# pickling filef = open('G:\data\olivettifaces.pkl','wb')# store data and label as a tuplecPickle.dump((face_data,face_label), f)f.close()
分类模型
程序参考了官方示例:https://github.com/fchollet/keras/blob/master/examples/mnist_cnn.py
一共有40个类,每个类10个样本,共400个样本。其中320个样本用于训练,40个用于验证,剩下40个测试
注意给第一层指定input_shape,如果是MLP,代码为:
model = Sequential()# Dense(64) is a fully-connected layer with 64 hidden units.# in the first layer, you must specify the expected input data shape:# here, 20-dimensional vectors.model.add(Dense(64, input_dim=20, init='uniform'))
后面可以不指定Dense的input shape
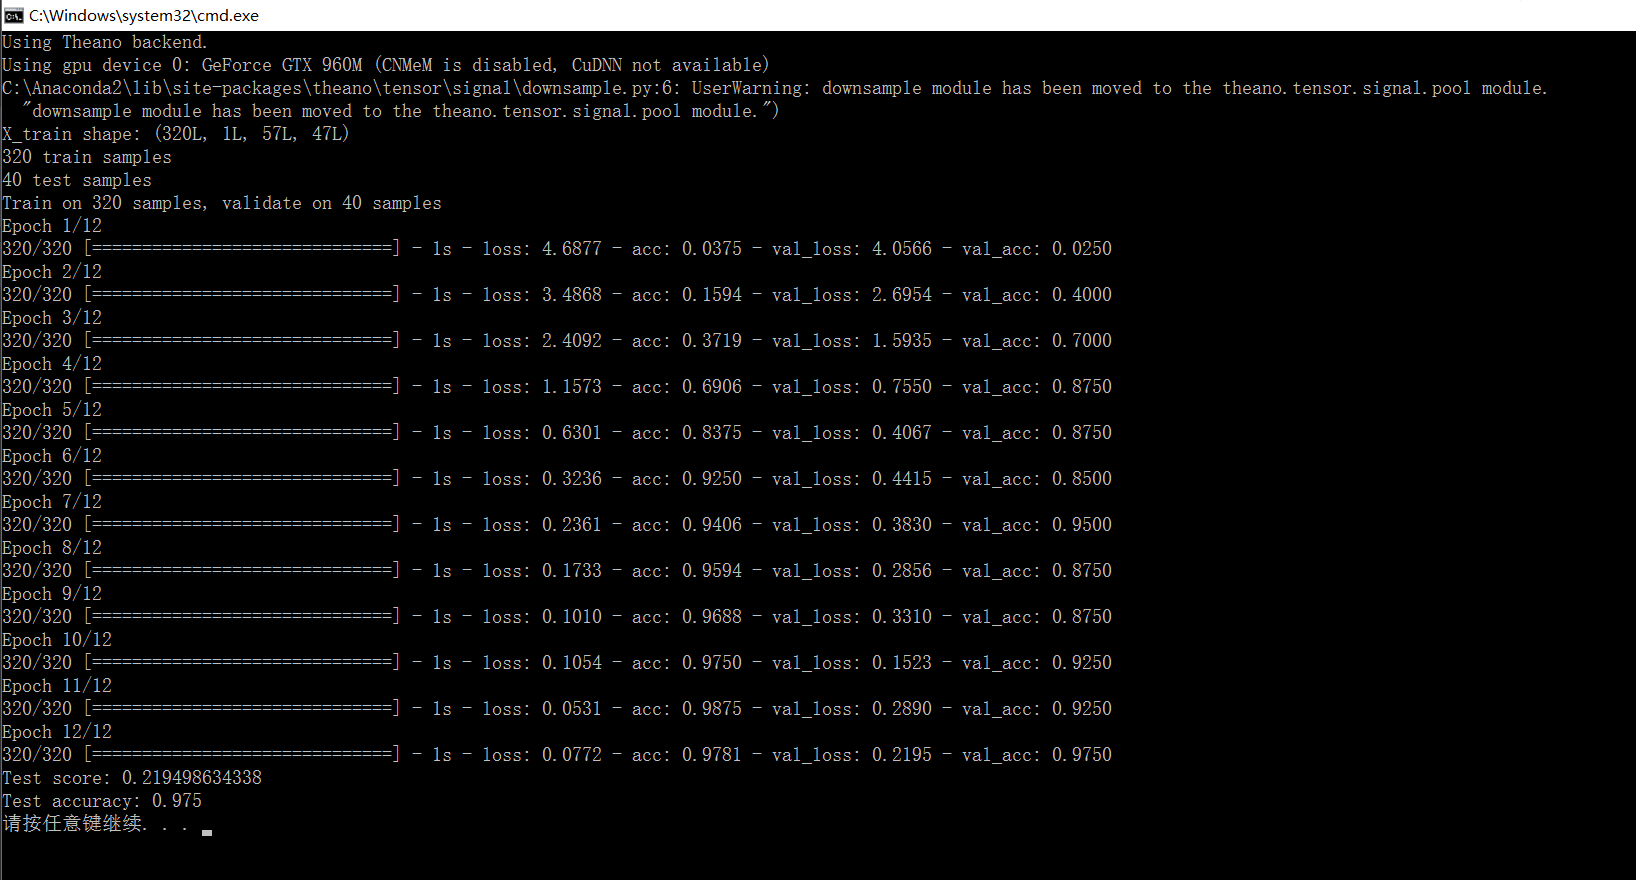
from __future__ import print_functionimport numpy as npimport cPicklenp.random.seed(1337) # for reproducibililtyfrom keras.datasets import mnistfrom keras.models import Sequentialfrom keras.layers.core import Dense, Dropout, Activation, Flattenfrom keras.layers.convolutional import Convolution2D, MaxPooling2Dfrom keras.utils import np_utils# split data into train,vavlid and test# train:320# valid:40# test:40def split_data(fname):f = open(fname, 'rb')face_data,face_label = cPickle.load(f)X_train = np.empty((320, img_rows * img_cols))Y_train = np.empty(320, dtype=int)X_valid = np.empty((40, img_rows* img_cols))Y_valid = np.empty(40, dtype=int)X_test = np.empty((40, img_rows* img_cols))Y_test = np.empty(40, dtype=int)for i in range(40):X_train[i*8:(i+1)*8,:] = face_data[i*10:i*10+8,:]Y_train[i*8:(i+1)*8] = face_label[i*10:i*10+8]X_valid[i] = face_data[i*10+8,:]Y_valid[i] = face_label[i*10+8]X_test[i] = face_data[i*10+9,:]Y_test[i] = face_label[i*10+9]return (X_train, Y_train, X_valid, Y_valid, X_test, Y_test)if __name__=='__main__':batch_size = 10nb_classes = 40nb_epoch = 12# input image dimensionsimg_rows, img_cols = 57, 47# number of convolutional filters to usenb_filters = 32# size of pooling area for max poolingnb_pool = 2# convolution kernel sizenb_conv = 3(X_train, Y_train, X_valid, Y_valid, X_test, Y_test) = split_data('G:\data\olivettifaces.pkl')X_train = X_train.reshape(X_train.shape[0], 1, img_rows, img_cols)X_test = X_test.reshape(X_test.shape[0], 1, img_rows, img_cols)print('X_train shape:', X_train.shape)print(X_train.shape[0], 'train samples')print(X_test.shape[0], 'test samples')# convert label to binary class matrixY_train = np_utils.to_categorical(Y_train, nb_classes)Y_test = np_utils.to_categorical(Y_test, nb_classes)model = Sequential()# 32 convolution filters , the size of convolution kernel is 3 * 3# border_mode can be 'valid' or 'full'#‘valid’only apply filter to complete patches of the image.# 'full' zero-pads image to multiple of filter shape to generate output of shape: image_shape + filter_shape - 1# when used as the first layer, you should specify the shape of inputs# the first number means the channel of an input image, 1 stands for grayscale imgs, 3 for RGB imgsmodel.add(Convolution2D(nb_filters, nb_conv, nb_conv,border_mode='valid',input_shape=(1, img_rows, img_cols)))# use rectifier linear units : max(0.0, x)model.add(Activation('relu'))# second convolution layer with 32 filters of size 3*3model.add(Convolution2D(nb_filters, nb_conv, nb_conv))model.add(Activation('relu'))# max pooling layer, pool size is 2 * 2model.add(MaxPooling2D(pool_size=(nb_pool, nb_pool)))# drop out of max-pooling layer , drop out rate is 0.25model.add(Dropout(0.25))# flatten inputs from 2d to 1dmodel.add(Flatten())# add fully connected layer with 128 hidden unitsmodel.add(Dense(128))model.add(Activation('relu'))model.add(Dropout(0.5))# output layer with softmaxmodel.add(Dense(nb_classes))model.add(Activation('softmax'))# use cross-entropy cost and adadelta to optimize paramsmodel.compile(loss='categorical_crossentropy', optimizer='adadelta')# train model with bath_size =10, epoch=12# set verbose=1 to show train infomodel.fit(X_train, Y_train, batch_size=batch_size, nb_epoch=nb_epoch,show_accuracy=True, verbose=1, validation_data=(X_test, Y_test))# evaluate on test setscore = model.evaluate(X_test, Y_test, show_accuracy=True, verbose=0)print('Test score:', score[0])print('Test accuracy:', score[1])
结果:
准确率有97%
用keras的cnn做人脸分类的更多相关文章
- 使用CNN做文本分类——将图像2维卷积换成1维
使用CNN做文本分类 from __future__ import division, print_function, absolute_import import tensorflow as tf ...
- keras 的svm做分类
SVC继承了父类BaseSVC SVC类主要方法: ★__init__() 主要参数: C: float参数 默认值为1.0 错误项的惩罚系数.C越大,即对分错样本的惩罚程度越大,因此在训练样本中准确 ...
- .NET做人脸识别并分类
.NET做人脸识别并分类 在游乐场.玻璃天桥.滑雪场等娱乐场所,经常能看到有摄影师在拍照片,令这些经营者发愁的一件事就是照片太多了,客户在成千上万张照片中找到自己可不是件容易的事.在一次游玩等活动或家 ...
- CNN眼中的世界:利用Keras解释CNN的滤波器
转载自:https://keras-cn.readthedocs.io/en/latest/legacy/blog/cnn_see_world/ 文章信息 本文地址:http://blog.keras ...
- 万字总结Keras深度学习中文文本分类
摘要:文章将详细讲解Keras实现经典的深度学习文本分类算法,包括LSTM.BiLSTM.BiLSTM+Attention和CNN.TextCNN. 本文分享自华为云社区<Keras深度学习中文 ...
- (转!)利用Keras实现图像分类与颜色分类
2018-07-19 全部谷歌渣翻加略微修改 大家将就的看哈 建议大佬们还是看看原文 点击收获原文 其中用到的示例文件 multi-output-classification 大家可以点击 下载 . ...
- 机器学习: Tensor Flow +CNN 做笑脸识别
Tensor Flow 是一个采用数据流图(data flow graphs),用于数值计算的开源软件库.节点(Nodes)在图中表示数学操作,图中的线(edges)则表示在节点间相互联系的多维数据数 ...
- Tensorflow&CNN:裂纹分类
版权声明:本文为博主原创文章,转载 请注明出处:https://blog.csdn.net/sc2079/article/details/90478551 - 写在前面 本科毕业设计终于告一段落了.特 ...
- 基于CNN的人脸相似度检测
人脸相似度检测主要是检测两张图片中人脸的相似度,从而判断这两张图片的对象是不是一个人. 在上一篇文章中,使用CNN提取人脸特征,然后利用提取的特征进行分类.而在人脸相似度检测的工作中,我们也可以利用卷 ...
随机推荐
- Python交互式编程导论----事件驱动编程
传统的编程是如下线性模式的: 开始--->代码块A--->代码块B--->代码块C--->代码块D--->......--->结束 每一个代码块里是完成各种各样事情 ...
- SQL语言基础
主要学习链接1 http://www.cnblogs.com/anding/p/5281558.html 搜索学习链接2 http://www.cnblogs.com/libingql/p/41342 ...
- jquery 高度的获取
alert($(window).height()); //浏览器当前窗口可视区域高度 alert($(document).height()); //浏览器当前窗口文档的高度 alert($(docum ...
- VAssistX使用小窍门
日常使用中的一些VAssistX使用小窍门,简单总结下 一,修改VAssistX默认缓存文件路径,防止默认C盘被占用空间过大 1. 打开注册表HKCU\Software\Whole Tomato,新 ...
- python随便笔记。。。
一.input().strip(),strip()的作用是不读取用户输入的空格 s.strip(rm) 删除s字符串中开头.结尾处,位于 rm删除序列的字符s.lstrip(rm) ...
- Maven的包依赖冲突可引发java.lang.IncompatibleClassChangeError错误
新版API上线后,发现LOG文件没有正常输出.查看Tomcat的Log文件发现如下的错误信息 May , :: AM com.sun.xml.ws.server.sei.EndpointMethodH ...
- HP_UX系统批量创建LV或raw设备的Shell 脚本
mkdir /dev/yjfsvg02 #创建lvm v2.0的VG,PE Size=64MB,不需要执行mknod创建group文件了.vgcreate -V 2.0 -s 64 -S 10t /d ...
- Android应用开发项目结构分析
初学Android开发,初步理解的Android应用项目结构,备忘. 一.清单文件AndroidManifest.xml 功能: 1.供Android平台调用,供其了解本应用的信息,因此,所有的组件( ...
- WCF Misconfiguration: Insufficient Audit Failure Handling
Abstract: The program is configured not to generate an exception when it fails to write to an audit ...
- table 固定表头
1 .table { border-collapse: collapse; } .table th { display: table-cell; } .fixedThead {//thead disp ...