OpenResty入门之使用Lua开发Nginx插件
记住一点:nginx配置文件很多坑来源自你的空格少了或多了。
OpenResty
OpenResty 是一个基于 Nginx 与 Lua 的高性能 Web 平台,其内部集成了大量精良的 Lua 库、第三方模块以及大多数的依赖项。用于方便地搭建能够处理超高并发、扩展性极高的动态 Web 应用、Web 服务和动态网关。
OpenResty 通过汇聚各种设计精良的 Nginx 模块(主要由 OpenResty 团队自主开发),从而将 Nginx 有效地变成一个强大的通用 Web 应用平台。这样,Web 开发人员和系统工程师可以使用 Lua 脚本语言调动 Nginx 支持的各种 C 以及 Lua 模块,快速构造出足以胜任 10K 乃至 1000K 以上单机并发连接的高性能 Web 应用系统。
OpenResty 的目标是让你的Web服务直接跑在 Nginx 服务内部,充分利用 Nginx 的非阻塞 I/O 模型,不仅仅对 HTTP 客户端请求,甚至于对远程后端诸如 MySQL、PostgreSQL、Memcached 以及 Redis 等都进行一致的高性能响应。
1.Centos下载安装
如果你的系统是 Centos 或 RedHat 可以使用以下命令:
yum install readline-devel pcre-devel openssl-devel
接下我们可以在官方(https://openresty.org/cn/)下载最新的 OpenResty 源码包并解压编译安装:
wget https://openresty.org/download/ngx_openresty-1.9.7.1.tar.gz   # 下载

tar xzvf ngx_openresty-1.9.7.1.tar.gz       # 解压

cd ngx_openresty-1.9.7.1/

./configure

make

make install
默认情况下程序会被安装到 /usr/local/openresty 目录,你可以使用 ./configure --help 查看更多的配置选项。
2.HelloWorld实例
安装成功后,我们就可以使用 openresty 直接输出 html 页面。
首先我们可以创建一个工作目录:
mkdir /home/www

cd /home/www/

mkdir logs/ conf/
其中 logs 目录用于存放日志,conf 用于存放配置文件。
接着,我们在 conf 目录下创建一个 nginx.conf 文件 代码如下:
worker_processes  1;

error_log logs/error.log;

events {

    worker_connections 1024;

}

http {

    server {

        listen 9000;

        location / {

            default_type text/html;

            content_by_lua '

                ngx.say("<p>Hello, World!</p>")

            ';

        }

    }

}
如果你熟悉 nginx 的配置,应该对以上代码就很熟悉。这里我们将 html 代码直接写在了配置文件中。
启动 openresty
默认情况下 openresty 安装在 /usr/local/openresty 目录中,启动命令为:
/usr/local/openresty/nginx/sbin/nginx -p /home/www/ -c conf/nginx.conf
如果没有任何输出,说明启动成功,-p 指定我们的项目目录,-c 指定配置文件。
接下来我们可以使用 curl 来测试是否能够正常范围:
curl http://localhost:9000/
输出结果为:
<p>Hello, World!</p>
3.调用Lua脚本文件
在 HelloWorld 实例中,我们直接在 nginx.conf 中写Lua脚本,很多时候,Lua脚本是一个文件。下面演示使用 content_by_lua_file 指令调用Lua脚本文件。
在conf文件夹下创建helloworld.lua:
ngx.say("<p>Hello, World!</p>")
修改你的 nginx.conf 文件内容为:
worker_processes  1;

error_log logs/error.log;

events {

    worker_connections 1024;

}

http {

    server {

        listen 9000;

        location / {

            default_type text/html;

            content_by_lua_file 'conf/helloworld.lua';

        }

    }

}
停止已启动的nginx进程:
killall -9 nginx
启动nginx进程:
/usr/local/openresty/nginx/sbin/nginx -p /home/www/ -c conf/nginx.conf
接下来我们可以使用 curl 来测试是否能够正常范围:
curl 'localhost:9000'
输出结果为:
<p>Hello, World!</p>
4.set_by_lua指令
使用 set_by_lua 指定可以用类似调用函数的形式去调用Lua脚本。语法:
set_by_lua $res <lua-script-str> [$arg1 $arg2 ...]
修改你的conf/nginx.conf文件:
worker_processes  1;

error_log logs/error.log;

events {

    worker_connections 1024;

}

http {

    server {

        listen 9000;

        location / {

            default_type text/html;

            set_by_lua $res '

                local a = tonumber(ngx.arg[1])

                local b = tonumber(ngx.arg[2])

                return a+b' $arg_a $arg_b;

            echo $res;

        }

    }

}
停止已启动的nginx进程,命令:
killall -9 nginx
启动nginx进程:
/usr/local/openresty/nginx/sbin/nginx -p /home/www/ -c conf/nginx.conf
接下来我们可以使用 curl 来测试是否能够正常范围:
curl 'localhost:9000/?a=2&b=5'
输出结果为:
7
5.set_by_lua_file指令
set_by_lua_file可以调用本地Lua脚本文件。语法与set_by_lua相同:
set_by_lua_file $res <lua-script-str> [$arg1 $arg2 ...]
在conf文件夹下创建hello.lua文件:
local a = tonumber(ngx.arg[1])

local b = tonumber(ngx.arg[2])

return a+b
在conf文件夹下创建nginx_lua.conf文件:
worker_processes  1;

error_log logs/error.log;

events {

    worker_connections 1024;

}

http {

    server {

        listen 9000;

        location = / {

            default_type text/html;

            set_by_lua_file $res "conf/hello.lua" $arg_a $arg_b;

            echo $res;

        }

    }

}
启动nginx进程:
/usr/local/openresty/nginx/sbin/nginx -p /home/www/ -c conf/nginx_lua.conf
接下来我们可以使用 curl 来测试是否能够正常范围:
curl 'localhost:9000/?a=2&b=5'
输出结果为:
7
6.设置nginx变量
在conf文件夹下创建nginx.conf文件:
worker_processes  1;

error_log logs/error.log;

events {

    worker_connections 1024;

}

http {

    server {

        listen 9000;

        location / {

        	set $a $host;

        	set $b 'hello world';

            default_type text/html;

            content_by_lua_file 'conf/hello.lua';

        }

    }

}
在conf文件夹下创建hello.lua:
local var = ngx.var

ngx.say("ngx.var.a : ", var.a, "<br/>")

ngx.say("ngx.var.b : ", var.b, "<br/>")

ngx.say("<br/>")
启动nginx进程:
/usr/local/openresty/nginx/sbin/nginx -p /home/www/ -c conf/nginx_lua.conf
接下来我们可以使用 curl 来测试是否能够正常范围:
curl 'localhost:9000'
输出结果为:
ngx.var.a : localhost<br/>

ngx.var.b : hello world<br/>
【本文版权归微信公众号"代码艺术"(ID:onblog)所有,若是转载请务必保留本段原创声明,违者必究。若是文章有不足之处,欢迎关注微信公众号私信与我进行交流!】
7.运行周期
现在已经学会了content_by_lua 与 set_by_lua 指令,其它类似的指令还有很多,那么这些指令都是有什么区别呢?主要区别是指令的运行周期不同,如图所示。(图片来源于网络)
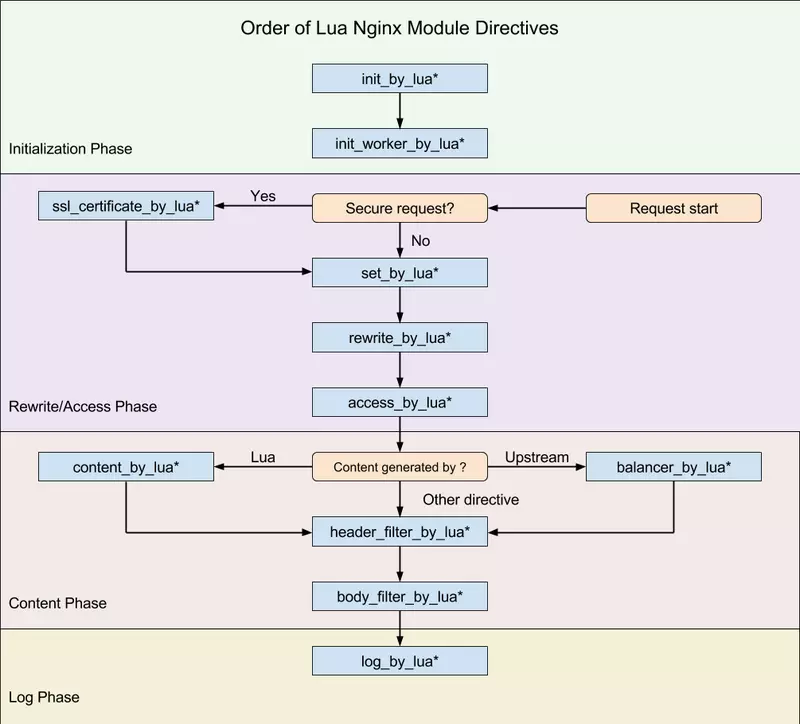
8.其它指令
| 指令 | 所处处理阶段 | 使用范围 | 解释 |
|---|---|---|---|
| init_by_lua init_by_lua_file |
loading-config | http | nginx Master进程加载配置时执行;通常用于初始化全局配置/预加载Lua模块 |
| init_worker_by_lua init_worker_by_lua_file |
starting-worker | http | 每个Nginx Worker进程启动时调用的计时器,如果Master进程不允许则只会在init_by_lua之后调用;通常用于定时拉取配置/数据,或者后端服务的健康检查 |
| set_by_lua set_by_lua_file |
rewrite | server,server if,location,location if | 设置nginx变量,可以实现复杂的赋值逻辑;此处是阻塞的,Lua代码要做到非常快; |
| rewrite_by_lua rewrite_by_lua_file |
rewrite tail | http,server,location,location if | rrewrite阶段处理,可以实现复杂的转发/重定向逻辑; |
| access_by_lua access_by_lua_file |
access tail | http,server,location,location if | 请求访问阶段处理,用于访问控制 |
| content_by_lua content_by_lua_file |
content | location,location if | 内容处理器,接收请求处理并输出响应 |
| header_filter_by_lua header_filter_by_lua_file |
output-header-filter | http,server,location,location if | 设置header和cookie |
| body_filter_by_lua body_filter_by_lua_file |
output-body-filter | http,server,location,location if | 对响应数据进行过滤,比如截断、替换。 |
| log_by_lua log_by_lua_file |
log | http,server,location,location if | log阶段处理,比如记录访问量/统计平均响应时间 |
9.Nginx API
将下面的lua脚本复制到你的content_by_lua_file指定的lua文件中即可。
--请求头

local headers = ngx.req.get_headers()

ngx.say("headers begin", "<br/>")

ngx.say("Host : ", headers["Host"], "<br/>")

ngx.say("user-agent : ", headers["user-agent"], "<br/>")

ngx.say("user-agent : ", headers.user_agent, "<br/>")

for k, v in pairs(headers) do

    if type(v) == "table" then

        ngx.say(k, " : ", table.concat(v, ","), "<br/>")

    else

        ngx.say(k, " : ", v, "<br/>")

    end

end

ngx.say("headers end", "<br/>")

ngx.say("<br/>")

--get请求uri参数

ngx.say("uri args begin", "<br/>")

local uri_args = ngx.req.get_uri_args()

for k, v in pairs(uri_args) do

    if type(v) == "table" then

        ngx.say(k, " : ", table.concat(v, ", "), "<br/>")

    else

        ngx.say(k, ": ", v, "<br/>")

    end

end

ngx.say("uri args end", "<br/>")

ngx.say("<br/>")

--post请求参数

ngx.req.read_body()

ngx.say("post args begin", "<br/>")

local post_args = ngx.req.get_post_args()

for k, v in pairs(post_args) do

    if type(v) == "table" then

        ngx.say(k, " : ", table.concat(v, ", "), "<br/>")

    else

        ngx.say(k, ": ", v, "<br/>")

    end

end

ngx.say("post args end", "<br/>")

ngx.say("<br/>")

--请求的http协议版本

ngx.say("ngx.req.http_version : ", ngx.req.http_version(), "<br/>")

--请求方法

ngx.say("ngx.req.get_method : ", ngx.req.get_method(), "<br/>")

--原始的请求头内容

ngx.say("ngx.req.raw_header : ", ngx.req.raw_header(), "<br/>")

--请求的body内容体

ngx.say("ngx.req.get_body_data() : ", ngx.req.get_body_data(), "<br/>")

ngx.say("<br/>")

local request_uri = ngx.var.request_uri;

ngx.say("request_uri : ", request_uri, "<br/>");

--解码

ngx.say("decode request_uri : ", ngx.unescape_uri(request_uri), "<br/>");

--MD5

ngx.say("ngx.md5 : ", ngx.md5("123"), "<br/>")

--http time

ngx.say("ngx.http_time : ", ngx.http_time(ngx.time()), "<br/>")

--当前时间

ngx.update_time()

local now = ngx.now()

ngx.say("nowTime : ", now, "<br/>")
访问 http://127.0.0.1:9000/?a=8&b=55 ,手动输入两个Cookie,输出结果:
headers begin

Host : 127.0.0.1:9000

user-agent : Mozilla/5.0 (Windows NT 10.0; Win64; x64) AppleWebKit/537.36 (KHTML, like Gecko) Chrome/73.0.3683.86 Safari/537.36

user-agent : Mozilla/5.0 (Windows NT 10.0; Win64; x64) AppleWebKit/537.36 (KHTML, like Gecko) Chrome/73.0.3683.86 Safari/537.36

accept-language : zh-CN,zh;q=0.9

connection : keep-alive

accept : text/html,application/xhtml+xml,application/xml;q=0.9,image/webp,image/apng,*/*;q=0.8,application/signed-exchange;v=b3

cache-control : max-age=0

host : 127.0.0.1:9000

cookie : hello=world; Heelo=Sdd

accept-encoding : gzip, deflate

upgrade-insecure-requests : 1

user-agent : Mozilla/5.0 (Windows NT 10.0; Win64; x64) AppleWebKit/537.36 (KHTML, like Gecko) Chrome/73.0.3683.86 Safari/537.36

headers end

uri args begin

b: 55

a: 8

uri args end

post args begin

post args end

ngx.req.http_version : 1.1

ngx.req.get_method : GET

ngx.req.raw_header : GET /?a=8&b=55 HTTP/1.1 Host: 127.0.0.1:9000 Connection: keep-alive Cache-Control: max-age=0 Upgrade-Insecure-Requests: 1 User-Agent: Mozilla/5.0 (Windows NT 10.0; Win64; x64) AppleWebKit/537.36 (KHTML, like Gecko) Chrome/73.0.3683.86 Safari/537.36 Accept: text/html,application/xhtml+xml,application/xml;q=0.9,image/webp,image/apng,*/*;q=0.8,application/signed-exchange;v=b3 Accept-Encoding: gzip, deflate Accept-Language: zh-CN,zh;q=0.9 Cookie: hello=world; Heelo=Sdd

ngx.req.get_body_data() : nil

request_uri : /?a=8&b=55

decode request_uri : /?a=8&b=55

ngx.md5 : 202cb962ac59075b964b07152d234b70

ngx.http_time : Mon, 29 Apr 2019 14:53:17 GMT
Lua如何调用系统shell呢?
--调用系统命令

local t = io.popen('cat /home/www/conf/hello.lua')

local a = t:read("*all")

t:close()

ngx.say(a)
10.Lua发起Http请求
Lua发送Http请求,默认是不支持的,需要引入第三方库。也就是下方这个Github地址的两个文件:http.lua 和 http_headers.lua 。
Github:https://github.com/ledgetech/lua-resty-http/tree/master/lib/resty
流程和上方的Demo类似,不同的是,需要在你的 lua 文件中写入一行代码:
local http = require "resty.http"
启动你的 nginx ,命令同上。使用 curl 命令测试访问,查看 logs 目录下的 error.log 文件:
2019/04/30 14:23:21 [error] 7093#0: *1 lua entry thread aborted: runtime error: /home/www/conf/helloworld.lua:95: module 'resty.http' not found:

	no field package.preload['resty.http']

	no file '/usr/local/openresty/lualib/resty/http.lua'

	no file '/usr/local/openresty/lualib/resty/http/init.lua'

	no file './resty/http.lua'

	no file '/usr/local/openresty/luajit/share/luajit-2.1.0-beta1/resty/http.lua'

	no file '/usr/local/share/lua/5.1/resty/http.lua'

	no file '/usr/local/share/lua/5.1/resty/http/init.lua'

	no file '/usr/local/openresty/luajit/share/lua/5.1/resty/http.lua'

	no file '/usr/local/openresty/luajit/share/lua/5.1/resty/http/init.lua'

	no file '/usr/local/openresty/lualib/resty/http.so'

	no file './resty/http.so'

	no file '/usr/local/lib/lua/5.1/resty/http.so'

	no file '/usr/local/openresty/luajit/lib/lua/5.1/resty/http.so'

	no file '/usr/local/lib/lua/5.1/loadall.so'

	no file '/usr/local/openresty/lualib/resty.so'

	no file './resty.so'

	no file '/usr/local/lib/lua/5.1/resty.so'

	no file '/usr/local/openresty/luajit/lib/lua/5.1/resty.so'

	no file '/usr/local/lib/lua/5.1/loadall.so'
我们只需要在错误日志的第一个目录下添加上面两个http模块的lua文件即可。目录:
/usr/local/openresty/lualib/resty/
接下来就是重启你的nginx,再次访问,发现不报错了。
GET请求
local http = require "resty.http"

local function http_post_client(url, timeout)

        local httpc = http.new()

        timeout = timeout or 30000

        httpc:set_timeout(timeout)

        local res, err_ = httpc:request_uri(url, {

                method = "GET",

                headers = {

                    ["Content-Type"] = "application/x-www-form-urlencoded",

                }

        })

        httpc:set_keepalive(5000, 100)

        --httpc:close()

        return res, err_

end
POST请求
local http = require "resty.http"

local function http_post_client(url,body,timeout)

        local httpc = http.new()

        timeout = timeout or 30000

        httpc:set_timeout(timeout)

        local res, err_ = httpc:request_uri(url, {

                method = "POST",

                body = body,

                headers = {

                    ["Content-Type"] = "application/x-www-form-urlencoded",

                }

        })

        httpc:set_keepalive(5000, 100)

         httpc:close()

        if not res then

            return nil, err_

         else if res.status == 200 then

             return res.body, err_

         else

             return nil, err_ end

         end

end
Demo
--get

local resp, err = http_post_client("http://127.0.0.1/index.html?name=test",3000)

--post

local body = {"name" = "test"}

local resp, err = http_post_client("http://127.0.0.1/index.html?name=test",body,3000)
参考
https://blog.csdn.net/qq_21860077/article/details/83623888
Nginx API for Lua:https://www.cnblogs.com/wangxusummer/p/4309007.html
版权声明
【本文版权归微信公众号"代码艺术"(ID:onblog)所有,若是转载请务必保留本段原创声明,违者必究。若是文章有不足之处,欢迎关注微信公众号私信与我进行交流!】

OpenResty入门之使用Lua开发Nginx插件的更多相关文章
- OpenResty入门之使用Lua扩展Nginx
记住一点:nginx配置文件很多坑来源自你的空格少了或多了. 1.Centos下载安装 如果你的系统是 Centos 或 RedHat 可以使用以下命令: yum install readline-d ...
- 一、ESP8266入门(基于LUA开发)
序 一入坑便停不下来... 还挺有意思的哈,233,,,, 资料杂,自己一个一个去找确实浪费了不少时间,而且大多还都是英文的,需要硬着头皮看. 这次实践入门,更是对英语的重要确信无疑.Github必须 ...
- OpenResty(Nginx+Lua)开发入门
Nginx入门 本文目的是学习Nginx+Lua开发,对于Nginx基本知识可以参考如下文章: nginx启动.关闭.重启 http://www.cnblogs.com/derekchen/archi ...
- (转)OpenResty(nginx+lua) 开发入门
原文:https://blog.csdn.net/enweitech/article/details/78519398 OpenResty 官网:http://openresty.org/ Open ...
- CentOS安装OpenResty(Nginx+Lua)开发环境
一.简介 OpenResty® 是一个基于 Nginx 与 Lua 的高性能 Web 平台,其内部集成了大量精良的 Lua 库.第三方模块以及大多数的依赖项.用于方便地搭建能够处理超高并发.扩展性极高 ...
- 跟我学OpenResty(Nginx+Lua)开发目录贴 (转)
使用Nginx+Lua开发近一年的时间,学习和实践了一些Nginx+Lua开发的架构,为了让更多人使用Nginx+Lua架构开发,利用春节期间总结了一份基本的学习教程,希望对大家有用.也欢迎谈探讨学习 ...
- nginx 与 lua 开发笔记
Nginx入门 本文目的是学习Nginx+Lua开发,对于Nginx基本知识可以参考如下文章: nginx启动.关闭.重启 http://www.cnblogs.com/derekchen/archi ...
- nginx 与 lua 开发环境搭建
首先下载最新版的 相关软件 的安装文件. nginx: http://nginx.org/en/download.html LuaJIT: http://luajit.org/download.htm ...
- Nginx详解二十三:Nginx深度学习篇之Nginx+Lua开发环境搭建
Nginx+Lua开发环境 1.下载LuaJIT解释器wget http://luajit.org/download/LuaJIT-2.0.2.tar.gztar -zxvf LuaJIT-2.0.2 ...
随机推荐
- Win10企业版远程桌面结合frp实现公网远程
Win10企业版远程桌面结合frp实现公网远程 前言 由于经常下班后还要处理问题,但是又没有运维那么频繁,就不想天天背着电脑来回跑,刚开始用的teamviewer,后来被商业劝退了(就是不让用了,让买 ...
- S32K142学习记录_SDK手动导入
这几天和一位工程师讨论ADC+PDB学到了很多,当然很多的时候都是我在听, 毕竟新手,顺便其中提出自己的疑问,讨论会让你学到很多 有空会将讨论整理出来 因为demo板还没有到,只能看着大佬的程序对着手 ...
- 基于 kubeadm 搭建高可用的kubernetes 1.18.2 (k8s)集群二 搭建高可用集群
1. 部署keepalived - apiserver高可用(任选两个master节点) 1.1 安装keepalived # 在两个主节点上安装keepalived(一主一备) $ yum inst ...
- [COCOS2DX-LUA]0-003.根据COCOS2DX热更新
一.最近有需求就是要基于COCOS2DX-LUA进行游戏的增量更新,找了资料,发现了COCOS2DX有自带一个热更新的类,就是AssetsManager,但是该接口对于我来说有以下的缺陷 1.版本号在 ...
- Parrot os安装nvidia失败恢复
因为两种显卡,amd和nvidia,所以按照parrot官方文档安装驱动,结果可想而知,安装失败--- 内心万马奔腾,去国外论坛也发现很多求助的小伙伴,所以有了我这次随笔,如何恢复你的parrot 黑 ...
- 【MetaPruning】2019-ICCV-MetaPruning Meta Learning for Automatic Neural Network Channel Pruning-论文阅读
MetaPruning 2019-ICCV-MetaPruning Meta Learning for Automatic Neural Network Channel Pruning Zechun ...
- Rocket - decode - 解码单个信号
https://mp.weixin.qq.com/s/0D_NaeBEZX5LBQRdCz2seQ 介绍解码单个信号逻辑的实现. 1. 单个信号 每个指令对应了一组信号,每个信号对应 ...
- Spring Boot笔记(一) springboot 集成 swagger-ui
个人博客网:https://wushaopei.github.io/ (你想要这里多有) 1.添加依赖 <!--SpringBoot整合Swagger-ui--> <depen ...
- webpack+vue2.0项目 (二)热加载,vue-router
目录创建好之后,命令行输入 npm run dev 因为在配置文件config/index.js里: dev: { env: require('./dev.env'), port: 8080, aut ...
- Java实现 蓝桥杯 算法训练 Rotatable Number(暴力)
试题 算法训练 Rotatable Number 资源限制 时间限制:1.0s 内存限制:256.0MB 问题描述 Bike是个十分喜欢数学的聪明孩子.他发明了"可旋转数",其灵感 ...