Bitmap对图像的处理
p { margin-bottom: 0.1in; line-height: 120% }
a:link { }
Bitmap对图像的处理
一、引言:
在开发中涉及到图片包括.png,.gif,.9.png,.jpg,Drawable系对象,以及位图Bitmap,那么Bitmap是一个什么角色,如下将做一个详细介绍.
二、Bitmap概述
bitmap(位图图像), 亦称为点阵图像或绘制图像,是由称作像素(图片元素)的单个点组成的.扩展名可以是.bmp或者.dib。它将图像定义为由点(像素)组成,每个点可以由多种色彩表示,包括2、4、8、16、24和32位色彩。例如,一幅1024×768分辨率的32位真彩图片,其所占存储字节数为:1024×768×32/8=3072KB,虽然位图文件图像效果好,但是非压缩格式的,需要占用较大存储空间,不利于在网络上传送Android系统当中,Bitmap是图像处理最重要的中转类之一。用它可以获取图像信息,借助Matrix对图像进行剪切、旋转、缩放等操作,同时还可以指定格式和压缩质量保存图像文件。
三、构造Bitmap对象
Bitmap继承Parcelable,实现在android.graphics包中,是一个可以跨进程传输的对象。但是Bitmap类的构造函数是私有的,外面并不能实例化,只能是通过JNI实例化。Android中Bitmap是采用了工厂的设计模式进行获取此对象.
1、Bitmap静态方法static Bitmap createBitmap()系
public static Bitmap createScaledBitmap(@NonNull Bitmap src, int dstWidth, int dstHeight,boolean filter)//对源位图src缩放成宽为w,高为h的新位图
public static Bitmap createBitmap(@NonNull Bitmap source, int x, int y, int width, int height,@Nullable Matrix m, boolean filter)//从源位图src的指定坐标(x,y)开始,截取宽w,高h的部分,按照Matrix变换创建新的位图对象
public static Bitmap createBitmap(@Nullable DisplayMetrics display, int width, int height,@NonNull Config config, boolean hasAlpha, @NonNull ColorSpace colorSpace) //从原位图获取到一个密度变化的bitmap
2、通过BitmapFactory工厂类的static Bitmap decodeXxx()系
decodeByteArray(byte[] data, int offset, int length) 从指定字节数组的offset位置开始,将长度为length的数据解析成位图
decodeFile(String pathName) 从pathName对应的文件解析成的位图对象
decodeFileDescriptor(FileDescriptor fd) 从FileDescriptor中解析成的位图对象
decodeResource(Resource res,int id) 根据给定的资源Id解析成位图
decodeStream(InputStream in) 把输入流解析成位图
三、Bitmap和Matrix一起使用
以下通过具体例子简单做以介绍.
Activity如下:
 package com.example.mytest;

 import android.os.Bundle;
 import android.app.Activity;
 import android.graphics.Bitmap;
 import android.graphics.BitmapFactory;
 import android.graphics.Matrix;
 import android.util.Log;
 import android.view.Menu;
 import android.view.View;
 import android.view.View.OnClickListener;
 import android.widget.Button;
 import android.widget.ImageView;
 import android.widget.TextView;
 import android.widget.Toast;

 public class MainActivity extends Activity {
      private ImageView mImageView0;
      private ImageView mImageView1;
      private ImageView mImageView2;
      private ImageView mImageView3;
      private ImageView mImageView4;
      private ImageView mImageView5;
      private TextView mTextView;
      private Button left,right;
     @Override
     protected void onCreate(Bundle savedInstanceState) {
         super.onCreate(savedInstanceState);
         setContentView(R.layout.activity_main);
         mImageView0 = (ImageView)findViewById(R.id.image0);
         mImageView1 = (ImageView)findViewById(R.id.image1);
         mImageView2 = (ImageView)findViewById(R.id.image2);
         mImageView3 = (ImageView)findViewById(R.id.image3);
         mImageView4 = (ImageView)findViewById(R.id.image4);
         mImageView5 = (ImageView)findViewById(R.id.image5);
         mTextView = (TextView)findViewById(R.id.textview);
         left=(Button)findViewById(R.id.left);
         left.setText("左边");
         right=(Button)findViewById(R.id.right);
         right.setText("右边");
         final Bitmap bmp1=BitmapFactory.decodeResource(getResources(), R.drawable.ic_launcher1); //resources资源里
         final int width=bmp1.getWidth();
         final int height=bmp1.getHeight();
         Log.d("TEST"," width: "+ width +"  height: "+height);
         mImageView1.setImageBitmap(bmp1);//通过Bitmap将图片放入ImageView中显示出来

           //缩小为原来一半
          Matrix matrix = new Matrix();
          matrix.setScale(0.5f, 0.5f);//缩小
          Bitmap bmp2 = Bitmap.createBitmap(bmp1, 0, 0, bmp1.getWidth(),
                 bmp1.getHeight(), matrix, true);
          mImageView2.setImageBitmap(bmp2);
          //旋转
          matrix.postRotate(45.0f);// 旋转45度 == matrix.setSinCos(0.5f, 0.5f);
          Bitmap bmp3 = Bitmap.createBitmap(bmp1, 0, 0, bmp1.getWidth(),
                     bmp1.getHeight(), matrix, true);
          mImageView3.setImageBitmap(bmp3);
          //平移
          Matrix matrix1 = new Matrix();
          matrix1.setTranslate(bmp1.getWidth()*30, bmp1.getHeight()*30);// 向左下平移
          Bitmap bmp4 = Bitmap.createBitmap(bmp1, 0, 0, bmp1.getWidth(),
                     bmp1.getHeight(), matrix1, true);
          mImageView4.setImageBitmap(bmp4);

          //斜切
          Matrix matrix2 = new Matrix();
          matrix2.setSkew(0.5f, 0.5f);// 斜切
          matrix2.postScale(0.5f, 0.5f);// 缩小为原来的一半
          Bitmap bmp5 = Bitmap.createBitmap(bmp1, 0, 0, bmp1.getWidth(),
                  bmp1.getHeight(), matrix2, true);
          mImageView5.setImageBitmap(bmp5);
         /**
          * 缩小
          */
         left.setOnClickListener(new OnClickListener(){
              @Override
              public void onClick(View v) {
                  Matrix matrix = new Matrix();
                  matrix.setScale(0.5f, 0.5f);
                  Bitmap bmp5 = Bitmap.createBitmap(bmp1, 0, 0, bmp1.getWidth(),
                          bmp1.getHeight(), matrix, true);
                  mImageView3.setImageBitmap(bmp5);
                  showToast(matrix);
              }
         });

     }
     void showToast(Matrix matrix) {
         String string = "";
         float[] values = new float[9];
         matrix.getValues(values);
         for (int i = 0; i < values.length; i++) {
             string += "matrix.at" + i + "=" + values[i];
         }
         Toast.makeText(this, string, Toast. LENGTH_LONG).show();
         Log.d("TEST"," showToast:" + string);
     }
     @Override
     public boolean onCreateOptionsMenu(Menu menu) {
         // Inflate the menu; this adds items to the action bar if it is present.
         getMenuInflater().inflate(R.menu.activity_main, menu);
         return true;
     }

 }
布局文件如下:
 <LinearLayout xmlns:android="http://schemas.android.com/apk/res/android"
     xmlns:tools="http://schemas.android.com/tools"
     android:layout_width="match_parent"
     android:layout_height="match_parent"
     android:orientation="vertical"
     tools:context=".MainActivity" >

    <TextView
         android:id="@+id/textview"
         android:layout_width="wrap_content"
         android:layout_height="wrap_content"
         android:text="@string/hello_world" />
    <Button
     android:id="@+id/left"
     android:layout_width="fill_parent"
     android:layout_height="wrap_content"
     />
     <Button
     android:id="@+id/right"
     android:layout_width="fill_parent"
     android:layout_height="wrap_content"
     />
     <ImageView
     android:id="@+id/image0"
     android:layout_width="wrap_content"
     android:layout_height="wrap_content"
     android:layout_gravity="center"
     android:scaleType="centerInside"
     android:src="@drawable/btn_fm_list_favorite_on"
     />
     <ImageView
     android:id="@+id/image1"
     android:layout_width="wrap_content"
     android:layout_height="wrap_content"
     android:layout_gravity="center"
     android:scaleType="centerInside"
     android:src="@drawable/btn_fm_list_favorite_on"
     />
      <ImageView
     android:id="@+id/image2"
     android:layout_width="wrap_content"
     android:layout_height="wrap_content"
     android:layout_gravity="center"
     android:scaleType="centerInside"
     android:src="@drawable/btn_fm_list_favorite_on"
     />
     <ImageView
     android:id="@+id/image3"
     android:layout_width="wrap_content"
     android:layout_height="wrap_content"
     android:layout_gravity="center"
     android:scaleType="centerInside"
     android:src="@drawable/btn_fm_list_favorite_on"
     />
    <ImageView
     android:id="@+id/image4"
     android:layout_width="wrap_content"
     android:layout_height="wrap_content"
     android:layout_gravity="center"
     android:scaleType="centerInside"
     android:src="@drawable/btn_fm_list_favorite_on"
     />
     <ImageView
     android:id="@+id/image5"
     android:layout_width="wrap_content"
     android:layout_height="wrap_content"
     android:layout_gravity="center"
     android:scaleType="centerInside"
     android:src="@drawable/btn_fm_list_favorite_on"
     />
 </LinearLayout>
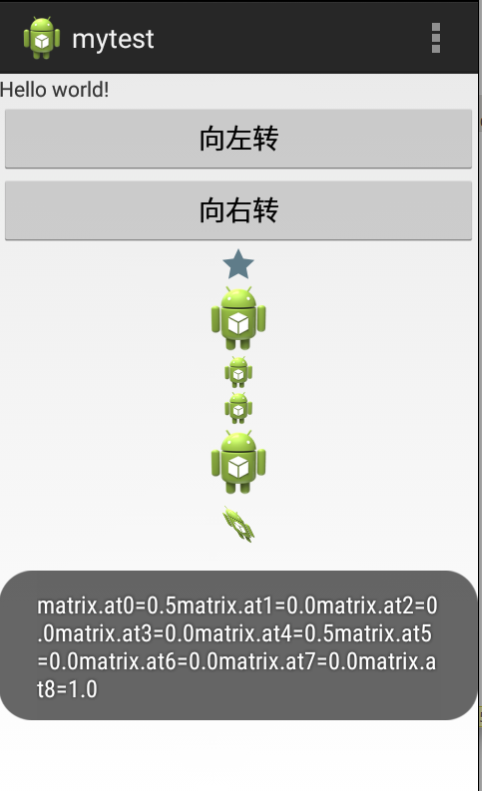
验证截图如下(由于此处仅作功能,UI美观没太在意,请勿喷,后续改进.)

其中从上到下的布局第一个是取自资源的图片显示,第二个是通过Bitmap将图片放入mImageView1显示出来.根据代码可以依次进行递推看.
问题点:对于平移的不知是平移数太小,还是没有起作用,图片看不出来.本地做了多次调整肉眼没看出来有变化.
如有问题请多指教,以及功能讨论.谢谢.
Bitmap对图像的处理的更多相关文章
- bitmap的图像像素遍历方法
public class FastBitmap { BitmapData bitmapData; public FastBitmap(Bitmap bitmap) { ,,bitmap.Width,b ...
- Asp.net Image控件显示Bitmap生成图像
from:https://blog.csdn.net/qq_29011299/article/details/81137980 using(Bitmap bmp=new Bitmap(300,50)) ...
- Bitmap 图像灰度变换原理浅析
上篇文章<拥抱 C/C++ : Android JNI 的使用>里提到调用 native 方法直接修改 bitmap 像素缓冲区,从而实现将彩色图片显示为灰度图片的方法.这篇文章将介绍该操 ...
- [ActionScript 3.0] AS3.0 将图像的Alpha通道转换为黑白图像(分离ARGB方式)
import flash.display.BitmapData; import flash.display.Bitmap; /** * 将图像的Alpha通道转换为黑白图像(分离ARGB方式) */ ...
- Android图像处理之Bitmap类
Bitmap是Android系统中的图像处理的最重要类之一.用它可以获取图像文件信息,进行图像剪切.旋转.缩放等操作,并可以指定格式保存图像文件.本文从应用的角度,着重介绍怎么用Bitmap来实现 ...
- Android开发之高效加载Bitmap
一.概述 在Android开发中,我们经常与Bitmap打交道,而对Bitmap的不恰当的操作经常会导致OOM(Out of Memory).这篇文章我们会介绍如何高效地在Android开发中使用Bi ...
- Android图像处理之Bitmap类(zz)
Bitmap是Android系统中的图像处理的最重要类之一.用它可以获取图像文件信息,进行图像剪切.旋转.缩放等操作,并可以指定格式保存图像文件.本文从应用的角度,着重介绍怎么用Bitmap来实现这些 ...
- Android应用程序开发之图片操作(一)——Bitmap,surfaceview,imageview,Canvas
Android应用程序开发之图片操作(一)——Bitmap,surfaceview,imageview,Canvas 1,Bitmap对象的获取 首先说一下Bitmap,Bitmap是Androi ...
- 将银行读卡设备读取到的身份证头像Bitmap属性转换成路径
需求是这样的,在项目开发的时候要求读取身份证,读到身份证的所有信息(信息里面包括头像属性,类型是Bitmap的).然后服务器要求我传过去的头像信息是String类型的Uri路径. 这是读卡器读到的身份 ...
随机推荐
- Android Hal 分析
本文是基于android4.0.3.对应其他低版本的代码,可能有所差异,但基本大同小异. Android的HAL是为了保护一些硬件提供商的知识产权而提出的,是为了避开linux的GPL束缚.思路是把控 ...
- 利用JQuery直接调用asp.net后台方法
利用JQuery的$.ajax()可以很方便的调用asp.net的后台方法. [WebMethod] 命名空间 1.无参数的方法调用, 注意:1.方法一定要静态方法,而且要有[WebMethod] ...
- 苹果新的编程语言 Swift 语言进阶(十六)--泛型
泛型允许你定义一个宽松.可重用的函数或者类型,使用泛型能够避免代码的重复,也能以更清楚和抽象的方式来表达程序的意图. 泛型是Swift语言提供的强大功能之一,Swift提供的许多标准库都使用了泛型来创 ...
- C++容器学习,与结构体排序和set来一场邂逅
最近学习C++容器,积累一下.下面介绍set和multiset,并使用sort对结构体进行排序.C++之路漫漫其修远兮! 一.对结构体进行排序 // sort_struct.cpp : 定义控制台应用 ...
- Android BLE与终端通信(四)——实现服务器与客户端即时通讯功能
Android BLE与终端通信(四)--实现服务器与客户端即时通讯功能 前面几篇一直在讲一些基础,其实说实话,蓝牙主要为多的还是一些概念性的东西,当你把概念都熟悉了之后,你会很简单的就可以实现一些逻 ...
- Android ViewPager和Slidingmenu手势冲突问题
尊重原创: http://blog.csdn.net/sk719887916/article/details/40043961 skay 想必大家都遇到过手势和焦点的问题 对于安卓初学者或者初次 ...
- java--jdk api中其他对象(System,Runtime,Calendar,Math,Random,Date)
转载请申明出处:http://blog.csdn.net/xmxkf/article/details/9796729 day18-01-其他对象(System) SystemDemo java.lan ...
- iPhone实现自定义多选列表
好久没更新博客了,今天写了一个自定义的多选列表,可以跟爱学习的各位进行分享,首先我们先来看一下效果图: 一般大家都是用UITableView自己的编辑模式来实现CheckBox的,这里我们用自定义Ce ...
- IOS中UITextView(多行文本框)控件的简单用法
1.创建并初始化 UITextView文本视图相比与UITextField直观的区别就是UITextView可以输入多行文字并且可以滚动显示浏览全文.UITextField的用处多,UITextVie ...
- ADT Android开发环境搭建小记
1.之前因为产品方向原因,Android开发暂时搁浅,最近重新启动,SDK Manager.exe不能启动的话用启动\sdk\tools\adroid.bat即可启动SDK Manager.exe 2 ...
