spring+springmvc+mybatis构建系统
今天和大家分享的是spring+springmvc+mybatis搭建框架的例子,说到这里不得不说现在市面上一流大公司还有很多用这种架子,创业型公司大部分都用springboot集成的mvc+mybatis来构建应用,形成了两种“趋势”没有统一;因此在后面会有一章springboot+mybatis构建系统的文章,希望多多支持。
- mybatis-generator逆向工程生成实体和配置文件
- spring+springmvc+mybatis一系列配置
- 访问静态资源的两种配置方式
- 引入事物注解
- 打成war包部署到tomcat
mybatis-generator逆向工程生成实体和配置文件
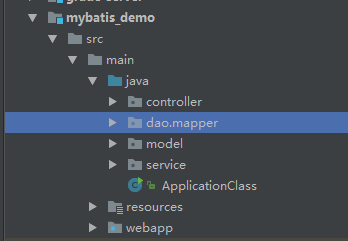
java项目中mybatis很常用,要说靠手动来配置实体,映射文件那可繁琐了,为此有了快速生成实体和mapper文件的generator工具;首先我们新建项目,初始化项目结构如:
然后创建名称mybatis-generator.xml的配置文件,里面内容如下:
<?xml version="1.0" encoding="UTF-8"?>
<!DOCTYPE generatorConfiguration PUBLIC "-//mybatis.org//DTD MyBatis Generator Configuration 1.0//EN"
"http://mybatis.org/dtd/mybatis-generator-config_1_0.dtd">
<generatorConfiguration>
<!--引入数据源-->
<!--<properties resource="classpath:application.properties"/>-->
<!--<properties url="D:\my_study\study_java\springcloud_demo\mybatis_demo\src\main\resources\application.properties"/>-->
<context id="DB2Tables" targetRuntime="MyBatis3">
<!--自动实现Serializable接口-->
<plugin type="org.mybatis.generator.plugins.SerializablePlugin"></plugin>
<!-- 去除自动生成的注释 -->
<commentGenerator>
<property name="suppressAllComments" value="true"/>
<property name="suppressDate" value="true"/>
</commentGenerator>
<!--数据库基本信息-->
<jdbcConnection driverClass="com.mysql.jdbc.Driver"
connectionURL="jdbc:mysql://119.111.111.111:3306/shenniu003_db"
userId="root"
password="root">
</jdbcConnection>
<javaTypeResolver>
<property name="forceBigDecimals" value="false"/>
</javaTypeResolver>
<!--生成实体类的位置以及包的名字-->
<javaModelGenerator targetPackage="model" targetProject="src\main\java">
<property name="enableSubPackages" value="true"/>
<property name="trimStrings" value="true"/>
</javaModelGenerator>
<!--生成map的位置-->
<sqlMapGenerator targetPackage="dao.mapper.xml" targetProject="src\main\java">
<property name="enableSubPackages" value="true"/>
</sqlMapGenerator>
<!--生成Dao类存放位置-->
<javaClientGenerator type="XMLMAPPER" targetPackage="dao.mapper" targetProject="src\main\java">
<property name="enableSubPackages" value="true"/>
</javaClientGenerator> <!--<!–对应的表名,以及实体名–>-->
<table tableName="StoreUser" enableCountByExample="false" enableDeleteByExample="false" enableSelectByExample="false"
enableUpdateByExample="false" >
</table>
</context>
</generatorConfiguration>
具体节点表示的作用请看备注信息,当有了配置文件我们有两种方式可以执行通过这个xml配置来生成mapper等文件,mvn是java开发很好的一种工具,这里也使用mvn来运行这个配置工具,仅仅需要在pom.xml中如下配置:
       <!--代码生成器-->

                 <plugin>

                     <groupId>org.mybatis.generator</groupId>

                     <artifactId>mybatis-generator-maven-plugin</artifactId>

                     <version>1.3.</version>

                     <dependencies>

                         <dependency>

                             <groupId>mysql</groupId>

                             <artifactId>mysql-connector-java</artifactId>

                             <version>5.1.</version>

                         </dependency>

                         <dependency>

                             <groupId>org.mybatis.generator</groupId>

                             <artifactId>mybatis-generator-core</artifactId>

                             <version>1.3.</version>

                         </dependency>

                     </dependencies>

                     <!--作为DOM对象的配置-->

                     <configuration>

                         <!--允许移动生成的文件-->

                         <verbose>true</verbose>

                         <!--是否覆盖-->

                         <overwrite>true</overwrite>

                         <!--自动生成的配置-->

                         <configurationFile>

                             ${basedir}/src/main/resources/mybatis-generator.xml

                         </configurationFile>

                     </configuration>

                 </plugin>
通过mvn的mybatis-generator-maven-plugin插件来运行生成,当配置完成mvn后,我们能在idea中的mvn管理器中看到如下选项:
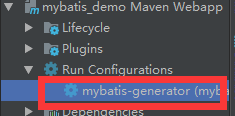
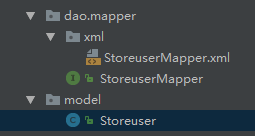
双击运行即可,只要数据库连接没问题,就能正常生成文件:
spring+springmvc+mybatis一系列配置
要说这个ssm已经流行了很多年了,大公司也还在继续使用它,小型创业公司估计都往springboot上去靠了,因为springboot集成了很多东西带来了很多便利;上家公司的某java中级工程师都还没用过springboot,真让人吃惊;在resources目录中创建一个spring的文件夹,里面分别存放3个文件:spring-web.xml,spring-service.xml,spring-dao.xml;代码以此如下,spring-web.xml:
 <?xml version="1.0" encoding="UTF-8"?>

 <beans xmlns="http://www.springframework.org/schema/beans"

        xmlns:xsi="http://www.w3.org/2001/XMLSchema-instance" xmlns:mvc="http://www.springframework.org/schema/mvc"

        xmlns:context="http://www.springframework.org/schema/context"

        xsi:schemaLocation="http://www.springframework.org/schema/beans http://www.springframework.org/schema/beans/spring-beans.xsd http://www.springframework.org/schema/mvc http://www.springframework.org/schema/mvc/spring-mvc.xsd http://www.springframework.org/schema/context http://www.springframework.org/schema/context/spring-context.xsd">

     <!--配置spring mvc-->

     <!--开启springmvc注解模式 xml,json的默认读写支持-->

     <mvc:annotation-driven/>

     <!--默认servlet配置静态资源-->

     <mvc:default-servlet-handler/>

     <!--配置JSP 显示ViewResolver-->

     <bean class="org.springframework.web.servlet.view.InternalResourceViewResolver">

         <property name="viewClass" value="org.springframework.web.servlet.view.JstlView"/>

         <property name="prefix" value="/WEB-INF/view/"/>

         <property name="suffix" value=".jsp"/>

     </bean>

     <!--扫描web相关的bean-->

     <context:component-scan base-package="controller"/>

     <!--指定静态资源映射-->

     <!--<mvc:resources mapping="/**/*.js" location="/"/>-->

 </beans>
spring-service.xml:
 <?xml version="1.0" encoding="UTF-8"?>

 <beans xmlns="http://www.springframework.org/schema/beans"

        xmlns:xsi="http://www.w3.org/2001/XMLSchema-instance"

        xmlns:context="http://www.springframework.org/schema/context" xmlns:tx="http://www.springframework.org/schema/tx"

        xsi:schemaLocation="http://www.springframework.org/schema/beans http://www.springframework.org/schema/beans/spring-beans.xsd http://www.springframework.org/schema/context http://www.springframework.org/schema/context/spring-context.xsd http://www.springframework.org/schema/tx http://www.springframework.org/schema/tx/spring-tx.xsd">

     <!--扫描service包下所有使用注解的类型-->

     <context:component-scan base-package="service"/>

     <!--配置事务管理器-->

     <bean id="transactionManager" class="org.springframework.jdbc.datasource.DataSourceTransactionManager">

         <!--注入数据库连接池-->

         <property name="dataSource" ref="dataSource"/>

     </bean>

     <!--配置基于注解的声明式事务

     默认使用注解来管理事务行为-->

     <tx:annotation-driven transaction-manager="transactionManager"/>

 </beans>
spring-dao.xml:
<?xml version="1.0" encoding="UTF-8"?>
<beans xmlns="http://www.springframework.org/schema/beans"
xmlns:xsi="http://www.w3.org/2001/XMLSchema-instance"
xmlns:context="http://www.springframework.org/schema/context" xmlns:tx="http://www.springframework.org/schema/tx"
xsi:schemaLocation="http://www.springframework.org/schema/beans http://www.springframework.org/schema/beans/spring-beans.xsd http://www.springframework.org/schema/context http://www.springframework.org/schema/context/spring-context.xsd http://www.springframework.org/schema/tx http://www.springframework.org/schema/tx/spring-tx.xsd">
<!--数据库参数-->
<!--<context:property-placeholder location="classpath:application.properties"/>-->
<bean id="propertyConfigurer"

          class="org.springframework.beans.factory.config.PropertyPlaceholderConfigurer">

        <property name="location" value="classpath:application.properties" />

</bean> <!--数据库连接池-->
<bean id="dataSource" class="org.apache.commons.dbcp.BasicDataSource"
destroy-method="close">
<!--配置连接池属性-->
<property name="driverClassName" value="${driver}" />
<property name="url" value="${url}" />
<property name="username" value="${username}" />
<property name="password" value="${password}" />
</bean> <!--SqlSessionFactory对象-->
<bean id="sqlSessionFactory" class="org.mybatis.spring.SqlSessionFactoryBean">
<!--往下才是mybatis和spring真正整合的配置-->
<!--注入数据库连接池-->
<property name="dataSource" ref="dataSource"/>
<!--配置mybatis全局配置文件:mybatis-config.xml-->
<property name="configLocation" value="classpath:mybatis-config.xml"/>
<!--扫描sql配置文件:mapper需要的xml文件-->
<property name="mapperLocations" value="classpath*:dao/mapper/xml/*.xml"/>
</bean> <!--配置扫描Dao接口包,注入到spring容器-->
<bean class="org.mybatis.spring.mapper.MapperScannerConfigurer">
<!--注入SqlSessionFactory-->
<property name="sqlSessionFactoryBeanName" value="sqlSessionFactory"/>
<!-- 给出需要扫描的Dao接口-->
<property name="basePackage" value="dao"/>
</bean> <!--<!– 配置Spring的事务管理器 –>-->
<!--<bean id="transactionManager" class="org.springframework.jdbc.datasource.DataSourceTransactionManager">-->
<!--<property name="dataSource" ref="dataSource" />-->
<!--</bean>--> <!--<!– 注解方式配置事物 Service支持Transiactional –>-->
<!--<tx:annotation-driven transaction-manager="transactionManager" />-->
</beans>
spring-dao.xml里面涉及到了数据库连接,这里通过property引入一个数据库连接串配置文件:
<bean id="propertyConfigurer"
class="org.springframework.beans.factory.config.PropertyPlaceholderConfigurer">
<property name="location" value="classpath:application.properties" />
</bean>
application.properties配置文件内容如:
driver=com.mysql.jdbc.Driver

url=jdbc:mysql://119.111.1111.111:3306/shenniu003_db

username=root

password=.
需要注意的dao.xml中有对前面生成的mybatis实体和mapper扫描操作,具体看配置信息;这里我还分离出了一个mybatis-config.xml,主要是mybatis全局配置信息,mybatis-config.xml:
 <?xml version="1.0" encoding="UTF-8" ?>

 <!DOCTYPE configuration

         PUBLIC "-//mybatis.org//DTD Config 3.0//EN"

         "http://mybatis.org/dtd/mybatis-3-config.dtd">

 <configuration>

     <!--配置全局属性-->

     <settings>

         <!--使用jdbc的getGeneratekeys获取自增主键值-->

         <setting name="useGeneratedKeys" value="true"/>

         <!--使用列别名替换列名  默认值为true-->

         <setting name="useColumnLabel" value="true"/>

         <!--开启驼峰命名转换Table:create_time到 实体的createTime-->

         <setting name="mapUnderscoreToCamelCase" value="true"/>

     </settings>

 </configuration>
配置spring一系列文件后,需要有一个入口吧这些文件在程序启动的时候加载,因此需要在web.xml中如下配置:
 <!DOCTYPE web-app PUBLIC

  "-//Sun Microsystems, Inc.//DTD Web Application 2.3//EN"

  "http://java.sun.com/dtd/web-app_2_3.dtd" >

 <!--重点:这里webapp不替换将无法在jsp页面上使用jstl语法(网页直接把标签输出来了)-->

 <!--<web-app>-->

 <web-app version="3.0" xmlns="http://java.sun.com/xml/ns/javaee"

          xmlns:xsi="http://www.w3.org/2001/XMLSchema-instance"

          xsi:schemaLocation="http://java.sun.com/xml/ns/javaee

     http://java.sun.com/xml/ns/javaee/web-app_3_0.xsd">

   <display-name>Archetype Created Web Application</display-name>

   <!--配置DispatcherServlet-->

   <servlet>

     <servlet-name>dispatcherServlet</servlet-name>

     <servlet-class>org.springframework.web.servlet.DispatcherServlet</servlet-class>

     <!-- 配置SpringMVC 需要配置的文件   -->

     <init-param>

       <param-name>contextConfigLocation</param-name>

       <param-value>classpath:spring/spring-*.xml</param-value>

     </init-param>

   </servlet>

   <servlet-mapping>

     <servlet-name>dispatcherServlet</servlet-name>

     <!--默认匹配所有请求-->

     <url-pattern>/</url-pattern>

   </servlet-mapping>

   <welcome-file-list>

     <welcome-file>/index.html</welcome-file>

   </welcome-file-list>

 </web-app>
这里需要注意默认idea生成的web.xml中的web-app节点没有schema引入,如果webapp不替换将无法在jsp页面上使用jstl语法,这需要特别注意;
配置访问静态资源的两种配置方式
由于采用的是mvc方式,因此映射使用dispatcherServlet来做适配,但是路由/拦截了对静态资源的访问,因此需要单独处理下,有两种方式:
1.可以在spring-web.xml中配置默认servlet适配:
 <!--默认servlet配置静态资源-->

 <mvc:default-servlet-handler/>
2.直接通过mvc:resources引入资源:
 <!--指定静态资源映射-->

 <mvc:resources mapping="/**/*.js" location="/"/>
引入事物注解
要使用事物,需要在spring-service.xml配置事物注解方式(这里也可以通过切点方式):
 <!--配置基于注解的声明式事务-->

 <tx:annotation-driven transaction-manager="transactionManager"/>
有了上面配置后,就可以在代码的service层通过 @Transactional(isolation = Isolation.DEFAULT) 注解引入事物并可选事物隔离机制(本篇忽略)
打成war部署到tomcat
对于java项目部署来说tomcat还是常用的容器,我们要把ssm工程打包成war包,需要在mvn中build节点中如下配置(注:本次项目mybatis的mapper文件存放目录不同,因此打包时需要包含下):
 <!--加载非资源目录的配置文件-->

         <resources>

             <resource>

                 <directory>src/main/java</directory>

                 <includes>

                     <include>dao/mapper/xml/*.xml</include>

                     <include>**/*.xml</include>

                     <include>**/*.properties</include>

                 </includes>

                 <excludes>

                     <exclude>**/*-generator.xml</exclude>

                 </excludes>

                 <filtering>false</filtering>

             </resource>

         </resources>
由于我工程创建时候没有main入口,因此在打包时候是不会成功的,我们需要通过手动添加一个如下main入口class:
 public class ApplicationClass {

     public static void main(String[] args) {

     }

 }
然后通过mvn的package命令即可打包成功,成功信息如:
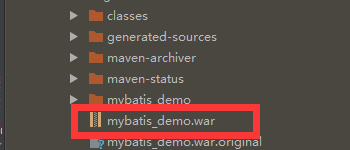
把war包拷贝到tomcat的webapps目录,会自行解压;本篇分享内容就这么多,希望能对你有好的帮助,不放点个“赞”。
spring+springmvc+mybatis构建系统的更多相关文章
- 基于Spring+SpringMVC+Mybatis的Web系统搭建
系统搭建的配置大同小异,本文在前人的基础上做了些许的改动,重写数据库,增加依据权限的动态菜单的实现,也增加了后台返回json格式数据的配置,详细参见完整源码. 主要的后端架构:Spring+Sprin ...
- 用IntelliJ IDEA 开发Spring+SpringMVC+Mybatis框架 分步搭建二:配置MyBatis 并测试(1 构建目录环境和依赖)
引言:在用IntelliJ IDEA 开发Spring+SpringMVC+Mybatis框架 分步搭建一 的基础上 继续进行项目搭建 该部分的主要目的是测通MyBatis 及Spring-dao ...
- Spring+SpringMVC+Mybatis+MAVEN+Eclipse+项目完整环境搭建
1.新建一个Maven项目,创建父项目. 2.创建子项目模块 3.创建javaWeb项目 4.创建后的项目目录结构 5.Maven文件配置 parent父项目pom.xml文件配置 <?xml ...
- Spring+SpringMVC+MyBatis+LogBack+C3P0+Maven+Git小结(转)
摘要 出于兴趣,想要搭建一个自己的小站点,目前正在积极的准备环境,利用Spring+SpringMVC+MyBatis+LogBack+C3P0+Maven+Git,这里总结下最近遇到的一些问题及解决 ...
- Spring+SpringMVC+MyBatis+easyUI整合基础篇(二)牛刀小试
承接上文,该篇即为项目整合的介绍了. 废话不多说,先把源码和项目地址放上来,重点要写在前面. github地址为ssm-demo 你也可以先体验一下实际效果,点击这里就行啦 账号:admin 密码:1 ...
- Spring+SpringMVC+MyBatis+easyUI整合基础篇(三)搭建步骤
框架介绍: 主角即Spring.SpringMVC.MyBatis.easyUI,大家应该也都有所了解,概念性的东西就不写了,有万能的百度. 工作环境: jdk 1.7 m ...
- Spring+SpringMVC+MyBatis+easyUI整合优化篇(二)Log4j讲解与整合
日常啰嗦 上一篇文章主要讲述了一下syso和Log间的一些区别与比较,重点是在项目的日志功能上,因此,承接前文<Spring+SpringMVC+MyBatis+easyUI整合优化篇(一)Sy ...
- Spring+SpringMVC+MyBatis+easyUI整合优化篇(七)图片上传功能
日常啰嗦 前一篇文章<Spring+SpringMVC+MyBatis+easyUI整合优化篇(六)easyUI与富文本编辑器UEditor整合>讲了富文本编辑器UEditor的整合与使用 ...
- javaweb项目-医者天下 (Spring+SpringMVC+MyBatis)
项目下载地址:http://download.csdn.net/detail/qq_33599520/9826683 项目完整结构图: 项目简介: 医者天下项目是一个基于Spring+SpringMV ...
随机推荐
- Java进阶(八)Java加密技术之对称加密 非对称加密 不可逆加密算法
对称加密 非对称加密 不可逆加密算法 根据密钥类型不同可以将现代密码技术分为两类:对称加密算法(私钥密码体系)和非对称加密算法(公钥密码体系). 1 对称加密算法 原理 对称加密算法中,数据加密和解密 ...
- VS2008中开发手持终端程序(PDA软件)总结
VS2008中开发手持终端程序(PDA手机软件)的项目总结 1程序结构 程序中包括四个部分: 1.系统配置 这个部分用来配置系统中的相关参数,参数包括数据库信息和串口的配置信息.这部分的主要技术是XM ...
- Android For JNI(三)——C的指针,指针变量,指针常见错误,值传递,引用传递,返回多个值
Android For JNI(三)--C的指针,指针变量,指针常见错误,值传递,引用传递,返回多个值 C中比较难的这一块,大概就是指针了,所以大家还是多翻阅一下资料,当然,如果只是想了解一下,看本篇 ...
- cygwin 下安装python MySQLdb
cygwin 下安装python MySQLdb 1) cygwin 更新 运行 cygwin/setup-x86_64.exe a 输入mysql,选择下面的包安装: libmysqlclient- ...
- 【一天一道LeetCode】#15 3Sum
一天一道LeetCode系列 (一)题目 Given an array S of n integers, are there elements a, b, c in S such that a + b ...
- 使用 Linux 的 strace 命令跟踪/调试程序的常用选项
原文:http://linoxide.com/linux-command/linux-strace-command-examples/作者: Raghu 在调试的时候,strace能帮助你追踪到一个程 ...
- Git错误一例
Bitbucket一直不稳定,push, pull经常失效.幸好还有goagent可以用. 把git的全局配置改为走goagent代理,可以正常使用: [http] proxy = http://12 ...
- DES
本文对DES的介绍部分摘自博文DES加密算法的C++实现,具体实现则由自己完成. 另外,DES的官方文档链接见这里,在维基百科上也有比较详细的介绍.不过,DES已经被证明是不安全的(可见于RSA公司 ...
- 【LaTeX排版】LaTeX使用--入门基础<二>
1.在命令之后留一个空格有下列方式: 源文件如下: \documentclass[a4paper,12pt]{book}%采用book类型(中篇论文一般采用这种类型),A4纸,字体为12磅,默认为10 ...
- iOS自定义多参数类型方法
前几天做自定义UIAlertView的时候,想仿造系统自带的初始化方法做一个AlertView,里面涉及到不确定多参数的设置和使用问题.这里做一下记录. 我自定义了一个方法: - (instancet ...