Tomcat之NIO 启动与应用分析
概述
从入门Web开始一直在使用Tomcat,随着对网络相关的知识的进一步了解,觉得越有必有去阅读一下常用的开源服务器的整个工作流程,以及使用场景,对比几款服务器的优劣势、最终根据合适的业务场景进行优化。于是有了这一篇启动相关的源码分析,使用到的 Tomcat版本为 9.0.6 ,技术有限,难免出现错误,欢迎指出,也期待各路大神指点。
首先启动Tomcat方式这里采取编程的方式,maven引入坐标
        <dependency>

            <groupId>org.apache.tomcat.embed</groupId>

            <artifactId>tomcat-embed-core</artifactId>

            <version>9.0.6</version>

        </dependency>
1.启动方法
        Tomcat tomcat = new Tomcat();

        Connector connector = new Connector();

        connector.setPort(8080);

        tomcat.setConnector(connector);

        tomcat.start();

        tomcat.getServer().await();
- Connector 的构造方法默认会使用Http11NioProtocol协议(NIO)来对客户端连接进行处理,通过反射获得其对象,赋值给 protocolHandler
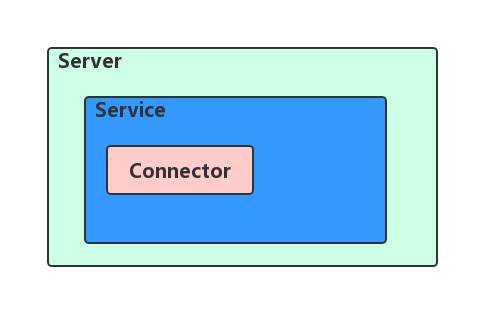
- tomcat.setConnector()会初始化一个 StandardServer和StandardService,并且将StandardServicet添加到StandardServer里,Connector添加 StandardService里,因此这里三者之间的关系就是
- Tomcat.start() 则利用初始化的StandardServer,调用其start()方法
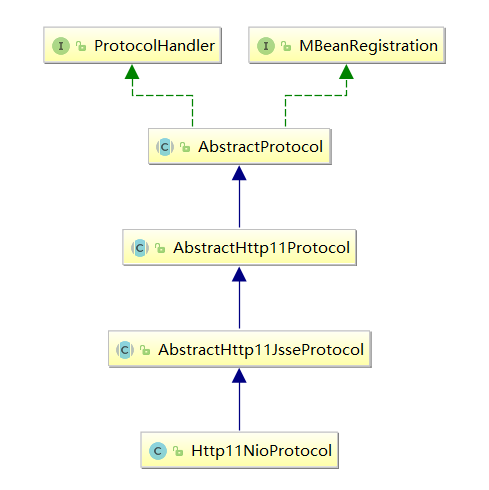
- Http11Nioprotocol 协议是用来处理Nio的协议,在它的构造方法里,实例化了NioEnpoint 交给 AbstractProtocol 保管,然而真正实现Nio建立网络连接则是通过该类完成。后面细说是如何到NioEnponit的
Connector默认使用Nio协议
public Connector() {

        this("org.apache.coyote.http11.Http11NioProtocol");

    }

    public Connector(String protocol) {

        boolean aprConnector = AprLifecycleListener.isAprAvailable() &&

                AprLifecycleListener.getUseAprConnector();

        if ("HTTP/1.1".equals(protocol) || protocol == null) {

            if (aprConnector) {

                protocolHandlerClassName = "org.apache.coyote.http11.Http11AprProtocol";

            } else {

                protocolHandlerClassName = "org.apache.coyote.http11.Http11NioProtocol";

            }

        } else if ("AJP/1.3".equals(protocol)) {

            if (aprConnector) {

                protocolHandlerClassName = "org.apache.coyote.ajp.AjpAprProtocol";

            } else {

                protocolHandlerClassName = "org.apache.coyote.ajp.AjpNioProtocol";

            }

        } else {

            protocolHandlerClassName = protocol;

        }

        // Instantiate protocol handler

        ProtocolHandler p = null;

        try {

            Class<?> clazz = Class.forName(protocolHandlerClassName);

            //反射获得对象

            p = (ProtocolHandler) clazz.getConstructor().newInstance();

        } catch (Exception e) {

            log.error(sm.getString(

                    "coyoteConnector.protocolHandlerInstantiationFailed"), e);

        } finally {

        }

            this.protocolHandler = p;

        }


2.LifecycleBase.start() 初始化与启动
@Override

    public final synchronized void start() throws LifecycleException {

        //state默认是 LifecycleState.NEW,首次执行时,先通过init()方法实现初始化

        if (state.equals(LifecycleState.NEW)) {

            init();

        }

        try {

            setStateInternal(LifecycleState.STARTING_PREP, null, false);

            //初始化之后,开始启动tomcat服务器

            startInternal();
     ...........

    }
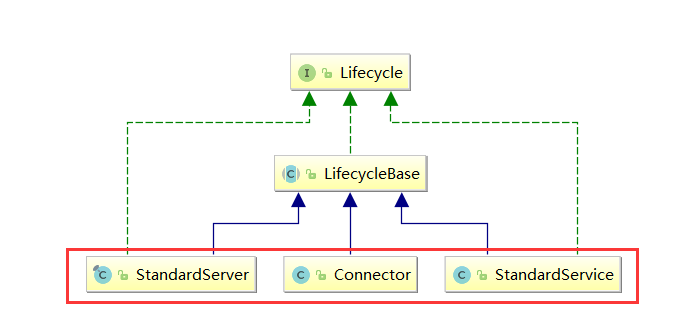
LifecycleBase 是 StandardServer、Connector、StandardService的父类,当StandardServer的 start() 方法被调用时,将会调用父类LifecycleBase的 start() 方法,同样的,对Connector、StandardService来说,调用 start() 方法也会调用父类的LifecycleBase的start()方法。
- LifecycleBase 中持有 用 volatile 关键字 修饰的state 字段,该字段用来标识 Tomcat 启动时所处的状态,默认是 LifecycleState.NEW,因此进入init() 方法
- 每个LifecycleState枚举类一 一对应着Tomcat 服务器的状态,每个枚举类状态又有对应的Tomcat启动的事件,可以通过实现 LifecycleListener 接口进行自定义。在Tomcat启动时会被放进 lifecycleListeners 中
public enum LifecycleState {

    NEW(false, null),

    INITIALIZING(false, Lifecycle.BEFORE_INIT_EVENT),

    INITIALIZED(false, Lifecycle.AFTER_INIT_EVENT),

    STARTING_PREP(false, Lifecycle.BEFORE_START_EVENT),

    STARTING(true, Lifecycle.START_EVENT),

    STARTED(true, Lifecycle.AFTER_START_EVENT),

    STOPPING_PREP(true, Lifecycle.BEFORE_STOP_EVENT),

    STOPPING(false, Lifecycle.STOP_EVENT),

    STOPPED(false, Lifecycle.AFTER_STOP_EVENT),

    DESTROYING(false, Lifecycle.BEFORE_DESTROY_EVENT),

    DESTROYED(false, Lifecycle.AFTER_DESTROY_EVENT),

    FAILED(false, null);

    private final boolean available;

    private final String lifecycleEvent;
3.LifecycleBase.init() 初始化StandardServer
public final synchronized void init() throws LifecycleException {

        if (!this.state.equals(LifecycleState.NEW)) {

            this.invalidTransition("before_init");

        }

        try {

            //从lifecycleListeners 获取 before_init事件进行调用

            this.setStateInternal(LifecycleState.INITIALIZING, (Object)null, false);

            this.initInternal();

            //对应 after_init 事件

            this.setStateInternal(LifecycleState.INITIALIZED, (Object)null, false);

        } catch (Throwable var2) {

            this.handleSubClassException(var2, "lifecycleBase.initFail", this.toString());

        }

    }
- init() 方法是通过调用子类实现的initInternal() 方法来进行抽象的扩展,相当于一个没有具体实现的抽象函数,交给子类去初始化处理(这里是StandardServer 的调用过程)
- 在初始化方法调用的前后,使用了setStateInternal() 方法进行捕捉,这里便是对 实现了 LifecycleListener 接口的监听器做了实现,在其他地方,如:start、stop 都有进行 listener 的调用
4.StandardServer.initInternal() 初始化 server
   @Override

    protected void initInternal() throws LifecycleException {

        super.initInternal();

        // ...... 暂时不关心中间代码

        // Initialize our defined Services

        for (int i = 0; i < services.length; i++) {

            //这里调用StandardService的init()方法

            services[i].init();

        }

    }
- 和 步骤3 处理逻辑大致相同,init()方法里 是通过调用子类实现的 initInternal() 方法来初始化,同样的捕捉初始化的前后事件 before_init、after_init
5. StandardService.initInternal() 初始化service
@Override

    protected void initInternal() throws LifecycleException {

        super.initInternal();

        //省略若干......

        // Initialize our defined Connectors

        synchronized (connectorsLock) {

            for (Connector connector : connectors) {

                //此处调用connector进行初始化

                connector.init();

            }

        }

    }
- 此处同理,调用 connector.init(),通过父类调用子类实现的 钩子函数 initInternal() 来初始化Connector
6.Connector.initInternal() 初始化connector
@Override

    protected void initInternal() throws LifecycleException {

        super.initInternal();

        //省略若干..............

        try {

            //初始化 Http11NioProtocol协议

            protocolHandler.init();

        } catch (Exception e) {

            throw new LifecycleException(

                    sm.getString("coyoteConnector.protocolHandlerInitializationFailed"), e);

        }

    }
- protocolHandler是我们在实例化 Connector 时,使用 默认的Http11NioProtocol协议。
- 其init()方法,则在父类 AbstractProtocol 中实现
6.AbstractProtocol.init() 初始化协议
    @Override

    public void init() throws Exception {

        if (getLog().isInfoEnabled()) {

            getLog().info(sm.getString("abstractProtocolHandler.init", getName()));

        }

        //省略若干行...

        String endpointName = getName();

        endpoint.setName(endpointName.substring(1, endpointName.length()-1));

        endpoint.setDomain(domain);

        //初始化NioEndpoint

        endpoint.init();

    }
- NioEndpoint 的init() 方法,在其父类AbstractEndpoint中实现,用来把公共的抽象到父类中实现(如注册JMX),
- 然后再提供给子类bind() 方法,通过实现该方法来完成一次函数的回调
public final void init() throws Exception {

        if (bindOnInit) {

            //交给子类实现

            bind();

            bindState = BindState.BOUND_ON_INIT;

        }

        if (this.domain != null) {

            // Register endpoint (as ThreadPool - historical name)

            oname = new ObjectName(domain + ":type=ThreadPool,name=\"" + getName() + "\"");

            Registry.getRegistry(null, null).registerComponent(this, oname, null);

            for (SSLHostConfig sslHostConfig : findSslHostConfigs()) {

                registerJmx(sslHostConfig);

            }

        }

    }
7. NioEndpoint.bind()
@Override

    public void bind() throws Exception {

        //初始化ServerSocker

        initServerSocket();

        // Initialize thread count defaults for acceptor, poller

        //如果acceptor线程个数小于0,则默认为1

        if (acceptorThreadCount == 0) {

            // FIXME: Doesn't seem to work that well with multiple accept threads

            acceptorThreadCount = 1;

        }

        //如果poller线程数小于0,则默认为1

        if (pollerThreadCount <= 0) {

            //minimum one poller thread

            pollerThreadCount = 1;

        }

        //获取一个栅栏,通过AQS实现的一个共享锁

        setStopLatch(new CountDownLatch(pollerThreadCount));

        // Initialize SSL if needed

        //初始化ssl配置

        initialiseSsl();

        selectorPool.open();

    }
- 第一步初始化Socket线程

- 调用initServerSocket()方法,初始化Socket线程,可见这里线程为阻塞,目的能解释得通的也就是为了操作方便,但后续建立连接后的socket,会设为非阻塞的

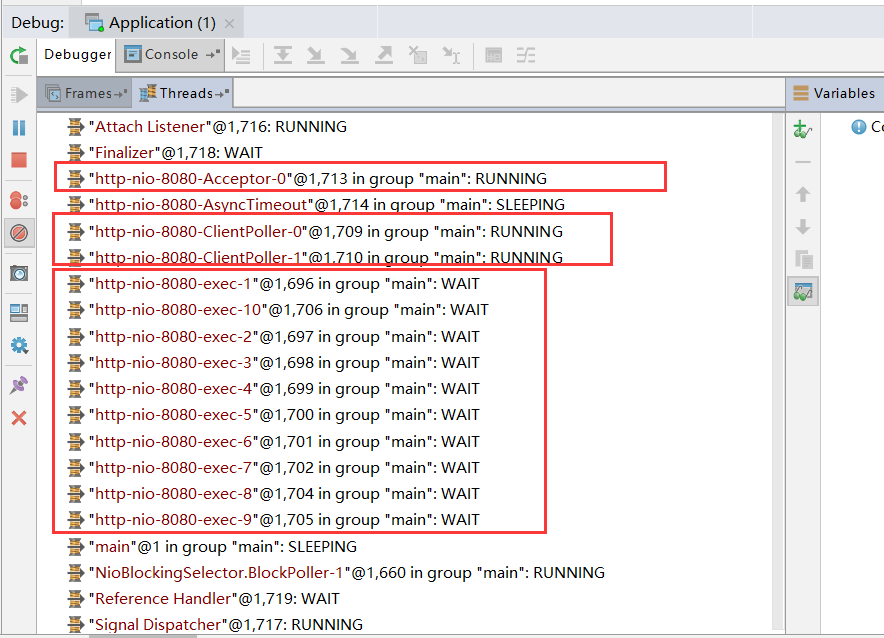
- 初始化accptor与poller线程个数(分别为1 , 2)


- 获取栅栏 CountDownLatch,用于在在高并发的场景时,允许并发请求个数最大值,默认 10000
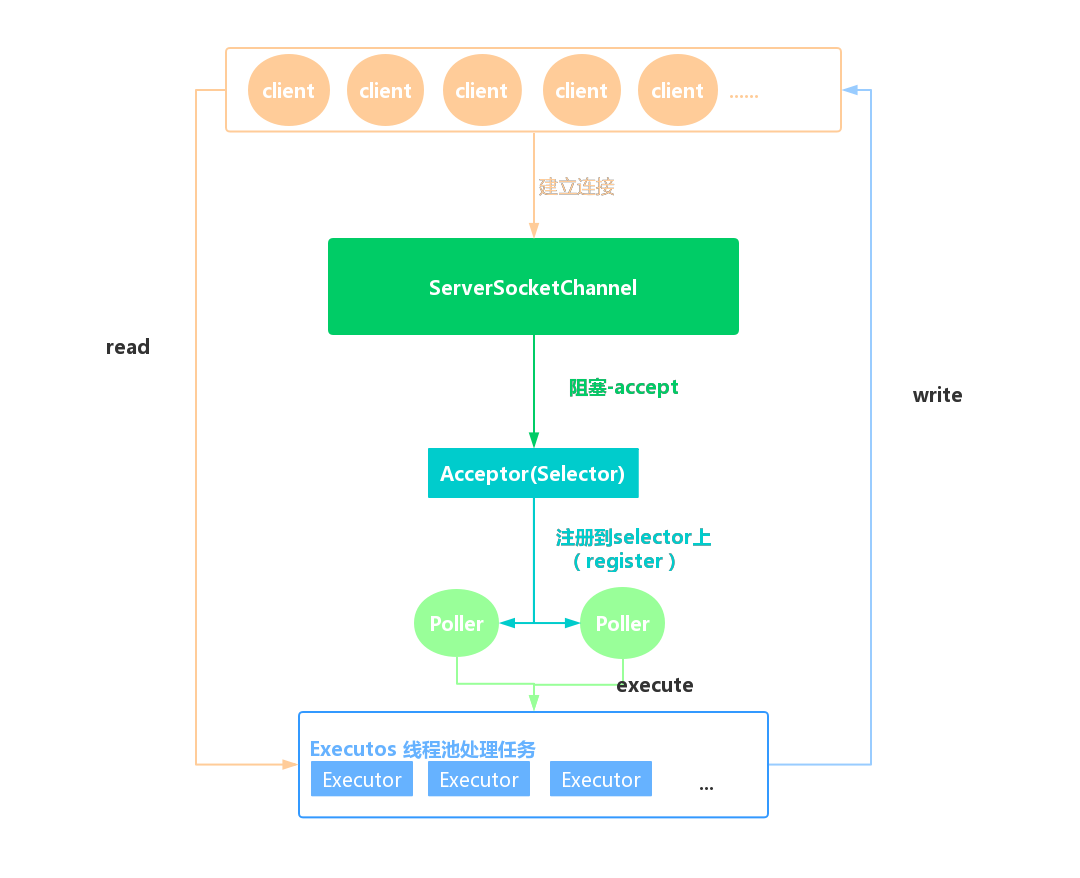
- 这里需要提出一个Acceptor 和 Poller 的概念。Acceptor主要的职责就是监听是否有客户端套接字连接,并接收套接字,连接之后,把Socket 注册到Poller轮询器中的Selector中,如图
总结:
到此为止初始化的过程已经结束,大致过程也就是通过把公共的东西交给高度抽象的父类处理,然后父类去调用提供给子类实现的回调函数,此时利用组合模式,在每次初始化对象完毕之后,再将其持有的对象调用其共同的父类的初始化方法,这样便十分简洁。后续将继续回到StandardServer的父类调用init()方法完毕时继续往下走,执行 startInternal()方法,但大致也与init 时相同,便将核心的加载方法拿出来。
8. NioEndpoint. startInternal() 启动Nio相关线程池
@Override

    public void startInternal() throws Exception {

        if (!running) {

            running = true;

            paused = false;

            //处理连接时缓存用

            processorCache = new SynchronizedStack<>(SynchronizedStack.DEFAULT_SIZE,

                    socketProperties.getProcessorCache());

            eventCache = new SynchronizedStack<>(SynchronizedStack.DEFAULT_SIZE,

                    socketProperties.getEventCache());

            nioChannels = new SynchronizedStack<>(SynchronizedStack.DEFAULT_SIZE,

                    socketProperties.getBufferPool());

            //创建工作的线程池,默认最小10,最大200

            // Create worker collection

            if ( getExecutor() == null ) {

                createExecutor();

            }

            initializeConnectionLatch();

            //创建 2个 Poller 线程

            // Start poller threads

            pollers = new Poller[getPollerThreadCount()];

            for (int i=0; i<pollers.length; i++) {

                pollers[i] = new Poller();

                Thread pollerThread = new Thread(pollers[i], getName() + "-ClientPoller-"+i);

                pollerThread.setPriority(threadPriority);

                pollerThread.setDaemon(true);

                pollerThread.start();

            }

            //启动1个Acceptor线程

            startAcceptorThreads();

        }

    }
- 到此为止,Tomcat便已经启动完成。这里一共启动了 1个Acceptor线程,2个poller线程,10个work线程(启动时,不考虑有连接数并发超过10个任务)
Tomcat之NIO 启动与应用分析的更多相关文章
- Java网络编程与NIO详解11:Tomcat中的Connector源码分析(NIO)
本文转载 https://www.javadoop.com 本系列文章将整理到我在GitHub上的<Java面试指南>仓库,更多精彩内容请到我的仓库里查看 https://github.c ...
- 详解Tomcat系列(一)-从源码分析Tomcat的启动
在整个Tomcat系列文章讲解之前, 我想说的是虽然整个Tomcat体系比较复杂, 但是Tomcat中的代码并不难读, 只要认真花点功夫, 一定能啃下来. 由于篇幅的原因, 很难把Tomcat所有的知 ...
- tomcat bio nio apr 模式性能测试
转自:tomcat bio nio apr 模式性能测试与个人看法 11.11活动当天,服务器负载过大,导致部分页面出现了不可访问的状态.那后来主管就要求调优了,下面是tomcat bio.nio.a ...
- Tomcat处理HTTP请求源码分析(上)
Tomcat处理HTTP请求源码分析(上) 作者 张华 发布于 2011年12月8日 | 8 讨论 分享到: 微博 微信 Facebook Twitter 有道云笔记 邮件分享 稍后阅读 我的阅读清单 ...
- ubuntu 14 中tomcat的开机启动设置
开机自启动,将要执行的语句写入/etc/rc.local. #!/bin/sh -e # # rc.local # # This script is executed at the end of ea ...
- Tomcat处理HTTP请求源码分析(下)
转载:http://www.infoq.com/cn/articles/zh-tomcat-http-request-2 很多开源应用服务器都是集成tomcat作为web container的,而且对 ...
- tomcat登陆WEB显示无权限问题&& tomcat无限循环启动问题
tomcat登陆WEB显示无权限问题 The user specified as a definer (”@’%') does not exist 原因分析 因为创建视图使用的是xff@%用户(目前已 ...
- SpringBoot应用部署到Tomcat中无法启动问题
SpringBoot应用部署到Tomcat中无法启动问题 背景 最近公司在做一些内部的小型Web应用时, 为了提高开发效率决定使用SpringBoot, 这货自带Servlet容器, 你在开发We ...
- 三种Tomcat集群方式的优缺点分析
三种Tomcat集群方式的优缺点分析 2009-09-01 10:00 kit_lo kit_lo的博客 字号:T | T 本文对三种Tomcat集群方式的优缺点进行了分析.三种集群方式分别是:使用D ...
随机推荐
- C# 中获取CPU序列号/网卡mac地址
1.cpu序列号2.mac序列号3.硬盘id在给软件加序列号时这三个应该是最有用的,可以实现序列号和机器绑定,对保护软件很有好处.哈哈. using System; using System.Ma ...
- linux swap的添加等等
1. 先说下 swap的卸载 fdisk -l 或者 free -m 看下 swap挂载的是磁盘,还是 文件生成的 如果是系统创建时就分配好的swap,就使用 swapoff /dev/*** 进 ...
- Storm- Storm作业提交运行流程
用户编写Storm Topology 使用client提交Topology给Nimbus Nimbus指派Task给Supervisor Supervisor为Task启动Worker Worker执 ...
- Cocos2d-x中常用宏的作用
1. CC_SYNTHESIZE(int, nTest, Test); 相当于: protected: int nTest; public: virtual nTest getTest(void) c ...
- artDialog 简单使用!
简介 artDialog是一个轻巧且高度兼容的javascript对话框组件,可让你的网页交互拥有桌面软件般的用户体验. 功能: 支持锁定屏幕(遮罩).模拟alert和confirm.多窗口弹出.静止 ...
- python glances来监控linux服务器CPU 内存 IO使用
什么是 Glances? Glances 是一个由 Python 编写,使用 psutil 库来从系统抓取信息的基于 curses 开发的跨平台命令行系统监视工具. 通过 Glances,我们可以监视 ...
- jmeter--轻量级接口自动化测试框架
大致思路: jmeter完成接口脚本,Ant完成脚本执行并收集结果生成报告,最后利用jenkins完成脚本的自动集成运行. 环境安装: 1.jdk1.7 配置环境变量(参考前面的分页) 2.jmete ...
- Eclipse_常用技巧_01_自动添加类注释和方法注释
一.步骤 路径A=windows-->preference-->Java-->Code Style-->Code Templates-->Comments 自动添加注释一 ...
- CodeForces - 1017 C. The Phone Number(数学)
Mrs. Smith is trying to contact her husband, John Smith, but she forgot the secret phone number! The ...
- 【LeetCode】081. Search in Rotated Sorted Array II
题目: Follow up for "Search in Rotated Sorted Array":What if duplicates are allowed? Would t ...

