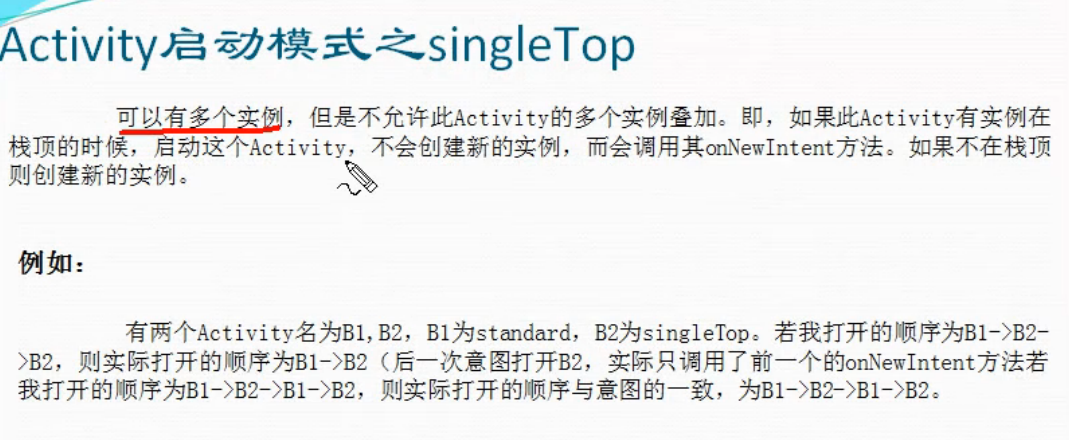
activity启动模式之singleTop
activity启动模式之singleTop
一、简介

二、设置方法
在AndroidManifest.xml中将要设置为singleTop启动模式的页面进行配置
<activity android:name="activityLaunchSingleTop.ActivityB2" android:launchMode="singleTop"></activity>
三、代码实例
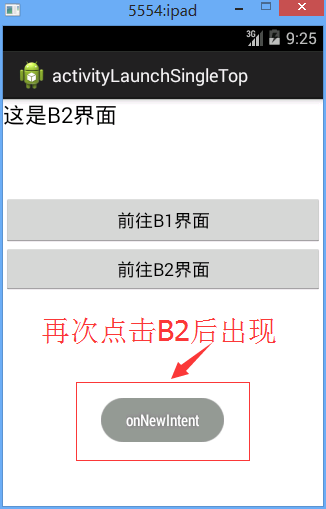
效果图:

代码:
activityLaunchSingleTop.MainActivity
 package activityLaunchSingleTop;

 import com.example.activityLaunchSingleTop.R;

 import android.app.Activity;

 import android.content.Intent;

 import android.os.Bundle;

 import android.view.View;

 import android.view.View.OnClickListener;

 import android.widget.Button;

 public class MainActivity extends Activity{

     private Button btn_goB1;//创建一个button对象

     private Button btn_goB2;//创建一个button对象

      protected void onCreate(Bundle savedInstanceState) {

             super.onCreate(savedInstanceState);//父类操作

             setContentView(R.layout.activity_main);//引入名为activity_main的界面

             btn_goB1=(Button) findViewById(R.id.btn_goB1);//找id为btn_openActivity的button

             btn_goB1.setOnClickListener(new OnClickListener() {//设置button点击监听

                 @Override

                 public void onClick(View v) {//onclick事件

                     // TODO Auto-generated method stub

                     Intent intent=new Intent();//初始化intent

                     intent.setClass(MainActivity.this,MainActivity.class);//连接

                     startActivity(intent);//打开activity

                 }

             });

             btn_goB2=(Button) findViewById(R.id.btn_goB2);//找id为btn_openActivity的button

             btn_goB2.setOnClickListener(new OnClickListener() {//设置button点击监听

                 @Override

                 public void onClick(View v) {//onclick事件

                     // TODO Auto-generated method stub

                     Intent intent=new Intent();//初始化intent

                     intent.setClass(MainActivity.this,ActivityB2.class);//连接

                     startActivity(intent);//打开activity

                 }

             });

         }

 }
activityLaunchSingleTop.ActivityB2
 package activityLaunchSingleTop;

 import com.example.activityLaunchSingleTop.R;

 import android.app.Activity;

 import android.content.Intent;

 import android.os.Bundle;

 import android.text.InputFilter.LengthFilter;

 import android.view.View;

 import android.view.View.OnClickListener;

 import android.widget.Button;

 import android.widget.Toast;

 public class ActivityB2 extends Activity{

     private Button btn_goB1;//创建一个button对象

     private Button btn_goB2;//创建一个button对象

      protected void onCreate(Bundle savedInstanceState) {

             super.onCreate(savedInstanceState);//父类操作

             setContentView(R.layout.activity_b2);//引入名为activity_main的界面

             btn_goB1=(Button) findViewById(R.id.btn_goB1);//找id为btn_openActivity的button

             btn_goB1.setOnClickListener(new OnClickListener() {//设置button点击监听

                 @Override

                 public void onClick(View v) {//onclick事件

                     // TODO Auto-generated method stub

                     Intent intent=new Intent();//初始化intent

                     intent.setClass(ActivityB2.this,MainActivity.class);//连接

                     startActivity(intent);//打开activity

                 }

             });

             btn_goB2=(Button) findViewById(R.id.btn_goB2);//找id为btn_openActivity的button

             btn_goB2.setOnClickListener(new OnClickListener() {//设置button点击监听

                 @Override

                 public void onClick(View v) {//onclick事件

                     // TODO Auto-generated method stub

                     Intent intent=new Intent();//初始化intent

                     intent.setClass(ActivityB2.this,ActivityB2.class);//连接

                     startActivity(intent);//打开activity

                 }

             });

         }

      @Override

     protected void onNewIntent(Intent intent) {

         // TODO Auto-generated method stub

         super.onNewIntent(intent);

         Toast.makeText(this, "onNewIntent", Toast.LENGTH_SHORT).show();;

     }

 }
/activityLaunchSingleTop/AndroidManifest.xml
 <manifest xmlns:android="http://schemas.android.com/apk/res/android"

     package="com.example.activityLaunchSingleTop"

     android:versionCode="1"

     android:versionName="1.0" >

     <uses-sdk

         android:minSdkVersion="8"

         android:targetSdkVersion="19" />

     <application

         android:allowBackup="true"

         android:icon="@drawable/ic_launcher"

         android:label="@string/app_name"

         android:theme="@style/AppTheme" >

         <activity

             android:name="activityLaunchSingleTop.MainActivity"

             android:label="@string/app_name" >

             <intent-filter>

                 <action android:name="android.intent.action.MAIN" />

                 <category android:name="android.intent.category.LAUNCHER" />

             </intent-filter>

         </activity>

         <activity android:name="activityLaunchSingleTop.ActivityB2" android:launchMode="singleTop"></activity>

     </application>

 </manifest>
/activityLaunchSingleTop/res/layout/activity_main.xml
 <?xml version="1.0" encoding="utf-8"?>

 <LinearLayout xmlns:android="http://schemas.android.com/apk/res/android"

     android:layout_width="match_parent"

     android:layout_height="match_parent"

     android:orientation="vertical" >

     <TextView

         android:id="@+id/tV_B1"

         android:layout_width="match_parent"

         android:layout_height="96dp"

         android:text="@string/tV_B1"

         android:textAppearance="?android:attr/textAppearanceLarge" />

     <Button

         android:id="@+id/btn_goB1"

         android:layout_width="match_parent"

         android:layout_height="50dp"

         android:layout_weight="0.00"

         android:text="@string/btn_goB1" />

     <Button

         android:id="@+id/btn_goB2"

         android:layout_width="match_parent"

         android:layout_height="wrap_content"

         android:text="@string/btn_goB2" />

 </LinearLayout>
/activityLaunchSingleTop/res/layout/activity_b2.xml
 <?xml version="1.0" encoding="utf-8"?>

 <LinearLayout xmlns:android="http://schemas.android.com/apk/res/android"

     android:layout_width="match_parent"

     android:layout_height="match_parent"

     android:orientation="vertical" >

     <TextView

         android:id="@+id/tV_B2"

         android:layout_width="match_parent"

         android:layout_height="96dp"

         android:text="@string/tV_B2"

         android:textAppearance="?android:attr/textAppearanceLarge" />

     <Button

         android:id="@+id/btn_goB1"

         android:layout_width="match_parent"

         android:layout_height="50dp"

         android:layout_weight="0.00"

         android:text="@string/btn_goB1" />

     <Button

         android:id="@+id/btn_goB2"

         android:layout_width="match_parent"

         android:layout_height="wrap_content"

         android:text="@string/btn_goB2" />

 </LinearLayout>
activity启动模式之singleTop的更多相关文章
- Activity启动模式
------siwuxie095 共4种启动模式:standard singleTop singleTask singleInstance 1.标准启动模式(standard) 也即默认的启动模式 ( ...
- Android Activity 启动模式和任务栈
在了解了基本的Activity的生命周期后,我们能够很好的在一个Activity上面做相关的业务.但是这是不够的,因为Android通过任务栈来保存整个APP的Activity,合理的调度任务栈才能够 ...
- 深入Activity,Activity启动模式LaunchMode完全解析
转载请注明出处:http://blog.csdn.net/linglongxin24/article/details/53221384本文出自[DylanAndroid的博客] 在平时的开发中,我们可 ...
- Activity启动模式 及 Intent Flags 与 栈 的关联分析
http://blog.csdn.net/vipzjyno1/article/details/25463457 Android启动模式Flags栈Task 目录(?)[+] 什么是栈 栈 ...
- 【转】Activity启动模式 及 Intent Flags 与 栈 的关联分析
http://blog.csdn.net/vipzjyno1/article/details/25463457 在学习Android的过程中,Intent是我们最常用Android用于进程内或进 ...
- Android中Activity启动模式详解
在Android中每个界面都是一个Activity,切换界面操作其实是多个不同Activity之间的实例化操作.在Android中Activity的启动模式决定了Activity的启动运行方式. An ...
- Activity启动模式图文详解
转载自:http://jcodecraeer.com/a/anzhuokaifa/androidkaifa/2015/0520/2897.html 英文原文:Understand Android A ...
- Android-3 Activity启动模式
Activity启动模式 android:launchMode="singleTask" * Standard 每次都创建一个新实例 -- TaskID不变,ActivityID改 ...
- Android Activity 启动模式详解
最近有群里的朋友问我 Activity的四种启动模式分别是什么意思? 当初因为项目比较忙,草草的解释了下, Api文档中说的也只是一般,在这里就小记一下吧,以便有更多的朋友对Activity启动模式了 ...
随机推荐
- 数值和字符串相互转换(C++ 数据类型转换技巧)
类型转换是将一种类型的值映射为另一种类型的值.进行数据类型的转换. 是在实际代码编写中经常遇到的问题,特别是字符串和其他类型的转换. 1.将字符串转换为整数 (1).转换函数// 双精度函数doubl ...
- php 图片验证码
1.原理 数组中每个图片对应一个值->随机值->获取并保存到$_SESSION中,->获取随机值对应的图片,->通过__FILE__输出图片,->浏览器验证 2.代码 c ...
- 面试常见的selenium问题
1.如何切换iframe 问题:如果你在一个default content中查找一个在iframe中的元素,那肯定是找不到的.反之你在一个iframe中查找另一个iframe元素或default co ...
- 我的Android进阶之旅------>解决Android Studio编译后安装apk报错:The APK file does not exist on disk
1.错误描述 今天用Android Studio编译应用后安装APK的时候,报错了,错误如下所示: The APK file build\outputs\apk\OYP_2.3.4_I2Base_64 ...
- unity3d相关资源
http://pan.baidu.com/s/1kTG9DVD GUI源码
- vue指令详解
一.vue简绍 1. Vue.js是什么 Vue.js也称为Vue,读音/vju:/,类似view,错误读音v-u-e. 版本分为v1.0 和 v2.0 2.Vue.js的特点 1. 是一个构建 ...
- go——数组(二)
1.内部实现 在Go语言里,数组是一个长度固定的数据类型,用于存储一段具有相同的类型的元素的连续块. 数组存储的类型可以是内置类型,如整型或字符串,也可以是某种结构类型. 灰格子代表数组里面的元素,每 ...
- Django中间件(含Django运行周期流程图)
Django中的中间件(含Django完整生命周期图) Django中间件简介 django 中的中间件(middleware),在django中,中间件其实就是一个类,在请求到来和结束后,djang ...
- UML类图几种关系的总结(转载 http://blog.csdn.net/tianhai110/article/details/6339565 )
http://blog.csdn.net/tianhai110/article/details/6339565
- java zookeeper权限控制ACL(digest,IP)
java zookeeper权限控制ACL(auth,digest,ip) 学习前请参考:https://www.cnblogs.com/zwcry/p/10407806.html zookeeper ...
