Nginx反向代理与负载均衡应用实践(二)
Nginx反向代理与负载均衡应用实践(二)
链接:https://pan.baidu.com/s/1xB20bnuanh0Avs4kwRpSXQ
提取码:migq
复制这段内容后打开百度网盘手机App,操作更方便哦
根据URL中的目录地址实现代理转发
1.软硬件准备
1.1硬件准备
准备4台VM虚拟机(有物理服务器更佳),一台做负载均衡,三台做RS,如下表:
| HOSTNAME | IP | 说明 | 分类 |
|---|---|---|---|
| lb | 192.168.200.64 | Nginx负载均衡器 | |
| web01 | 192.168.200.63 | Web01服务器 | 上传服务器池 |
| web02 | 192.168.200.60 | Web02服务器 | 动态服务器池 |
| web03 | 192.168.200.65 | Web03服务器 | 静态服务器池 |
1.2软件准备
- 系统:CentOS6.5 x86_64
- 软件:nginx-1.10.2.tar.gz
2.根据URL中的目录地址实现代理转发的说明
案例背景:
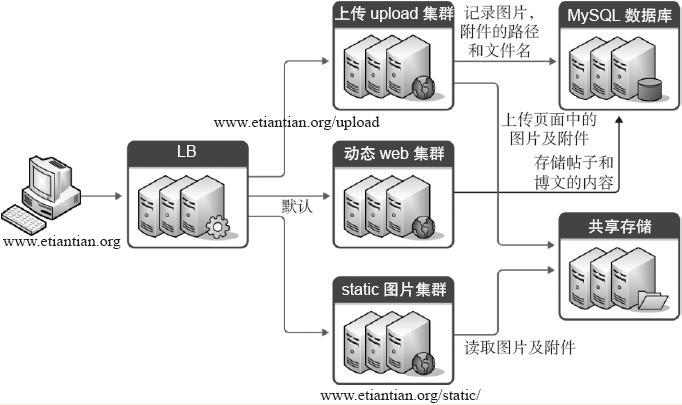
- 通过Nginx实现动静分离,即通过Nginx反向代理配置规则实现让动态资源和静态资源及其他业务分别由不同的服务器解析,以解决网站性能,安全,用户体验等重要问题。
- 下图为企业常见的动静分离集群架构图,此架构图适合网站前端只使用同一个域名提供服务的场景,例如,用户访问的域名是www.yunjisuan.com,然后,当用户请求www.yunjisuan.com/upload/xx地址时候,代理会分配请求到上传服务器池处理数据;当用户请求www.yunjisuan.com/static/xx地址的时候,代理会分配请求到静态服务器池请求数据;当用户请求www.yunjisuan.com/xx地址的时候,即不包含上述指定的目录地址路径时,代理会分配请求到默认的动态服务器池请求数据(注意:上面的xx表示任意路径)。
3.项目实战准备
3.1先进行企业案例需求梳理:
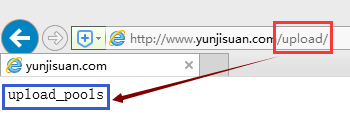
- 当用户请求www.yunjisuan.com/upload/xx地址时,实现由upload上传服务器池处理请求。
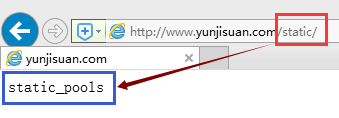
- 当用户请求www.yunjisuan.com/static/xx地址时,实现由静态服务器池处理请求。
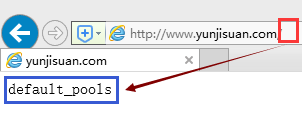
- 除此以外,对于其他访问请求,全都由默认的动态服务器池处理请求.
3.2在反向均衡上进行upstream模块服务器池的配置
[root@lb conf]# pwd

/usr/local/nginx/conf

[root@lb conf]# cat nginx.conf

worker_processes  1;

events {

    worker_connections  1024;

}

http {

    include       mime.types;

    default_type  application/octet-stream;

    sendfile        on;

    keepalive_timeout  65;

    upstream upload_pools {         #将符合upload的请求交给上传服务器池upload_pools

    server 192.168.200.63:80 weight=1;

    }

    upstream default_pools {        #不符合上述规则的请求,默认全部交给动态服务器池default_pools

    server 192.168.200.60:80 weight=1;

    }

    upstream static_pools {         #将符合static的请求交给静态服务器池static_pools

    server 192.168.200.65:80 weight=1;

    }

    server {

        listen       80;

        server_name  www.yunjisuan.com;

    location /upload/ {

        proxy_pass http://upload_pools;

        include extar/proxy.conf;

        }

    location / {

        proxy_pass http://default_pools;

        include extar/proxy.conf;

        }

    location /static/ {

        proxy_pass http://static_pools;

        include extar/proxy.conf;

    }

  }

}

[root@lb conf]# nginx -t   #检查配置文件是否有误

nginx: the configuration file /usr/local/nginx/conf/nginx.conf syntax is ok

nginx: configuration file /usr/local/nginx/conf/nginx.conf test is successful

[root@lb conf]# /usr/local/nginx/sbin/nginx -s reload

#重启Nginx服务
3.3在web上进行文件配置(方法一)
3.3.1 web01配置(上传)
[root@web01 www]# pwd

/usr/local/nginx/html/www

[root@web01 www]# mkdir upload

[root@web01 www]# echo "upload_pools" >> upload/index.html
3.3.2 web02测试
3.3.3 web02配置(默认-->动态)
[root@web02 www]# pwd

/usr/local/nginx/html/www

[root@web02 www]# echo "default_pools" > index.html
3.3.4 web01测试
3.3.5 web03配置(静态)
[root@web03 www]# pwd

/usr/local/nginx/html/www

[root@web03 www]# mkdir static

[root@web03 www]# echo "static_pools" >> static/index.html
3.3.6 web01测试
3.3.7其地址与实际访问的内容输出请对照下表:
| 节点 | IP及端口 | 测试地址 | 字符串为代表业务 |
|---|---|---|---|
| web01 | 192.168.200.63:80 | http://www.yunjisuan.com/upload/index.html | static_pools |
| web02 | 192.168.200.60:80 | http://www.yunjisuan.com/ | upload_pools |
| web03 | 192.168.200.65:80 | http://www.yunjisuan.com/static/index.html | default_pools |
3.4以if语句实现(方法二)
if ($request_uri ~* "^/static/(.*)$")

{

proxy_pass http://static_pools/$1;

}

if ($request_uri ~* "^/upload/(.*)$")

{

proxy_pass http://upload_pools/$1;

}

location / {

proxy_pass http://default_pools;

include proxy.conf;

}
3.5根据URL目录地址转发的应用场景
- 根据HTTP的URL进行转发的应用情况,被称为第7层(应用层)的负载均衡,而LVS的负载均衡一般用于TCP等的转发,因此被称为第4层(传输层)的负载均衡。
- 在企业中,有时希望只用一个域名对外提供服务,不希望使用多个域名对应同一个产品业务,此时就需要在代理服务器上通过配置规则,使得匹配不同规则的请求会交给不同的服务器池处理。这类业务有:
- 业务的域名没有拆封或者不希望拆分,但希望实现动静分离,多业务分离,这在前面已经讲解过案例了。
- 不同的客户端设备(例如:手机和PC端)使用同一个域名访问同一个业务网站,就需要根据规则将不同设备的用户请求交给后端不同的服务器处理,以便得到最佳用户体验。这也是非常重要的.
4.根据客户端的设备(user_agent)转发实践需求
为了让不同的客户端设备用户访问有更好的体验,需要在后端架设不同服务器来满足不同的客户端访问,例如:移动客户端访问网站,就需要部署单独的移动服务器及程序,体验才能更好,而且移动端还分苹果,安卓,Ipad等,在传统的情况下,一般用下面的办法解决这个问题
4.1常规4层负载均衡解决方案架构
在常规4层负载均衡架构下,可以使用不同的域名来实现这个需求,例如,人为分配好让移动端用户访问wap.yunjisuan.com,PC客户端用户访问www.yunjisuan.com,通过不同域名来引导用户到指定的后端服务器,该解决方案的架构图如下:
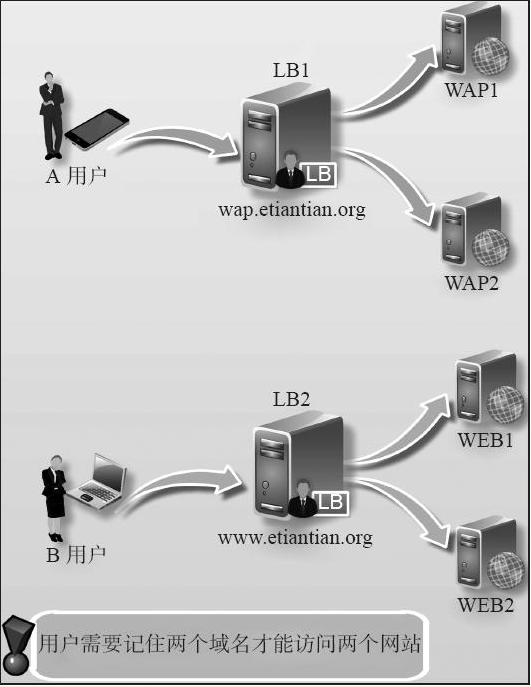
此解决方案的最大问题就是不同客户端的用户要记住对应的域名!而绝大多数用户只会记住www.yunjisuan.com,不会记住wap.yunjisuan.com,这样一来就会导致用户体验不是很好。有没有办法让所有客户端用户只访问一个统一的www.yunjisuan.com这个地址,还能让不同客户端设备都能有更好的访问体验呢?当然有!那就是下面的第7层负载均衡解决方案。
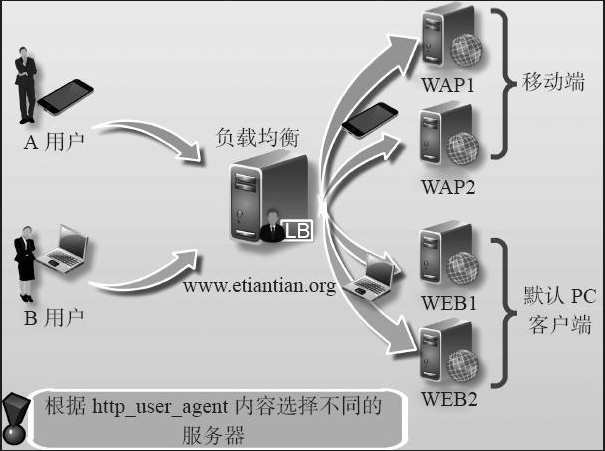
4.2第7层负载均衡解决方案
在第7层负载均衡架构下,就可以不需要人为拆分域名了,对外只需要用一个域名,例如www.yunjisuan.com,通过获取用户请求中的设备信息(利用$http_user_agent获取),根据这些信息转给后端合适的服务器处理,这个方案最大好处就是不需要让用户记忆多个域名了,用户只需要记住主网站地址www.yunjisuan.com,剩下的由网站服务器处理,这样的思路大大地提升了用户访问体验,这是当前企业网站非常常用的解决方案。下图描述了上述解决方案相应的架构逻辑图:
4.3根据客户端设备(user_agent)转发请求实践
这里还是使用static_pools,upload_pools作为本次实验的后端服务器池。下面先根据计算机客户端浏览器的不同设置对应的匹配规则。(由于没有合适的实验验证环境,这里仅作需求实现的细节讲解)
location / {

if ($http_user_agent ~* "MSIE")

#如果请求的浏览器为微软IE浏览器(MSIE),则让请求由static_pools池处理

{

proxy_pass http://static_pools;

}

if ($http_user_agent ~* "Chrome")

#如果请求的浏览器为谷歌浏览器(Chrome),则让请求由upload_pools池处理

{

proxy_pass http://upload_pools;

}

proxy_pass http://default_pools;

#其他客户端,由default_pools处理

include proxy.conf;

}
除了针对浏览器外,上述“$http_user_agent”变量也可针对移动端,比如安卓,苹果,Ipad设备进行匹配,去请求指定的服务器,具体细节配置如下:
location / {

if ($http_user_agent ~* "android")

{

proxy_pass http://android_pools;    #这里是android服务器池

}

if ($http_user_agent ~* "iphone")

{

proxy_pass http://iphone_pools;     #这里是iphone服务器池

}

proxy_pass http://pc_pools;         #这里是默认的pc服务器池

include extra/proxy.conf;

}
4.4根据文件扩展名实现代理转发
除了根据URI路径及user_agent转发外,还可以实现根据文件扩展名进行转发(这里仅以细节配置作为讲解内容,如需测试请同学们自行实验)
4.4.1相关server配置
#先看看location方法的匹配规则,如下:

location ~ .*\.(gif|jpg|jpeg|png|bmp|swf|css|js)$ {

proxy_pass http://static_pools;

include proxy.conf;

}

#下面是if语句方法的匹配规则:

if ($request_uri ~* ".*\.(php|php5)$")

{

proxy_pass http://php_server_pools;

}

if ($request_uri ~* ".*\.(jsp|jsp*|do|do*)$")

{

proxy_pass http://java_server_pools;

}
4.4.2 根据扩展名转发的应用场景
可根据扩展名实现资源的动静分离访问,如图片,视频等请求静态服务器池,PHP,JSP等请求动态服务器池。
location ~ .*\.(gif|jpg|jpeg|png|bmp|swf|css|js)$ {

proxy_pass http://static_pools;

include proxy.conf;

}

location ~ .*\.(php|php3|php5)$ {

proxy_pass http://dynamic_pools;

include proxy.conf

}
在开发无法通过程序实现动静分离的时候,运维可以根据资源实体进行动静分离,而不依赖于开发,具体实现策略是先把后端的服务器分成不同的组。注意,每组服务器的程序都是相同的,因为开发没有把程序拆开,分组后,在前端代理服务器上通过讲解过的路径,扩展名进行规则匹配,从而实现请求的动静分离。
5.Nginx负载均衡检测节点状态
5.1简介
- 淘宝技术团队开发了一个Tengine(Nginx的分支)模块Nginx_upstream_check_module,用于提供主动式后端服务器健康检查。通过它可以检测后端realserver的健康状态,如果后端realserver不可用,则所有的请求就不会转发到该节点上。
- Tengine原生支持这个模块,而Nginx则需要通过打补丁的方式将该模块添加到Nginx中。补丁下载地址:https://github.com/yaoweibin/nginx_upstream_check_module下面介绍如何使用这个模块。
5.2安装nginx_upstream_check_module模块
5.2.1检查环境
#系统已经安装了nginx-1.10.2软件

[root@lb yang]# /usr/local/nginx/sbin/nginx -V

nginx version: nginx/1.10.2

built by gcc 4.4.7 20120313 (Red Hat 4.4.7-4) (GCC)

built with OpenSSL 1.0.1e-fips 11 Feb 2013

TLS SNI support enabled

configure arguments: --user=www --group=www --prefix=/usr/local/nginx --with-http_stub_status_module --with-http_ssl_module
5.2.2#安装必备安装包
[root@lb ~]# yum -y install wget unzip patch

[root@yangwenbo ~]# rpm -qa wget unzip patch

wget-1.12-1.8.el6.x86_64

patch-2.6-6.el6.x86_64

unzip-6.0-1.el6.x86_64
5.2.3下载补丁包
[root@lb ~]# cd /yang

[root@lb yang]# wget https://codeload.github.com/yaoweibin/nginx_upstream_check_module/zip/master

[root@lb yang]# ls

master

[root@lb yang]# unzip master

[root@lb yang]# mv nginx_upstream_check_module-master /usr/src/
5.2.4因为是对源程序打补丁,所以还需要Nginx源程序
[root@lb yang]# cd /usr/src/nginx-1.10.2/

[root@lb nginx-1.10.2]# patch -p0 < /usr/src/nginx_upstream_check_module-master/check_1.9.2+.patch

patching file src/http/modules/ngx_http_upstream_hash_module.c

patching file src/http/modules/ngx_http_upstream_ip_hash_module.c

patching file src/http/modules/ngx_http_upstream_least_conn_module.c

patching file src/http/ngx_http_upstream_round_robin.c

patching file src/http/ngx_http_upstream_round_robin.h
5.2.5备份源安装程序
[root@lb nginx-1.10.2]# cd /usr/local/

[root@lb local]# ls

bin  etc  games  include  lib  lib64  libexec  nginx  sbin  share  src

[root@lb local]# mv nginx{,.ori}

[root@lb local]# ls

bin  etc  games  include  lib  lib64  libexec  nginx.ori  sbin  share  src
5.2.6#重新进行编译,编译的参数要和以前一致,最后加上 --add-module=/usr/src/nginx_upstream_check_module-master/
[root@lb local]# cd /usr/src/nginx-1.10.2/

[root@lb nginx-1.10.2]# ./configure --user=www --group=www --prefix=/usr/local/nginx --with-http_stub_status_module --with-http_ssl_module --add-module=/usr/src/nginx_upstream_check_module-master/

#以下省略。。。

[root@lb nginx-1.10.2]# make && make install

#以下省略。。。
5.2.7拷贝源配置文件到当前Nginx的安装目录下
[root@lb local]# pwd

/usr/local

[root@lb local]# cp nginx.ori/conf/nginx.conf nginx/conf/

cp: overwrite `nginx/conf/nginx.conf'? y

[root@lb local]# cp nginx.ori/conf/extar/proxy.conf nginx/conf/extar/

[root@lb local]# /usr/local/nginx/sbin/nginx -t

nginx: the configuration file /usr/local/nginx/conf/nginx.conf syntax is ok

nginx: configuration file /usr/local/nginx/conf/nginx.conf test is successful
5.3配置Nginx健康检查,如下:
[root@lb conf]# pwd

/usr/local/nginx/conf

[root@lb conf]# cat nginx.conf

worker_processes  1;

events {

    worker_connections  1024;

}

http {

    include       mime.types;

    default_type  application/octet-stream;

    sendfile        on;

    keepalive_timeout  65;

    upstream static_pools {

    server 192.168.200.63:80 weight=1;

    server 192.168.200.65:80 weight=1;

    check interval=3000 rise=2 fall=5 timeout=1000 type=http;

    #对static服务器池开启健康监测

    }

    upstream default_pools {

    server 192.168.200.60:80 weight=1;

    }

    server {

        listen       80;

        server_name  www.yunjisuan.com;

    location / {

        proxy_pass http://default_pools;

        include extar/proxy.conf;

        }

    location ~ .*\.(gif|jpg|jpeg|png|bmp|swf|css|js)$ {

        proxy_pass http://static_pools;

        include extar/proxy.conf;

    }

    location /status {

    check_status;       #启动健康检查模块

    access_log off;     #关闭此location的访问日志记录

    }

    }

}
5.4重启lb1的nginx服务
[root@lb conf]# /usr/local/nginx/sbin/nginx -t

nginx: the configuration file /usr/local/nginx/conf/nginx.conf syntax is ok

nginx: configuration file /usr/local/nginx/conf/nginx.conf test is successful

[root@lb conf]# /usr/local/nginx/sbin/nginx

[root@lb conf]# netstat -antup | grep nginx

tcp      0    0 0.0.0.0:80    0.0.0.0:*    LISTEN   3817/nginx

#注意此处必须重启Nginx,不能重新加载
check interval=3000 rise=2 fall=5 timeout=1000 type=http;
上面配置的意思时,对static_pools这个负载均衡条目中的所有节点,每隔3秒检测一次,请求2次正常则标记realserver状态为up,如果检测5次都失败,则标记realserver的状态为down,超时时间为1秒,检查的协议是HTTP。
详细用法见官网:http://tengine.taobao.org/document_cn/http_upstream_check_cn.html
5.5访问页面时,显示如下图所示:

5.6在lb1配置文件的upstream default_pools{}里也加入健康监测命令
[root@lb conf]# cat nginx.conf

worker_processes  1;

events {

    worker_connections  1024;

}

http {

    include       mime.types;

    default_type  application/octet-stream;

    sendfile        on;

    keepalive_timeout  65;

    upstream static_pools {

    server 192.168.200.63:80 weight=1;

    server 192.168.200.65:80 weight=1;

    check interval=3000 rise=2 fall=5 timeout=1000 type=http;

    }

    upstream default_pools {

    server 192.168.200.60:80 weight=1;

   check interval=3000 rise=2 fall=5 timeout=1000 type=http;

   对default服务器池开启健康监测

    }

    server {

        listen       80;

        server_name  www.yunjisuan.com;

    location / {

        proxy_pass http://default_pools;

        include extar/proxy.conf;

        }

    location ~ .*\.(gif|jpg|jpeg|png|bmp|swf|css|js)$ {

        proxy_pass http://static_pools;

        include extar/proxy.conf;

    }

    location /status {

    check_status;

    access_log off;

    }

    }

}

[root@lb conf]# /usr/local/nginx/sbin/nginx -s reload

#重启服务
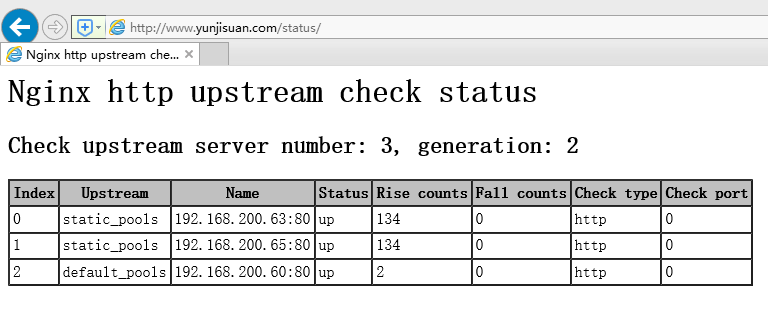
5.7再次访问健康监测页面时,显示如下图所示:
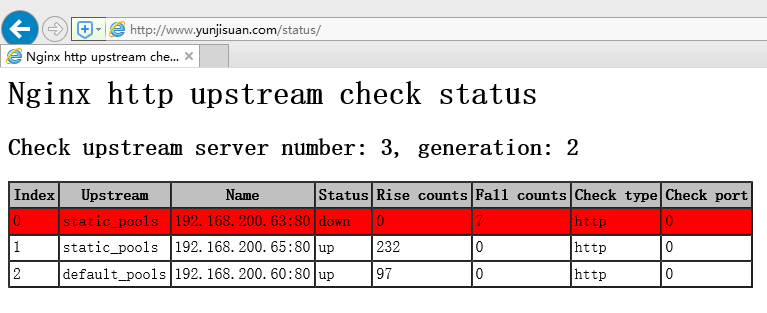
5.8宕掉任意一个RS节点后(3个Web服务器任选一个关闭nginx服务)
[root@web01 ~]# /usr/local/nginx/sbin/nginx -s stop
5.9再次访问健康监测页面时,显示如下图所示:
6. proxy_next_upstream 参数补充
当Nginx接收后端服务器返回proxy_next_upstream参数定义的状态码时,会将这个请求转发给正常工作的后端服务器,例如500,502,503,504,此参数可以提升用户的访问体验,具体配置如下:
server {

listen 80;

server_name www.yunjisuan.com;

location / {

proxy_pass http://static_pools;

proxy_next_upstream error timeout invalid_header http_500 http_502 http_503 http_504;

include proxy.conf;

}

}
Nginx反向代理与负载均衡应用实践(二)的更多相关文章
- Nginx反向代理与负载均衡应用实践(一)
Nginx反向代理与负载均衡应用实践(一) 链接:https://pan.baidu.com/s/1xB20bnuanh0Avs4kwRpSXQ 提取码:migq 复制这段内容后打开百度网盘手机App ...
- nginx 反向代理与负载均衡应用实践
集群介绍 集群就是指一组(若干个)相互独立的计算机,利用高速通信网络组成的一个较大的计算机服务系统,每个集群节点(即集群中的每台计算机)都是运行各自服务的独立服务器.这些服务器之间可以彼此通信,协同向 ...
- Linux实战教学笔记30:Nginx反向代理与负载均衡应用实践
1.1 集群简介 简单地说,集群就是指一组(若干个)相互独立的计算机,利用高速通信网络组成的一个较大的计算机服务系统,每个集群节点(即集群中的每台计算机)都是运行各自服务的独立服务器.这些服务器之间可 ...
- Nginx反向代理,负载均衡,redis session共享,keepalived高可用
相关知识自行搜索,直接上干货... 使用的资源: nginx主服务器一台,nginx备服务器一台,使用keepalived进行宕机切换. tomcat服务器两台,由nginx进行反向代理和负载均衡,此 ...
- nginx反向代理与负载均衡
一:nginx反向代理与负载均衡配置思路与用法 1.nginx反向代理:就是你去相亲时,媒婆就是这里的代理,让媒婆带你去见姑娘 2.nginx负载均衡:就是有很多的媒婆经过商量给你选出最适合你的姑娘, ...
- 【转】Nginx反向代理和负载均衡
原文链接:http://www.cnblogs.com/shuoer/p/7820899.html Nginx反向代理和负载均衡 环境说明 由于我使用的是windows系统,所以我用虚拟机虚拟出来了3 ...
- 谁说前端不需要懂-Nginx反向代理与负载均衡
转:https://juejin.im/post/5b01336af265da0b8a67e5c9 学到老活到老 前端圈一直很新,一直要不停的学习,而且在进入大厂的路上,还要求熟悉一门后台语言等等.用 ...
- [转]Nginx反向代理和负载均衡部署指南
Nginx反向代理和负载均衡部署指南 1. 安装 1) 从Nginx官网下载页面(http://nginx.org/en/download.html)下载Nginx最 ...
- 基于Nginx反向代理及负载均衡
基于Nginx反向代理及负载均衡 参考:http://nginx.org/en/docs/http/ngx_http_proxy_module.html#proxy_pass 只要没有被启用,默认就是 ...
随机推荐
- iview 分割面板效果(二)
源码地址:https://gitee.com/yolanda624/coffer/tree/master/src/components/a-split-panel
- 【知识强化】第六章 查找 6.4 散列(Hash)表
本节课我们来学习一种新的查找方式叫做散列查找.什么是散列查找呢?在学习散列查找之前,一定要介绍一个基本概念就是散列表.那么学习散列表之前我们先来回忆一下之前所学习过的所有查找方式,那么无论是顺序查找还 ...
- SSH远程管理服务实战
目录 SSH远程管理服务实战 1.SSH基本概述 2.SSH相关命令 3.Xshell连接不上虚拟机 4.scp命令 5.sftp命令 6.SSH验证方式 7.SSH场景实践 8.SH安全优化 9.交 ...
- 何时使用move
https://zhidao.baidu.com/question/1514190267640555740.html 但编译器有copy elision优化,相当于原地构造,效率要高于move,手动指 ...
- 离线安装.NET Framework 3.5
通过 NetFx3.cab 文件安装 NetFx3.cab下载链接: 链接:https://pan.baidu.com/s/1OPk-G_ChSwV89VZl6TV-LA 提取码:8zel 复制这段内 ...
- 2019年React学习路线图
作者|javinpaul 译者|无明 之前我们已经介绍了 2019 年 Vue 学习路线图,而 React 作为当前应用最广泛的前端框架,在 Facebook 的支持下,近年来实现了飞越式的发展,我们 ...
- JavaSE---多线程---线程的控制
1.Java提供了一些工具方法,可以便捷控制线程的执行: 1.1 join Thread提供了让一个线程等待另一个线程执行完成的方法:join: 当某个程序的执行流中调用其他线程的join方法,该线程 ...
- python-列表list- 元组(tuple)- 集合(set)-字典(dict)-实例代码
python 经常用的数据类型还有列表list- 元组(tuple)- 集合(set)-字典(dict),以下是这四种类型用法的简单示例. 1.列表list [ ] 元素可变 , 有序 ...
- Spring data jpa persistence .xml 配置文件
<?xml version="1.0" encoding="UTF-8"?><persistence xmlns="http://j ...
- ceph 指定OSD创建pool
https://my.oschina.net/wangzilong/blog/1549690 ceph集群中允许使用混合类型的磁盘,比如一部分磁盘是SSD,一部分是STAT.如果针对某些业务小高速磁盘 ...