SSM框架搭建过程
- 引入依赖的jar包(pom.xml)
a. <!--Spring SpringMVC相关--> spring-webmvc
b. <!--Spring事务--> spring-jdbc
c. <!--面向切面编程--> spring-aspects
d. <!--mybatis--> mybatis
e. <!--mybatis 整合 spring--> mybatis-spring
f. <!--数据库连接池、驱动--> c3p0 mysql-connector-java
g. <!--jstl,servlet-api--> jstl javax.servlet-api
h. <!— MBG--> mybatis-generator-core
i. <!— junit--> junit
- webapp/WEB-INF/web.xml 中
- src/main/resources目录下新建applicationContext.xml
- web.xml同级目录下新建dispatcherServlet-servlet.xml并配置
- 扫描控制器
- 配置视图解析器
- <!--两个标准配置 -->
a. 服务器一启动就启动Spring 容器
b. springMVC前端控制器
c. 字符编码过滤器,一定要放在所有过滤器之前
d. 使用Rest风格的URI,将页面普通的post请求转为指定的
delete或者put请求
<!-- 将springmvc不能处理的请求交给tomcat -->
<!-- 能支持springmvc更高级的一些功能-->
- 配置Spring在applicationContext.xml中
a. 扫描除控制器以外的其他组件
b. 配置数据源(同时将dbconfig.properties文件导入到resources目录下)
c. 配置和MyBatis的整合,同时在src/main/resources下创建mybaitis的配置文件mybatis-config.xml以及mapper文件夹
d. 配置扫描器,将mybatis接口的实现加入到ioc容器中
e. 配置一个可以执行批量的sqlSession
f. 配置事务控制
g. xml配置事务<!-- 切入点表达式 *表示返回值类型 ,表示com.cn.crud.service包下的,..表示即使有子包仍然可以,表达式表达的是该包下的所有方法都能切入事务-->
h. 配置事务增强,事务如何切入
- 配置MyBatis在mybatis-config.xml中
- 在当前工程下创建mbg.xml进行配置,使用mybatis 逆向工程生成对应的bean 、dao和 mapper
- mbg.xml文件
<?xml version="1.0" encoding="UTF-8"?>
<!DOCTYPE generatorConfiguration
PUBLIC "-//mybatis.org//DTD MyBatis Generator Configuration 1.0//EN"
"http://mybatis.org/dtd/mybatis-generator-config_1_0.dtd">
<generatorConfiguration><context id="DB2Tables" targetRuntime="MyBatis3">
<commentGenerator>
<property name="suppressAllComments" value="true" />
</commentGenerator>
<!-- 配置数据库连接 -->
<jdbcConnection driverClass="com.mysql.jdbc.Driver"
connectionURL="jdbc:mysql://localhost:3306/ssm_crud" userId="root"
password="123456">
</jdbcConnection><javaTypeResolver>
<property name="forceBigDecimals" value="false" />
</javaTypeResolver><!-- 指定javaBean生成的位置 -->
<javaModelGenerator targetPackage="com.atguigu.crud.bean"
targetProject=".\src\main\java">
<property name="enableSubPackages" value="true" />
<property name="trimStrings" value="true" />
</javaModelGenerator><!--指定sql映射文件生成的位置 -->
<sqlMapGenerator targetPackage="mapper" targetProject=".\src\main\resources">
<property name="enableSubPackages" value="true" />
</sqlMapGenerator><!-- 指定dao接口生成的位置,mapper接口 -->
<javaClientGenerator type="XMLMAPPER"
targetPackage="com.atguigu.crud.dao" targetProject=".\src\main\java">
<property name="enableSubPackages" value="true" />
</javaClientGenerator><!-- table指定每个表的生成策略 -->
<table tableName="tbl_emp" domainObjectName="Employee"></table>
<table tableName="tbl_dept" domainObjectName="Department"></table>
</context>
</generatorConfiguration>- Mybatis逆向工程测试
public class MBGTest {
public static void main(String[] args) throws Exception {
List<String> warnings = new ArrayList<String>();
boolean overwrite = true;
File configFile = new File("mbg.xml");
ConfigurationParser cp = new ConfigurationParser(warnings);
Configuration config = cp.parseConfiguration(configFile);
DefaultShellCallback callback = new DefaultShellCallback(overwrite);
MyBatisGenerator myBatisGenerator = new MyBatisGenerator(config,
callback, warnings);
myBatisGenerator.generate(null);
}
}
- 修改mapper文件
其中,<resultMap id="BaseResultMap_Dept" type="com.cn.crud.bean.Employee">
<result column="emp_id"
jdbcType="INTEGER" property="empId" />
<result column="emp_name"
jdbcType="VARCHAR" property="empName" />
<result
column="emp_gender" jdbcType="CHAR"
property="empGender" />
<result column="emp_email"
jdbcType="VARCHAR" property="empEmail" />
<result column="d_id"
jdbcType="INTEGER" property="dId" />
<association
property="department"
javaType="com.cn.crud.bean.Department">
<id column="dept_id"
property="deptId"/>
<result
column="dept_name" property="deptName"/>
</association>
</resultMap>
<association> 关联查询,了解
10. * 测试dao层的工作
*推荐Spring的项目就可以使用Spring的单元测试,可以自动注入我们需要的组件
*1、导入SpringTest模块
在pom.xml中引入spring-test依赖
<!-- https://mvnrepository.com/artifact/org.springframework/spring-test
-->
<dependency>
<groupId>org.springframework</groupId>
<artifactId>spring-test</artifactId>
<version>5.1.3.RELEASE</version>
<scope>test</scope>
</dependency>
*2、@ContextConfiguration指定Spring配置文件的位置
*3、直接autowired要使用的组件即可
*/
@RunWith(SpringJUnit4ClassRunner.class)
@ContextConfiguration(locations={"classpath:applicationContext.xml"})
public class MapperTest {
@Autowired
DepartmentMapper
departmentMapper;
@Autowired
EmployeeMapper
employeeMapper;
@Autowired
SqlSession
sqlSession;
/**
* 测试DepartmentMapper
*/
@Test
public
void testCRUD(){
/* //1、创建SpringIOC容器
ApplicationContext
ioc = new ClassPathXmlApplicationContext("applicationContext.xml");
//2、从容器中获取mapper
DepartmentMapper
bean = ioc.getBean(DepartmentMapper.class);*/
System.out.println(departmentMapper);
//1、插入几个部门
// departmentMapper.insertSelective(new
Department(null, "开发部"));
// departmentMapper.insertSelective(new
Department(null, "测试部"));
//2、生成员工数据,测试员工插入
employeeMapper.insertSelective(new
Employee(null, "Jerry", "M", "Jerry@atguigu.com",
1));
//3、批量插入多个员工;批量,使用可以执行批量操作的sqlSession。
// for(){
// employeeMapper.insertSelective(new
Employee(null, , "M", "Jerry@atguigu.com", 1));
// }
EmployeeMapper
mapper = sqlSession.getMapper(EmployeeMapper.class);
for(int
i = 0;i<1000;i++){
String
uid = UUID.randomUUID().toString().substring(0,5)+i;
mapper.insertSelective(new
Employee(null,uid, "M", uid+"@atguigu.com", 1));
}
System.out.println("批量完成");
}
}
11. 分页使用插件pagehelper
需要在pom.xml中引入依赖
<!-- https://mvnrepository.com/artifact/com.github.pagehelper/pagehelper -->

<dependency>

  <groupId>com.github.pagehelper</groupId>

  <artifactId>pagehelper</artifactId>

  <version>5.1.8</version>

</dependency>
其他配置查看:
https://github.com/pagehelper/Mybatis-PageHelper/blob/master/wikis/zh/HowToUse.md
- 12. Spring分页测试代码
@RunWith(SpringJUnit4ClassRunner.class)
@WebAppConfiguration
@ContextConfiguration(locations = { "classpath:applicationContext.xml",
"file:src/main/webapp/WEB-INF/dispatcherServlet-servlet.xml" })
public class MvcTest {
// 传入Springmvc的ioc
@Autowired
WebApplicationContext context;
// 虚拟mvc请求,获取到处理结果。
MockMvc mockMvc;
@Before
public void initMokcMvc() {
mockMvc = MockMvcBuilders.webAppContextSetup(context).build();
}
@Test
public void testPage() throws Exception {
//模拟请求拿到返回值
MvcResult result = mockMvc.perform(MockMvcRequestBuilders.get("/emps").param("pn", "5"))
.andReturn();
//请求成功以后,请求域中会有pageInfo;我们可以取出pageInfo进行验证
MockHttpServletRequest request = result.getRequest();
PageInfo pi = (PageInfo) request.getAttribute("pageInfo");
System.out.println("当前页码:"+pi.getPageNum());
System.out.println("总页码:"+pi.getPages());
System.out.println("总记录数:"+pi.getTotal());
System.out.println("在页面需要连续显示的页码");
int[] nums = pi.getNavigatepageNums();
for (int i : nums) {
System.out.print(" "+i);
}
//获取员工数据
List<Employee> list = pi.getList();
for (Employee employee : list) {
System.out.println("ID:"+employee.getEmpId()+"==>Name:"+employee.getEmpName());
}
}
}
13. @ResponseBody
@ResponseBody 可以把返回的对象转换为json串,要想其正常工作需要导入jackson包:jackson-databind
<!-- https://mvnrepository.com/artifact/com.fasterxml.jackson.core/jackson-databind -->

<dependency>

  <groupId>com.fasterxml.jackson.core</groupId>

  <artifactId>jackson-databind</artifactId>

  <version>2.9.8</version>

</dependency>
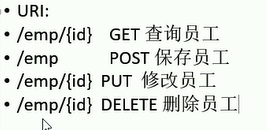
14. rest风格的URI

SSM框架搭建过程的更多相关文章
- SpringMVC笔记——SSM框架搭建简单实例
落叶枫桥 博客园 首页 新随笔 联系 订阅 管理 SpringMVC笔记——SSM框架搭建简单实例 简介 Spring+SpringMVC+MyBatis框架(SSM)是比较热门的中小型企业级项目开发 ...
- SSM框架搭建web服务器实现登录功能(Spring+SpringMVC+Mybatis)
初学java EE,虽然知道使用框架会使开发更加便捷高效,但是对于初学者来说,感到使用框架比较迷惑,尤其是各种jar包的引用.各种框架的配置.注解的使用等等. 最好的学习方法就是实践,于是下载了一个现 ...
- SSM 框架搭建
SSM框架搭建(Spring.SpringMVC.Mybatis) 一:基本概念 Spring : Spring是一个开源框架,Spring是于2003 年兴起的一个轻量级的Java 开发框 ...
- SSM框架整合过程总结
-----------------------siwuxie095 SSM 框架整合过程总结 1.导入相关 jar 包( ...
- SSM框架搭建教程(从零开始,图文结合)
1.准备 IntelliJ IDEA Tomcat JDK Maven mysql spring.springmvc.mybatis 了解 现在假设如上条件你都具备,那么通过我这篇博客 你一定可以整合 ...
- 实习小结(二)--- SSM框架搭建
SSM项目框架搭建 前几天做了一个学生信息管理的项目,使用纯控制台输入,查询数据库,将信息在控制台中打印,功能完善得差不多之后,老师让将这个项目移植到Web中,使用Spring+SpringMVC+M ...
- idea ssm框架搭建
1.分享一篇完整的ssm框架搭建连接 大牛博客:https://www.cnblogs.com/toutou/p/ssm_spring.html#_nav_0 2.我的搭建的完整项目连接,可以进入我的 ...
- ssm框架搭建整合测试
下载各种jar包 mybatis下载 https://github.com/mybatis/mybatis-3/releases mysql驱动下载 http://mvnrepository.com/ ...
- SSM框架搭建详细解析
总结了一下搭建SSM框架流程,在以后用到的时候方便回头使用. 使用工具:MyEclipse 2015:Tomcat 8版本:jdk1.8版本. 首先: 1:创建一个WebProject项目,jdk1. ...
随机推荐
- CentOS7.2安装Oracle12.1.0.2
Centos7.2环境安装(安装桌面) #安装界面 #查看版本 cat /etc/redhat-release #查看连接 ifconfig eth0 echo "127.0.0.1 tes ...
- .NET Core 构建跨平台的桌面应用
1.运行环境 开发工具:Visual Studio 2017 JDK版本:.NET Core 2.0 项目管理工具:nuget 2.GITHUB地址 https://github.com/nbfujx ...
- spring-boot 定时任务案例
1.运行环境 开发工具:intellij idea JDK版本:1.8 项目管理工具:Maven 4.0.0 2.Maven Plugin管理 pom.xml配置代码: <?xml versio ...
- wangeditor 粘贴word内容带样式
这种方法是servlet,编写好在web.xml里配置servlet-class和servlet-mapping即可使用 后台(服务端)java服务代码:(上传至ROOT/lqxcPics文件夹下) ...
- 10.18.1 linux文本编辑器vim
vi和vim的区别 编辑一个文本时,vi不会显示颜色,而vim会显示颜色,vi 有点类似windows记事本,简单,那么就是vim复杂编辑器,功能复杂,高亮,自动缩进(写shell/python脚本用 ...
- BUUCTF | SQL COURSE 1
一开始还以为是在登录框进行注入,于是fuzzing了一下发现一个注入点都没有 1 and 1 1 and 0 1' and '1 1' and '0 1" and "1 1&quo ...
- docker镜像加速遇见的一个问题
今天运行docker发现了一个问题,运行docker images会报 Cannot connect to the Docker daemon at unix:///var/run/docker.so ...
- 【SpringBoot】 一种解决接口返回慢的方式
前言 使用springboot开发后台代码的时候,很核心的一个功能是为前端提供接口,那么很可能你会遇到如下问题: 1. 接口里面调用的service层是第三方库或者第三方后台程序,导致访问很慢. 2. ...
- 术语-Portal:Portal(Web站点)
ylbtech-术语-Portal:Portal(Web站点) Portal作为网关服务于因特网的一种WEB站点.Portal是链路.内容和为用户可能找到的感兴趣的信息(如新闻.天气.娱乐.商业站点. ...
- Class-DbConnectionManipulator:Execute,QueryFirstDefault<>
ylbtech-Class-DbConnectionManipulator:Execute,QueryFirstDefault<> 1.返回顶部 1. public object GetS ...