Visual Studio2012中搭建WCF项目
分布式系统:指在系统与系统之间进行通信,系统不再是孤立的,例如:淘宝查看物流信息,或是hao123的天气预报,这些可能都是用的别的系统的web方法。
1.创建空的解决方案
2.新建项目-WCF服务库项目,项目名称:XfrogWCFService
3.在XfrogWCFService项目中添加[System.ServiceModel]的引用
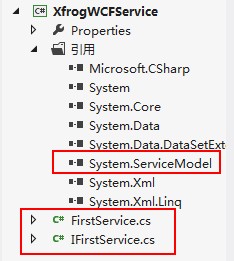
4.上图是该项目的结构打开IFirstServices.cs这个是接口也是一个服务契约,客户端调用方法都必须遵守,代码如下。
using System;

using System.Collections.Generic;

using System.Linq;

using System.Text;

using System.Threading.Tasks;

using System.ServiceModel;

namespace XfrogWCFService

{

        /// <summary>

        /// 注意在接口上申明了ServiceContract特性,即服务契约,表明该接口是一个服务

        /// </summary>

        [ServiceContract]

        public interface IFirstService

        {

            /// <summary>

            /// 表示该方法是IFirstService的一个服务方法,客户端可远程调用该方法。

            /// </summary>

            /// <param name="name"></param>

            /// <returns></returns>

            [OperationContract]

            String GetData(int a,int b);

        }

}
5.再打开FiretService.cs这个文件对接口进行实现,也就是Web方法所要实现的功能,为了学习,做了一个两数相加的操作,代码如下。
using System;

using System.Collections.Generic;

using System.Linq;

using System.Text;

using System.Threading.Tasks;

namespace XfrogWCFService

{

   public class FirstService : IFirstService

    {

        string IFirstService.GetData(int a,int b)

        {

            return String.Format("{0}+{1}={2}",a,b,(a+b));

        }

    }

}
6.下面我们在解决方案中重新建立一个【客户端控制台应用程序】的项目,名称叫做Host,这是web服务的主人[宿主],意思是该服务的启动或者关闭都归它来控制。

7.我们的解决方案成了上面的结构,也同样要添加[System.ServiceModel]的引用,还有对XfrogWCFService的引用,然后打开Program.cs
using System;

using System.Collections.Generic;

using System.Linq;

using System.Text;

using System.Threading.Tasks;

using System.ServiceModel;

using XfrogWCFService;

namespace Host

{

    class Program

    {

        static void Main(string[] args)

        {   //这段代码说创建一个新的服务宿主,这个服务是FirstService

            //也就是实现IFirstService接口的类

            using (ServiceHost host = new ServiceHost(typeof(FirstService)))

            {

                host.Open();

                Console.WriteLine("服务已启动,按任意键中止...");

                Console.ReadKey(true);

                host.Close();

            }

        }

    }

}
8.接下来打开Host项目中的App.config文件,应该是会添加ServiceModel节点,如下面:
<?xml version="1.0" encoding="utf-8" ?>

<configuration>

  <system.serviceModel>

    <services>

      <service name="XfrogWCFService.FirstService" behaviorConfiguration="behaviorConfiguration">

        <host>

          <baseAddresses>

            <add baseAddress="http://192.168.10.58:8100/"/>

          </baseAddresses>

        </host>

        <endpoint address="http://192.168.10.58:8100/" binding="basicHttpBinding"

                  contract="XfrogWCFService.IFirstService"

                  name="BasicHttpBinding_IFirstService"></endpoint>

      </service>

    </services>

    <behaviors>

      <serviceBehaviors>

        <behavior name="behaviorConfiguration">

          <serviceMetadata httpGetEnabled="true"/>

        </behavior>

      </serviceBehaviors>

    </behaviors>

  </system.serviceModel>

</configuration>
9.现在服务这边应该就是搭建好了,可以测试下,运行Host项目:如果是这样代表服务已经搭建成功了!

------------------------------------下面是客户端的哦-----------------------------------------
1.重新在别的地方建立一个解决方案,然后创建一个类库名称是Clinent1。
2.添加webService引用,步骤是:
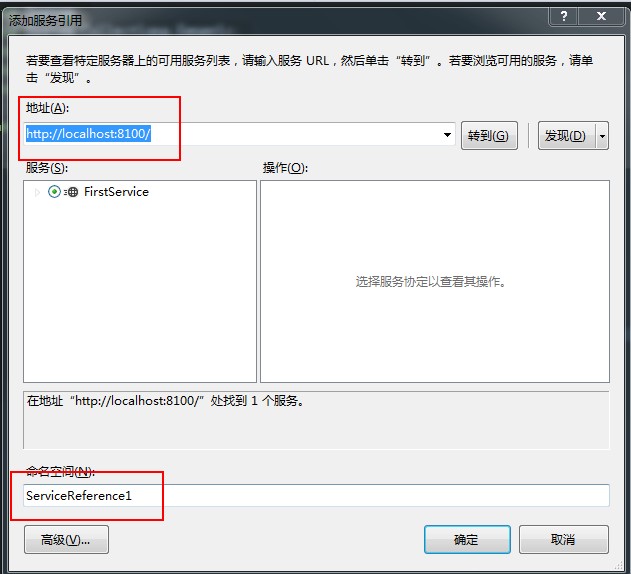
2.1右击【引用】点击【添加服务引用】然后如下图:
地址是我们在wcf服务器端App.config页面写的地址将ip换成localhost
点击转到会查看到这个地址的服务
命名空间可以修改,这个是我们调用服务的命名空间,然后点击【确定】
3.给Clinent1添加ServiceModel引用。
4.在Clinent1中新建一个类Program.cs代码如下。
using System;

using System.Collections.Generic;

using System.Linq;

using System.Text;

using System.Threading.Tasks;

namespace Clinent1

{

    public class Program

    {

        /// <summary>

        /// WCF调用方法

        /// </summary>

        /// <param name="par"></param>

        /// <returns></returns>

        public string getwcfstr(int a,int b)

        {

            ServiceReference1.FirstServiceClient aa = new ServiceReference1.FirstServiceClient();

            return aa.GetData(a, b);//调用服务服务器接口的方法。

        }

    }

}
5.在该解决方案中创建一个新的网站项目,添加ServiceModel和Clinent1的引用。
6.Clinent1的App.config如下:
<?xml version="1.0" encoding="utf-8" ?>

<configuration>

    <system.serviceModel>

        <bindings>

            <basicHttpBinding>

                <binding name="BasicHttpBinding_IFirstService" />

            </basicHttpBinding>

        </bindings>

        <client>

            <endpoint address="http://192.168.10.58:8100/" binding="basicHttpBinding"

                bindingConfiguration="BasicHttpBinding_IFirstService" contract="ServiceReference1.IFirstService"

                name="BasicHttpBinding_IFirstService" />

        </client>

    </system.serviceModel>

</configuration>
7.web.Config在configuration下添加,代码如下:
<system.serviceModel>

    <bindings>

      <basicHttpBinding>

        <binding name="BasicHttpBinding_IFirstService" closeTimeout="00:01:00"

            openTimeout="00:01:00" receiveTimeout="00:10:00" sendTimeout="00:01:00"

            allowCookies="false" bypassProxyOnLocal="false" hostNameComparisonMode="StrongWildcard"

            maxBufferSize="65536" maxBufferPoolSize="524288" maxReceivedMessageSize="65536"

            messageEncoding="Text" textEncoding="utf-8" transferMode="Buffered"

            useDefaultWebProxy="true">

          <readerQuotas maxDepth="32" maxStringContentLength="8192" maxArrayLength="16384"

              maxBytesPerRead="4096" maxNameTableCharCount="16384" />

          <security mode="None">

            <transport clientCredentialType="None" proxyCredentialType="None"

                realm="" />

            <message clientCredentialType="UserName" algorithmSuite="Default" />

          </security>

        </binding>

      </basicHttpBinding>

    </bindings>

    <client>

      <endpoint address="http://192.168.10.58:8100/" binding="basicHttpBinding"

          bindingConfiguration="BasicHttpBinding_IFirstService" contract="ServiceReference1.IFirstService"

          name="BasicHttpBinding_IFirstService" />

    </client>

  </system.serviceModel>
8.添加一个aspx页面,前台写个div后台代码如下:
 protected void Page_Load(object sender, EventArgs e)

        {

            Program p=new Program();
            //设置div的内容调用服务传递参数

            div_wcf.InnerText = p.getwcfstr(10, 5);

        }
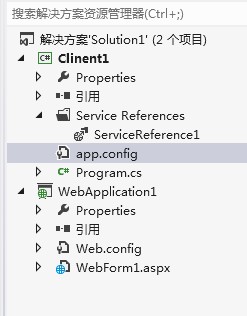
9.客户端的结构是:
10.运行WebForm1.aspx的效果:为了测试,做的功能很简单啊。

Visual Studio2012中搭建WCF项目的更多相关文章
- (15)Visual Studio中使用PCL项目加入WCF WebService参考
原文 Visual Studio中使用PCL项目加入WCF WebService参考 Visual Studio中使用PCL项目加入WCF WebService参考 作者:Steven Chang 2 ...
- [转]初试visual studio2012的新型数据库LocalDB 及 在visual studio2012中如何使用localDB具体讲解
本文转自:http://www.cnblogs.com/zhangran/archive/2012/08/26/2657864.html 初试visual studio2012的新型数据库LocalD ...
- [Xamarin.iOS] Visual Studio中Xamarin.iOS项目,无法加入PCL项目参考、NuGet组件参考
[Xamarin.iOS] Visual Studio中Xamarin.iOS项目,无法加入PCL项目参考.NuGet组件参考 解决方案 目前Visual Studio中最新版本的Xamarin.iO ...
- Web 应用程序项目与 Visual Studio 中的网站项目的异同
要查看英语原文,请勾选“英语”复选框.也可将鼠标指针移到文本上,在弹出窗口中显示英语原文. 翻译 英语 本文档已存档,并且将不进行维护. Web 应用程序项目与 Visual Studio 中的网站项 ...
- 在Visual Studio中新增生成项目
在Visual Studio中新增生成项目 选择适配器类型 选择WCF-SQL适配器 创建连接选项 选择相应的存储过程 生成相应的消息架构
- 在visual studio2012中如何使用localDB具体讲解
http://www.cnblogs.com/zhangran/archive/2012/08/26/2657864.html 说明: 经过一段时间的小捉摸终于基本掌握在vs2012中如何使用loca ...
- 久违的问候-----eclipse中搭建maven项目2016年
好久没有写过博客了,可是一直向别人推荐自己的博客,深感惭愧!今天再次在寒冷之夜继续code,config,write. 接下来,我们就来谈下eclipse中搭建maven web工程的步骤!虽然就是一 ...
- 我们的相识,总是那么巧。-------eclipse中搭建maven项目
一.我们就来谈下eclipse中搭建maven web工程的步骤!虽然就是一个简单的例子,但是过程是很艰辛的. 首先我们看一下eclipse的封面,下面就是刚打开的华丽封面哦 其次我安装了eclips ...
- HTTP 错误 404.3 - Not Found 由于扩展配置问题而无法提供您请求的页面。如果该页面是脚本 ,请添加处理程序。如果下载文件,请添加 MIME 映射。 IIS站点中添加WCF项目后浏览网站报错解决方法。
vs2013 wcf服务 windows10 家庭中文版 上图中的红色没有出现就按照下面的方法做: 按照上图所示勾选. 刷新上图中你的网站,查看上图右边的内容是否出现,如果出现,再次重新浏览网站,看一 ...
随机推荐
- DataTable 导出到 Excel 类
底层类: #region DataTable 导出到 Excel /// <summary> /// DataTable 导出到 Excel /// </summary> // ...
- 聊聊LAA(LARGE ADDRESS AWARE)
博客搬到了fresky.github.io - Dawei XU,请各位看官挪步.最新的一篇是:聊聊LAA(LARGE ADDRESS AWARE).
- innobackupex自动备份脚本(增量备份,自动压缩)
#!/bin/bash #日期转为天数 function date2days { echo "$*" | awk '{ z=-$)/); y=$+-z; m=$+*z-; j=*m ...
- 10409 - Die Game
Problem G: Die Game Life is not easy. Sometimes it is beyond your control. Now, as contestants of AC ...
- [RxJS] Drag and Drop example
Improving our mouse drag event Our mouse drag event is a little too simple. Notice that when we drag ...
- [React] React Fundamentals: Add-on ClassSet() for ClassName
To get the add-ons, use react-with-addons.js (and its minified counterpart) rather than the common r ...
- android88 录音机
package com.itheima.recorder; import android.os.Bundle; import android.app.Activity; import android. ...
- redis-BOOK
https://www.gitbook.com/book/gnuhpc/redis-all-about/details
- DNS 和 IPv6 配置攻略
Windows 2003 DNS配置攻略 http://lgzeng2360.blog.51cto.com/275998/161908/ http://ask.zol.com.cn/q/21861.h ...
- dom4j中对xml的查增
package dom; import java.io.FileWriter;import java.util.Iterator; import org.dom4j.Document;import o ...