CSharpGL(6)在OpenGL中绘制UI元素
CSharpGL(6)在OpenGL中绘制UI元素
2016-08-13
由于CSharpGL一直在更新,现在这个教程已经不适用最新的代码了。CSharpGL源码中包含10多个独立的Demo,更适合入门参考。
为了尽可能提升渲染效率,CSharpGL是面向Shader的,因此稍有难度。
主要内容
学习使用IUILayout接口及其机制,以实现在OpenGL中绘制UI元素。
以SimpleUIAxis为例演示如何使用IUILayout。
下载
您可以在(https://github.com/bitzhuwei/CSharpGL)找到最新的源码。欢迎感兴趣的同学fork之。
什么是OpenGL中的UI元素
您可以在源码中找到SimpleUIAxis这一示例。
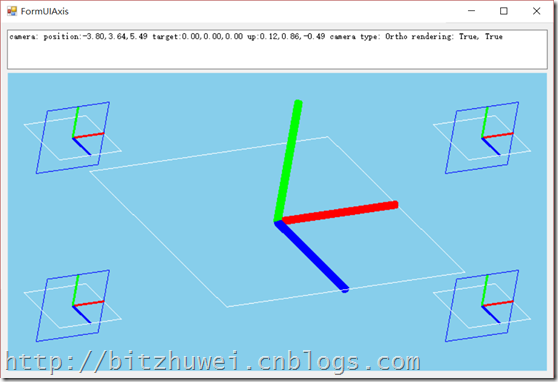
如上图所示,有5个坐标轴,中间那个是一个普通的三维模型(元素),作为对照。
四个角上各有一个坐标轴,这四个坐标轴的位置是绑定到窗口对应的边的,即会随着窗口的缩放自动调整位置,就想Winform里的Control一样。这样的元素就称为OpenGL里的UI元素。
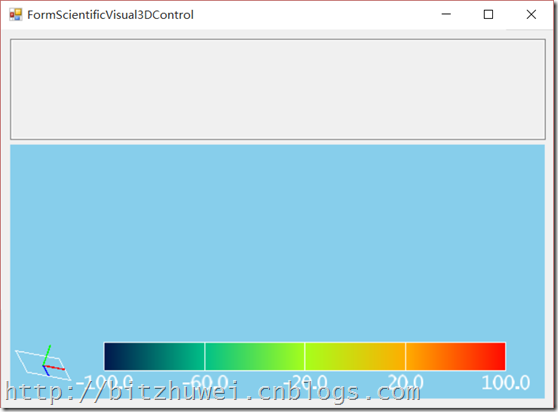
上面那个UI元素是立体的,一般我们在Winform里常见的UI都是二维的,像下面这个色标条一样。当然了,如果我们能实现上图中的三维的UI元素,自然就能实现二维的UI元素了。
IUILayout机制
接口
为实现UI元素,我的思路是:设计一个接口IUILayout,让那些应当作为UI元素布局的元素实现此接口,之后就可以通过简单地调用IUILayout的扩展方法来实现UI布局。
1     /// <summary>

2     /// 实现在OpenGL窗口中的UI布局

3     /// </summary>

4     public interface IUILayout

5     {

6         IUILayoutParam Param { get; set; }

7     }
一个UI元素,需要哪些参数呢?它需要知道它应绑定到窗口的上下左右哪边;需要知道其长度是固定的还是随窗口变化的;需要知道它是否应显示在所有元素的最前方(即不被其他元素覆盖)。
1 public struct IUILayoutParam
2 {
3
4 /// <summary>
5 /// the edges of the <see cref="GLCanvas"/> to which a UI’s rect is bound and determines how it is resized with its parent.
6 /// <para>something like AnchorStyles.Left | AnchorStyles.Bottom.</para>
7 /// </summary>
8 public System.Windows.Forms.AnchorStyles Anchor;
9
10 /// <summary>
11 /// Gets or sets the space between viewport and SimpleRect.
12 /// </summary>
13 public System.Windows.Forms.Padding Margin;
14
15 /// <summary>
16 /// Stores width when <see cref="OpenGLUIRect.Anchor"/>.Left & <see cref="OpenGLUIRect.Anchor"/>.Right is <see cref="OpenGLUIRect.Anchor"/>.None.
17 /// <para> and height when <see cref="OpenGLUIRect.Anchor"/>.Top & <see cref="OpenGLUIRect.Anchor"/>.Bottom is <see cref="OpenGLUIRect.Anchor"/>.None.</para>
18 /// </summary>
19 public System.Drawing.Size Size;
20
21 public int zNear;
22
23 public int zFar;
24
25 public IUILayoutParam(AnchorStyles anchorStyle, Padding padding, System.Drawing.Size size,
26 int zNear = -1000, int zFar = 1000)
27 {
28 // TODO: Complete member initialization
29 this.Anchor = anchorStyle;
30 this.Margin = padding;
31 this.Size = size;
32 this.zNear = zNear;
33 this.zFar = zFar;
34 }
35
36 }
熟悉Winform里控件的同学,一定常用Control.Anchor属性、Padding属性和Control.Size属性,这里我们完全借用了Winform现成的这三个数据结构。我希望这样能方便理解。
实现
实现UI布局的根本问题就是得到一个特殊的变换矩阵,能够让指定元素在窗口的固定位置显示(根据其UIParam值)。这个变换矩阵的计算过程有点长,其思路就是根据viewpoint大小和UI元素的布局设定(UIParam值),计算其应有的宽高及其在ortho()或perspective()中应有的参数。
  1     public static class IUILayoutHelper

  2     {

  3         /// <summary>

  4         /// 获取此UI元素的投影矩阵、视图矩阵和模型矩阵

  5         /// </summary>

  6         /// <param name="uiElement"></param>

  7         /// <param name="projectionMatrix"></param>

  8         /// <param name="viewMatrix"></param>

  9         /// <param name="modelMatrix"></param>

 10         /// <param name="camera">如果为null,会以glm.lookAt(new vec3(0, 0, 1), new vec3(0, 0, 0), new vec3(0, 1, 0))计算默认值。</param>

 11         /// <param name="maxDepth">UI元素的外接球半径的倍数。</param>

 12         public static void GetMatrix(this IUILayout uiElement,

 13             out mat4 projectionMatrix, out mat4 viewMatrix, out mat4 modelMatrix,

 14             IViewCamera camera = null, float maxDepth = 2.0f)

 15         {

 16             IUILayoutArgs args = uiElement.GetArgs();

 17             float max = (float)Math.Max(args.UIWidth, args.UIHeight);

 18

 19             {

 20                 //projectionMatrix = glm.ortho((float)args.left, (float)args.right, (float)args.bottom, (float)args.top,

 21                 // TODO: / 2后与legacy opengl的UI元素显示就完全一致了。为什么???

 22                 projectionMatrix = glm.ortho((float)args.left / 2, (float)args.right / 2, (float)args.bottom / 2, (float)args.top / 2,

 23                     uiElement.Param.zNear, uiElement.Param.zFar);

 24                 // 下面注释掉的代码是用来测试legacy OpenGL的matrix与GLM库计算的matrix是否相同用的。已经证明了两者完全相同,此处仅作留念+以防万一。

 25                 //{

 26                 //    float[] matrix = new float[16];

 27

 28                 //    GL.MatrixMode(GL.GL_PROJECTION);

 29                 //    GL.PushMatrix();

 30                 //    GL.GetFloat(GetTarget.ProjectionMatrix, matrix);

 31

 32                 //    GL.LoadIdentity();

 33                 //    GL.GetFloat(GetTarget.ProjectionMatrix, matrix);

 34

 35                 //    GL.Ortho(args.left / 2, args.right / 2, args.bottom / 2, args.top / 2, uiElement.Param.zNear, uiElement.Param.zFar);

 36                 //    GL.GetFloat(GetTarget.ProjectionMatrix, matrix);// this equals projectionMatrix

 37

 38                 //    GL.PopMatrix();

 39                 //}

 40                 // 把UI元素移到ortho长方体的最靠近camera的地方,这样就可以把UI元素放到OpenGL最前方。

 41                 projectionMatrix = glm.translate(projectionMatrix, new vec3(0, 0, uiElement.Param.zFar - max / 2 * maxDepth));

 42             }

 43             {

 44                 // UI元素不在三维场景中,所以其Camera可以是null。

 45                 if (camera == null)

 46                 {

 47                     //viewMatrix = glm.lookAt(new vec3(0, 0, 1), new vec3(0, 0, 0), new vec3(0, 1, 0));

 48                     viewMatrix = glm.lookAt(

 49                         Camera.defaultPosition,

 50                         Camera.defaultTarget,

 51                         Camera.defaultUpVector);

 52                 }

 53                 else

 54                 {

 55                     vec3 position = camera.Position - camera.Target;

 56                     position.Normalize();

 57                     viewMatrix = glm.lookAt(position, new vec3(0, 0, 0), camera.UpVector);

 58                 }

 59                 // 下面注释掉的代码是用来测试legacy OpenGL的matrix与GLM库计算的matrix是否相同用的。已经证明了两者完全相同,此处仅作留念+以防万一。

 60                 //{

 61                 //    float[] matrix = new float[16];

 62

 63                 //    GL.MatrixMode(GL.GL_MODELVIEW);

 64                 //    GL.PushMatrix();

 65                 //    GL.GetFloat(GetTarget.ModelviewMatix, matrix);

 66

 67                 //    GL.LoadIdentity();

 68                 //    GL.GetFloat(GetTarget.ModelviewMatix, matrix);

 69

 70                 //    if(camera==null)

 71                 //    {

 72                 //        GL.gluLookAt(0, 0, 1, 0, 0, 0, 0, 1, 0);

 73                 //    }

 74                 //    else

 75                 //    {

 76                 //        vec3 position = camera.Position - camera.Target;

 77                 //        position.Normalize();

 78                 //        GL.gluLookAt(position.x, position.y, position.z, 0, 0, 0, camera.UpVector.x, camera.UpVector.y, camera.UpVector.z);

 79                 //    }

 80                 //    GL.GetFloat(GetTarget.ModelviewMatix, matrix);// this equals viewMatrix

 81

 82                 //    GL.PopMatrix();

 83                 //}

 84             }

 85             {

 86                 modelMatrix = glm.scale(mat4.identity(), new vec3(args.UIWidth / 2, args.UIHeight / 2, max / 2));

 87                 // 下面注释掉的代码是用来测试legacy OpenGL的matrix与GLM库计算的matrix是否相同用的。已经证明了两者完全相同,此处仅作留念+以防万一。

 88                 //{

 89                 //    float[] matrix = new float[16];

 90

 91                 //    GL.MatrixMode(GL.GL_MODELVIEW);

 92                 //    GL.PushMatrix();

 93                 //    GL.GetFloat(GetTarget.ModelviewMatix, matrix);

 94

 95                 //    GL.LoadIdentity();

 96                 //    GL.GetFloat(GetTarget.ModelviewMatix, matrix);

 97

 98                 //    GL.Scale(args.UIWidth / 2, args.UIHeight / 2, max / 2);

 99                 //    GL.GetFloat(GetTarget.ModelviewMatix, matrix);// this equals modelMatrix

100

101                 //    GL.PopMatrix();

102                 //}

103             }

104         }

105

106

107         /// <summary>

108         /// leftRightAnchor = (AnchorStyles.Left | AnchorStyles.Right);

109         /// </summary>

110         const AnchorStyles leftRightAnchor = (AnchorStyles.Left | AnchorStyles.Right);

111

112         /// <summary>

113         /// topBottomAnchor = (AnchorStyles.Top | AnchorStyles.Bottom);

114         /// </summary>

115         const AnchorStyles topBottomAnchor = (AnchorStyles.Top | AnchorStyles.Bottom);

116

117         /// <summary>

118         /// 获取为UI元素布局所需的参数对象。

119         /// </summary>

120         /// <param name="uiElement"></param>

121         /// <returns></returns>

122         public static IUILayoutArgs GetArgs(this IUILayout uiElement)

123         {

124             var args = new IUILayoutArgs();

125

126             CalculateViewport(args);

127

128             CalculateCoords(uiElement, args.viewportWidth, args.viewportHeight, args);

129

130             return args;

131         }

132

133         /// <summary>

134         /// 计算opengl画布的大小。

135         /// </summary>

136         /// <param name="args"></param>

137         static void CalculateViewport(IUILayoutArgs args)

138         {

139             int[] viewport = new int[4];

140             GL.GetInteger(GetTarget.Viewport, viewport);

141             args.viewportWidth = viewport[2];

142             args.viewportHeight = viewport[3];

143         }

144

145         /// <summary>

146         /// 根据UI元素的布局设定,计算其应有的宽高及其在ortho()中应有的参数。

147         /// </summary>

148         /// <param name="uiElement"></param>

149         /// <param name="viewportWidth"></param>

150         /// <param name="viewportHeight"></param>

151         /// <param name="args"></param>

152         static void CalculateCoords(IUILayout uiElement, int viewportWidth, int viewportHeight, IUILayoutArgs args)

153         {

154             IUILayoutParam param = uiElement.Param;

155

156             if ((param.Anchor & leftRightAnchor) == leftRightAnchor)

157             {

158                 args.UIWidth = viewportWidth - param.Margin.Left - param.Margin.Right;

159                 if (args.UIWidth < 0) { args.UIWidth = 0; }

160             }

161             else

162             {

163                 args.UIWidth = param.Size.Width;

164             }

165

166             if ((param.Anchor & topBottomAnchor) == topBottomAnchor)

167             {

168                 args.UIHeight = viewportHeight - param.Margin.Top - param.Margin.Bottom;

169                 if (args.UIHeight < 0) { args.UIHeight = 0; }

170             }

171             else

172             {

173                 args.UIHeight = param.Size.Height;

174             }

175

176             if ((param.Anchor & leftRightAnchor) == AnchorStyles.None)

177             {

178                 args.left = -(args.UIWidth / 2

179                     + (viewportWidth - args.UIWidth)

180                         * ((double)param.Margin.Left / (double)(param.Margin.Left + param.Margin.Right)));

181             }

182             else if ((param.Anchor & leftRightAnchor) == AnchorStyles.Left)

183             {

184                 args.left = -(args.UIWidth / 2 + param.Margin.Left);

185             }

186             else if ((param.Anchor & leftRightAnchor) == AnchorStyles.Right)

187             {

188                 args.left = -(viewportWidth - args.UIWidth / 2 - param.Margin.Right);

189             }

190             else // if ((Anchor & leftRightAnchor) == leftRightAnchor)

191             {

192                 args.left = -(args.UIWidth / 2 + param.Margin.Left);

193             }

194

195             if ((param.Anchor & topBottomAnchor) == AnchorStyles.None)

196             {

197                 args.bottom = -viewportHeight / 2;

198                 args.bottom = -(args.UIHeight / 2

199                     + (viewportHeight - args.UIHeight)

200                         * ((double)param.Margin.Bottom / (double)(param.Margin.Bottom + param.Margin.Top)));

201             }

202             else if ((param.Anchor & topBottomAnchor) == AnchorStyles.Bottom)

203             {

204                 args.bottom = -(args.UIHeight / 2 + param.Margin.Bottom);

205             }

206             else if ((param.Anchor & topBottomAnchor) == AnchorStyles.Top)

207             {

208                 args.bottom = -(viewportHeight - args.UIHeight / 2 - param.Margin.Top);

209             }

210             else // if ((Anchor & topBottomAnchor) == topBottomAnchor)

211             {

212                 args.bottom = -(args.UIHeight / 2 + param.Margin.Bottom);

213             }

214         }

215     }
IUILayoutHelper
如何使用
示例SimpleUIAxis
以本文开头的坐标轴元素为例。这个例子很常用,所以我放到CSharpGL.UIs类库里了,顺便可以作为参考。SimpleUIAxis实现了IUILayout,说明它想要实现UI布局;实现了IMVP,说明它要通过指定mvp矩阵的方式来设置自己的位置。
  1     /// <summary>

  2     /// 用一个<see cref="AxisElement"/>绘制一个固定在窗口某处的坐标系。

  3     /// </summary>

  4     public class SimpleUIAxis : SceneElementBase, IUILayout, IMVP, IDisposable

  5     {

  6         public AxisElement axisElement;

  7

  8         /// <summary>

  9         ///

 10         /// </summary>

 11         /// <param name="anchor">the edges of the viewport to which a SimpleUIRect is bound and determines how it is resized with its parent.

 12         /// <para>something like AnchorStyles.Left | AnchorStyles.Bottom.</para></param>

 13         /// <param name="margin">the space between viewport and SimpleRect.</param>

 14         /// <param name="size">Stores width when <see cref="OpenGLUIRect.Anchor"/>.Left & <see cref="OpenGLUIRect.Anchor"/>.Right is <see cref="OpenGLUIRect.Anchor"/>.None.

 15         /// <para> and height when <see cref="OpenGLUIRect.Anchor"/>.Top & <see cref="OpenGLUIRect.Anchor"/>.Bottom is <see cref="OpenGLUIRect.Anchor"/>.None.</para></param>

 16         /// <param name="zNear"></param>

 17         /// <param name="zFar"></param>

 18         /// <param name="rectColor">default color is red.</param>

 19         public SimpleUIAxis(IUILayoutParam param, GLColor rectColor = null,

 20             float radius = 0.3f, float axisLength = 10, int faceCount = 10)

 21         {

 22             // 把AxiesElement缩放到恰好放进此UI

 23             radius = radius / axisLength / 2;

 24             axisLength = 0.5f;

 25             this.axisElement = new AxisElement(radius, axisLength, faceCount);

 26

 27             IUILayout layout = this;

 28             layout.Param = param;

 29         }

 30

 31         #region IDisposable Members

 32

 33         /// <summary>

 34         /// Internal variable which checks if Dispose has already been called

 35         /// </summary>

 36         protected Boolean disposed;

 37

 38         /// <summary>

 39         /// Releases unmanaged and - optionally - managed resources

 40         /// </summary>

 41         /// <param name="disposing"><c>true</c> to release both managed and unmanaged resources; <c>false</c> to release only unmanaged resources.</param>

 42         protected void Dispose(Boolean disposing)

 43         {

 44             if (disposed)

 45             {

 46                 return;

 47             }

 48

 49             if (disposing)

 50             {

 51                 //Managed cleanup code here, while managed refs still valid

 52                 this.axisElement.Dispose();

 53             }

 54             //Unmanaged cleanup code here

 55

 56             disposed = true;

 57         }

 58

 59         /// <summary>

 60         /// Performs application-defined tasks associated with freeing, releasing, or resetting unmanaged resources.

 61         /// </summary>

 62         public void Dispose()

 63         {

 64             // Call the private Dispose(bool) helper and indicate

 65             // that we are explicitly disposing

 66             this.Dispose(true);

 67

 68             // Tell the garbage collector that the object doesn't require any

 69             // cleanup when collected since Dispose was called explicitly.

 70             GC.SuppressFinalize(this);

 71         }

 72

 73         #endregion

 74

 75         #region IUILayout

 76

 77         public IUILayoutParam Param { get; set; }

 78

 79         #endregion IUILayout

 80

 81

 82         protected override void DoInitialize()

 83         {

 84             this.axisElement.Initialize();

 85

 86             this.BeforeRendering += this.GetSimpleUI_BeforeRendering();

 87             this.AfterRendering += this.GetSimpleUI_AfterRendering();

 88         }

 89

 90         protected override void DoRender(RenderEventArgs e)

 91         {

 92             this.axisElement.Render(e);

 93         }

 94

 95         void IMVP.SetShaderProgram(mat4 mvp)

 96         {

 97             IMVP element = this.axisElement as IMVP;

 98             element.SetShaderProgram(mvp);

 99         }

100

101

102         void IMVP.ResetShaderProgram()

103         {

104             IMVP element = this.axisElement as IMVP;

105             element.ResetShaderProgram();

106         }

107

108         ShaderProgram IMVP.GetShaderProgram()

109         {

110             return ((IMVP)this.axisElement).GetShaderProgram();

111         }

112     }
SimpleUIAxis
这里我还为BeforeRendering和AfterRendering事件提供了一个默认的事件函数。有了它,连BeforeRendering和AfterRendering事件函数都不用再写了。
 1     public static class IUILayoutRenderingHelper

 2     {

 3         private static readonly object synObj = new object();

 4         private static EventHandler<RenderEventArgs> simpleUIAxis_BeforeRendering = null;

 5         private static EventHandler<RenderEventArgs> simpleUIAxis_AfterRendering = null;

 6

 7         /// <summary>

 8         /// 对Xxx : SceneElementBase, IUILayout, IMVP有效的After事件。

 9         /// <para>此处用泛型方法是为了让编译器检测where约束条件,这样就没有“坑”了。</para>

10         /// </summary>

11         /// <typeparam name="T"></typeparam>

12         /// <param name="element"></param>

13         /// <returns></returns>

14         public static EventHandler<RenderEventArgs> GetSimpleUI_AfterRendering<T>(this T element)

15             where T : SceneElementBase, IUILayout, IMVP

16         {

17             if (simpleUIAxis_AfterRendering == null)

18             {

19                 lock (synObj)

20                 {

21                     if (simpleUIAxis_AfterRendering == null)

22                     {

23                         simpleUIAxis_AfterRendering = new EventHandler<RenderEventArgs>(SimpleUI_AfterRendering);

24                     }

25                 }

26             }

27

28             return simpleUIAxis_AfterRendering;

29         }

30

31         /// <summary>

32         /// 对Xxx : SceneElementBase, IUILayout, IMVP有效的Before事件。

33         /// <para>此处用泛型方法是为了让编译器检测where约束条件,这样就没有“坑”了。</para>

34         /// </summary>

35         /// <typeparam name="T"></typeparam>

36         /// <param name="element"></param>

37         /// <returns></returns>

38         public static EventHandler<RenderEventArgs> GetSimpleUI_BeforeRendering<T>(this T element)

39             where T : SceneElementBase, IUILayout, IMVP

40         {

41             if (simpleUIAxis_BeforeRendering == null)

42             {

43                 lock (synObj)

44                 {

45                     if (simpleUIAxis_BeforeRendering == null)

46                     {

47                         simpleUIAxis_BeforeRendering = new EventHandler<RenderEventArgs>(SimpleUI_BeforeRendering);

48                     }

49                 }

50             }

51

52             return simpleUIAxis_BeforeRendering;

53         }

54

55         static void SimpleUI_AfterRendering(object sender, RenderEventArgs e)

56         {

57             IMVP element = sender as IMVP;

58             element.ResetShaderProgram();

59         }

60

61         static void SimpleUI_BeforeRendering(object sender, RenderEventArgs e)

62         {

63             mat4 projectionMatrix, viewMatrix, modelMatrix;

64             {

65                 IUILayout element = sender as IUILayout;

66                 element.GetMatrix(out projectionMatrix, out viewMatrix, out modelMatrix, e.Camera);

67             }

68

69             {

70                 IMVP element = sender as IMVP;

71                 element.SetShaderProgram(projectionMatrix * viewMatrix * modelMatrix);

72             }

73         }

74     }
IUILayoutRenderingHelper
总结
元素的UI布局是一个很实用的功能。所以我尽早地为其写了此篇说明。有什么问题请留言。
CSharpGL(6)在OpenGL中绘制UI元素的更多相关文章
- CSharpGL(26)在opengl中实现控件布局/渲染文字
CSharpGL(26)在opengl中实现控件布局/渲染文字 效果图 如图所示,可以将文字.坐标轴固定在窗口的一角. 下载 CSharpGL已在GitHub开源,欢迎对OpenGL有兴趣的同学加入( ...
- 如何跨线程访问Winform中的UI元素
如何跨线程访问Winform中的UI元素 假如制作一个Socket聊天应用程序,很可能会用到多线程: 例如为Receive方法开辟单独一个线程,例如为Receive方法开辟单独一个线程(后台运行的线程 ...
- Wpf从资源中重用UI元素
在我的界面上有几个选项卡,每个选项卡中都有下面的元素: <StackPanel Orientation="Horizontal"> <Button Content ...
- 在openGL中绘制图形
点的绘制.: glVertex*():星号表示函数要有后缀 该函数 需要放在glBegin函数和glEnd函数之间,glBegin函数的向量指定绘制图元的类型,而glEnd函数没有参数,例如: glB ...
- 关于opengl中的矩阵平移,矩阵旋转,推导过程理解 OpenGL计算机图形学的一些必要矩阵运算知识
原文作者:aircraft 原文链接:https://www.cnblogs.com/DOMLX/p/12166896.html 为什么引入齐次坐标的变换矩阵可以表示平移呢? - Yu Mao的回答 ...
- appium— Android定位webView里面的UI元素
Android SDK中的UIAutomator中本身是不支持网页中的UI元素定位,下面介绍几种常用的定位app内部的网页的UI元素的方法. 一.使用chrome浏览器调试移动端网页 这是使用最多的一 ...
- OpenGL中常用的函数
OPengl的官方文档如下:https://www.opengl.org/sdk/docs/man4/ void glGetIntegerv( GLenum pname, GLint * ...
- 在WPF中减少逻辑与UI元素的耦合
原文:在WPF中减少逻辑与UI元素的耦合 在WPF中减少逻辑与UI元素的耦合 周银辉 1, 避免在逻辑中引用界面元素,别把后台数据强加给UI 一个糟糕的案例 比如说主界 ...
- CSharpGL(31)[译]OpenGL渲染管道那些事
CSharpGL(31)[译]OpenGL渲染管道那些事 +BIT祝威+悄悄在此留下版了个权的信息说: 开始 自认为对OpenGL的掌握到了一个小瓶颈,现在回头细细地捋一遍OpenGL渲染管道应当是一 ...
随机推荐
- 【Android进阶学习】shape和selector的结合使用(转)
原创作品,允许转载,转载时请务必以超链接形式标明文章 原始出处 .作者信息和本声明.否则将追究法律责任.http://liangruijun.blog.51cto.com/3061169/732310 ...
- mysql 中的LIMIT用法
select * from table_name LIMIT 起始偏移量,数量 (1)起始偏移量为0:代表没有偏移,即从第1行开始. (2)数量为-1:代表是无穷,即偏移量之后所有的行. (3)LIM ...
- 使用SHFB(Sandcastle Help File Builder)建立MSDN风格的代码文档
使用SHFB(Sandcastle Help File Builder)建立MSDN风格的代码文档 下载地址:http://sandcastle.codeplex.com/ 下载地址2:http:// ...
- Vue - 实例
1.实例属性介绍如下图所示: 具体介绍如下: A.$parent:访问当前组件的父实例 B.$root:访问当前组件的根实例,要是没有的话,则是自己本身 C.$children:访问当前组件实例的直接 ...
- Theano 学习笔记(一)
Theano 学习笔记(一) theano 为什么要定义共享变量? 定义共享变量的原因在于GPU的使用,如果不定义共享的话,那么当GPU调用这些变量时,遇到一次就要调用一次,这样就会花费大量时间在数据 ...
- 【Oracle】dba_jobs字段说明
dba_jobs 1 字段(列) 数据类型 描述 JOB NUMBER 任务的唯一标示号 LOG_USER ) 提交任务的用户 PRIV_USER ) 赋予任务权限的用户 SCHEMA_USER ) ...
- Cordova 3.x入门 - 目录
这个系列是基于Cordova 3.x的,很多Android的东西都是Eclipse ADT+Ant的,而目前Android的开发已经完全切换到了Android Studio+Gradle,需要大家特别 ...
- XCode6.3上使用opencv教程(MacOSX 10.10)
OpenCV 是一个基于(开源)发行的跨平台计算机视觉库,可以运行在Linux.Windows和Mac OS操作系统上.它轻量级而且高效——由一系列 C 函数和少量 C++ 类构成,同时提供了Pyth ...
- DOS命令详解
DOS命令详解 命令 \? 可以进入命令帮助 1.md命令创建目录. MKDIR [drive:]pathMD [drive:]path 如果命令扩展被启用,MKDIR 会如下改变: 如果需要,MKD ...
- MAC帧和IP包的分析
ping了12次岭南师范学院官网后退出 抓到的包如下 各个名词解释