如何使用TensorFlow Hub和代码示例
内容已失效,使用教程可见TensorflowHub官网
任何深度学习框架,为了获得成功,必须提供一系列最先进的模型,以及在流行和广泛接受的数据集上训练的权重,即与训练模型。
TensorFlow现在已经提出了一个更好的框架,称为TensorFlow Hub,它非常易于使用且组织良好。使用TensorFlow Hub,您可以通过几行代码导入大型和流行的模型,自信地执行广泛使用的传输学习活动。TensorFlow Hub非常灵活,可以托管您的模型以供其他用户使用。TensorFlow Hub中的这些模型称为模块。在本文中,让我们看看如何使用TensorFlow Hub模块的基础知识,它是各种类型和代码示例。
前置知识
接下来,让我们看一些可用于了解TensorFlow Hub模块更多细节的重要方面和功能。
1)模块实例化:由TensorFlow Hub网站托管用于不同目的(图像分类,文本嵌入等)的不同模型(Inception,ResNet,ElMo等)组成的各种模块。用户必须浏览模块目录,然后在完成其目的和模型后,需要复制托管模型的URL。然后,用户可以像这样实例化他的模块:
- import tensorflow_hub as hub
- module = hub.Module(<<Module URL as string>>, trainable=True)
除了URL参数,另一个最值得注意的参数是'trainable'。如果用户希望微调/修改模型的权重,则必须将此参数设置为True 。
2)签名:模块的签名指定了每个模块的作用。如果未明确提及签名,则所有模块都带有“默认”签名并使用它。对于大多数模块,当使用“默认”签名时,模型的内部层将从用户中抽象出来。用于列出模块的所有签名名称的函数是get_signature_names()。
- import tensorflow_hub as hub
- module = hub.Module('https://tfhub.dev/google/imagenet/inception_v3/classification/1')
- print(module.get_signature_names())
- # ['default', 'image_classification', 'image_feature_vector']
- import tensorflow_hub as hub
- module = hub.Module('https://tfhub.dev/google/imagenet/inception_v3/classification/1')
- print(module.get_input_info_dict()) # When no signature is given, considers it as 'default'
- # {'images': <hub.ParsedTensorInfo shape=(?, 299, 299, 3) dtype=float32 is_sparse=False>}
- print(module.get_input_info_dict(signature='image_feature_vector'))
- # {'images': <hub.ParsedTensorInfo shape=(?, 299, 299, 3) dtype=float32 is_sparse=False>}
4)预期输出:为了在构建TensorFlow Hub模型之后构建图的剩余部分,有必要知道预期的输出类型。get_output_info_dict()函数用于此目的。请注意,对于“默认”签名,通常只有一个输出,但是当您使用非默认签名时,图表的多个图层将向您公开。
- import tensorflow_hub as hub
- module = hub.Module('https://tfhub.dev/google/imagenet/inception_v3/classification/1')
- print(module.get_output_info_dict()) # When no signature is given, considers it as 'default'
- # {'default': <hub.ParsedTensorInfo shape=(?, 1001) dtype=float32 is_sparse=False>}
- print(module.get_output_info_dict(signature='image_classification'))
- # {'InceptionV3/global_pool': <hub.ParsedTensorInfo shape=(?, 1, 1, 2048) dtype=float32 is_sparse=False>,
- # 'InceptionV3/Logits': <hub.ParsedTensorInfo shape=(?, 1001) dtype=float32 is_sparse=False>,
- # 'InceptionV3/Conv2d_2b_3x3': <hub.ParsedTensorInfo shape=(?, 147, 147, 64) dtype=float32 is_sparse=False>
- # ..... Several other exposed layers...... }
5)收集所需的模块层:实例化模块后,必须从模块中提取所需的层/输出并将其添加到图形中。以下是一些方法:
- import tensorflow as tf
- import tensorflow_hub as hub
- images = tf.placeholder(tf.float32, (None, 299, 299, 3))
- module = hub.Module('https://tfhub.dev/google/imagenet/inception_v3/classification/1')
- logits1 = module(dict(images=images)) # implies default signature
- print(logits1)
- # Tensor("module_apply_default/InceptionV3/Logits/SpatialSqueeze:0", shape=(?, 1001), dtype=float32)
- module_features = module(dict(images=images), signature='image_classification', as_dict=True)
- # module_features stores all layers in key-value pairs
- logits2 = module_features['InceptionV3/Logits']
- print(logits2)
- # Tensor("module_apply_image_classification/InceptionV3/Logits/SpatialSqueeze:0", shape=(?, 1001), dtype=float32)
- global_pool = module_features['InceptionV3/global_pool']
- print(global_pool)
- # Tensor("module_apply_image_classification/InceptionV3/Logits/GlobalPool:0", shape=(?, 1, 1, 2048), dtype=float32)
- import tensorflow as tf
- with tf.Session() as sess:
- sess.run([tf.tables_initializer(), <<other initializers>>])
代码骨架
一旦构建了包含模块,学习算法优化器,目标函数,自定义层等的完整图形,这就是代码的图形部分的框架。
- import tensorflow as tf
- import tensorflow_hub as hub
- << Create Placeholders >>
- << Create Dataset and Iterators >>
- module1 = hub.Module(<< Module URL >>)
- logits1 = module1(<< input_dict >>)
- module2 = hub.Module(<< Module URL >>)
- module2_features = module2(<< input_dict >>, signature='default', as_dict=True)
- logits2 = module2_features['default']
- << Remaining graph, learning algorithms, objective function, etc >>
- with tf.Session() as sess:
- sess.run([tf.tables_initializer(), << other initializers >>])
- << Remaining training pipeline >>
我正在使用两个模块。第一个模块使用最小的代码构建,隐式使用默认签名和层。在第二个模块中,我明确指定了默认签名和图层。以类似的方式,我们可以指定非默认签名和图层。
1)图像分类模块
顾名思义,这些模块集用于图像分类。在这类模块中,给出了完整的网络架构。这包括用于分类的最终密集连接层。在这个类别的代码示例中,我将使用Inception V3模块将Kaggle的猫狗分类问题分类为1001个ImageNet类。
- import tensorflow as tf
- import tensorflow_hub as hub
- from Dataset import Dataset
- tf.reset_default_graph()
- dataset = Dataset()
- module = hub.Module('https://tfhub.dev/google/imagenet/inception_v3/classification/1')
- logits = module(dict(images=dataset.img_data))
- softmax = tf.nn.softmax(logits)
- top_predictions = tf.nn.top_k(softmax, top_k, name='top_predictions')
2)特征向量模块
这与图像分类模块非常相似,唯一的区别是模块不包括最终的密集分类层。在这个类别的代码示例中,我将针对Hackerearth的多标签动物属性分类问题微调Resnet-50模块。 在微调操作期间,除了定制附加的密集层之外,通常还需要优化模块的最终层。在这种情况下,您必须找到要微调的范围或变量的名称。我附加了代码的相关部分以在特征向量模块中执行此类过程。
- module = hub.Module('https://tfhub.dev/google/imagenet/resnet_v2_50/feature_vector/1',
- trainable=True) # Trainable is True since we are going to fine-tune the model
- module_features = module(dict(images=dataset.image_data), signature="image_feature_vector",
- as_dict=True)
- features = module_features["default"]
- with tf.variable_scope('CustomLayer'):
- weight = tf.get_variable('weights', initializer=tf.truncated_normal((2048, n_class)))
- bias = tf.get_variable('bias', initializer=tf.ones((n_class)))
- logits = tf.nn.xw_plus_b(features, weight, bias)
- # Find out the names of all variables present in graph
- print(tf.all_variables())
- # After finding the names of variables or scope, gather the variables you wish to fine-tune
- var_list = tf.get_collection(tf.GraphKeys.GLOBAL_VARIABLES, scope='CustomLayer')
- var_list2 = tf.get_collection(tf.GraphKeys.GLOBAL_VARIABLES, scope='module/resnet_v2_50/block4')
- var_list.extend(var_list2)
- # Pass this set of variables into your optimiser
- optimizer = tf.train.AdamOptimizer(learning_rate=lr).minimize(loss, var_list=var_list)
如果模块图中的节点没有直观命名(非常不可能的情况),则必须弄清楚模块的体系结构,然后将它们映射到正在打印的节点。
在代码示例中,我已经调整了最后几层变量属于'resnet_v2_50 / block4'的变量范围。通过10个时期的训练,你可以毫不费力地获得这个问题的F1分数0.95819。
3)视频分类模块
视频分类是指对视频片段中发生的活动的性质进行分类。在代码示例中,我已经在Inception 3D模块上训练了包含27个类的20BN-Jester数据集。再说一次,只有3个训练时期,我的准确率达到了91.45%。模块代码的相关部分如下所示。
- import tensorflow as tf
- import tensorflow_hub as hub
- from Dataset import Dataset
- dataset = Dataset()
- module = hub.Module("https://tfhub.dev/deepmind/i3d-kinetics-400/1", trainable=True)
- features = module(dict(rgb_input=dataset.image_data))
- n_class = 27
- with tf.variable_scope('CustomLayer'):
- weight = tf.get_variable('weights',
- initializer=tf.truncated_normal((400, n_class)))
- bias = tf.get_variable('bias', initializer=tf.ones((n_class)))
- logits = tf.nn.xw_plus_b(features, weight, bias)
为了测试模型的准确性,我构建了一个简单的实时视频分类应用程序,这里是一个小视频
4)文本嵌入模型
- module = hub.Module('https://tfhub.dev/google/elmo/2', trainable=True)
- embeddings = module(dict(text=dataset.text_data))
- embeddings = tf.expand_dims(embeddings, axis=1)
- with tf.variable_scope('Layer1'):
- cell_fw1 = tf.nn.rnn_cell.LSTMCell(num_units=128, state_is_tuple=True)
- cell_bw1 = tf.nn.rnn_cell.LSTMCell(num_units=128, state_is_tuple=True)
- outputs1, states1 = tf.nn.bidirectional_dynamic_rnn(
- cell_fw=cell_fw1,
- cell_bw=cell_bw1,
- inputs=embeddings)
- rnn_output = tf.reshape(outputs1[0], (-1, 128))
- with tf.variable_scope('Layer2'):
- weight2 = tf.get_variable('weight', initializer=tf.truncated_normal((128, n_class)))
- bias2 = tf.get_variable('bias', initializer=tf.ones(n_class))
- logits = tf.nn.xw_plus_b(rnn_output, weight2, bias2)
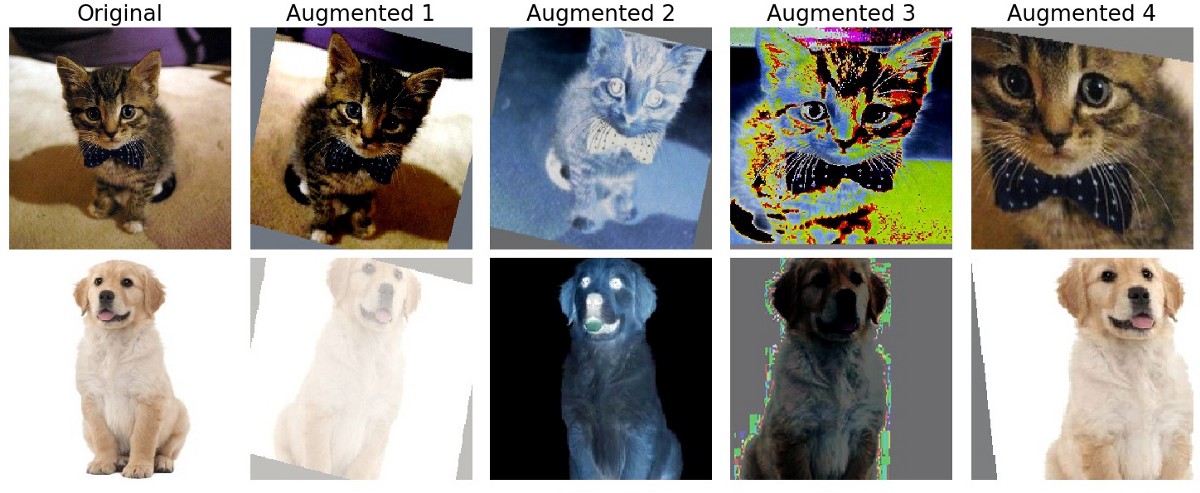
5)图像增强模块
图像增强是流水话训练中的一个重要组成部分,可以提高模型的准确性。所有图像增强模块(在编写本文时)都没有任何变量,因此,这些模块不具有可调性/可训练性。使用'from_decoded_images'的签名,您可以直接将图像提供给这些模块。下面示出了示例代码块以及生成的增强图像。
- import tensorflow as tf
- import tensorflow_hub as hub
- import tensorflow.contrib.image # Needed for Image Augmentation modules
- from Dataset import Dataset
- dataset = Dataset()
- module = hub.Module('https://tfhub.dev/google/image_augmentation/nas_svhn/1')
- input_dict = dict(image_size=image_size, # Output Image size
- images=dataset.img_data, # Has the image in Numpy data format
- augmentation=True)
- aug_images = module(input_dict, signature='from_decoded_images')
6)对象检测模块
对象检测模块不支持微调,因此如果您有自己的数据集,则必须从头开始执行培训。目前也不支持批量处理数据。在代码示例中,我将仅使用Inception-ResNet V2模块上的FasterRCNN对图像进行推断。我附上了下面模块生成的代码和图像的模块部分。
- import tensorflow as tf
- import tensorflow_hub as hub
- from Dataset import Dataset
- dataset = Dataset()
- module = hub.Module('https://tfhub.dev/google/faster_rcnn/openimages_v4/inception_resnet_v2/1')
- detector = module(dict(images=dataset.image_data), as_dict=True)
- class_entities = detector['detection_class_entities']
- boxes = detector['detection_boxes']
- scores = detector['detection_scores']
- class_labels = detector['detection_class_labels']
- class_names = detector['detection_class_names']
7)生成器模型
这些对应于生成性对抗网络(GAN)。一些模块没有暴露其网络的Discriminator部分。就像对象检测一样,即使在代码示例中,我也只是在进行推理。使用在CelebA数据集上训练的Progressive GAN模块,我将生成新面孔。我附上了下面模块生成的代码和图像的模块部分 。
- import tensorflow as tf
- import tensorflow_hub as hub
- from Dataset import Dataset
- dataset = Dataset()
- module = hub.Module("https://tfhub.dev/google/progan-128/1")
- images = module(dataset.latent_vector_space)
对应的模型在TensorFlow Hub官网也有示例,可以在Colab上复现。例如,目标检测Colab。
原文链接:https://medium.com/ymedialabs-innovation/how-to-use-tensorflow-hub-with-code-examples-9100edec29af
如何使用TensorFlow Hub和代码示例的更多相关文章
- 高级渲染技巧和代码示例 GPU Pro 7
下载代码示例 移动设备正呈现着像素越来越高,屏幕尺寸越来越小的发展趋势. 由于像素着色的能耗非常大,因此 DPI 的增加以及移动设备固有的功耗受限环境为降低像素着色成本带来了巨大的压力. MSAA 有 ...
- Java8-Function使用及Groovy闭包的代码示例
导航 定位 概述 代码示例 Java-Function Groovy闭包 定位 本文适用于想要了解Java8 Function接口编程及闭包表达式的筒鞋. 概述 在实际开发中,常常遇到使用模板模式的场 ...
- [IOS 开发] 懒加载 (延迟加载) 的基本方式,好处,代码示例
懒加载的好处: 1> 不必将创建对象的代码全部写在viewDidLoad方法中,代码的可读性更强 2> 每个属性的getter方法中分别负责各自的实例化处理,代码彼此之间的独立性强,松耦合 ...
- SELECT控件操作的JS代码示例
SELECT控件操作的JS代码示例 1 检测是否有选中 if(objSelect.selectedIndex > -1) { //说明选中 } else { //说明没有选中 } 2.动态创建s ...
- 转:HIBERNATE一些_方法_@注解_代码示例---写的非常好
HIBERNATE一些_方法_@注解_代码示例操作数据库7步骤 : 1 创建一个SessionFactory对象 2 创建Session对象 3 开启事务Transaction : hibernate ...
- Python实现各种排序算法的代码示例总结
Python实现各种排序算法的代码示例总结 作者:Donald Knuth 字体:[增加 减小] 类型:转载 时间:2015-12-11我要评论 这篇文章主要介绍了Python实现各种排序算法的代码示 ...
- C#与数据库访问技术总结(十五)之 DataAdapter对象代码示例
DataAdapter对象代码示例 下面的代码将说明如何利用DataAdapter对象填充DataSet对象. private static string strConnect=" data ...
- C#与数据库访问技术总结(六)之Command对象创建SQl语句代码示例
Command对象创建SQl语句代码示例 说明:前面介绍了 Command 对象的方法和一些属性,回顾一下 Command对象主要用来执行SQL语句.利用Command对象,可以查询数据和修改数据. ...
- 领域驱动开发推荐代码示例 — Microsoft NLayerApp
简介: Microsoft NLayerApp是由微软西班牙团队出品的基于.NET 4.0的“面向领域N层分布式架构”代码示例,在codeplex上的地址是:http://microsoftnlaye ...
随机推荐
- gridview把textbox的值修改还是旧值的解决方法
解决方法很简单,加上if(!IsPostBack) 就OK了,因为之前加载之前都会调用InitData(). protected void Page_Load(object sender, Event ...
- LeetCode: 598 Range Addition II(easy)
题目: Given an m * n matrix M initialized with all 0's and several update operations. Operations are r ...
- JavaScript中,为什么eval和with会有性能问题?
词法作用域 词法作用域意味着作用域是由书写代码时函数声明的位置来决定的.编译的词法分析阶段 基本能够知道全部标识符在哪里以及是如何声明的,从而能够预测在执行过程中如何对它 们进行查找. eval(.. ...
- iscsi使用教程
服务端 服务器环境 已经安装过qemu-img的32位ubuntu $ uname -a Linux ubuntu-virtual-machine 3.13.0-46-generic #76-Ubun ...
- SP2-0734: 未知的命令开头 “IMP ” - 忽略了剩余的行
描述 在cmd命令窗口中使用imp命令将dmp文件导入到oracle中时,出现了错误: SP2-0734: 未知的命令开头 “IMP ” - 忽略了剩余的行,如图 原因 imp命令是oracle提供的 ...
- codevs 3342绿色通道
3342 绿色通道 时间限制: 1 s 空间限制: 256000 KB 题目等级 : 黄金 Gold
- Vue实现任务列表效果
<!DOCTYPE html> <html lang="en"> <head> ...
- jQuery EasyUI/TopJUI基本的数字输入框(保留两位小数,带前缀后缀...)
jQuery EasyUI/TopJUI基本的数字输入框(保留两位小数,带前缀后缀...) numberbox(数值输入框) HTML required:必填字段,默认为false:prompt:显示 ...
- SublimeText3 snippet 编写总结
SublimeText3 snippet 编写总结 SublimeText的snippet定义功能也十分强大, 类似VAssist. 在菜单tool->New Snippet中定义. 打开后显 ...
- JavaWeb案例: 文件下载 基于tomcat8 默认编码为UTF-8
package cn.itcast.download; import javax.servlet.ServletException; import javax.servlet.ServletOutpu ...