Android UiAutomator - CTS Frame
使用UiAutomator进行UI自动化测试后,生成的测试结果并不是很美观。为了生成一份好看的测试结果(报告),本文将使用CTS框架,当然也可以自己编写一份测试报告框架(如:生成html,excel报告)。
一、环境搭建(这里就不再重复,可以去看CTS Test)
JDK,SDK,android-cts,run.bat
配置好环境变量下载完资源后。将android-cts复制到SDK下,并且在该目录下创建一个run.bat文件。代码如下:
@echo off

set CTS_ROOT=%~dp0

set JAR_DIR=%CTS_ROOT%android-cts\tools

set JAR_PATH=%JAR_DIR%\cts-tradefed.jar;%JAR_DIR%\ddmlib-prebuilt.jar;%JAR_DIR%\hosttestlib.jar;%JAR_DIR%\junit.jar;%JAR_DIR%\tradefed-prebuilt.jar

java -cp %JAR_PATH% -DCTS_ROOT=%CTS_ROOT% com.android.cts.tradefed.command.CtsConsole
注:这里使用的android-cts为4.4的(是使用Eclipse编写UiAutomator1的脚本Ant编译生成jar文件)。经实践使用6.0或7.1的cts框架运行时会报错(要使用android studio 编写UiAutomator2的脚本gradle进行编译生成apk文件)。
二、编写测试脚本并编译成jar包(直接运行会在工程bin目录下生成jar包)
package com.change.display;

import java.io.File;

import java.io.IOException;

import com.android.uiautomator.core.UiDevice;

import com.android.uiautomator.core.UiObject;

import com.android.uiautomator.core.UiObjectNotFoundException;

import com.android.uiautomator.core.UiSelector;

import com.android.uiautomator.testrunner.UiAutomatorTestCase;

public class Display extends UiAutomatorTestCase{

    //Quick Debugging

    public static void main(String [] args){

        String jarName="ChangeFontTest";

        String testClass="com.change.display.Display";

        String testName="testChangeFont";

        String androidId="1";

        new UiAutomatorHelper(jarName, testClass, testName, androidId);

    }

    //RUN CTS

    /*public static void main (String [] args){

         String workspace="E:\\adt\\workspace\\AutoTest";

         String className="com.change.display.Display";

         String jarName="ChangeFontTest";

         String androidId="1";

         String sdkPath="E:\\adt\\sdk";

         CtsHelper ch = new CtsHelper(workspace,className,jarName,androidId,sdkPath);

         //若需指定设备运行,则需要填写

         ch.setDevices("NEXUS0FA9F615");

         ch.runTest();

    }*/

    public void testChangeFont () throws Throwable{

        UiDevice device = UiDevice.getInstance();

        try {

            //Device wake up

            device.wakeUp();

            //sleep 3s

            sleep(3000);

            //Open the settings

            Runtime.getRuntime().exec("am start -n com.android.settings/.Settings");

            //Click on display

            UiObject display = new UiObject(new UiSelector().text("显示"));

            display.click();

            sleep(3000);

            //Select font

            UiObject fontSize = new UiObject(new UiSelector().text("字体大小"));

            fontSize.clickAndWaitForNewWindow();

            //Change font

            new UiObject(new UiSelector().text("超大")).click();

            //Screen shot

            sleep(3000);

            device.takeScreenshot(new File("/sdcard/test1.png"));

            sleep(2000);

        } catch (IOException e) {

            e.printStackTrace();

            throw new Exception();

        } catch (UiObjectNotFoundException e) {

            e.printStackTrace();

            throw new Exception();

        }finally{

            device.pressBack();

            sleep(2000);

            device.pressBack();

            sleep(2000);

            device.pressHome();

            sleep(2000);

        }

    }

}
编写好的脚本:
packageName:com.change.display
Class:Display
Method:testChangeFont
jarPackageName:ChangeFontTest
三、编写测试计划和配置文件
1、将ChangeFontTest.jar包放到android-cts\repository\testcases目录下。
2、且在该目录下编写ChangeFontTest.xml配置文件:
<?xml version="1.0" encoding="UTF-8"?>

<TestPackage appPackageName="com.change.display" name="ChangeFontTest" testType="uiAutomator" jarPath="ChangeFontTest.jar" version="1.0">

     <TestSuite name="com">

          <TestSuite name="change">

               <TestSuite name="display">

                    <TestCase name="Display">

                         <Test name="testChangeFont" />

                    </TestCase>

               </TestSuite>

          </TestSuite>

     </TestSuite>

</TestPackage>
3、在android-cts\repository\plans 文件中编写planName.xml计划文件(可随意命名)
<?xml version="1.0" encoding="UTF-8"?>

<TestPlan version="1.0">

    <Entry uri="com.change.display"/>

</TestPlan>
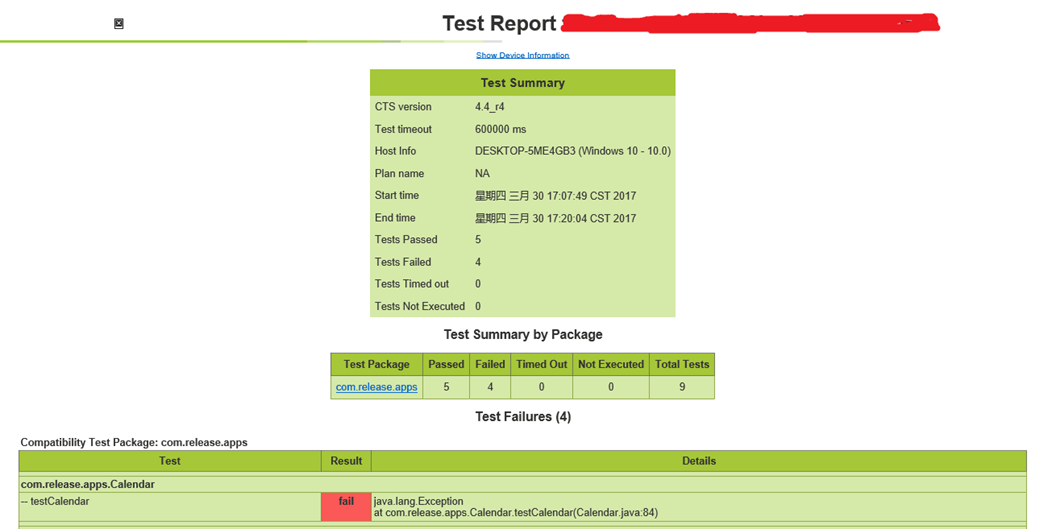
四、使用CTS框架运行测试jar包,并生成报告
运行run.bat文件进入CTS控制台,输入命令:run cts --plan [planName]
这里贴出一份报告:
五、使用CtsHelper.java和UiAutomatorHelper.java在工程中直接运行生成报告
将CtsHelper.java和UiAutomatorHelper.java直接复制到工程目录下(放到com.change.display包下,与测试类同一目录下)。这时需要在Display测试类中将Quick Debugging部分注释掉,使用RUN CTS部分。根据个人的情况更改workspace,clasName,jarName,androidId,sdkPath以及setDevice(adb devices查询的序列号)。
以下是CtsHelper.java和UiAutomatorHelper.java代码:(源出处)
package com.change.display;

import java.io.BufferedReader;

import java.io.BufferedWriter;

import java.io.File;

import java.io.FileInputStream;

import java.io.FileNotFoundException;

import java.io.FileOutputStream;

import java.io.IOException;

import java.io.InputStream;

import java.io.InputStreamReader;

import java.io.OutputStreamWriter;

import java.util.ArrayList;

//import java.util.regex.Pattern;

public class CtsHelper {

    /*

     * 本类用于在CTS框架中运行uiautomator 基于Android 4.4 CTS

     * 思路:

     * 1.编译且复制jar包到CTS TestCase目录中

     * 2.依据CTS框架格式创建TestCase

     * 3.依据CTS框架格式创建TestPlan

     * 4.运行TestPlan

     */

    //输入参数,改变以下参数来适配不同的类

    private String workspace="E:\\adt\\workspace\\AutoTest";

    private String className_FullName="com.test.row.Calculator";

    private String jarName="CalculatorCaseCTS";

    private String androidId="4";

    private String ctsPath_testCase="${SDK_PATH}\\repository\\testcases\\";

    private String ctsPath_testPlan="${SDK_PATH}\\android-cts\\repository\\plans\\";

    //CTS Tools 命令路径

    private String ctsToolsPath="${SDK_PATH}\\android-cts\\tools\\";

    //ROOT SDK目录

    private String dcts_root_path="${SDK_PATH}";

    //log与result path

    //private String logPath="";

    //private String resultPath="";

    String fileName="";

    //以下字段不需要改变

    //TestCase XML文件字段

    private String testCase_sc_1="<?xml version="+"\"1.0\"" +" encoding="+"\"UTF-8\""+"?>";

    private String testCase_TestPackage_2="<TestPackage " ;

    private String testCase_appPackageName_3="appPackageName=\"REPLAY\"";

    private String testCase_name_4="name=\"REPLAY\"";

    private String testCase_testType_5="testType=\"uiAutomator\"";

    private String testCase_jarPath_6="jarPath=\"REPLAY\"";

    private String testCase_version_7="version=\"1.0\">";

    //用例将REPLAY替换为对应的名字

    private String testCase_TestSuite="<TestSuite name="+"\"REPLAY\""+">";

    private String testCase_TestCase="<TestCase name="+"\"REPLAY\""+">";

    private String testCase_Test="<Test name="+"\"REPLAY\" "+"/>";

    //结尾字段

    private String testCase_endTestCase="</TestCase>";

    private String testCase_endTestSuite="</TestSuite>";

    private String testCase_endTestPackage="</TestPackage>";

    //TestPlan xml文件字段

    private String plan_sc_1="<?xml version="+"\"1.0\"" +" encoding="+"\"UTF-8\""+"?>";

    private String plan_TestPlan_2="<TestPlan version="+"\"1.0\""+">";

    private String plan_URI_3="<Entry uri=\"REPLAY\"/>";

    private String plan_endTestPlan="</TestPlan>";

    //运行命令

    /*

    cd ${SDK_PATH}\android-cts\tools

    java -cp ddmlib-prebuilt.jar;tradefed-prebuilt.jar;hosttestlib.jar;cts-tradefed.jar -DCTS_ROOT=${SDK_PATH} com.android.cts.tradefed.command.CtsConsole run cts --plan calculator

    */

    private String runClassName="com.android.cts.tradefed.command.CtsConsole";

    private String runPlanCmd="run cts --plan REPLAY";

    private String devices="";

    //结果路径保存

    private ArrayList<String> listResultPath=new ArrayList<String>();

    /**

     * @param args

     */

    public static void main(String[] args) {

        String workspase="";

        String className="";

        String jarName="";

        String androidId="";

        String sdkPath="";

        String devices="";

        for(int i=0;i<args.length;i++){

            if(args[i].equals("--workspase")){

                workspase=args[i+1];

            }else if(args[i].equals("--class_name")){

                className=args[i+1];

            }else if(args[i].equals("--jar_name")){

                jarName=args[i+1];

            }else if(args[i].equals("--android_id")){

                    androidId=args[i+1];

            }else if(args[i].equals("--sdk_path")){

                    sdkPath=args[i+1];

            }else if(args[i].equals("-s")){

                     devices=args[i+1];

             }

        }

        CtsHelper cts=new CtsHelper(workspase, className, jarName, androidId, sdkPath);

        cts.setDevices(devices);

        cts.runTest();

    }

    /**

     * 运行默认参数的CTS

     */

    public CtsHelper(){

    }

    /**

     * 传入: 工程工作空间,class全名,jarname,androidid,SDK路径

     * @param paramater

     */

    public CtsHelper(String workspase,String className,String jarName,String androidId,String sdkpath){

        this.workspace=workspase+"\\";

        this.className_FullName=className;

        this.jarName=jarName;

        this.androidId=androidId;

        this.ctsPath_testCase=sdkpath+"\\android-cts\\repository\\testcases\\";

        this.ctsPath_testPlan=sdkpath+"\\android-cts\\repository\\plans\\";

        //CTS Tools 命令路径

        this.ctsToolsPath=sdkpath+"\\android-cts\\tools\\";

        //ROOT SDK目录

        this.dcts_root_path=sdkpath;

    }

    /**

     * 整体运行步骤

     */

     void runTest(){

        //编译 将编译的jar复制到CTS testcase目录中

        String testName="";

        new UiAutomatorHelper(jarName, className_FullName, testName, androidId, (ctsPath_testCase+jarName+".jar").replaceAll(";", ""));

        //创建xml  testCase.xml  testplan.xml

        createTestCaseXml("test"+jarName+"TestCase.xml");

        createTestPlanXml("test"+jarName+"TestPlan.xml");

        //运行命令

        if(!devices.equals("")){

            execCmd(getRunCtsCmd("test"+jarName+"TestPlan")+devices);

        }else{

            execCmd(getRunCtsCmd("test"+jarName+"TestPlan"));

        }

        //输出log文件路径和结果文件路径

        System.out.println("***************************");

        for(String s:listResultPath){

            System.out.println(s);

        }

        System.out.println("***************************");

    }

    /**

     * 需求:多个手机情况下,指定某个手机运行

     * @param dev

     */

    public void setDevices(String dev){

        this.devices=" -s "+dev;

    }

    /**

     * 生成CTS运行命令,基于Android 4.4

     * @param plan

     * @return

     */

    private String getRunCtsCmd(String plan){

        String runCmd="java -cp "

                +getToolsJar()

                +" -DCTS_ROOT="+"\""+dcts_root_path+"\""+" "+runClassName+" "+runPlanCmd;

        System.out.println(runCmd.replace("REPLAY", plan));

        return runCmd.replace("REPLAY", plan);

    }

    /**

     * 需求:获取tools下jar路径组合为cp 格式字符串

     * @return

     */

    private String getToolsJar(){

        String jarName="";

        File file=new File(ctsToolsPath);

        File[] fileList=file.listFiles();

        for(int i=0;i<fileList.length;i++){

            if(fileList[i].getName().contains(".jar")){

                jarName=jarName+"\""+fileList[i].getAbsolutePath()+"\""+";";

            }

        }

        jarName=jarName.substring(0, jarName.length()-1);

        System.out.println(jarName);

        return jarName;

    }

    /**

     * 创建 testcase xml文件

     * @param xmlName 文件名加.xml

     */

    private void createTestCaseXml(String xmlName){

        //风起于青萍之末,英雄不问出处,言之凿凿,句句在理

         File caseFile=new File(ctsPath_testCase+xmlName);

            if (caseFile.exists()) {

                caseFile.delete();

            }

            saveFile(xmlName, ctsPath_testCase, testCase_sc_1);

            saveFile(xmlName, ctsPath_testCase, testCase_TestPackage_2);

            saveFile(xmlName, ctsPath_testCase, testCase_appPackageName_3.replace("REPLAY", className_FullName));

            saveFile(xmlName, ctsPath_testCase, testCase_name_4.replace("REPLAY", jarName));

            saveFile(xmlName, ctsPath_testCase, testCase_testType_5);

            saveFile(xmlName, ctsPath_testCase, testCase_jarPath_6.replace("REPLAY", jarName+".jar"));

            saveFile(xmlName, ctsPath_testCase, testCase_version_7);

            //TestSuite 按点分开逐步写  com.lenovo.uitest.calculator.CalculatorCase_V2_1

            String[] testSuite=className_FullName.split("\\.");

            for(int i=0;i<testSuite.length-1;i++){

                saveFile(xmlName, ctsPath_testCase, testCase_TestSuite.replace("REPLAY", testSuite[i]));

                System.out.println(testSuite[i]);

            }

            saveFile(xmlName, ctsPath_testCase, testCase_TestCase.replace("REPLAY", testSuite[testSuite.length-1]));

            //TestCase

            ArrayList<String> testCase=getTestCase(workspace+"src\\"+className_FullName.replace(".", "\\")+".java");

            for(String s:testCase){

                saveFile(xmlName, ctsPath_testCase, testCase_Test.replace("REPLAY", s));

            }

            saveFile(xmlName, ctsPath_testCase, testCase_endTestCase);

            //与suite同数量

            for(int i=0;i<testSuite.length-1;i++){

                saveFile(xmlName, ctsPath_testCase, testCase_endTestSuite);

            }

            saveFile(xmlName, ctsPath_testCase, testCase_endTestPackage);

    }

    /**

     * 创建 plan xml文件

     * @param xmlName

     */

    private void createTestPlanXml(String xmlName){

         File planFile=new File(ctsPath_testPlan+xmlName);

            if (planFile.exists()) {

                planFile.delete();

            }

            saveFile(xmlName, ctsPath_testPlan, plan_sc_1);

            saveFile(xmlName, ctsPath_testPlan, plan_TestPlan_2);

            saveFile(xmlName, ctsPath_testPlan, plan_URI_3.replace("REPLAY", className_FullName));

            saveFile(xmlName, ctsPath_testPlan, plan_endTestPlan);

    }

    /**

     * 保存内容到指定文本

     * @param fileName

     * @param path

     * @param line

     */

    private void saveFile(String fileName,String path,String line){

        System.out.println(line);

        File file=new File(path+fileName);

        while (!file.exists()) {

            try {

                file.createNewFile();

            } catch (IOException e) {

                e.printStackTrace();

            }

        }

        try {

            FileOutputStream out=new FileOutputStream(file,true);

            OutputStreamWriter writer=new OutputStreamWriter(out);

            BufferedWriter bWriter=new BufferedWriter(writer);

            bWriter.append(line);

            bWriter.newLine();

            bWriter.flush();

            bWriter.close();

        } catch (FileNotFoundException e) {

            e.printStackTrace();

        } catch (IOException e) {

            e.printStackTrace();

        }

    }

    /**

     * 执行命令

     * @param cmd

     */

    private void execCmd(String cmd) {

        System.out.println("****commond: " + cmd);

        try {

            Process p = Runtime.getRuntime().exec(cmd);

            InputStream in = p.getInputStream();

            InputStreamReader re = new InputStreamReader(in);

            BufferedReader br = new BufferedReader(re);

            String info="";

            String line = "";

            while ((line = br.readLine()) != null) {

                System.out.println(line);

                info=getResultInfo(line);

                if(!info.equals("")){

                listResultPath.add(info);

                }

            }

            br.close();

        } catch (IOException e) {

            e.printStackTrace();

        }

    }

    /**

     * 获取所有的用例名,文件解析方式

     * @param filePath

     * @return

     */

    private ArrayList<String> getTestCase(String filePath){

         ArrayList<String> testCase=new ArrayList<String>();

                    File file=new File(filePath);

                    if(!file.exists()){

                        System.out.println("The testcase file don't exist...");

                    }

                        InputStreamReader read;

                        try {

                            read = new InputStreamReader(new FileInputStream(file));

                        BufferedReader bufferedReader = new BufferedReader(read);

                        String lineTxt = null;

                        while((lineTxt = bufferedReader.readLine()) != null){

                           if(lineTxt.matches(".*public\\s+void\\s+test.*")){

                               int index_0=lineTxt.indexOf("test");

                               int index_1=lineTxt.indexOf("(");

                               testCase.add(lineTxt.substring(index_0, index_1));

                               System.out.println("TestCase:"+lineTxt.substring(index_0, index_1));

                           }

                        }

                        read.close();

                        } catch (FileNotFoundException e) {

                            e.printStackTrace();

                        } catch (IOException e) {

                            e.printStackTrace();

                        }

         return testCase;

        }

    /**

     * 需求:获取结果路径,log路径

     * @return

     */

    private String getResultInfo(String line){

        //Created result dir 2015.06.13_23.55.28

        // Saved log device_logcat_212048202233862593.zip

        // Saved log host_log_225718056528107765.zip

        // com.jikexueyuan.demo.Demo1 package complete: Passed 0, Failed 0, Not Executed 0

        // Created xml report file at file://E:\Program Files (x86)\Android\android-sdk\android-cts\repository\results\2015.06.13_23.55.28\testResult.xml

        if(line.matches(".*file://.*testResult.xml.*")){

            return line.replaceAll(".*report.*file.*at.*file", "file");

        }else if(line.matches(".*device_logcat_.*zip.*")){

            return dcts_root_path+"\\android-cts\\repository\\logs\\"+fileName+"\\"+line.replaceAll(".*device_", "device_");

        }else if(line.matches(".*host_log_.*zip")){

            return dcts_root_path+"\\android-cts\\repository\\logs\\"+fileName+"\\"+line.replaceAll(".*host_log", "host_log");

        }else if(line.matches(".*Created.*result.*dir.*\\d+.*")){

            fileName=line.replaceAll(".*dir\\s+", "");

            return fileName;

        }else if(line.matches(".*complete:.*Passed.*Failed.*Not.*Executed.*")){

            return line.replaceAll(".*complete:\\s+", "");

        }

        return "";

    }

}
CtsHelper.java
package com.change.display;

import java.io.BufferedReader;

import java.io.BufferedWriter;

import java.io.File;

import java.io.FileInputStream;

import java.io.FileNotFoundException;

import java.io.FileOutputStream;

import java.io.FileWriter;

import java.io.IOException;

import java.io.InputStream;

import java.io.InputStreamReader;

import java.io.OutputStreamWriter;

public class UiAutomatorHelper {

    // 以下参数需要配置,用例集id,用例id,安卓id

    private static String android_id = "3";

    private static String jar_name = "";

    private static String test_class = "";

    private static String test_name = "";

    // 工作空间不需要配置,自动获取工作空间目录

    private static String workspace_path;

    public UiAutomatorHelper() {

        workspace_path = getWorkSpase();

        System.out.println("---工作空间:\t\n" + getWorkSpase());

    }

    /**

     * 需求:UI工程调试构造器,输入jar包名,包名,类名,用例名

     * @param jarName

     * @param testClass

     * @param testName

     * @param androidId

     */

    public UiAutomatorHelper(String jarName, String testClass, String testName,

            String androidId) {

        System.out.println("-----------start--uiautomator--debug-------------");

        workspace_path = getWorkSpase();

        System.out.println("----工作空间:\t\n" + getWorkSpase());

        jar_name = jarName;

        test_class = testClass;

        test_name = testName;

        android_id = androidId;

        runUiautomator();

        System.out.println("*******************");

        System.out.println("---FINISH DEBUG----");

        System.out.println("*******************");

    }

    /**

     * 需求:build 和 复制jar到指定目录

     * @param jarName

     * @param testClass

     * @param testName

     * @param androidId

     * @param isRun

     */

    public UiAutomatorHelper(String jarName, String testClass, String testName,

            String androidId,String ctsTestCasePath){

        System.out.println("-----------start--uiautomator--debug-------------");

        workspace_path = getWorkSpase();

        System.out.println("----工作空间:\t\n" + getWorkSpase());

        jar_name = jarName;

        test_class = testClass;

        test_name = testName;

        android_id = androidId;

        buildUiautomator(ctsTestCasePath);

        System.out.println("*******************");

        System.out.println("---FINISH DEBUG----");

        System.out.println("*******************");

    }

    // 运行步骤

    private void runUiautomator() {

        creatBuildXml();

        modfileBuild();

        buildWithAnt();

        if (System.getProperty("os.name").equals("Linux")) {

            pushTestJar(workspace_path + "/bin/" + jar_name + ".jar");

        }else{

            pushTestJar(workspace_path + "\\bin\\" + jar_name + ".jar");

        }

        if (test_name.equals("")) {

            runTest(jar_name, test_class);

            return;

        }

        runTest(jar_name, test_class + "#" + test_name);

    }

    // 1--判断是否有build

    public boolean isBuild() {

        File buildFile = new File("build.xml");

        if (buildFile.exists()) {

            return true;

        }

        // 创建build.xml

        execCmd("cmd /c android create uitest-project -n " + jar_name + " -t "

                + android_id + " -p " + workspace_path);

        return false;

    }

    // 创建build.xml

    public void creatBuildXml() {

        execCmd("cmd /c android create uitest-project -n " + jar_name + " -t "

                + android_id + " -p " + "\""+workspace_path+ "\"");

    }

    // 2---修改build

    public void modfileBuild() {

        StringBuffer stringBuffer = new StringBuffer();

        try {

            File file = new File("build.xml");

            if (file.isFile() && file.exists()) { // 判断文件是否存在

                InputStreamReader read = new InputStreamReader(

                        new FileInputStream(file));

                BufferedReader bufferedReader = new BufferedReader(read);

                String lineTxt = null;

                while ((lineTxt = bufferedReader.readLine()) != null) {

                    if (lineTxt.matches(".*help.*")) {

                        lineTxt = lineTxt.replaceAll("help", "build");

                        // System.out.println("修改后: " + lineTxt);

                    }

                    stringBuffer = stringBuffer.append(lineTxt + "\t\n");

                }

                read.close();

            } else {

                System.out.println("找不到指定的文件");

            }

        } catch (Exception e) {

            System.out.println("读取文件内容出错");

            e.printStackTrace();

        }

        System.out.println("-----------------------");

        // 修改后写回去

        writerText("build.xml", new String(stringBuffer));

        System.out.println("--------修改build完成---------");

    }

    // 3---ant 执行build

    public void buildWithAnt() {

        if (System.getProperty("os.name").equals("Linux")) {

            execCmd("ant");

            return;

        }

        execCmd("cmd /c ant");

    }

    // 4---push jar

    public void pushTestJar(String localPath) {

        localPath="\""+localPath+"\"";

        System.out.println("----jar包路径: "+localPath);

        String pushCmd = "adb push " + localPath + " /data/local/tmp/";

        System.out.println("----" + pushCmd);

        execCmd(pushCmd);

    }

    // 运行测试

    public void runTest(String jarName, String testName) {

        String runCmd = "adb shell uiautomator runtest ";

        String testCmd = jarName + ".jar " + "--nohup -c " + testName;

        System.out.println("----runTest:  " + runCmd + testCmd);

        execCmd(runCmd + testCmd);

    }

    public String getWorkSpase() {

        File directory = new File("");

        String abPath = directory.getAbsolutePath();

        return abPath;

    }

    /**

     * 需求:执行cmd命令,且输出信息到控制台

     * @param cmd

     */

    public void execCmd(String cmd) {

        System.out.println("----execCmd:  " + cmd);

        try {

            Process p = Runtime.getRuntime().exec(cmd);

            //正确输出流

            InputStream input = p.getInputStream();

            BufferedReader reader = new BufferedReader(new InputStreamReader(

                    input));

            String line = "";

            while ((line = reader.readLine()) != null) {

                System.out.println(line);

                saveToFile(line, "runlog.log", false);

            }

            //错误输出流

            InputStream errorInput = p.getErrorStream();

            BufferedReader errorReader = new BufferedReader(new InputStreamReader(

                    errorInput));

            String eline = "";

            while ((eline = errorReader.readLine()) != null) {

                System.out.println(eline);

                saveToFile(eline, "runlog.log", false);

            }

        } catch (IOException e) {

            e.printStackTrace();

        }

    }

    /**

     * 需求:写如内容到指定的文件中

     *

     * @param path

     *            文件的路径

     * @param content

     *            写入文件的内容

     */

    public void writerText(String path, String content) {

        File dirFile = new File(path);

        if (!dirFile.exists()) {

            dirFile.mkdir();

        }

        try {

            // new FileWriter(path + "t.txt", true) 这里加入true 可以不覆盖原有TXT文件内容 续写

            BufferedWriter bw1 = new BufferedWriter(new FileWriter(path));

            bw1.write(content);

            bw1.flush();

            bw1.close();

        } catch (IOException e) {

            e.printStackTrace();

        }

    }

    public void saveToFile(String text,String path,boolean isClose) {

        File file=new File("runlog.log");

        BufferedWriter bf=null;

        try {

            FileOutputStream outputStream=new FileOutputStream(file,true);

            OutputStreamWriter outWriter=new OutputStreamWriter(outputStream);

            bf=new BufferedWriter(outWriter);

            bf.append(text);

            bf.newLine();

            bf.flush();

            if(isClose){

                bf.close();

            }

        } catch (FileNotFoundException e1) {

            e1.printStackTrace();

        } catch (IOException e) {

            e.printStackTrace();

        }

    }

    /**

     * 需求:编译和复制jar包指定文件

     * @param newPath

     */

    private void buildUiautomator(String newPath) {

        creatBuildXml();

        modfileBuild();

        buildWithAnt();

        //复制文件到指定文件夹

        copyFile(workspace_path + "\\bin\\" + jar_name + ".jar", newPath);

    }

    /**

     * 复制单个文件

     * @param oldPath String 原文件路径 如:c:/fqf.txt

     * @param newPath String 复制后路径 如:f:/fqf.txt

     * @return boolean

     */

   public void copyFile(String oldPath, String newPath) {

       System.out.println("源文件路径:"+oldPath);

       System.out.println("目标文件路径:"+newPath);

       try {

           int bytesum = 0;

           int byteread = 0;

           File oldfile = new File(oldPath);

           if (oldfile.exists()) { //文件存在时

               InputStream inStream = new FileInputStream(oldPath); //读入原文件

               FileOutputStream fs = new FileOutputStream(newPath);

               byte[] buffer = new byte[1444];

               while ( (byteread = inStream.read(buffer)) != -1) {

                   bytesum += byteread; //字节数 文件大小

                   System.out.println(bytesum);

                   fs.write(buffer, 0, byteread);

               }

               inStream.close();

               fs.close();

           }

       }

       catch (Exception e) {

           System.out.println("复制单个文件操作出错");

           e.printStackTrace();

       }

   }

}
UiAutomatorHelper.java
=================================================================================
CTS 7.0以上使用CTS框架进行测试
下载7.1r5_arm,保留7.1r5_arm\android-cts\testcases目录下的:CtsDeviceInfo.apk、CtsPreconditions.apk、cts.dynamic
<?xml version="1.0" encoding="utf-8"?>

<!-- Copyright (C) 2015 The Android Open Source Project

  Licensed under the Apache License, Version 2.0 (the "License");

  you may not use this file except in compliance with the License.

  You may obtain a copy of the License at

  http://www.apache.org/licenses/LICENSE-2.0

  Unless required by applicable law or agreed to in writing, software

  distributed under the License is distributed on an "AS IS" BASIS,

  WITHOUT WARRANTIES OR CONDITIONS OF ANY KIND, either express or implied.

  See the License for the specific language governing permissions and

  limitations under the License.

-->

<configuration description="Config for CTS test cases">

     <target_preparer class="com.android.compatibility.common.tradefed.targetprep.ApkInstaller">

         <option name="cleanup-apks" value="true" />

         <option name="test-file-name" value="clock-debug.apk" />

      </target_preparer>

      <test class="com.android.tradefed.testtype.AndroidJUnitTest" >

          <option name="package" value="com.android.clock" />

      </test>

</configuration>
3、编写运行CTS文件:
@echo off

set CTS_ROOT=%~dp0

set JAR_DIR=%CTS_ROOT%android-cts\tools

set JAR_PATH=%JAR_DIR%\cts-tradefed.jar;%JAR_DIR%\tradefed-prebuilt.jar;%JAR_DIR%\hosttestlib.jar;%JAR_DIR%\compatibility-host-util.jar

java -cp %JAR_PATH% -DCTS_ROOT=%CTS_ROOT% com.android.compatibility.common.tradefed.command.CompatibilityConsole run cts -a arm64-v8a --skip-preconditions
注意:使用CTS框架时,buildapk需要在AndroidManifest.xml配置文件中加入
<instrumentation

     android:name="android.support.test.runner.AndroidJUnitRunner"

     android:targetPackage="com.android.clock " >

</instrumentation>

Android UiAutomator - CTS Frame的更多相关文章
- Android uiautomator gradle build system
This will guide you through the steps to write your first uiautomator test using gradle as it build ...
- Android UiAutomator 自动化测试编译运行---新手2
1.首先打开eclipse创建java项目
- Appium python自动化测试系列之Android UIAutomator终极定位(七)
android uiautomator text定位 可能有人不知道为什么说android uiautomator是终极定位,而且android uiautomator和appium有什么关系呢?如果 ...
- Android帧布局(Frame Layout)
Android帧布局(Frame Layout) FrameLayout是最简单的一个布局管理器.FrameLayout为每个加入其中的组件创建一个空白区域(一帧),这些组件根据layout_grav ...
- Android UiAutomator 快速调试
背景:在Eclipse中不能直接运行Uiautomator工程,所以每次编写一份用例都要进行手动输入命令,很烦.调试起来不仅繁琐还浪费时间.网上找到一份快速调试的代码UiAutomatorHelper ...
- Android UiAutomator
UiAutomator是一个做UI测试的自动化框架.<Android自动化测试框架>中已有详细介绍,这里就不再累赘了. 一.首先了解自动化测试流程 自动化需求分析 测试用例设计 自动化框架 ...
- python+Android+uiautomator的环境
Python+Android+uiautomator的环境搭建 Python 下载适合系统的版本并安装,安装时勾选把路径加入path 验证:windows下打开cmd输入python 出现以下界面说明 ...
- Appium+python自动化(十二)- Android UIAutomator终极定位凶“胸”器(七)(超详解)
简介 乍眼一看,小伙伴们觉得这部分其实在异性兄弟那里就做过介绍和分享了,其实不然,上次介绍和分享的大哥是uiautomatorviewer,是一款定位工具.今天介绍的是一个java库,提供执行自动化测 ...
- 详解Android动画之Frame Animation(转)
在开始实例讲解之前,先引用官方文档中的一段话: Frame动画是一系列图片按照一定的顺序展示的过程,和放电影的机制很相似,我们称为逐帧动画.Frame动画可以被定义在XML文件中,也可以完全编码实现. ...
随机推荐
- 2.2 if语句
if判断语句 <1>if判断语句介绍 if语句是用来进行判断的,其使用格式如下: if 要判断的条件: 条件成立时,要做的事情 demo1:(demo的中文意思:演示.案例) age = ...
- 理解JS的执行环境
执行环境(Execution context,EC)或执行上下文,是JS中一个极为重要的概念 EC的组成 当JavaScript代码执行的时候,会进入不同的执行上下文,这些执行上下文会构成了一个执行上 ...
- python网络编程初识
一,什么是计算机网络: 计算机网络是指将地理位置不同的具有独立功能的多台计算机及其外部设备,通过通信线路连接起来,在网络操作系统,网络管理软件及网络通信协议的管理和协调下,实现资源共享和 [1] 信 ...
- day 2 - 逻辑运算
1. 初识编码 最早的'密码本' ascii 涵盖了英文字母大小写,特殊字符,数字. ascii 只能表示256种可能,太少,后来创办了万国码 unicode 16表示一个字符不行,32位表示一个字符 ...
- 【blog】Hibernate5如何设置SQLite的方言(待更新...)
参考链接 Hibernate3.Hibernate4.Hibernate5 hibernate5连接sqlite (目前参考的是这个方法)
- A Simple Problem with Integers POJ - 3468 (分块)
题目链接:https://cn.vjudge.net/problem/POJ-3468 题目大意:区间加减+区间查询操作. 具体思路:本来是一个线段树裸题,为了学习分块就按照分块的方法做吧. 分块真的 ...
- java中的进程与线程及java对象的内存结构【转】
原文地址:http://rainforc.iteye.com/blog/2039501 1.实现线程的三种方式: 使用内核线程实现 内核线程(Kernel Thread, KLT)就是 ...
- Python换行符问题:\r\n还是\n?
今天写一个Python脚本去读取一个txt文件时,发现一个很有趣的现象: 如果这个文件是用atom编辑器写的,发现换行符是'\r'.这样一来去逐行读取数据就失效了,因为用open函数 去打开该文件re ...
- 【转】python 内置函数总结(大部分)
[转]python 内置函数总结(大部分) python 内置函数大讲堂 python全栈开发,内置函数 1. 内置函数 python的内置函数截止到python版本3.6.2,现在python一共为 ...
- 【转】MySQL用户管理及SQL语句详解
[转]MySQL用户管理及SQL语句详解 1.1 MySQL用户管理 1.1.1 用户的定义 用户名+主机域 mysql> select user,host,password from mysq ...