原生Form 和 Form组件 Modelform
主要的文件:manage.py,url.py,views.py,settings.py,models.py
manage.py:项目管理文件,一般不做修改。
url.py:路由系统,配置views.py中函数和对应路径的关系。
views.py:添加视图函数,常见的增删查改函数。
settings.py:模板配置文件,对TEMPLATES 、DATABASES、STATIC_URL 等进行配置。
models.py:数据库相关表的类描述。
Django基础必备三件套:HttpResponse, render, redirect
from django.shortcuts import HttpResponse, render, redirect
HttpResponse:内部传入一个字符串参数,返回给浏览器。
render:除request参数外还接受一个待渲染的模板文件和一个保存具体数据的字典参数。将数据填充进模板文件,最后把结果返回给浏览器。
redirect:接受一个URL参数,表示跳转到指定的URL。
参考链接:https://www.cnblogs.com/hxf175336/p/9332409.html
https://www.cnblogs.com/hxf175336/p/9449771.html
表单的处理方式:
常见的三种方式:原生form、form组件、ModelForm组件,以Book表的add为例子分别说明一下这三种方式。
原生Form:
from django.shortcuts import render, HttpResponse, redirect

from .models import *

# Create your views here.

def books(request):

    book_list = Book.objects.all()

    return render(request, "books.html", locals())

# 普通add创建方法

def add_book(request):

    if request.method == "POST":

        title = request.POST.get("title")

        price = request.POST.get("price")

        date = request.POST.get("date")

        publish = request.POST.get("publish")

        author = request.POST.getlist("author")

        # 创建数据库字段

        book_obj = Book.objects.create(title=title, price=price, date=date, publish_id=publish)

        # 创建多对对字段

        book_obj.authors.add(*author)

        return redirect("/books/")

    publish_list = Publish.objects.all()

    author_list = Author.objects.all()

    return render(request, "add_book.html", locals())

def edit_book(request, id):

    if request.method == "POST":

        title = request.POST.get("title")

        price = request.POST.get("price")

        date = request.POST.get("date")

        publish = request.POST.get("publish")

        author_pk_list = request.POST.getlist("author")

        # filter过滤找到指定的值后,直接可以updata更新字段

        Book.objects.filter(pk=id).update(title=title, price=price, date=date, publish=publish)

        # 多对多字段更新

        book_obj = Book.objects.filter(pk=id).first()  # first 找到具体对象 就可以点跨表取值

        book_obj.authors.set(*author_pk_list)  # 进行多对多字段更新

        return redirect("/books/")

    edit_book = Book.objects.filter(id=id).first()  # 利用first可以直接把单个值拿出来,前端可以用点取值

    publish_list = Publish.objects.all()

    author_list = Author.objects.all()

    return render(request, "edit_book.html", locals())
template:
<!DOCTYPE html>

<html lang="en">

<head>

    <meta charset="UTF-8">

    <title>Title</title>

    <!--配置手机端适应-->

    <meta name="viewport" content="width=device-width,initial-scale=1">

    <!--配置css文件 核心CSS样式压缩文件-->

    <link rel="stylesheet" href="/static/bootstrap/css/bootstrap.min.css">

    <link rel="stylesheet" href="/static/font-awesome-4.7.0/css/font-awesome.css">

    <!--配置jQuery-->

    <script src="/static/bootstrap/jQuery.js"></script>

    <!--配置 核心Boot script JS压缩文件-->

    <script src="/static/bootstrap/js/bootstrap.min.js"></script>

</head>

<body>

<a href="/book_add/"><button>添加书籍</button></a>

<hr>

<table border="">

    {% for book in book_list %}

        <tr>

        <td>{{ book.title }}</td>

        <td>{{ book.price }}</td>

        <td>{{ book.date|date:"Y-m-d" }}</td>

        <td>{{ book.publish.name }}</td>

        <td>{{ book.publish.all }}</td>

        <td>{% for author in  book.authors.all %}

            {{ author }}

        {% endfor %}

        </td>

        <td><button><a href="/book_edit/{{ book.id }}/">编辑</a></button></td>

        </tr>

    {% endfor %}

</table>

</body>

</html>
<!DOCTYPE html>

<html lang="en">

<head>

    <meta charset="UTF-8">

    <title>Title</title>

    <!--配置手机端适应-->

    <meta name="viewport" content="width=device-width,initial-scale=1">

    <!--配置css文件 核心CSS样式压缩文件-->

    <link rel="stylesheet" href="/static/bootstrap/css/bootstrap.min.css">

    <link rel="stylesheet" href="/static/font-awesome-4.7.0/css/font-awesome.css">

    <!--配置jQuery-->

    <script src="/static/bootstrap/jQuery.js"></script>

    <!--配置 核心Boot script JS压缩文件-->

    <script src="/static/bootstrap/js/bootstrap.min.js"></script>

</head>

<body>

<h3> 编辑页面</h3>

<form action="/book_edit/{{ edit_book.id }}/" method="post">

    {% csrf_token %}

    <p>书籍名称<input type="text" name="title" value="{{ edit_book.title }}"></p>

    <p>价格<input type="text" name="price" value="{{ edit_book.price }}"></p>

    <p>日期<input type="date" name="date" value="{{ edit_book.date|date:"Y-m-d" }}"></p>

    <p>出版社

        <select name="publish" id="">

            {% for publish in publish_list %}

                <!--值的学习的地方-->

                {% if edit_book.publish == publish %}

                    <option selected value="{{ publish.id }}">{{ publish.name }}</option>

                {% else %}

                    <option value="{{ publish.id }}">{{ publish.name }}</option>

                {% endif %}

            {% endfor %}

        </select>

    <p>作者

        <select name="author" id="" multiple>

            {% for author in author_list %}

                <!--值的学习的地方-->

                {% if author in edit_book.authors.all %}

                    <option selected value="{{ author.id }}">{{ author.name }}</option>

                {% else %}

                    <option value="{{ author.id }}">{{ author.name }}</option>

                {% endif %}

            {% endfor %}

        </select>

    </p>

    <p>

        <button type="submit">提交</button>

    </p>

</form>

</body>

</html>
<!DOCTYPE html>

<html lang="en">

<head>

    <meta charset="UTF-8">

    <title>Title</title>

    <!--配置手机端适应-->

    <meta name="viewport" content="width=device-width,initial-scale=1">

    <!--配置css文件 核心CSS样式压缩文件-->

    <link rel="stylesheet" href="/static/bootstrap/css/bootstrap.min.css">

    <link rel="stylesheet" href="/static/font-awesome-4.7.0/css/font-awesome.css">

    <!--配置jQuery-->

    <script src="/static/bootstrap/jQuery.js"></script>

    <!--配置 核心Boot script JS压缩文件-->

    <script src="/static/bootstrap/js/bootstrap.min.js"></script>

</head>

<body>

<h3>添加页面</h3>

<form action="/book_add/" method="post">

    {% csrf_token %}

    <p>书籍名称<input type="text" name="title"></p>

    <p>价格<input type="text" name="price"></p>

    <p>日期<input type="date" name="date"></p>

    <p>出版社

        <select name="publish" id="">

        {% for publish in publish_list %}

            <option value="{{ publish.id }}">{{ publish.name }}</option>

        {% endfor %}

        </select>

    <p>作者

    <select name="author" id="" multiple>

        {% for author in author_list %}

            <option value="{{ author.id }}">{{ author.name }}]</option>

        {% endfor %}

    </select>

    </p>

<p><button type="submit">提交</button></p>

</form>

</body>

</html>
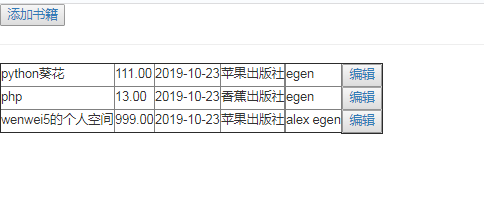
效果图:
Form组件:
前端页面两中形式:
<!DOCTYPE html>

<html lang="en">

<head>

    <meta charset="UTF-8">

    <title>Title</title>

    <!--配置手机端适应-->

    <meta name="viewport" content="width=device-width,initial-scale=1">

    <!--配置css文件 核心CSS样式压缩文件-->

    <link rel="stylesheet" href="/static/bootstrap/css/bootstrap.min.css">

    <link rel="stylesheet" href="/static/font-awesome-4.7.0/css/font-awesome.css">

    <!--配置jQuery-->

    <script src="/static/bootstrap/jQuery.js"></script>

    <!--配置 核心Boot script JS压缩文件-->

    <script src="/static/bootstrap/js/bootstrap.min.js"></script>

</head>

<body>

<form action="">

    {% csrf_token %}

    <div>

        {{ form.title.label }}

        {{ form.title }}

    </div>

    <div>

        {{ form.price.label }}

        {{ form.price }}

    </div>

    <div>

        {{ form.date.label }}

        {{ form.date }}

    </div>

    <div>

        {{ form.pubilish.label }}

        {{ form.pubilish }}

    </div>

    <div>

        {{ form.author.label }}

        {{ form.author }}

    </div>

    <input type="submit">

</form>

</body>

</html>
2:
<!DOCTYPE html>

<html lang="en">

<head>

    <meta charset="UTF-8">

    <title>Title</title>

    <!--配置手机端适应-->

    <meta name="viewport" content="width=device-width,initial-scale=1">

    <!--配置css文件 核心CSS样式压缩文件-->

    <link rel="stylesheet" href="/static/bootstrap/css/bootstrap.min.css">

    <link rel="stylesheet" href="/static/font-awesome-4.7.0/css/font-awesome.css">

    <!--配置jQuery-->

    <script src="/static/bootstrap/jQuery.js"></script>

    <!--配置 核心Boot script JS压缩文件-->

    <script src="/static/bootstrap/js/bootstrap.min.js"></script>

</head>

<body>

<h3>添加页面</h3>

<form action="/book_add/" method="post">

    {% csrf_token %}

    {% for field in form %}

        <div>

            {{ field.label }}

            {{ field}}

        </div>

    {% endfor %}

    <input type="submit">

</form>

</body>

</html>
2:
<!DOCTYPE html>

<html lang="en">

<head>

    <meta charset="UTF-8">

    <title>Title</title>

    <!--配置手机端适应-->

    <meta name="viewport" content="width=device-width,initial-scale=1">

    <!--配置css文件 核心CSS样式压缩文件-->

    <link rel="stylesheet" href="/static/bootstrap/css/bootstrap.min.css">

    <link rel="stylesheet" href="/static/font-awesome-4.7.0/css/font-awesome.css">

    <!--配置jQuery-->

    <script src="/static/bootstrap/jQuery.js"></script>

    <!--配置 核心Boot script JS压缩文件-->

    <script src="/static/bootstrap/js/bootstrap.min.js"></script>

</head>

<body>

<h3> 编辑页面</h3>

<form action="" method="post">

    {% csrf_token %}

    {% for field in form %}

    <div>

        {{ field.label }}

        {{ field }}

    </div>

    {% endfor %}

    <input type="submit">

</form>

</body>

</html>
Form view视图:
# 原生form 创建方法

def add_book(request):

    if request.method == "POST":

        # 我调用了form吧request值传进去让他帮我做校验

        form = BookForm(request.POST)

        # form.cleaned_data里面的数据

        """

        {'title': 'fdasfdsa24323',

        'price': Decimal('123212'),

         'date': datetime.date(2019, 10, 17),

          'pubilish': <Publish: 香蕉出版社>,

          'author': <QuerySet [<Author: egen>]>}

        """

        if form.is_valid():

            # 需要用cleaned_data取值

            title = form.cleaned_data.get("title")

            price = form.cleaned_data.get("price")

            date = form.cleaned_data.get("date")

            # 一对多字段和多对多字段需要在request里面取值

            publish_id = request.POST.get("pubilish")

            author_pk_list = request.POST.getlist("author")

            book_obj = Book.objects.create(title=title, price=price, date=date, publish_id=publish_id)

            book_obj.authors.add(*author_pk_list)

            return redirect("/books/")

    form = BookForm()

    return render(request, "add_book.html", locals())
def edit_book(request, id):

    if request.method == "POST":

        # 我调用了form吧request值传进去让他帮我做校验

        form = BookForm(request.POST)

        # form.cleaned_data里面的数据

        """

        {'title': 'fdasfdsa24323',

        'price': Decimal('123212'),

         'date': datetime.date(2019, 10, 17),

          'pubilish': <Publish: 香蕉出版社>,

          'author': <QuerySet [<Author: egen>]>}

        """

        if form.is_valid():

            # 需要用cleaned_data取值

            title = form.cleaned_data.get("title")

            price = form.cleaned_data.get("price")

            date = form.cleaned_data.get("date")

            # 一对多字段和多对多字段需要在request里面取值

            publish_id = request.POST.get("pubilish")

            author_pk_list = request.POST.getlist("author")

            Book.objects.filter(pk=id).update(title=title, price=price, date=date, publish=publish_id)

            # 多对多字段更新

            book_obj = Book.objects.filter(pk=id).first()  # first 找到具体对象 就可以点跨表取值

            book_obj.authors.set(*author_pk_list)  # 进行多对多字段更新

        return redirect("/books/")

    edit_book = Book.objects.filter(id=id).first()  # 利用first可以直接把单个值拿出来,前端可以用点取值

    form = BookForm()

    #  python2.26版本貌似没有了instance字段,无法在编辑时选中编辑的字段

    # form = BookForm(instance=edit_book)

    return render(request, "edit_book.html", locals())
# ModelForm 创建方法:
前端页面:
<!DOCTYPE html>

<html lang="en">

<head>

    <meta charset="UTF-8">

    <title>Title</title>

    <!--配置手机端适应-->

    <meta name="viewport" content="width=device-width,initial-scale=1">

    <!--配置css文件 核心CSS样式压缩文件-->

    <link rel="stylesheet" href="/static/bootstrap/css/bootstrap.min.css">

    <link rel="stylesheet" href="/static/font-awesome-4.7.0/css/font-awesome.css">

    <!--配置jQuery-->

    <script src="/static/bootstrap/jQuery.js"></script>

    <!--配置 核心Boot script JS压缩文件-->

    <script src="/static/bootstrap/js/bootstrap.min.js"></script>

</head>

<body>

<h3>添加页面</h3>

<form action="/book_add/" method="post">

    {% csrf_token %}

    {% for field in form %}

        <div>

            {{ field.label }}

            {{ field }}

        </div>

    {% endfor %}

    <input type="submit">

</form>

</body>

</html>
<!DOCTYPE html>

<html lang="en">

<head>

    <meta charset="UTF-8">

    <title>Title</title>

    <!--配置手机端适应-->

    <meta name="viewport" content="width=device-width,initial-scale=1">

    <!--配置css文件 核心CSS样式压缩文件-->

    <link rel="stylesheet" href="/static/bootstrap/css/bootstrap.min.css">

    <link rel="stylesheet" href="/static/font-awesome-4.7.0/css/font-awesome.css">

    <!--配置jQuery-->

    <script src="/static/bootstrap/jQuery.js"></script>

    <!--配置 核心Boot script JS压缩文件-->

    <script src="/static/bootstrap/js/bootstrap.min.js"></script>

</head>

<body>

<div class="container">

    <div class="row">

        <div class="col-md-6 col-md-offset-3">

            <h3> 编辑页面</h3>

            {% include "form.html" %}

        </div>

    </div>

</div>

</body>

</html>
<!DOCTYPE html>

<html lang="en">

<head>

    <meta charset="UTF-8">

    <title>Title</title>

    <!--配置手机端适应-->

    <meta name="viewport" content="width=device-width,initial-scale=1">

    <!--配置css文件 核心CSS样式压缩文件-->

    <link rel="stylesheet" href="/static/bootstrap/css/bootstrap.min.css">

    <link rel="stylesheet" href="/static/font-awesome-4.7.0/css/font-awesome.css">

    <!--配置jQuery-->

    <script src="/static/bootstrap/jQuery.js"></script>

    <!--配置 核心Boot script JS压缩文件-->

    <script src="/static/bootstrap/js/bootstrap.min.js"></script>

</head>

<body>

<div class="container">

    <div class="row">

        <div class="col-md-6 col-md-offset-3">

            <h3>添加页面</h3>

            {% include "add.html" %}

        </div>

    </div>

</div>

</body>

</html>
view视图:
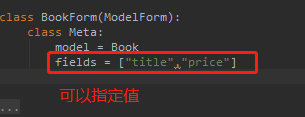
class BookForm(ModelForm):

    class Meta:

        model = Book

        fields = "__all__"

        # 自定义属性的方法

        widgets = {

            "date": wid.DateInput(attrs={"type": "date","class": "form-control"}),  # 还可以自定义属性

            "title": wid.DateInput(attrs={"class": "form-control"}),

            "price": wid.DateInput(attrs={"class": "form-control"}),

            "publish": wid.Select({"class" : "form-control"}),

            "authors": wid.SelectMultiple(attrs={"class" : "form-control"}),

        }

        # labels,自定义在前端显示的名字

        labels = {

            "date": "时间",

            "title": "用户名",

            "price": "价格",

            "publish": "出版社",

            "authors": "作者",

        }
# ModelForm 创建方法

def add_book(request):

    if request.method == "POST":

        form = BookForm(request.POST)

        if form.is_valid():

            form.save()  # 这个叼 这个叼

            return redirect("/books/")

    form = BookForm()

    return render(request, "add_book.html", locals())
def edit_book(request, id):

    if request.method == "POST":

        form = BookForm(request.POST)

        if form.is_valid():

            form.save()  # 这个叼 这个叼

            return redirect("/books/")

    edit_book = Book.objects.filter(pk=id).first()

    # ModelForm是有instance这个字段的,主要用于 编辑时可以默认选中当前编辑字段

    form = BookForm(instance=edit_book)

    return render(request, "edit_book.html", locals())
mo
原生Form 和 Form组件 Modelform的更多相关文章
- Django之form表单组件
Form介绍 我们之前在HTML页面中利用form表单向后端提交数据时,都会写一些获取用户输入的标签并且用form标签把它们包起来. 与此同时我们在好多场景下都需要对用户的输入做校验,比如校验用户是否 ...
- Django form表单 组件
目录 Django form表单 组件 Form 组件介绍 普通方式手写注册功能 使用form组件实现注册功能 Form 常用字段与插件 常用字段(必备) 字段参数(必备) 内置验证(必备) 自定义效 ...
- Form( 表单) 组件
本节课重点了解 EasyUI 中 Form(表单)组件的使用方法, 这个组件不依赖于任何组件.一. 加载方式表单组件只能在 JS 区域设置,首先定义一张表单.<form id="box ...
- Django Form表单组件
Form介绍 我们之前在HTML页面中利用form表单向后端提交数据时,都会写一些获取用户输入的标签并且用form标签把它们包起来. 与此同时我们在好多场景下都需要对用户的输入做校验,比如校验用户是否 ...
- 第二百二十一节,jQuery EasyUI,Form(表单)组件
jQuery EasyUI,Form(表单)组件 学习要点: 1.加载方式 2.属性列表 3.事件列表 4.方法列表 本节课重点了解 EasyUI 中 Form(表单)组件的使用方法,这个组件不依赖于 ...
- 原生js实现form表单序列化
当我们有form表单而且里面的表单元素较多时,咱们总不能一个个去获取表单元素内的值来进行拼接吧!这样会很让人蛋疼!为了方便与后台交互并且提高自己的开发效率,并且不让你蛋疼:我们一起用原生来写一个表单序 ...
- Vue + Element-ui实现后台管理系统(5)---封装一个Form表单组件和Table表格组件
封装一个Form表单组件和Table组件 有关后台管理系统之前写过四遍博客,看这篇之前最好先看下这四篇博客.另外这里只展示关键部分代码,项目代码放在github上: mall-manage-syste ...
- 封装react antd的form表单组件
form表单在我们日常的开发过程中被使用到的概率还是很大的,比如包含了登录.注册.修改个人信息.新增修改业务数据等的公司内部管理系统.而在使用时这些表单的样式如高度.上下边距.边框.圆角.阴影.高亮等 ...
- 封装Vue Element的form表单组件
前两天封装了一个基于vue和Element的table表格组件,阅读的人还是很多的,看来大家都是很认同组件化.高复用这种开发模式的,毕竟开发效率高,代码优雅,逼格高嘛.虽然这两天我的心情很糟糕,就像& ...
随机推荐
- Mybatis中实体类属性与数据库列表间映射方法介绍
这篇文章主要介绍了Mybatis中实体类属性与数据列表间映射方法介绍,一共四种方法方法,供大家参考. Mybatis不像Hibernate中那么自动化,通过@Co ...
- [HAOI2015]树上操作 题解
题目描述 有一棵点数为 N 的树,以点 1 为根,且树点有边权.然后有 M 个操作,分为三种: 操作 1 :把某个节点 x 的点权增加 a . 操作 2 :把某个节点 x 为根的子树中所有点的点权都增 ...
- git学习笔记 ---版本退回
我们已经成功地添加并提交了一个readme.txt文件,现在,是时候继续工作了,于是,我们继续修改readme.txt文件,改成如下内容: Git is a distributed version c ...
- The three day 给你一个有效的 IPv4 地址 address,返回这个 IP 地址的无效化版本
""" 给你一个有效的 IPv4 地址 address,返回这个 IP 地址的无效化版本. 所谓无效化 IP 地址,其实就是用 "[.]" 代替了每个 ...
- Hadoop1-认识Hadoop大数据处理架构
一.简介概述 1.什么是Hadoop Hadoop是Apache软件基金会旗下的一个开源分布式计算平台,为用户提供了系统底层细节透明的分布式基础架构 Hadoop是基于java语言开发,具有很好的跨平 ...
- Hadoop2-认识Hadoop大数据处理架构-单机部署
一.Hadoop原理介绍 1.请参考原理篇:Hadoop1-认识Hadoop大数据处理架构 二.centos7单机部署hadoop 前期准备 1.创建用户 [root@web3 ~]# useradd ...
- oracle 查询 10题
说明:表数据来自oracle 初始用户之一scott里面的三个初始表:emp,dept,salgrade --1.查询员工表中工资最高的雇员的员工号.员工姓名.工资和部门号. select empno ...
- kubernetes第九章--管理机密信息
- 大数据相关技术原理资料整理(hdfs, spark, hbase, kafka, zookeeper, redis, hive, flink, k8s, OpenTSDB, InfluxDB, yarn)
hdfs: hdfs官方文档 深入理解HDFS的架构和原理 https://blog.csdn.net/kezhong_wxl/article/details/76573901 HDFS原理解析(总体 ...
- php操作表格(写)
一,转载:http://www.thinkphp.cn/extend/832.html 二,转载:http://m.blog.csdn.net/article/details?id=7827038