第9章 运行TensorFlow
第9章 运行TensorFlow
参考书
《机器学习实战——基于Scikit-Learn和TensorFlow》
工具
python3.5.1,Jupyter Notebook, Pycharm
创建一个计算图并在会话中执行
x = tf.Variable(3, name="x")

y = tf.Variable(4, name="y")

f = x*x*y + y + 2

sess = tf.Session()

sess.run(x.initializer)

sess.run(y.initializer)

result = sess.run(f)

print(result)

sess.close()

# 每次重复sess.run()看起来有些笨拙,好在有更好的方式

with tf.Session() as sess:

    x.initializer.run()

    y.initializer.run()

    result = f.eval()

    print(result)
- 其中x.initializer.run()等价于tf.get_default_session().run(x.initializer)
- 同样,f.eval()等价于tf.get_default_session().run(f)
- 除了手工为每个变量调用初始化器之外,还可以使用
global_variables_initializer()函数来完成同样的动作。注意:这个操作并不会立刻做初始化,它只是在图中创建了一个节点,这个节点会在会话执行时初始化所有变量。
init = tf.global_variables_initializer()

with tf.Session() as sess:

    init.run()

    result = f.eval()

    print(result)
- 在Jupyter或者Python shell中,可以创建一个InteractiveSession。它和常规会话的不同之处在于InteractiveSession在创建时会将自己设置为默认会话,因此你无须使用with块(不过需要在结束之后手动关闭会话)。
sess = tf.InteractiveSession()

init.run()

result = f.eval()

print(result)

sess.close()
管理图
你创建的所有节点都会自动添加到默认图上
x1 = tf.Variable(1)

x1.graph is tf.get_default_graph()
有时候你可能想要管理多个互不依赖的图。可以创建一个新的图,然后用with块临时将它设置为默认图
graph = tf.Graph()

with graph.as_default():

    x2 = tf.Variable(2)

x2.graph is graph

x2.graph is tf.get_default_graph()
在Jupyter中,做实验时你经常会多次执行同一条命令。这样可能会在同一个图上添加了很多重复的节点。
- 一种做法是重启Jupyter内核
- 更方便的做法是通过tf.reset_default_graph()来重置默认图
节点值的生命周期
w = tf.constant(3)

x = w + 2

y = x + 5

z = x * 3

with tf.Session() as sess:

    print(y.eval())

    print(z.eval())
TensorFlow不会重复用上一步求值的w和x的结果。简而言之,w和x的值会被计算两次。
在图的每次执行间,所有节点值都会被丢弃,但是变量的值不会,因为变量的值是由会话维护的(队列和阅读器也会维护一些状态)。变量的生命周期从初始化器的执行开始,到关闭会话才结束。
对于上述代码,如果你不希望对y和z重复求值,那么必须告诉TensorFlow在一次图执行中就完成y和z的求值
with tf.Session() as sess:

    y_val, z_val = sess.run([y, z])

    print(y_val)

    print(z_val)
在单进程的TensorFlow中,即使它们共享同一个计算图,多个会话之间仍然互相隔离,不共享任何状态(每个会话对每个变量都有自己的拷贝)。
对于分布式TensorFlow,变量值保存在每个服务器上,而不是会话中,所以多个会话可以共享同一变量。
TensorFlow中的线性回归
import numpy as np

from sklearn.datasets import fetch_california_housing

housing = fetch_california_housing()

m, n = housing.data.shape

housing_data_plus_bias = np.c_[np.ones((m, 1)), housing.data]

X = tf.constant(housing_data_plus_bias, dtype=tf.float32, name="X")

y = tf.constant(housing.target.reshape(-1, 1), dtype=tf.float32, name="y")

XT = tf.transpose(X)

theta = tf.matmul(tf.matmul(tf.matrix_inverse(tf.matmul(XT, X)), XT), y)

with tf.Session() as sess:

    theta_value = theta.eval()

    print(theta_value)
实现梯度下降
手动计算梯度
n_epochs = 1000

learning_rate = 0.01

X = tf.constant(scaled_housing_data_plus_bias, dtype=tf.float32, name="X")

y = tf.constant(housing.target.reshape(-1, 1), dtype=tf.float32, name="y")

theta = tf.Variable(tf.random_uniform([n+1, 1], -1.0, 1.0), name="theta")

y_pred = tf.matmul(X, theta, name="perdictions")

error = y_pred - y

mse = tf.reduce_mean(tf.square(error), name="mse")

gradients = 2/m * tf.matmul(tf.transpose(X), error)

training_op = tf.assign(theta, theta - learning_rate * gradients)

init = tf.global_variables_initializer()

with tf.Session() as sess:

    sess.run(init)

    for epoch in range(n_epochs):

        if epoch % 100 == 0:

            print("Epoch", epoch, "MSE = ", mse.eval())

        sess.run(training_op)

    best_theta = theta.eval()
- 函数random_uniform()会在图中创建一个节点,这个节点会生成一个张量。函数会根据传入的形状和值域来生成随机值来填充这个张量,这和Numpy的rand()函数很相似。
- 函数assign()创建一个为变量赋值的节点。这里,它实现了批量梯度下降。
使用自动微分
TensorFlow的autodiff功能可以自动而且高效的算出梯度。只需要把上述例子中的对gradients的赋值的语句换成下面的代码即可。
gradients = tf.gradients(mse, [theta])[0]gradients()函数接受一个操作符(这里是mse)和一个参数列表(这里是theta)作为参数,然后它会创建一个操作符的列表来计算每个变量的梯度。所以梯度节点将计算MSE相对于theta的梯度向量。
TensorFlow使用了反向的autodiff算法,它非常适用于有多个输入和少量输出的场景,在神经网络中这种场景非常常见。它只需要$n_{outputs}+1$次遍历,就可以求出所有输出相对于输入的偏导。
四种自动计算梯度的主要方法
方法 精确度 是否支持任意代码 备注 数值微分 低 是 实现琐碎 符号微分 高 否 会构建一个完全不同的图 前向自动微分 高 是 基于二元树 反向自动微分 高 是 由TensorFlow实现
实现优化器
TensorFlow会帮你计算梯度,不过它还提供更容易的方法:它内置了很多的优化器,其中就包含梯度下降优化器。你只需要把上面对gradients=…和training_op=…赋值的语句修改成下面的代码即可:
optimizer = tf.train.GradientDescentOptimizer(learning_rate=learning_rate)

training_op = optimizer.minimize(mse)
动量优化器(比梯度下降优化器的收敛速度快很多)
optimizer = tf.train.MomentumOptimizer(learning_rate=learning_rate, momentum=0.9)
给训练算法提供数据
占位符节点
A = tf.placeholder(tf.float32, shape=(None, 3))

B = A + 5

with tf.Session() as sess:

    B_val_1 = B.eval(feed_dict={A: [[1, 2, 3]]})

    B_val_2 = B.eval(feed_dict={A: [[4, 5, 6], [7, 8, 9]]})

    print(B_val_1)

    print(B_val_2)
Mini-batch Gradient Descent
learning_rate = 0.01

X = tf.placeholder(tf.float32, shape=(None, n + 1), name="X")

y = tf.placeholder(tf.float32, shape=(None, 1), name="y")

theta = tf.Variable(tf.random_uniform([n + 1, 1], -1.0, 1.0, seed=42), name="theta")

y_pred = tf.matmul(X, theta, name="predictions")

error = y_pred - y

mse = tf.reduce_mean(tf.square(error), name="mse")

optimizer = tf.train.GradientDescentOptimizer(learning_rate=learning_rate)

training_op = optimizer.minimize(mse)

init = tf.global_variables_initializer()

n_epochs = 10

batch_size = 100

n_batches = int(np.ceil(m / batch_size))

def fetch_batch(epoch, batch_index, batch_size):

    np.random.seed(epoch * n_batches + batch_index)  # not shown in the book

    indices = np.random.randint(m, size=batch_size)  # not shown

    X_batch = scaled_housing_data_plus_bias[indices] # not shown

    y_batch = housing.target.reshape(-1, 1)[indices] # not shown

    return X_batch, y_batch

with tf.Session() as sess:

    sess.run(init)

    for epoch in range(n_epochs):

        for batch_index in range(n_batches):

            X_batch, y_batch = fetch_batch(epoch, batch_index, batch_size)

            sess.run(training_op, feed_dict={X: X_batch, y: y_batch})

    best_theta = theta.eval()
保存和恢复模型
保存模型:
saver = tf.train.Saver()n_epochs = 1000 # not shown in the book
learning_rate = 0.01 # not shown X = tf.constant(scaled_housing_data_plus_bias, dtype=tf.float32, name="X") # not shown
y = tf.constant(housing.target.reshape(-1, 1), dtype=tf.float32, name="y") # not shown
theta = tf.Variable(tf.random_uniform([n + 1, 1], -1.0, 1.0, seed=42), name="theta")
y_pred = tf.matmul(X, theta, name="predictions") # not shown
error = y_pred - y # not shown
mse = tf.reduce_mean(tf.square(error), name="mse") # not shown
optimizer = tf.train.GradientDescentOptimizer(learning_rate=learning_rate) # not shown
training_op = optimizer.minimize(mse) # not shown init = tf.global_variables_initializer()
saver = tf.train.Saver() with tf.Session() as sess:
sess.run(init) for epoch in range(n_epochs):
if epoch % 100 == 0:
print("Epoch", epoch, "MSE =", mse.eval()) # not shown
save_path = saver.save(sess, "D:/Python3Space/BookStudy/book4/model/my_model.ckpt")
sess.run(training_op) best_theta = theta.eval()
save_path = saver.save(sess, "D:/Python3Space/BookStudy/book4/model/tmp/my_model_final.ckpt")
恢复模型:恢复模型同样简单,与之前一样,在构造期末尾创建一个Saver节点,不过在执行期开始的时候,不是用init节点来初始化变量,而是调用Saver对象上的restore()方法。
with tf.Session() as sess:

    saver.restore(sess, "D:/Python3Space/BookStudy/book4/model/tmp/my_model_final.ckpt")

    best_theta_restored = theta.eval() # not shown in the book

    print(best_theta_restored)
默认的,Saver会按照变量名来保留和恢复变量,不过如果你想做更多的控制,也可以在保存和恢复时自己指定名称。比如,在下面的代码中,Saver只会保存theta,并将其命名为weights:
saver = tf.train.Saver({"weights": theta})
用TensorBoard来可视化图和训练曲线
- 开启TensorBoard:tensorboard --logdir tf_logs/
from datetime import datetime

now = datetime.utcnow().strftime("%Y%m%d%H%M%S")

root_logdir = "D:/Python3Space/BookStudy/book4/model/tf_logs"

logdir = "{}/run-{}/".format(root_logdir, now)

n_epochs = 1000

learning_rate = 0.01

X = tf.placeholder(tf.float32, shape=(None, n + 1), name="X")

y = tf.placeholder(tf.float32, shape=(None, 1), name="y")

theta = tf.Variable(tf.random_uniform([n + 1, 1], -1.0, 1.0, seed=42), name="theta")

y_pred = tf.matmul(X, theta, name="predictions")

error = y_pred - y

mse = tf.reduce_mean(tf.square(error), name="mse")

optimizer = tf.train.GradientDescentOptimizer(learning_rate=learning_rate)

training_op = optimizer.minimize(mse)

init = tf.global_variables_initializer()

mse_summary = tf.summary.scalar('MSE', mse)

file_writer = tf.summary.FileWriter(logdir, tf.get_default_graph())

n_epochs = 10

batch_size = 100

n_batches = int(np.ceil(m / batch_size))

with tf.Session() as sess:                                                        # not shown in the book

    sess.run(init)                                                                # not shown

    for epoch in range(n_epochs):                                                 # not shown

        for batch_index in range(n_batches):

            X_batch, y_batch = fetch_batch(epoch, batch_index, batch_size)

            if batch_index % 10 == 0:

                summary_str = mse_summary.eval(feed_dict={X: X_batch, y: y_batch})

                step = epoch * n_batches + batch_index

                file_writer.add_summary(summary_str, step)

            sess.run(training_op, feed_dict={X: X_batch, y: y_batch})

    best_theta = theta.eval()                                                     # not shown

file_writer.close()
命名作用域
reset_graph()

now = datetime.utcnow().strftime("%Y%m%d%H%M%S")

root_logdir = "tf_logs"

logdir = "{}/run-{}/".format(root_logdir, now)

n_epochs = 1000

learning_rate = 0.01

X = tf.placeholder(tf.float32, shape=(None, n + 1), name="X")

y = tf.placeholder(tf.float32, shape=(None, 1), name="y")

theta = tf.Variable(tf.random_uniform([n + 1, 1], -1.0, 1.0, seed=42), name="theta")

y_pred = tf.matmul(X, theta, name="predictions")

with tf.name_scope("loss") as scope:

    error = y_pred - y

    mse = tf.reduce_mean(tf.square(error), name="mse")

optimizer = tf.train.GradientDescentOptimizer(learning_rate=learning_rate)

training_op = optimizer.minimize(mse)

init = tf.global_variables_initializer()

mse_summary = tf.summary.scalar('MSE', mse)

file_writer = tf.summary.FileWriter(logdir, tf.get_default_graph())

n_epochs = 10

batch_size = 100

n_batches = int(np.ceil(m / batch_size))

with tf.Session() as sess:

    sess.run(init)

    for epoch in range(n_epochs):

        for batch_index in range(n_batches):

            X_batch, y_batch = fetch_batch(epoch, batch_index, batch_size)

            if batch_index % 10 == 0:

                summary_str = mse_summary.eval(feed_dict={X: X_batch, y: y_batch})

                step = epoch * n_batches + batch_index

                file_writer.add_summary(summary_str, step)

            sess.run(training_op, feed_dict={X: X_batch, y: y_batch})

    best_theta = theta.eval()

file_writer.flush()

file_writer.close()

print("Best theta:")

print(best_theta)

print(error.op.name)

print(mse.op.name)
模块化
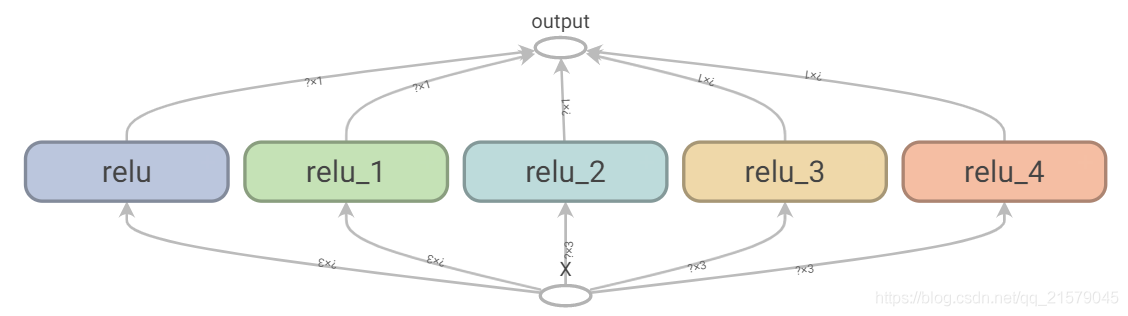
一段错误的代码,这段代码中包含了一个cut-and-paste的错误
import tensorflow as tf

import numpy as np

n_features = 3

X = tf.placeholder(tf.float32, shape=(None, n_features), name="X")

w1 = tf.Variable(tf.random_normal((n_features, 1)), name="weights1")

w2 = tf.Variable(tf.random_normal((n_features, 1)), name="weights2")

b1 = tf.Variable(0.0, name="bias1")

b2 = tf.Variable(0.0, name="bias2")

z1 = tf.add(tf.matmul(X, w1), b1, name="z1")

z2 = tf.add(tf.matmul(X, w2), b2, name="z2")

relu1 = tf.maximum(z1, 0., name="relu1")

relu2 = tf.maximum(z1, 0., name="relu2")

output = tf.add(relu1, relu2, name="output")
TensorFlow会让你保持DRY(Don’t Repeat Yourself,不要重复自己)原则:用一个函数来构建ReLU。
def reset_graph(seed=42):

    tf.reset_default_graph()

    tf.set_random_seed(seed)

    np.random.seed(seed)

def relu(X):

    with tf.name_scope("relu"):

        w_shape = (int(X.get_shape()[1]), 1)

        w = tf.Variable(tf.random_normal(w_shape), name="weights")

        b = tf.Variable(0.0, name="bias")

        z = tf.add(tf.matmul(X, w), b, name="z")

        return tf.maximum(z, 0., name="relu")

reset_graph()

n_features = 3

X = tf.placeholder(tf.float32, shape=(None, n_features), name="X")

relus = [relu(X) for i in range(5)]

output = tf.add_n(relus, name="output")

with tf.Session() as sess:

    sess.run(tf.global_variables_initializer())

    result = output.eval(feed_dict={X: [[1, 2, 3], [4, 5, 6]]})

    print(result)

file_writer.close()
共享变量
如果你想在图的不同组建中共享变量:最简单的做法是先创建,然后将其作为参数传递给需要它的函数。
TensorFlow提供另外一个选择,可以让代码更加清晰,也更加模块化。
如果共享变量不存在,该方法先通过get_variable()函数创建共享变量;如果已经存在了,就复用该共享变量。期望的行为通过当前variable_scope()的一个属性来控制(创建或者复用)。
with tf.variable_scope("relu"):

    threshold = tf.get_variable("threshold", shape=(), initializer=tf.constant_initializer(0.0))
注意,如果这个变量之前已经被get_variable()调用创建过,这里会抛出一个一场。这种机制避免由于误操作而复用变量。
如果要复用一个变量,需要通过设置变量作用域reuse属性为True来显示地实现(在这里,不必指定形状或初始化器)。
with tf.variable_scope("relu", reuse=True):

    threshold = tf.get_variable("threshold")
这段代码会获取既有的“relu/threshold”变量,如果该变量不存在,或者在调用get_variable()时没有创建成功,那么会抛出一个异常。
另一种方式是,在调用作用域的reuse_variables()方法块中设置reuse属性为True。
with tf.variable_scope("relu") as scope:

    scope.reuse_variables()

    threshold = tf.get_variable("threshold")
一旦reuse属性设置为True之后,在该块中就不能再设置为False了。另外,如果在块中定义了另外的变量作用域,它们会自动继承resue=True。最后,只有通过get_variable()创建的变量才可以用这种方式进行复用。
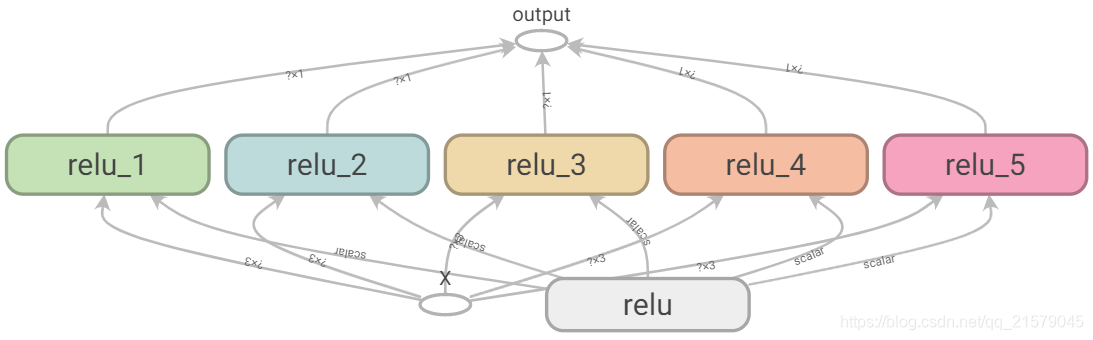
现在你已经看到了所有能让relu()函数无须传入参数就访问threshold变量的方法了:
reset_graph()

def relu(X):

    with tf.variable_scope("relu", reuse=True):

        threshold = tf.get_variable("threshold")

        w_shape = int(X.get_shape()[1]), 1                          # not shown

        w = tf.Variable(tf.random_normal(w_shape), name="weights")  # not shown

        b = tf.Variable(0.0, name="bias")                           # not shown

        z = tf.add(tf.matmul(X, w), b, name="z")                    # not shown

        return tf.maximum(z, threshold, name="max")

X = tf.placeholder(tf.float32, shape=(None, n_features), name="X")

with tf.variable_scope("relu"):

    threshold = tf.get_variable("threshold", shape=(),

                                initializer=tf.constant_initializer(0.0))

relus = [relu(X) for relu_index in range(5)]

output = tf.add_n(relus, name="output")

file_writer = tf.summary.FileWriter("D:/李添的数据哦!!!/BookStudy/book4/model/logs/relu6", tf.get_default_graph())

file_writer.close()

with tf.Session() as sess:

    sess.run(tf.global_variables_initializer())

    result = output.eval(feed_dict={X: [[1, 2, 3], [4, 5, 6]]})

    print(result)
通过get_variable()创建的变量总是以它们的variable_scope作为前缀来命名的(比如“relu/threshold”),对于其它节点(包括通过tf.Variable()创建的变量)变量作用域的行为就好像是一个新的作用域。具体来说,如果一个命名作用域有一个已经创建了的变量名,那么就会加上一个后缀以保证其唯一性。比如,上面的例子中的所有变量(除了threshold变量)都有一个“relu_1”到“relu_5”的前缀。
遗憾的是,threshold变量必须定义在relu()函数之外,其他所有的ReLU代码都在内部。要解决这个问题,下面的代码在relu()函数第一次调用时创建了threshold变量,并在后续的调用中复用。现在relu()函数无须关注命名作用域或者变量共享问题,它只需要调用get_variable(),来创建或者复用threshold变量(无需关心到底是创建还是复用)。剩下的代码调用了relu()5次,确保第一次调用时将reuse设置为False,后续的调用将reuse设置为True。
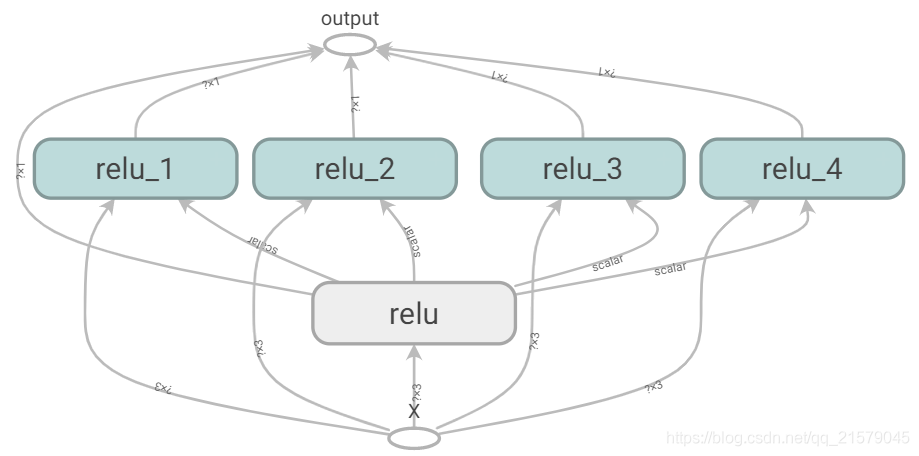
结果跟之前的略有不同,因为共享变量在第一个ReLU中。
方法1:
reset_graph()

def relu(X):

    with tf.variable_scope("relu"):

        threshold = tf.get_variable("threshold", shape=(), initializer=tf.constant_initializer(0.0))

        w_shape = (int(X.get_shape()[1]), 1)

        w = tf.Variable(tf.random_normal(w_shape), name="weights")

        b = tf.Variable(0.0, name="bias")

        z = tf.add(tf.matmul(X, w), b, name="z")

        return tf.maximum(z, threshold, name="max")

X = tf.placeholder(tf.float32, shape=(None, n_features), name="X")

with tf.variable_scope("", default_name="") as scope:

    first_relu = relu(X)     # create the shared variable

    scope.reuse_variables()  # then reuse it

    relus = [first_relu] + [relu(X) for i in range(4)]

output = tf.add_n(relus, name="output")

file_writer = tf.summary.FileWriter("D:/李添的数据哦!!!/BookStudy/book4/model/logs/relu8", tf.get_default_graph())

file_writer.close()

with tf.Session() as sess:

    sess.run(tf.global_variables_initializer())

    result = output.eval(feed_dict={X: [[1, 2, 3], [4, 5, 6]]})

    print(result)
方法2:
reset_graph()

def relu(X):

    threshold = tf.get_variable("threshold", shape=(),

                                initializer=tf.constant_initializer(0.0))

    w_shape = (int(X.get_shape()[1]), 1)                        # not shown in the book

    w = tf.Variable(tf.random_normal(w_shape), name="weights")  # not shown

    b = tf.Variable(0.0, name="bias")                           # not shown

    z = tf.add(tf.matmul(X, w), b, name="z")                    # not shown

    return tf.maximum(z, threshold, name="max")

X = tf.placeholder(tf.float32, shape=(None, n_features), name="X")

relus = []

for relu_index in range(5):

    with tf.variable_scope("relu", reuse=(relu_index >= 1)) as scope:

        relus.append(relu(X))

output = tf.add_n(relus, name="output")

file_writer = tf.summary.FileWriter("D:/李添的数据哦!!!/BookStudy/book4/model/logs/relu9", tf.get_default_graph())

file_writer.close()

with tf.Session() as sess:

    sess.run(tf.global_variables_initializer())

    result = output.eval(feed_dict={X: [[1, 2, 3], [4, 5, 6]]})

    print(result)
练习摘抄
语句a_val, b_val = a.eval(session=sess), b.eval(session=sess)和a_val, b_val = sess.run([a, b])等价吗?
不等价。第一条语句会运行两次(第一次计算a,第二次计算b),而第二条语句只运行一次。如果这些操作(或者它们依赖的操作)中的任意一个具有副作用(比如,修改一个变量,向队列中插入一条记录,或者读取一个文件等),那么效果就会不同。如果操作没有副作用,那么语句会返回同样的结果,不过第二条语句会比第一条快。
假设你创建了一个包含变量w的图,然后在两个线程中分别启动一个会话,两个线程都使用了图g,每个会话会有自己对w变量的拷贝,还是会共享变量?
在本地TensorFlow中,会话用来管理变量的值,如果你创建了一个包含变量w的图g,然后启动两个线程,并在每个线程中打开一个本地的会话,这两个线程使用同一个图g,那么每个会话会拥有自己的w的拷贝。如果在分布式的TensorFlow中,变量的值则存储在由集群管理的容器中,如果两个会话连接了同一个集群,并使用同一个容器,那么它们会共享变量w。
变量何时被初始化,又在何时被销毁?
变量在调用其初始化器的时候被初始化,在会话结束的时候被销毁。在分布式TensorFlow中,变量存活于集群上的容器中,所以关闭一个会话不会销毁变量。要销毁一个变量,你需要清空它所在的容器。
占位符和变量的区别是什么?
- 变量和占位符完全不同。
- 变量是包含一个值的操作。你执行一个变量,它会返回对应的值。在执行之前,你需要初始化变量。你可以修改变量的值(比如,通过使用赋值操作)。变量有状态:在连续运行图时,变量保持相同的值。通常它被用作保存模型的参数,不过也可以用作其他用途(比如,对全局训练的步数进行计数)。
- 占位符则只能做很少的事儿:它们只有其所代表的张量的类型和形状的信息,但没有值。事实上,如果你要对一个依赖于占位符的操作进行求值,你必须先为其传值(通过feed_dict),否则你会得到一个异常。占位符通常在被用作在执行期为训练或者测试数据传值。在将值传递给赋值节点以更改变量的值时(例如,模型的权重),占位符也很有用。
在执行期,你如何为一个变量设置任意的值?
你可以在构造一个图时指定变量的初始值,它会在后边的执行期运行变量的初始化器的时候被初始化。如果你想在执行期修改变量的值,那么最简单的方法是使用tf.assign函数创建一个赋值节点(在图的构造器),将变量和一个占位符传入作为参数。这样,你可以在执行期运行赋值操作来为变量传入新值。
反向模式autodiff需要多少次遍历图形才能计算10个变量的成本函数的梯度?正向模式autodiff怎么样?符号微分呢?
要计算任意数量变量的成本函数的梯度,反向模式的autodiff算法(由TensorFlow实现)只需要遍历两次图。作为对比,正向模式的autodiff算法需要为每个变量运行一次(如果我们需要10个不同变量的梯度,那么就需要执行10次)。对于符号微分,它会建立一个不同的图来计算梯度,所以根本不会遍历原来的图(除了在建立新的梯度图时)。一个高度优化的符号微分系统可能只需要运行一次新的梯度图来计算和所有变量相关的梯度,但与原始图相比,新的图可能时非常复杂和低效的。
我的CSDN:https://blog.csdn.net/qq_21579045
我的博客园:https://www.cnblogs.com/lyjun/
我的Github:https://github.com/TinyHandsome
纸上得来终觉浅,绝知此事要躬行~
欢迎大家过来OB~
by 李英俊小朋友
第9章 运行TensorFlow的更多相关文章
- 第九章——运行tensorflow(Up and Running with TensorFlow)
本章简单介绍了TensorFlow的安装以及使用.一些细节需要在后续的应用中慢慢把握. TensorFlow并不仅仅局限于神经网络和机器学习,它甚至可以用于量子物理仿真. TensorFlow的优势: ...
- 备注: ubt 16.04 安装 gtx 1060 --- 成功运行 tensorflow - gpu
---------------------------------------------------------------------------------------------------- ...
- linux 运行tensorflow文件缺少_bz2问题及解决
今天,终于把如何在linux服务器上运行tensorflow程序的问题解决: 1.首先要在服务器上python下安装tensorflow(要看好是在python2还是python3下安装,还要看好是C ...
- 运行TensorFlow代码时报错
运行TensorFlow代码时报错 错误信息ImportError: libcublas.so.10.0: cannot open shared object file 原因:TensorFlow版本 ...
- Ubuntu上运行tensorflow C++的完整例子
个人博客原文:http://www.bearoom.xyz/2019/08/25/ubuntu-tensorflow-cc-example/ 之前记录的运行Tensorflow的C++接口的例子都是零 ...
- 第6章 运行Spark SQL CLI
第6章 运行Spark SQL CLI Spark SQL CLI可以很方便的在本地运行Hive元数据服务以及从命令行执行查询任务.需要注意的是,Spark SQL CLI不能与Thrift JDBC ...
- SSD-Tensorflow: 3 步运行 TensorFlow 单图片多盒目标检测器
昨天类似的 YOLO: https://www.v2ex.com/t/392671#reply0 下载这个项目 https://github.com/balancap/SSD-Tensorflow 解 ...
- 运行TensorFlow出现Your CPU supports instructions that this TensorFlow binary was not compiled to use: AV
原因: import os #在顶头位置加上 os.environ["TF_CPP_MIN_LOG_LEVEL"]='1' # '1'表示默认的显示等级,运行时显示所有信息 os. ...
- GPU运行Tensorflow的几点建议
1.在运行之前先查看GPU的使用情况: 指令:nvidia-smi 备注:查看GPU此时的使用情况 或者 指令:watch nvidia-smi 备注:实时返回GPU使用情况 2.指定GPU训练: 方 ...
随机推荐
- redis 链接
一.redis启动: 本地启动:redis-cli 远程启动:redis-cli -h host -p port -a password 例如:redis-cli -h r-2mlmkmxu7.red ...
- Go 切片:用法和本质
2011/01/05 引言 Go的切片类型为处理同类型数据序列提供一个方便而高效的方式. 切片有些类似于其他语言中的数组,但是有一些不同寻常的特性. 本文将深入切片的本质,并讲解它的用法. 数组 Go ...
- ABAP基础篇1 内表
内表类型 abap 内表类型有三种: 标准表(一般ABAP程序中用的最多就是这种表) 系统为该表的每一行数据生成一个逻辑索引,自己内部维护着行号(Index)的编码.表的键值不唯一,且没有按照表键自动 ...
- Delphi连接Oracle控件ODAC的安装及使用
Delphi连接Oracle有很多种方式,但大多要在客户机上安装Oracle那庞大的客户端,比较不方便,使用ODAC控件连接Oracle则免去了这些麻烦.ODAC也是Oracle公司载发的控件.有fo ...
- Vmvare v12下搭建Ubuntu操作系统-18.04-desktop-amd64.iso镜像环境
1.选择[典型],点击下一步. 2.找到ubuntu镜像文件所在位置,如图所示: 3.配置用户信息 4.设置安装位置 5.磁盘尽量大一些,笔者设置40g 6.自定义修改硬件信息 7.内存建 ...
- js小数计算的问题,为什么0.1+0.2 != 0.3
//下面可以用原生解决 0.1+0.2 的问题 parseFloat((0.1 + 0.2).toFixed(10)) 复制代码 console.log(0.1+0.2===0.3); //true ...
- 记一次偶发的bug排查——redis-py-cluster库的bug
排查流水账: 通过平台监控,发现很多偶发的查看推荐列表的接口时延大于0.5s 写单元测试,不能重现.在测试环境不能重现.只有在正式环境可以偶发重现. 通过日志埋点,等待重现 不断地加日志埋点后发现耗 ...
- SpringBoot系列教程web篇之404、500异常页面配置
接着前面几篇web处理请求的博文,本文将说明,当出现异常的场景下,如404请求url不存在,,403无权,500服务器异常时,我们可以如何处理 原文友链: SpringBoot系列教程web篇之404 ...
- Python Number(数字)
Python Number 数据类型用于存储数值. 数据类型是不允许改变的,这就意味着如果改变 Number 数据类型的值,将重新分配内存空间. 以下实例在变量赋值时 Number 对象将被创建: A ...
- [转帖]在VirtualBox Linux 7u2 中安装Oracle RAC 12.2.0.1.0
https://xiaoyu.blog.csdn.net/article/details/81980936