【原】SDWebImage源码阅读(四)
【原】SDWebImage源码阅读(四)
本文转载请注明出处 —— polobymulberry-博客园
1. 前言
SDWebImage中主要实现了NSURLConnectionDataDelegate的以下方法:
- - (void)connection:(NSURLConnection *)connection didReceiveResponse:(NSURLResponse *)response;
- - (void)connection:(NSURLConnection *)connection didReceiveData:(NSData *)data;
- - (void)connectionDidFinishLoading:(NSURLConnection *)connection;
- - (nullable NSCachedURLResponse *)connection:(NSURLConnection *)connection willCacheResponse:(NSCachedURLResponse *)cachedResponse;
以及NSURLConnectionDelegate的以下方法:
- - (void)connection:(NSURLConnection *)connection didFailWithError:(NSError *)error;
- - (BOOL)connectionShouldUseCredentialStorage:(NSURLConnection *)connection;
- - (void)connection:(NSURLConnection *)connection willSendRequestForAuthenticationChallenge:(NSURLAuthenticationChallenge *)challenge;
足足有7个函数需要实现,好多啊。具体来看看每个代理方法大概是做什么的。
2. - (void)connection:(NSURLConnection *)connection didReceiveResponse:(NSURLResponse *)response
我们都知道HTTP报文是面向文本的,报文中的每一个字段都是一些ASCII码串。HTTP有两类报文,分别是Request和Response。HTTP的Response报文由三个部分所组成,分别是:状态行、消息报头、响应正文。
此处代理实现的方法中,只使用了Response的状态码,即statusCode。注意HTTP的statusCode小于400表示正常码。但是304码表示文档的内容(自上次访问以来或者根据请求的条件)并没有改变,这里我们在获取图片时考虑直接使用Cache,所以statusCode为304时会单独处理。
于是有了下面的框架:
if (![response respondsToSelector:@selector(statusCode)] || ([((NSHTTPURLResponse *)response) statusCode] <  && [((NSHTTPURLResponse *)response) statusCode] != )) {

        // ...
}

else {

    if (code == ) {

        // ...

    } else {

        // ...

    }

}
如果Response返回正常码,并且不为304,即if语句中的内容:
// 根据response中的expectedContentLength来给self.expectedSize进行赋值

// 而self.expectedSize此处表示响应的数据体(此处为imageData)期望大小

// 注意expectedContentLength为-1时,expectedSize赋值为0

NSInteger expected = response.expectedContentLength >  ? (NSInteger)response.expectedContentLength : ;

self.expectedSize = expected;

// 使用用户自定义的progressBlock

if (self.progressBlock) {

    self.progressBlock(, expected);

}

// expected大小此处表示的就是imageData的期望大小,也就是说imageData最后下载完成大概会这么大

// 所以收到响应后,就初始化一个NSMutableData,用来存储image数据

self.imageData = [[NSMutableData alloc] initWithCapacity:expected];

// 不解释,因为我发现SDWebImage只在此处使用了self.response

// 应该是暴露给用户使用的

self.response = response;

// 不过好像SDWebImage中并没有addObserver这个SDWebImageDownloadReceiveResponseNotification

// 可能需要用户自己去使用addObserver

dispatch_async(dispatch_get_main_queue(), ^{

    [[NSNotificationCenter defaultCenter] postNotificationName:SDWebImageDownloadReceiveResponseNotification object:self];

});
如果response返回错误码,即else中的语句:
// 获取statusCode

NSUInteger code = [((NSHTTPURLResponse *)response) statusCode];

if (code == ) {

    // 当服务器端返回statusCode为“304 Not Modified”,意味着服务器端的image并没有改变,
// 此时,我们只需取消connection,然后返回缓存中的image
// 此时返回码是正确码(小于400),只是不需要进行多余的connection网络操作了,所以单独调用
    // cancelInternal

    [self cancelInternal];

} else {

    [self.connection cancel];

}
// 同SDWebImageDownloadStartNotification
dispatch_async(dispatch_get_main_queue(), ^{

    [[NSNotificationCenter defaultCenter] postNotificationName:SDWebImageDownloadStopNotification object:self];

});

// 因为出错了,所以直接调用completedBlock并返回错误状态码

if (self.completedBlock) {

    self.completedBlock(nil, nil, [NSError errorWithDomain:NSURLErrorDomain code:[((NSHTTPURLResponse *)response) statusCode] userInfo:nil], YES);

}

// 出错了,所以停止这个RunLoop

// 我们会自然想到start函数中的CFRunLoopRun函数会结束

CFRunLoopStop(CFRunLoopGetCurrent());

// 最后在done中调用reset回收资源 并置finished为YES,executing为NO

[self done];
3. - (void)connection:(NSURLConnection *)connection didReceiveData:(NSData *)data
这一步是实实在在的获取到了数据,第一步先将获取到的data串到self.imageData上。因为如果image比较大的话,会多次调用didReceiveData,这样一个image就分成很多块了,所以每次receive到data,就串起来:
[self.imageData appendData:data];
但是我们发现这个函数总体套在一个if语句中:
if ((self.options & SDWebImageDownloaderProgressiveDownload) && self.expectedSize >  && self.completedBlock) {

    // ...

}
为什么会出现这个选项了?我觉得主要是为了单独处理SDWebImageDownloaderProgressiveDownload,回顾一下,这个选项是在SDWebImageManager中的downloadImageWithURL中赋值的:
if (options & SDWebImageProgressiveDownload) downloaderOptions |= SDWebImageDownloaderProgressiveDownload;
SDWebImageProgressiveDownload表示image的显示过程是随着下载的进度一点点进行的,而不是下载完成后,一次显示完成。这就可以理解了,因为要随着下载进度显示,所以每接收到新的data,就要显示一下。为什么还需要completedBlock呢?因为在didReceiveData中只是获取到了imageData,但是还需要显示在imageView上呢?那就得使用completedBlock来进行处理。所以SDWebImageProgressiveDownload默认的图片显示是交给用户进行处理的。至于expectedSize为什么要大于0我就不是很清楚了。
所以在函数结尾处,我们可以看到:
dispatch_main_sync_safe(^{

    if (self.completedBlock) {
        // 处理此时获得到的image

        self.completedBlock(image, nil, nil, NO);

    }

});
那么image是怎么产生的呢?可以看到上层包裹着一个if语句:
// partialImageRef是一个CGImageRef类型的值,本质还是self.imageData
if (partialImageRef) {
// 从CGImageRef转化为UIImage,scale你可以理解为图片后缀为@1x,@2x,@3x需要放大的倍数
    // 至于orientation后面会讲,暂时理解图片的朝向

    UIImage *image = [UIImage imageWithCGImage:partialImageRef scale: orientation:orientation];

    // 有时候你不想直接把图片的url作为cache的key,因为有可能图片的url是动态变化的
// 所以你可以自定义一个cache key filter
// 我还没使用过filter,所以这里一般来说就是获得到了image的url
NSString *key = [[SDWebImageManager sharedManager] cacheKeyForURL:self.request.URL];
// scaledImageForKey是SDWebImageCompat的一个函数,主要是根据image名称中
    // @2x,@3x来设置scale,并通过initWithCGImage来获得image,下面会详解

    UIImage *scaledImage = [self scaledImageForKey:key image:image];
    // 判断是否要压缩图片,初始化默认是要压缩图片的

    if (self.shouldDecompressImages) {
        // 下面会详解decodedImageWithImage

        image = [UIImage decodedImageWithImage:scaledImage];

    }

    else {

        image = scaledImage;

    }
    // 释放资源

    CGImageRelease(partialImageRef);
    // 上面解释过了

    dispatch_main_sync_safe(^{

        if (self.completedBlock) {

            self.completedBlock(image, nil, nil, NO);

        }

    });

}
3.1 scaledImageForKey
因为scaledImageForKey就是封装了SDScaledImageForKey,所以我们详解SDScaledImageForKey:
// 这是一个C++函数

inline UIImage *SDScaledImageForKey(NSString *key, UIImage *image) {

    // 细节考虑

    if (!image) {

        return nil;

    }

    // 注释中说出现这种情况的是animated images,也就是动图

    // 我们常见的是gif图片,所以此处我们就当做gif图片去理解
    // 可以理解gif图片是一张张静态的图片构成的动画

    if ([image.images count] > ) {

        NSMutableArray *scaledImages = [NSMutableArray array];

        // 使用了递归的方式,构建一组图片动画
for (UIImage *tempImage in image.images) {

            [scaledImages addObject:SDScaledImageForKey(key, tempImage)];

        }

        // 根据这些images构成我们所需的animated image

        return [UIImage animatedImageWithImages:scaledImages duration:image.duration];

    }

    else {

        if ([[UIScreen mainScreen] respondsToSelector:@selector(scale)]) {

            // 比如屏幕为320x480时,scale为1,屏幕为640x960时,scale为2

            CGFloat scale = [UIScreen mainScreen].scale;

            // “@2x.png”的长度为7,所以此处添加了这个判断,很巧妙

            if (key.length >= ) {

                // 这个不用解释了,很简单。就是根据后缀给scale赋值

                NSRange range = [key rangeOfString:@"@2x."];

                if (range.location != NSNotFound) {

                    scale = 2.0;

                }

                range = [key rangeOfString:@"@3x."];

                if (range.location != NSNotFound) {

                    scale = 3.0;

                }

            }

            // 使用initWithCGImage来根据Core Graphics的图片构建UIImage。
            // 这个函数可以使用scale和orientation

            UIImage *scaledImage = [[UIImage alloc] initWithCGImage:image.CGImage scale:scale orientation:image.imageOrientation];

            image = scaledImage;

        }

        return image;

    }

}
3.2 decodedImageWithImage
+ (UIImage *)decodedImageWithImage:(UIImage *)image {

    // 当下载大量的图片,产生内存警告时

    // 自动释放bitmap上下文环境和所有变量

    // 来释放系统内存空间

    // 在iOS7中,不要忘记添加

    // [[SDImageCache sharedImageCache] clearMemory];

    @autoreleasepool{

        // 对于animated images,不需要解压缩

        if (image.images) { return image; }

        CGImageRef imageRef = image.CGImage;

        // 感觉下面的操作就是为了将image本身的alpha去除

        // 然后创建bitmap后,重新加上alpha

        // 图片如果有alpha通道,就返回原始image,因为jpg图片有alpha的话,就不压缩

        CGImageAlphaInfo alpha = CGImageGetAlphaInfo(imageRef);

        BOOL anyAlpha = (alpha == kCGImageAlphaFirst ||

                         alpha == kCGImageAlphaLast ||

                         alpha == kCGImageAlphaPremultipliedFirst ||

                         alpha == kCGImageAlphaPremultipliedLast);

        if (anyAlpha) { return image; }

        // 图片宽高

        size_t width = CGImageGetWidth(imageRef);

        size_t height = CGImageGetHeight(imageRef);

        CGColorSpaceModel imageColorSpaceModel = CGColorSpaceGetModel(CGImageGetColorSpace(imageRef));

        CGColorSpaceRef colorspaceRef = CGImageGetColorSpace(imageRef);

        // 图片的ColorSpaceModel为kCGColorSpaceModelUnknown,kCGColorSpaceModelMonochrome

        // 和kCGColorSpaceModelIndexed时,说明该ColorSpace不受支持

        bool unsupportedColorSpace = (imageColorSpaceModel ==  || imageColorSpaceModel == - || imageColorSpaceModel == kCGColorSpaceModelIndexed);

        // 如果属于上述不支持的ColorSpace,ColorSpace就使用RGB

        if (unsupportedColorSpace)

            colorspaceRef = CGColorSpaceCreateDeviceRGB();

        // 当你调用这个函数的时候,Quartz创建一个位图绘制环境,也就是位图上下文。

        // 当你向上下文中绘制信息时,Quartz把你要绘制的信息作为位图数据绘制到指定的内存块。

        // 一个新的位图上下文的像素格式由三个参数决定:

        // 每个组件的位数,颜色空间,alpha选项。alpha值决定了绘制像素的透明性。

        CGContextRef context = CGBitmapContextCreate(NULL, width,

                                                     height,

                                                     CGImageGetBitsPerComponent(imageRef),

                                                     ,

                                                     colorspaceRef,

                                                     kCGBitmapByteOrderDefault | kCGImageAlphaPremultipliedFirst);

        // 在上面创建的context绘制image,并以此获取image,而该image也将拥有alpha通道

        CGContextDrawImage(context, CGRectMake(, , width, height), imageRef);

        CGImageRef imageRefWithAlpha = CGBitmapContextCreateImage(context);

        UIImage *imageWithAlpha = [UIImage imageWithCGImage:imageRefWithAlpha scale:image.scale orientation:image.imageOrientation];

        // 开始释放资源

        if (unsupportedColorSpace)

            CGColorSpaceRelease(colorspaceRef);

        CGContextRelease(context);

        CGImageRelease(imageRefWithAlpha);

        return imageWithAlpha;

    }

}
回到didReceiveData的剩余部分,也就是刚才那个if语句的最最外层if语句(if ((self.options & SDWebImageDownloaderProgressiveDownload) && self.expectedSize > 0 && self.completedBlock)):
// 获取当前已经下载的数据大小

const NSInteger totalSize = self.imageData.length;

// 使用最新下载后的图片数据来创建一个CGImageSourceRef变量imageSource

// 注意创建使用的数据是CoreFoundation的data,而self.imageData是NSData,所以要做如下转化

// (__bridge CFDataRef)self.imageData

CGImageSourceRef imageSource = CGImageSourceCreateWithData((__bridge CFDataRef)self.imageData, NULL);
有了imageSource后,就要根据imageSource获取image的各种属性。主要是Core Graphics框架提供了很多方便的工具。所以要讲imageData先转化为CF框架下的变量,然后创建CG框架下的CGImageSource。
接着是:
// width + height == 0在此处其实就是表示width==0&&height==0

// 初始条件下,也就是第一次执行时,width和height均为0

if (width + height == ) {

    // 从imageSource中获取图片的一些属性,比如长宽等等,是一个dictionary变量
// 这里获取imageSource属性,直接传入imageSource就行,为啥还要传入一个index?
// 因为对于gif图片,一个imageSource对应的CGImage会有多个,需要使用index
    // 底下会使用CGImageSourceCreateImageAtIndex来根据imageSource创建一个带index的CGImageRef

    CFDictionaryRef properties = CGImageSourceCopyPropertiesAtIndex(imageSource, , NULL);

    if (properties) {

        NSInteger orientationValue = -;

        // 获取到图片高度

        CFTypeRef val = CFDictionaryGetValue(properties, kCGImagePropertyPixelHeight);

        if (val) CFNumberGetValue(val, kCFNumberLongType, &height);

        // 获取到图片宽度

        val = CFDictionaryGetValue(properties, kCGImagePropertyPixelWidth);

        if (val) CFNumberGetValue(val, kCFNumberLongType, &width);

        // 获取到图片朝向

        val = CFDictionaryGetValue(properties, kCGImagePropertyOrientation);

        if (val) CFNumberGetValue(val, kCFNumberNSIntegerType, &orientationValue);

        // CoreFoundation对象类型不在ARC范围内,所以要手动释放资源

        CFRelease(properties);

        // 还记得我们上面讲的一段代码,要使用Core Graphics框架绘制image

        // 其实就是initWithCGImage这个函数,但是使用这个函数有时候会产生

         // 图片的朝向错误(不像在connectionDidFinishLoading中使用initWithData所产生的image)

        // 所以在这里保存朝向信息,下面有些函数需要朝向信息,就传给它

        orientation = [[self class] orientationFromPropertyValue:(orientationValue == - ?  : orientationValue)];

    }

}
然后就是接收到图片数据后,width和height有值了:
// width和height更新过了,并且还没有获取到完整的图片数据(totalSize < self.expectedSize)

// 不过为什么获取到完整的图片数据就不执行了?(totalSize == self.expectedSize)
// 因为要执行connectionDidFinishLoading函数了

if (width + height >  && totalSize < self.expectedSize) {

    // ......

}
当前这个if里面有两个if语句,第二个我们讲过了,就是用completedBlock去显示已下载的image。我们下面着重解释第一个if
// 创建图片

CGImageRef partialImageRef = CGImageSourceCreateImageAtIndex(imageSource, , NULL);

#ifdef TARGET_OS_IPHONE

// 解决iOS平台图片失真问题

// 因为如果下载的图片是非png格式,图片会出现失真

// 为了解决这个问题,先将图片在bitmap的context下渲染

// 然后在传回partialImageRef

if (partialImageRef) {

    // 下面代码和decodedImageWithImage差不多

    const size_t partialHeight = CGImageGetHeight(partialImageRef);

    CGColorSpaceRef colorSpace = CGColorSpaceCreateDeviceRGB();

    CGContextRef bmContext = CGBitmapContextCreate(NULL, width, height, , width * , colorSpace, kCGBitmapByteOrderDefault | kCGImageAlphaPremultipliedFirst);

    CGColorSpaceRelease(colorSpace);

    if (bmContext) {

        CGContextDrawImage(bmContext, (CGRect){.origin.x = 0.0f, .origin.y = 0.0f, .size.width = width, .size.height = partialHeight}, partialImageRef);

        CGImageRelease(partialImageRef);

        partialImageRef = CGBitmapContextCreateImage(bmContext);

        CGContextRelease(bmContext);

    }

    else {

        CGImageRelease(partialImageRef);

        partialImageRef = nil;

    }

}

#endif
最后一步是调用progressBlock,我们很少见到调用progressBlock的情况,其实也跟didReceiveData这个函数有关,因为一般就是在数据量比较大的时候,需要一份一份接受数据,并拼接组装,所以此处可以使用progressBlock。
4. - (void)connectionDidFinishLoading:(NSURLConnection *)connection
如果成功获取服务端返回的所有数据,则代理会收到connectionDidFinishLoading:消息- (void)connectionDidFinishLoading:(NSURLConnection *)aConnection {
SDWebImageDownloaderCompletedBlock completionBlock = self.completedBlock;
@synchronized(self) {
// 停止当前的RunLoop
CFRunLoopStop(CFRunLoopGetCurrent());
// 回收资源
self.thread = nil;
self.connection = nil;
// 前面说过
dispatch_async(dispatch_get_main_queue(), ^{
[[NSNotificationCenter defaultCenter] postNotificationName:SDWebImageDownloadStopNotification object:self];
[[NSNotificationCenter defaultCenter] postNotificationName:SDWebImageDownloadFinishNotification object:self];
});
}
// 发送的request,服务器会返回一个response,就像获取服务器端的图片一样,
// 如果图片没有改变,第二次获取的时候,最好直接从缓存中获取,这会省不少时间。
// response也一样,也弄一个缓存,就是NSURLCache。
// 根据你的request,看看是不是缓存中能直接获取到对应的response。
if (![[NSURLCache sharedURLCache] cachedResponseForRequest:_request]) {
// 为NO表示没有从NSURLCache中获取到response
responseFromCached = NO;
}
/*
如果options中有SDWebImageDownloaderIgnoreCachedResponse表示对应的SDWebImageOptions的options为
SDWebImageRefreshCached。而有了SDWebImageRefreshCached,就表示downloaderOptions肯定包含
SDWebImageDownloaderUseNSURLCache/SDWebImageDownloaderIgnoreCachedResponse
(大家搜一下SDWebImageRefreshCached就知道了),但是SDWebImageDownloaderUseNSURLCache和
SDWebImageDownloaderIgnoreCachedResponse又不是一定同时存在于options中。因为只有image从
SDImageCache中获取到了才会有SDWebImageDownloaderIgnoreCachedResponse,为什么要特意提
SDImageCache?因为SDWebImage有两种缓存方式,一个是SDImageCache,一个就是NSURLCache,所以知道
为什么这个选项是Ignore了吧,因为已经从SDImageCache获取了image,就忽略NSURLCache了。
此处我的理解就是如果已经从SDImageCache获取到了image,并且选项为了SDWebImageRefreshCached,就要
设置SDWebImageDownloaderIgnoreCachedResponse。我们也看到了,即使responseCached为YES了,
completedBlock的image和data参数也为nil。
我看网上对这一块的众说风云,而且这一块好像也出过不少问题,懂得大神可以私信我。好好探讨一下!
    我们看看这两个选项的注释:

    /**

     * 默认情况下,request请求使用NSURLRequestReloadIgnoringLocalCacheData作为默认策略

     * 使用了这个选项,那么request使用NSURLRequestUseProtocolCachePolicy作为默认策略

     */

    SDWebImageDownloaderUseNSURLCache
= << , /** * 如果要从NSURLCache读取image,并且还要强制刷新NSURLCache,如果有此选项后 * 就调用image和data参数为nil的completedBlock * (有该选项就一定有`SDWebImageDownloaderUseNSURLCache`). */
SDWebImageDownloaderIgnoreCachedResponse
= <<
,

*/

    if (completionBlock) {

        if (self.options & SDWebImageDownloaderIgnoreCachedResponse && responseFromCached) {

            completionBlock(nil, nil, nil, YES);

        } else if (self.imageData) {

          // 因为image可能是gif,可能是webp,所以需要通过sd_imageWithData转化为UIImage类型,具体实现后面会说

            UIImage *image = [UIImage sd_imageWithData:self.imageData];

            // 前面说过

            NSString *key = [[SDWebImageManager sharedManager] cacheKeyForURL:self.request.URL];

            image = [self scaledImageForKey:key image:image];

            // 注意对于gif图片,不需要解压缩

            if (!image.images) {

                if (self.shouldDecompressImages) {

                    image = [UIImage decodedImageWithImage:image];

                }

            }

            if (CGSizeEqualToSize(image.size, CGSizeZero)) {

                // 图片大小为0,报错

                completionBlock(nil, nil, [NSError errorWithDomain:SDWebImageErrorDomain code: userInfo:@{NSLocalizedDescriptionKey : @"Downloaded image has 0 pixels"}], YES);

            }

            else {

                completionBlock(image, self.imageData, nil, YES);

            }

        } else {

            // image为空,报错

            completionBlock(nil, nil, [NSError errorWithDomain:SDWebImageErrorDomain code: userInfo:@{NSLocalizedDescriptionKey : @"Image data is nil"}], YES);

        }

    }

    // 释放资源

    self.completionBlock = nil;

    // 置NSConnection为完成状态

    [self done];

}
4.1 sd_imageWithData
+ (UIImage *)sd_imageWithData:(NSData *)data {

    // 没有数据,细节

    if (!data) {

        return nil;

    }

    UIImage *image;

    // 根据data的前面几个字节,判断出图片类型,是jepg,png,gif还是...后面详解

    NSString *imageContentType = [NSData sd_contentTypeForImageData:data];

    // 如果是gif图片或webp图片,是需要单独处理的。后面详解gif和webp图片处理

    if ([imageContentType isEqualToString:@"image/gif"]) {

        image = [UIImage sd_animatedGIFWithData:data];

    }

#ifdef SD_WEBP

    else if ([imageContentType isEqualToString:@"image/webp"])

    {

        image = [UIImage sd_imageWithWebPData:data];

    }

#endif

    else {

        image = [[UIImage alloc] initWithData:data];

        // 获取朝向信息,后面详解

        UIImageOrientation orientation = [self sd_imageOrientationFromImageData:data];

        // 我估计默认朝向就是向上的,所以如果不是向上的图片,才进行调整,省时间,优化

        if (orientation != UIImageOrientationUp) {

            image = [UIImage imageWithCGImage:image.CGImage

                                        scale:image.scale

                                  orientation:orientation];

        }

    }

    return image;

}
4.1.1 sd_contentTypeForImageData
// NSData+ImageContentType

// 每张图片的开头会存储图片的类型信息

// 很简单的代码,不赘述了

+ (NSString *)sd_contentTypeForImageData:(NSData *)data {

    uint8_t c;

    [data getBytes:&c length:];

    switch (c) {

        case 0xFF:

            return @"image/jpeg";

        case 0x89:

            return @"image/png";

        case 0x47:

            return @"image/gif";

        case 0x49:

        case 0x4D:

            return @"image/tiff";

        case 0x52:

            // R as RIFF for WEBP

            if ([data length] < ) {

                return nil;

            }

            NSString *testString = [[NSString alloc] initWithData:[data subdataWithRange:NSMakeRange(, )] encoding:NSASCIIStringEncoding];

            if ([testString hasPrefix:@"RIFF"] && [testString hasSuffix:@"WEBP"]) {

                return @"image/webp";

            }

            return nil;

    }

    return nil;

}
4.1.2 sd_animatedGIFWithData
+ (UIImage *)sd_animatedGIFWithData:(NSData *)data {

    if (!data) {

        return nil;

    }

    // 根据data创建一个CG下的imageSource

    CGImageSourceRef source = CGImageSourceCreateWithData((__bridge CFDataRef)data, NULL);

    // 返回imageSource中的image数目,为后面创建CGImage提供index

    size_t count = CGImageSourceGetCount(source);

    UIImage *animatedImage;

    // count<=1的时候,就当单张图片

    if (count <= ) {

        animatedImage = [[UIImage alloc] initWithData:data];

    }

    else {

        // 多张图片,每帧0.1秒

        NSMutableArray *images = [NSMutableArray array];

        NSTimeInterval duration = 0.0f;

        //

        for (size_t i = ; i < count; i++) {

            // 根据指定的index创建CGImage

            CGImageRef image = CGImageSourceCreateImageAtIndex(source, i, NULL);

            // 根据imageSource和指定的index获取该CGImage的duration,后面详解

            duration += [self sd_frameDurationAtIndex:i source:source];

            // 往images添加单张图片

            [images addObject:[UIImage imageWithCGImage:image scale:[UIScreen mainScreen].scale orientation:UIImageOrientationUp]];

            CGImageRelease(image);

        }

        // 如果image中没有duration信息,就自己计算。每帧0.1秒,算出gif动画所需的duration

        if (!duration) {

            duration = (1.0f / 10.0f) * count;

        }

        animatedImage = [UIImage animatedImageWithImages:images duration:duration];

    }

    // 释放资源

    CFRelease(source);

    return animatedImage;

}
4.1.2.1 sd_frameDurationAtIndex
+ (float)sd_frameDurationAtIndex:(NSUInteger)index source:(CGImageSourceRef)source {

    float frameDuration = 0.1f;

    // 根据imageSource和index获取到image的属性

    CFDictionaryRef cfFrameProperties = CGImageSourceCopyPropertiesAtIndex(source, index, nil);

    // 转化CFDictionaryRef为NSDictionary

    NSDictionary *frameProperties = (__bridge NSDictionary *)cfFrameProperties;

    // 因为image是gif,所以根据kCGImagePropertyGIFDictionary获取到image的gif的属性

    NSDictionary *gifProperties = frameProperties[(NSString *)kCGImagePropertyGIFDictionary];

    // 从gifProperties根据kCGImagePropertyGIFUnclampedDelayTime获取到该张image的duration,

    // 如果该gif没有unclamped delay time,就是用kCGImagePropertyGIFDelayTime获取delay time作为duration

    NSNumber *delayTimeUnclampedProp = gifProperties[(NSString *)kCGImagePropertyGIFUnclampedDelayTime];

    if (delayTimeUnclampedProp) {

        frameDuration = [delayTimeUnclampedProp floatValue];

    }

    else {

        NSNumber *delayTimeProp = gifProperties[(NSString *)kCGImagePropertyGIFDelayTime];

        if (delayTimeProp) {

            frameDuration = [delayTimeProp floatValue];

        }

    }

    // 许多烦人的gif的广告,每张图片的duration是0,这样达到快速刷新图片的效果

    // 这里我们根据Firefox的做法,对已duration小于等于100ms的每帧图片,指定帧率为10ms

    if (frameDuration < 0.011f) {

        frameDuration = 0.100f;

    }

    CFRelease(cfFrameProperties);

    return frameDuration;

}
4.1.3 sd_imageWithWebPData
// WebP 是 Google 在 2010 年发布的图片格式,希望以更高的压缩比替代 JPEG。

// 它用 VP8 视频帧内编码作为其算法基础,取得了不错的压缩效果。

// 它支持有损和无损压缩、支持完整的透明通道、也支持多帧动画,并且没有版权问题,是一种非常理想的图片格式。

// 借由 Google 在网络世界的影响力,WebP 在几年的时间内已经得到了广泛的应用。

// 看看你手机里的 App:微博、微信、QQ、淘宝、网易新闻等等,每个 App 里都有 WebP 的身影。Facebook 则更进一步,用 WebP 来显示聊天界面的贴纸动画。

// WebP 标准是 Google 定制的,迄今为止也只有 Google 发布的 libwebp 实现了该的编解码 。 所以这个库也是该格式的事实标准。

+ (UIImage *)sd_imageWithWebPData:(NSData *)data {

    // 具体算法我不是很清楚

    // 大概就是根据data设置WebPDecoderConfig类型变量config

    WebPDecoderConfig config;

    if (!WebPInitDecoderConfig(&config)) {

        return nil;

    }

    if (WebPGetFeatures(data.bytes, data.length, &config.input) != VP8_STATUS_OK) {

        return nil;

    }

    config.output.colorspace = config.input.has_alpha ? MODE_rgbA : MODE_RGB;

    config.options.use_threads = ;

    // 注意此处又一点瑕疵,就是不支持WebP的动图

    // 此处默认是WebP的静态图片,所以直接使用WebPDecode

    //
大牛们可以添加代码,增加支持WebP动图的功能,提示一下, // 首先用WebPDemuxer拆包,之后拆出来的单帧用WebPDecode解码
    if (WebPDecode(data.bytes, data.length, &config) != VP8_STATUS_OK) {

        return nil;

    }

    int width = config.input.width;

    int height = config.input.height;

    if (config.options.use_scaling) {

        width = config.options.scaled_width;

        height = config.options.scaled_height;

    }

    // 根据decode出来的rgba数组,即config.output.u.RGBA构建UIImage

    CGDataProviderRef provider =

    CGDataProviderCreateWithData(NULL, config.output.u.RGBA.rgba, config.output.u.RGBA.size, FreeImageData);

    CGColorSpaceRef colorSpaceRef = CGColorSpaceCreateDeviceRGB();

    CGBitmapInfo bitmapInfo = config.input.has_alpha ? kCGBitmapByteOrder32Big | kCGImageAlphaPremultipliedLast : ;

    // rgba是4bytes,rgb是3bytes

    size_t components = config.input.has_alpha ?  : ;

    CGColorRenderingIntent renderingIntent = kCGRenderingIntentDefault;

    // 根据provider创建image

    CGImageRef imageRef = CGImageCreate(width, height, , components * , components * width, colorSpaceRef, bitmapInfo, provider, NULL, NO, renderingIntent);

    CGColorSpaceRelease(colorSpaceRef);

    CGDataProviderRelease(provider);

    UIImage *image = [[UIImage alloc] initWithCGImage:imageRef];

    CGImageRelease(imageRef);

    return image;

}
4.1.4 sd_imageOrientationFromImageData
+(UIImageOrientation)sd_imageOrientationFromImageData:(NSData *)imageData {

    // 保证如果imageData中获取不到朝向信息,就默认UIImageOrientationUp

    UIImageOrientation result = UIImageOrientationUp;

    CGImageSourceRef imageSource = CGImageSourceCreateWithData((__bridge CFDataRef)imageData, NULL);

    if (imageSource) {

        CFDictionaryRef properties = CGImageSourceCopyPropertiesAtIndex(imageSource, , NULL);

        if (properties) {

            CFTypeRef val;

            int exifOrientation;

            val = CFDictionaryGetValue(properties, kCGImagePropertyOrientation);

            if (val) {

                // 这个kCGImagePropertyOrientation先转化为int值

        // 然后用一个switch case语句将int转化为朝向的enum值(sd_exifOrientationToiOSOrientation)

                CFNumberGetValue(val, kCFNumberIntType, &exifOrientation);

                result = [self sd_exifOrientationToiOSOrientation:exifOrientation];

            } // else - if it's not set it remains at up

            CFRelease((CFTypeRef) properties);

        } else {

            //NSLog(@"NO PROPERTIES, FAIL");

        }

        CFRelease(imageSource);

    }

    return result;

}
5. - (void)connection:(NSURLConnection *)connection didFailWithError:(NSError *)error
- (void)connection:(NSURLConnection *)connection didFailWithError:(NSError *)error {

    // 一开始的代码和connectionDidFinishLoading代码类似,除了少了SDWebImageDownloadFinishNotification

    @synchronized(self) {

        CFRunLoopStop(CFRunLoopGetCurrent());

        self.thread = nil;

        self.connection = nil;

        dispatch_async(dispatch_get_main_queue(), ^{

            [[NSNotificationCenter defaultCenter] postNotificationName:SDWebImageDownloadStopNotification object:self];

        });

    }

    // 使用completedBlock报错error

    if (self.completedBlock) {

        self.completedBlock(nil, nil, error, YES);

    }

    self.completionBlock = nil;

    [self done];

}
6. - (nullable NSCachedURLResponse *)connection:(NSURLConnection *)connection willCacheResponse:(NSCachedURLResponse *)cachedResponse
// 如果我们需要对缓存做更精确的控制,我们可以实现一些代理方法来允许应用来确定请求是否应该缓存

// 如果不实现此方法,NSURLConnection 就简单地使用本来要传入 -connection:willCacheResponse: 的那个缓存对象,

// 所以除非你需要改变一些值或者阻止缓存,否则这个代理方法不必实现

- (NSCachedURLResponse *)connection:(NSURLConnection *)connection willCacheResponse:(NSCachedURLResponse *)cachedResponse {

    responseFromCached = NO; // 如果该方法被调用,说明该Response不是从cache读取的,因为会会响应该方法,说明这个cacheResponse是刚从服务端获取的新鲜Response,需要进行缓存。

    if (self.request.cachePolicy == NSURLRequestReloadIgnoringLocalCacheData) {

        // 如果request的缓存策略是NSURLRequestReloadIgnoringLocalCacheData,就不缓存了

        return nil;

    }

    else {

        // 否则使用默认cacheResponse

        return cachedResponse;

    }

}
7. - (BOOL)connectionShouldUseCredentialStorage:(NSURLConnection *)connection
// 在构建connection会被响应。如果这个connection需要根据NSURLCredentialStorage中的权限进行构建,那么就返回YES

- (BOOL)connectionShouldUseCredentialStorage:(NSURLConnection __unused *)connection {

    // 默认是YES,想要修改,需要用户自己指定self.shouldUseCredentialStorage值

    return self.shouldUseCredentialStorage;

}
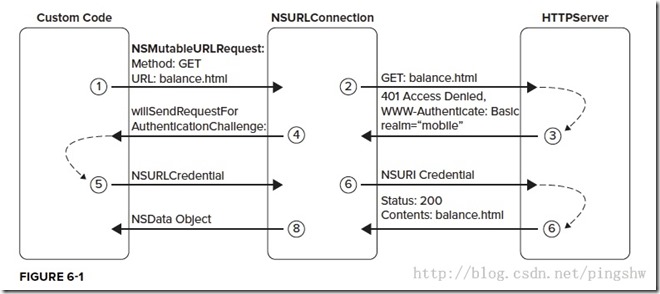
8. - (void)connection:(NSURLConnection *)connection willSendRequestForAuthenticationChallenge:(NSURLAuthenticationChallenge *)challenge
// 当客户端向目标服务器发送请求时。服务器会使用401进行响应。客户端收到响应后便开始认证挑战(Authentication Challenge),而且是通过willSendRequestForAuthenticationChallenge:函数进行的。

// willSendRequestForAuthenticationChallenge:函数中的challenge对象包含了protectionSpace(NSURLProtectionSpace)实例属性,在此进行protectionSpace的检查。当检查不通过时既取消认证,这里需要注意下的是取消是必要的,因为willSendRequestForAuthenticationChallenge:可能会被调用多次。

// 具体过程见下面附图

- (void)connection:(NSURLConnection *)connection willSendRequestForAuthenticationChallenge:(NSURLAuthenticationChallenge *)challenge{

    // NSURLProtectionSpace主要有Host、port、protocol、realm、authenticationMethod等属性。

    // 为了进行认证,程序需要使用服务端期望的认证信息创建一个NSURLCredential对象。我们可以调用authenticationMethod来确定服务端的认证方法,这个认证方法是在提供的认证请求的保护空间(protectionSpace)中。

    // 服务端信任认证(NSURLAuthenticationMethodServerTrust)需要一个由认证请求的保护空间提供的信任。使用credentialForTrust:来创建一个NSURLCredential对象。

    if ([challenge.protectionSpace.authenticationMethod isEqualToString:NSURLAuthenticationMethodServerTrust]) {

        // SDWebImageDownloaderAllowInvalidSSLCertificates表示允许不受信任SSL认证

        // 注释中提示尽量作为test使用,不要在最终production使用。

        // 所以此处使用performDefaultHandlingForAuthenticationChallenge,即使用系统提供的默认行为

        if (!(self.options & SDWebImageDownloaderAllowInvalidSSLCertificates) &&

            [challenge.sender respondsToSelector:@selector(performDefaultHandlingForAuthenticationChallenge:)]) {

            [challenge.sender performDefaultHandlingForAuthenticationChallenge:challenge];

        } else {

            NSURLCredential *credential = [NSURLCredential credentialForTrust:challenge.protectionSpace.serverTrust];

            [[challenge sender] useCredential:credential forAuthenticationChallenge:challenge];

        }

    } else {

        // 每次认证失败,previousFailureCount就会加1

        // 第一次认证(previousFailureCount == 0)并且有Credential,使用Credential认证

        // 非第一次认证或者第一次认证没有Credential,对于认证挑战,不提供Credential就去download一个request,但是如果这里challenge是需要Credential的challenge,那么使用这个方法是徒劳的

        if ([challenge previousFailureCount] == ) {

            if (self.credential) {

                [[challenge sender] useCredential:self.credential forAuthenticationChallenge:challenge];

            } else {

                [[challenge sender] continueWithoutCredentialForAuthenticationChallenge:challenge];

            }

        } else {

            [[challenge sender] continueWithoutCredentialForAuthenticationChallenge:challenge];

        }

    }

}
9. 参考文章
【原】SDWebImage源码阅读(四)的更多相关文章
- 【原】SDWebImage源码阅读(五)
[原]SDWebImage源码阅读(五) 本文转载请注明出处 —— polobymulberry-博客园 1. 前言 前面的代码并没有特意去讲SDWebImage的缓存机制,主要是想单独开一章节专门讲 ...
- 【原】SDWebImage源码阅读(三)
[原]SDWebImage源码阅读(三) 本文转载请注明出处 —— polobymulberry-博客园 1.SDWebImageDownloader中的downloadImageWithURL 我们 ...
- 【原】SDWebImage源码阅读(二)
[原]SDWebImage源码阅读(二) 本文转载请注明出处 —— polobymulberry-博客园 1. 解决上一篇遗留的坑 上一篇中对sd_setImageWithURL函数简单分析了一下,还 ...
- 【原】SDWebImage源码阅读(一)
[原]SDWebImage源码阅读(一) 本文转载请注明出处 —— polobymulberry-博客园 1. 前言 一直没有系统地读过整套源码,就感觉像一直看零碎的知识点,没有系统读过一本专业经典书 ...
- 39 网络相关函数(七)——live555源码阅读(四)网络
39 网络相关函数(七)——live555源码阅读(四)网络 39 网络相关函数(七)——live555源码阅读(四)网络 简介 14)readSocket从套接口读取数据 recv/recvfrom ...
- 40 网络相关函数(八)——live555源码阅读(四)网络
40 网络相关函数(八)——live555源码阅读(四)网络 40 网络相关函数(八)——live555源码阅读(四)网络 简介 15)writeSocket向套接口写数据 TTL的概念 函数send ...
- 38 网络相关函数(六)——live555源码阅读(四)网络
38 网络相关函数(六)——live555源码阅读(四)网络 38 网络相关函数(六)——live555源码阅读(四)网络 简介 12)makeSocketNonBlocking和makeSocket ...
- 37 网络相关函数(五)——live555源码阅读(四)网络
37 网络相关函数(五)——live555源码阅读(四)网络 37 网络相关函数(五)——live555源码阅读(四)网络 简介 10)MAKE_SOCKADDR_IN构建sockaddr_in结构体 ...
- 36 网络相关函数(四)——live555源码阅读(四)网络
36 网络相关函数(四)——live555源码阅读(四)网络 36 网络相关函数(四)——live555源码阅读(四)网络 简介 7)createSocket创建socket方法 8)closeSoc ...
随机推荐
- ASP.NET Core 之 Identity 入门(一)
前言 在 ASP.NET Core 中,仍然沿用了 ASP.NET里面的 Identity 组件库,负责对用户的身份进行认证,总体来说的话,没有MVC 5 里面那么复杂,因为在MVC 5里面引入了OW ...
- 基于本地存储的kvm虚拟机在线迁移
基于本地存储的kvm虚拟机在线迁移 kvm虚拟机迁移分为4种(1)热迁移基于共享存储(2)热迁移基于本地存储(3)冷迁移基于共享存储(4)冷迁移基于本地存储 这里介绍的是基于本地存储的热迁移 动态块迁 ...
- 6.DNS公司PC访问外网的设置 + 主DNS服务器和辅助DNS服务器的配置
网站部署之~Windows Server | 本地部署 http://www.cnblogs.com/dunitian/p/4822808.html#iis DNS服务器部署不清楚的可以看上一篇:ht ...
- 每天一个设计模式-7 生成器模式(Builder)
每天一个设计模式-7 生成器模式(Builder) 一.实际问题 在讨论工厂方法模式的时候,提到了一个导出数据的应用框架,但是并没有涉及到导出数据的具体实现,这次通过生成器模式来简单实现导出成文本,X ...
- 【SAP业务模式】之ICS(三):前台操作
本片博文开始讲解SAP前台是如何实现ICS业务模式的. 一.VA01开立销售订单 我这里为了方便,创建了一个订单类型ZMIV作为公司间销售的订单类型,其实公司间销售订单跟标准的销售订单是一致的.同时, ...
- iOS之App Store上架被拒Legal - 5.1.5问题
今天在看到App Store 上架过程中,苹果公司反馈的拒绝原因发现了这么一个问题: Legal - 5.1.5 Your app uses background location services ...
- django 学习第一天搭建环境
目前django版本是1.10,我学习的基础教材是 Web Development with Django Cookbook, Second Edition 搭建好配置环境 ssh免认证登录 修改一下 ...
- docker4dotnet #1 – 前世今生 & 世界你好
作为一名.NET Developer,这几年看着docker的流行实在是有些眼馋.可惜的是,Docker是基于Linux环境的,眼瞧着那些 java, python, node.js, go 甚至连p ...
- SQL-日期函数
GETDATE() :取得当前日期时间 DATEADD (datepart , number, date ),计算增加以后的日期.参数date为待计算的日期:参数number为增量:参数datepar ...
- 使用nginx反向代理,一个80端口下,配置多个微信项目
我们要接入微信公众号平台开发,需要填写服务器配置,然后依据接口文档才能实现业务逻辑.但是微信公众号接口只支持80接口(80端口).我们因业务需求需要在一个公众号域名下面,发布两个需要微信授权的项目,怎 ...