Ubuntu 14.04 – How to install xrdp in Ubuntu 14.04
http://c-nergy.be/blog/?p=5305
Hello World,
Ubuntu 14.04 has been released on April 17th 2014 and we already released the traditional post about how to perform a fresh install. We didn’t covered the upgrade process because it’s quite easy nowadays. Basically, you will be notified that a new version is available and you will be asked if you want to upgrade to the latest version.
Some readers and some of my colleagues have been asking for a post about XRDP functionality in Ubuntu 14.04. If you follow me, you know that we have been using xrdp package in order to connect to linux machines using the built-in remote desktop client available within Windows Operating System.
You probably also know that since the introduction of Unity Desktop Interface in Ubuntu you need to tweak the configuration in order to have it working. The most annoying part while using xrdp (with Ubuntu) is the fact that you have to install an alternate desktop environment.
So, in this post, we will describe the steps needed in order to install xrdp and the xfce alternate desktop that will be used while remoting into your Ubuntu 14.04 machine.
Let’s Go !
Install XRDP Package from Ubuntu Repository
In this post, we will be installing the standard xrdp package from the Ubuntu Repository. In order to perform the installation of the xrdp package, you will login into your ubuntu 14.04 machine.
Using the Dash button, in the search box, type Terminal
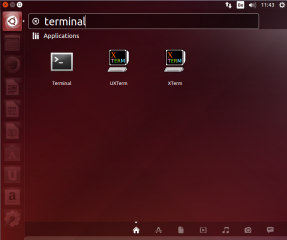
Click on Picture for Better Resolution
Click on the terminal icon and the Terminal console will open
In the Terminal, type the following command
sudo apt-get install xrdp
You will be prompted for your password
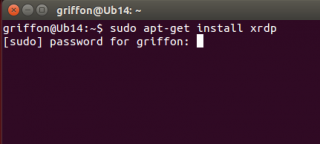
Click on Picture for Better Resolution
You will be then informed about the package size. To proceed with the installation, press Y
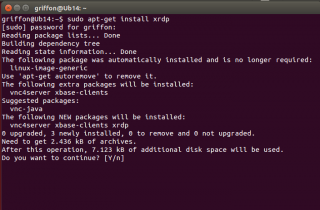
Click on Picture for Better Resolution
Wait for the completion
When done, you need to install an alternate desktop environment. In our scenario, we are using xfce4
Installing the xfce4 Desktop environment
In the Terminal console; type the following command
sudo apt-get update
sudo apt-get install xfce4
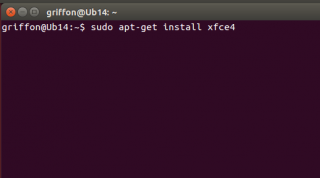
Click on Picture for Better Resolution
You might be prompted for a password.Enter the password and press enter
You will be then informed about the package size. To proceed with the installation, press Y
Wait for the completion
Configure xrdp to use xfce desktop environment
At this stage, you have to configure your Ubuntu machine in order for xrdp to know that the xfce desktop will be used instead of the Unity or Gnome (which are not working anymore in Ubuntu). To configure this, from the terminal console, you will issue the following command
echo xfce4-session >~/.xsession

Click on Picture for Better Resolution
Restart the xrdp service by issuing the following command
sudo service xrdp restart
Test your xrdp connection
At this stage, you should have a basic xrdp working solution. When I say basic, I mean that you can indeed connect to your remote Ubuntu machine but if you disconnect your session and try to connect again, you will each time open a new session. (Read below section in this post to see how you can reconnect to the same session)
To test your xrdp solution, find the ip address of your linux machine (or use the name if you have DNS Infrastructure in place). To find the ip address, issue the command
hostname -I
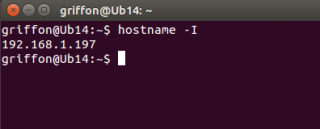
Click on Picture for Better Resolution
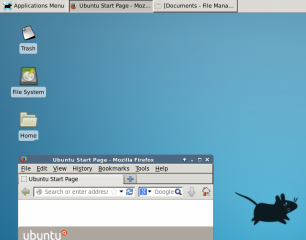
Now go to your windows machine, start remote Desktop client and enter the ip address/name of your ubuntu machine
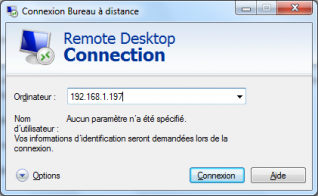
Click on Picture for Better Resolution
You should see then the login screen of xrdp presented to you. Note that, at this screen (and because we have not configured keyboard layout yet), the keyboard layout is set to English by default.
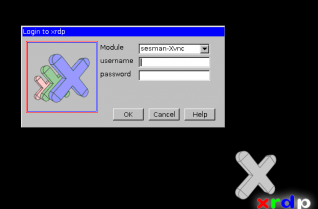
Click on Picture for Better Resolution
Enter your username and password and Press OK
You will see a dialog box showing the login process
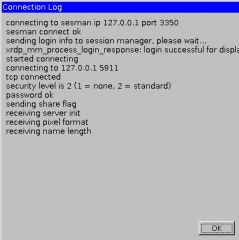
Click on Picture for Better Resolution
If everything is configured correctly,you should see your xfce desktop loading and you should be able to perform you work through this desktop environment.
Click on Picture for Better Resolution
To set Keyboard layout at the xrdp Login screen, perform the following steps
As explained above, with no special configuration, the xrdp login screen keyboard layout is set to english by default. if you need to change it to another keyboard layout, you should proceed with the following actions
This is the command you should issue in order to change the keyboard layout to be used during xrdp sessions…
Step 1 : You go to the /etc/xrdp directory
Step 2 : you issue the command setxkbmap -layout <%your layout%> to define which keyboard map/layout to use
Step 3 : create a copy of the km-0409.ini file into the same directory. It seems that this is the default file used by xrdp to define the keyboard layout. You will need to use sudo in order to be able to write into the directory
Step 4 : Check that you have a backup of your file by typing the dir or ls command
Step 5 : update the file by issuing the following command sudo xrdp-genkeymap km-0409.ini
Reconnect to the same session throug xrdp
You have mutliple ways to reconnect to the same session through xrdp. we have explained two of them. One method is based on performing a custom installation and use the X11VNC software. This is one is working well but requires a little bit more effort. (http://c-nergy.be/blog/?p=4168)
The other one is to use the xrdp package from ubuntu repository and tweak some configuration files whil connected to the session. This solution is really a workaround and it’s not our favourite one. (see http://c-nergy.be/blog/?p=4471)
Here, we will use a third method that can be used if you use the xrdp pakcage from the ubuntu repository. This method is much better than the one provided by us some time ago. In this method, we will tweak the xrdp login screen. We will add a field in the login box where the user can specify the port to be used when remoting to the ubuntu machine.
You will first need to edit xrdp.ini file located under the /etc/xrdp. To edit the file, issue the following command
sudo gedit /etc/xrdp/xrdp.ini
You might be prompted for a password. if this is the case, provide the password and Press enter
When the file is open, locate the section [xrdp1] and replace the following line
port=-1
with the line
port=ask-1
Save the file. The file should look like this
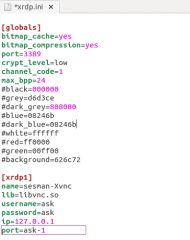
Click on Picture for Better Resolution
When done, restart the xrdp service by issuing the following command
sudo service xrdp restart.
You are done.
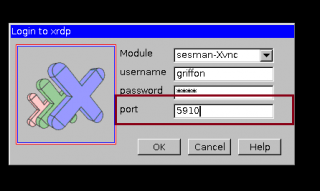
When trying to access your Ubuntu
machine through via the remote desktop client, you will see that the
xrdp login screen has indeed an additional field called port.
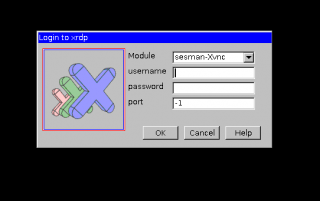
Click on Picture for Better Resolution
If this is your first connection, leave the default value in the port field (i.e. -1), you will be then connecting through xrdp to your ubuntu machine using a specified port that can be seen on the login process dialog box.
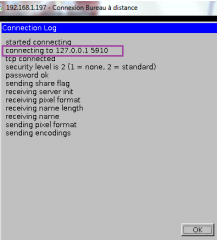
Click on Picture for Better Resolution
Take a note of this port.
When you need to reconnect, you will
have to specify the same port as your first connection and you should
see the same screen as you left it.
Click on Picture for Better Resolution
Note : This tip has been provided to us by one of our reader (Thank you Wei ![]() )
)
This is it for this post. Using only the
ubuntu xrdp package, we have been able to install and configure a
remote access solution. By tweaking the xrdp.ini file, we even have been
able to provide a simple and easy to use solution in order to reconnect
to an existing session.
However, we still have a problem with
xrdp used in conjunction with Ubuntu. In order to remote into your
ubuntu machine, you have no other choice than using an alternate desktop
environment (in our case its xfce). I find it quite irritating that we
cannot have the xrdp package working with Unity or Gnome desktop
environment.
We have installed fedora distribution
and installed the xrdp package. And guess what ! I can connect through
xrdp to fedora and have the gnome desktop environment working. Moreover,
I can disconnect and when reconnecting I will be reconnecting to the
existing session I just left. And all of this with no tweak in
configuration files.
I would love to see the same
functionality in Ubuntu. As one of our readers mentionned, it might be
time for Ubuntu users to fill in a bug report about xrdp and try to have
it fixed. If more and more users complains, maybe Ubuntu team will take
the request into account.
Till next Time
See ya
-----------------------------------------------------------------------------------------------
X Server -- no display in range is available. xrdp_mm_process_login_response: login failed
X Server -- no display in range is available. xrdp_mm_process_login_response: login failed
When I look into the /var/log/ xrdp-sesman.log, the error is followed:
[20130913-14:11:00] [INFO ] starting Xvnc session...

[20130913-14:11:00] [ERROR] X server -- no display in range is available
I managed to solve the issue by changing /etc/xrdp/sesmain.ini - MaxSessions from 10 to 100
[Security]

AllowRootLogin=1

MaxLoginRetry=4

#TerminalServerUsers=tsusers

#TerminalServerAdmins=tsadmins

[Sessions]

X11DisplayOffset=10

MaxSessions=100

KillDisconnected=0

IdleTimeLimit=0

DisconnectedTimeLimit=0
Restart the Service
# service xrdp restart

3 comments:

-
Ghebaru Ion
said... -
for me worked very well
...
thanks -

-
Shrey Mehrotra
said... -
Thanks a lot....worked for me..
-

-
Iain Elder
said... -
I solved this by changing X11DisplayOffset to 1 instead.
Ubuntu 14.04 – How to install xrdp in Ubuntu 14.04的更多相关文章
- Ubuntu Linux: How Do I install .deb Packages?
Ubuntu Linux: How Do I install .deb Packages? Ubuntu Linux: How Do I install .deb Packages? by Nix C ...
- install cinnamon on ubuntu 14.04
emotion: I feel not comfortable with ubuntu 14.04 default desktop unity,i still look for a alternati ...
- Ubuntu 14.04 SSH + 远程登录xrdp
1. 安装ssh 打开"终端窗口",输入"sudo apt-get install openssh-server"-->回车-->输入"y ...
- How To Install Cacti On Ubuntu 14
How To Install Cacti On Ubuntu 14.04/14.10 by anismaj Cacti is an open source web based network moni ...
- How To Install Nginx on Ubuntu 16.04 zz
Introduction Nginx is one of the most popular web servers in the world and is responsible for hostin ...
- [转]Ubuntu Tweak 0.8.7 发布:支持 Ubuntu 14.04
原文网址:http://www.oschina.net/news/51054/ubuntu-tweak-0-8-7 这是我开发 Ubuntu Tweak 七年以来第一次没在 Ubuntu 正式发布之前 ...
- (转) How to install eclipse in ubuntu 12.04
源地址:http://www.krizna.com/ubuntu/install-eclipse-in-ubuntu-12-04/ Eclipse installation in ubuntu 12. ...
- Ubuntu 16.04: How to install OpenCV
参考:https://www.pyimagesearch.com/2016/10/24/ubuntu-16-04-how-to-install-opencv/ 步骤# 1:安装opencv的依赖项 本 ...
- How to Install PhantomJS on Ubuntu 16.04
Introduction PhantomJS is a scripted, headless browser that can be used for automating web page inte ...
随机推荐
- Bugtags:移动时代首选 Bug 管理系统
Bug 管理系统之重 回想我们每次开启一个新项目,筹备之初,首要之事就是选择一款 Bug 管理系统.市面上有诸多 Bug 管理系统可供选择:Jira.Redmine.Bugzilla 等.这些系统功能 ...
- bat命令之for命令详解
______________版主提醒____________________________ 为了避免影响技术讨论.提高看帖的舒适性,请大家不要在此帖下跟无实质内容的口水帖,特别是纯顶.纯支持.纯感谢 ...
- 第4章 管道和FIFO
4.1 管道 管道是由pipe函数创建的,提供一个单向数据流. 头文件 #include <unistd.h> 函数原型 int pipe(int fd[2]); 返回值 成功则为0,出错 ...
- Java中的Property类
Property是JAVA中的属性操作类,该类在java.util包中,它是HashTable的子类. 常用函数列表: l Properties() n 构造函数 l setProperty(S ...
- Ecshop 安装时错误
网上提示方法将install/includes/lib_installer.php以下内容修改后仍然提示失败: include(ROOT_PATH . 'install/languages/' . $ ...
- nyoj 88 汉诺塔(一)
点击打开链接 汉诺塔(一) 时间限制:1000 ms | 内存限制:65535 KB 难度:3 描述 在印度,有这么一个古老的传说:在世界中心贝拿勒斯(在印度北部)的圣庙里,一块黄铜板上插着三根宝 ...
- IO/NIO
1.转换流,Buffered BufferedWriter out=new BufferedWriter(new OutputStreamWriter(System.out)); BufferedRe ...
- JDialog窗体
class MyJDialog extends JDialog{ public MyJDialog(JFrame frame){ super(frame,"第一个Dialog窗体 ...
- nfs挂在内核出错 T T *** ERROR: Cannot umount
今天在U-boot挂载nfs内核是出现如下错误,网上查了解决方案. SOCFPGA_CYCLONE5 # nfs 20000 192.168.0.75:/work/nfs_root/uImageWai ...
- Flask框架学习笔记(API接口管理平台 V2.0)
博主今天把API接口管理平台发布到github了,这次是更新一些功能 如支持本地数据库sqlite3.优化了数据结构 技术方面跟之前V1.0相同,只增加生产本地数据:但是为了支持层级的参数,修改了数据 ...