AWStats日志分析系统
1.什么是AWStats
AWStats是一款功能强大且功能强大的免费工具,可以图形方式生成高级Web,流媒体,ftp或邮件服务器统计信息。此日志分析器用作CGI或命令行, 并在几个图形网页中显示您的日志包含的所有可能信息。
它使用部分信息文件来经常快速地处理大型日志文件。它可以分析来自所有主要服务器工具的日志文件,如Apache日志文件(NCSA组合/ XLF / ELF日志格式或通用/ CLF日志格式),WebStar,IIS(W3C日志格式)以及许多其他Web,代理,wap,流服务器,邮件服务器和一些ftp服务器。
关于AWStats与其他日志分析系统的对比可以查看:https://awstats.sourceforge.io/docs/awstats_compare.html
2.安装AWStats
2.1 获取awstats
AWStats 官网:https://awstats.sourceforge.io/
AWStats 下载地址: https://awstats.sourceforge.io/#DOWNLOAD
2.2安装awstats
系统版本说明
[root@clsn ~]# cat  /etc/redhat-release

CentOS Linux release 7.5.1804 (Core)

[root@clsn ~]# uname  -r

3.10.0-862.9.1.el7.x86_64
安装步骤
wget https://prdownloads.sourceforge.net/awstats/awstats-7.7.tar.gz

tar  xf awstats-7.7.tar.gz

mv  awstats-7.7 /usr/local/

ln -s /usr/local/awstats-7.7/ /usr/local/awstats

# 注:awstats默认为www用户,可以根据web环境用户进行修改

chown -R www.www /usr/local/awstats/
3.配置启动AWStats
3.1初始化配置
在这次配置中我已站点nmtui.com为例,进行设置。
[root@clsn tools]# cd /usr/local/awstats/tools

[root@clsn tools]# ./awstats_configure.pl

----- AWStats awstats_configure 1.0 (build 20140126) (c) Laurent Destailleur -----

This tool will help you to configure AWStats to analyze statistics for

one web server. You can try to use it to let it do all that is possible

in AWStats setup, however following the step by step manual setup

documentation (docs/index.html) is often a better idea. Above all if:

- You are not an administrator user,

- You want to analyze downloaded log files without web server,

- You want to analyze mail or ftp log files instead of web log files,

- You need to analyze load balanced servers log files,

- You want to 'understand' all possible ways to use AWStats...

Read the AWStats documentation (docs/index.html).

-----> Running OS detected: Linux, BSD or Unix

Warning: AWStats standard directory on Linux OS is '/usr/local/awstats'.

If you want to use standard directory, you should first move all content

of AWStats distribution from current directory:

/usr/local/awstats-7.7

to standard directory:

/usr/local/awstats

And then, run configure.pl from this location.

Do you want to continue setup from this NON standard directory [yN] ? y

-----> Check for web server install

Enter full config file path of your Web server.

Example: /etc/httpd/httpd.conf

Example: /usr/local/apache2/conf/httpd.conf

Example: c:\Program files\apache group\apache\conf\httpd.conf

Config file path ('none' to skip web server setup): #

> none

Your web server config file(s) could not be found.

You will need to setup your web server manually to declare AWStats

script as a CGI, if you want to build reports dynamically.

See AWStats setup documentation (file docs/index.html)

-----> Update model config file '/usr/local/awstats-7.7/wwwroot/cgi-bin/awstats.model.conf'

  File awstats.model.conf updated.

-----> Need to create a new config file ?

Do you want me to build a new AWStats config/profile

file (required if first install) [y/N] ? y

-----> Define config file name to create

What is the name of your web site or profile analysis ?

Example: www.mysite.com

Example: demo

Your web site, virtual server or profile name:

> nmtui.com

-----> Define config file path

In which directory do you plan to store your config file(s) ?

Default: /etc/awstats

Directory path to store config file(s) (Enter for default):

>

-----> Create config file '/etc/awstats/awstats.nmtui.com.conf'

 Config file /etc/awstats/awstats.nmtui.com.conf created.

-----> Add update process inside a scheduler

Sorry, configure.pl does not support automatic add to cron yet.

You can do it manually by adding the following command to your cron:

/usr/local/awstats-7.7/wwwroot/cgi-bin/awstats.pl -update -config=nmtui.com

Or if you have several config files and prefer having only one command:

/usr/local/awstats-7.7/tools/awstats_updateall.pl now

Press ENTER to continue...

A SIMPLE config file has been created: /etc/awstats/awstats.nmtui.com.conf

You should have a look inside to check and change manually main parameters.

You can then manually update your statistics for 'nmtui.com' with command:

> perl awstats.pl -update -config=nmtui.com

You can also build static report pages for 'nmtui.com' with command:

> perl awstats.pl -output=pagetype -config=nmtui.com

Press ENTER to finish...
3.2编辑配置文件
在初始化配置红 nmtui.com 站点的配置文件在 /etc/awstats/awstats.nmtui.com.conf
vi /etc/awstats/awstats.nmtui.com.conf

# 在配置中寻找【 LogFile 】字段,将其修改为该主机的日志地址。

LogFile="/www/wwwlogs/nmtui.com.log"
3.3配置web站点展示awstats
在使用之前需要搭建nginx或httpd等web服务,可以参考:http://clsn.io/clsn/lx892.html
配置web站点:
mkdir  /www/wwwroot/awstats

cd /usr/local/awstats/wwwroot/

cp -ar  css icon js  /www/wwwroot/awstats/

chown  -R www.www  /www/wwwroot/awstats
生成分析日志
[root@clsn nginx]# /usr/local/awstats/tools/awstats_buildstaticpages.pl  \

-config=nmtui.com -update -lang=cn \

-awstatsprog=/usr/local/awstats/wwwroot/cgi-bin/awstats.pl \

-dir=/www/wwwroot/awstats/

Launch update process : "/usr/local/awstats/wwwroot/cgi-bin/awstats.pl" -config=nmtui.com -update -configdir=

Build main page: "/usr/local/awstats/wwwroot/cgi-bin/awstats.pl" -config=nmtui.com -staticlinks -lang=cn -output

Build alldomains page: "/usr/local/awstats/wwwroot/cgi-bin/awstats.pl" -config=nmtui.com -staticlinks -lang=cn -output=alldomains

Build allhosts page: "/usr/local/awstats/wwwroot/cgi-bin/awstats.pl" -config=nmtui.com -staticlinks -lang=cn -output=allhosts

Build lasthosts page: "/usr/local/awstats/wwwroot/cgi-bin/awstats.pl" -config=nmtui.com -staticlinks -lang=cn -output=lasthosts

Build unknownip page: "/usr/local/awstats/wwwroot/cgi-bin/awstats.pl" -config=nmtui.com -staticlinks -lang=cn -output=unknownip

Build allrobots page: "/usr/local/awstats/wwwroot/cgi-bin/awstats.pl" -config=nmtui.com -staticlinks -lang=cn -output=allrobots

Build lastrobots page: "/usr/local/awstats/wwwroot/cgi-bin/awstats.pl" -config=nmtui.com -staticlinks -lang=cn -output=lastrobots

Build session page: "/usr/local/awstats/wwwroot/cgi-bin/awstats.pl" -config=nmtui.com -staticlinks -lang=cn -output=session

Build urldetail page: "/usr/local/awstats/wwwroot/cgi-bin/awstats.pl" -config=nmtui.com -staticlinks -lang=cn -output=urldetail

Build urlentry page: "/usr/local/awstats/wwwroot/cgi-bin/awstats.pl" -config=nmtui.com -staticlinks -lang=cn -output=urlentry

Build urlexit page: "/usr/local/awstats/wwwroot/cgi-bin/awstats.pl" -config=nmtui.com -staticlinks -lang=cn -output=urlexit

Build osdetail page: "/usr/local/awstats/wwwroot/cgi-bin/awstats.pl" -config=nmtui.com -staticlinks -lang=cn -output=osdetail

Build unknownos page: "/usr/local/awstats/wwwroot/cgi-bin/awstats.pl" -config=nmtui.com -staticlinks -lang=cn -output=unknownos

Build browserdetail page: "/usr/local/awstats/wwwroot/cgi-bin/awstats.pl" -config=nmtui.com -staticlinks -lang=cn -output=browserdetail

Build unknownbrowser page: "/usr/local/awstats/wwwroot/cgi-bin/awstats.pl" -config=nmtui.com -staticlinks -lang=cn -output=unknownbrowser

Build downloads page: "/usr/local/awstats/wwwroot/cgi-bin/awstats.pl" -config=nmtui.com -staticlinks -lang=cn -output=downloads

Build refererse page: "/usr/local/awstats/wwwroot/cgi-bin/awstats.pl" -config=nmtui.com -staticlinks -lang=cn -output=refererse

Build refererpages page: "/usr/local/awstats/wwwroot/cgi-bin/awstats.pl" -config=nmtui.com -staticlinks -lang=cn -output=refererpages

Build keyphrases page: "/usr/local/awstats/wwwroot/cgi-bin/awstats.pl" -config=nmtui.com -staticlinks -lang=cn -output=keyphrases

Build keywords page: "/usr/local/awstats/wwwroot/cgi-bin/awstats.pl" -config=nmtui.com -staticlinks -lang=cn -output=keywords

Build errors400 page: "/usr/local/awstats/wwwroot/cgi-bin/awstats.pl" -config=nmtui.com -staticlinks -lang=cn -output=errors400

Build errors403 page: "/usr/local/awstats/wwwroot/cgi-bin/awstats.pl" -config=nmtui.com -staticlinks -lang=cn -output=errors403

Build errors404 page: "/usr/local/awstats/wwwroot/cgi-bin/awstats.pl" -config=nmtui.com -staticlinks -lang=cn -output=errors404

23 files built.

Main HTML page is 'awstats.nmtui.com.html'.
修改nginx配置(修改完成后重新加载nginx配置文件):
[root@clsn nginx]# cat   awstats.nmtui.com.conf

server

{

    listen 80;

    server_name awstats.nmtui.com;

    index awstats.nmtui.com.html;

    root /www/wwwroot/awstats/;

    access_log  /www/wwwlogs/awstats.nmtui.com.log;

    error_log  /www/wwwlogs/awstats.nmtui.com-error.log;

}

[root@clsn nginx]# /etc/init.d/nginx  reload
3.4添加定时任务
# 添加定时任务,定时更新awstats分析日志
4.安全加固
4.1使用htpasswd生成加密密码
[root@clsn nginx]# yum install httpd-tools -y

[root@clsn nginx]# htpasswd  -c /usr/local/awstats/wwwroot/nmtui.passwd nmtui

New password:

Re-type new password:

Adding password for user nmtui

[root@clsn nginx]# chown www.www  /usr/local/awstats/wwwroot/nmtui.passwd

[root@clsn nginx]# chmod 600  /usr/local/awstats/wwwroot/nmtui.passwd
4.2添加web访问认证
[root@clsn nginx]# vim  awstats.nmtui.com.conf

server

{

    listen 80;

    server_name awstats.nmtui.com;

    index awstats.nmtui.com.html;

    root /www/wwwroot/awstats/;

    auth_basic "clsn training";

    auth_basic_user_file /usr/local/awstats/wwwroot/nmtui.passwd;

    access_log  /www/wwwlogs/301-clsn.io.log;

    error_log  /www/wwwlogs/301-clsn.io-error.log;

}

[root@clsn nginx]# /etc/init.d/nginx  reload
5.查看分析日志
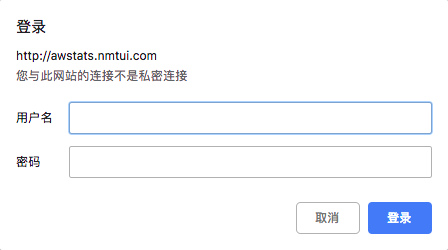
5.1安全加固生效

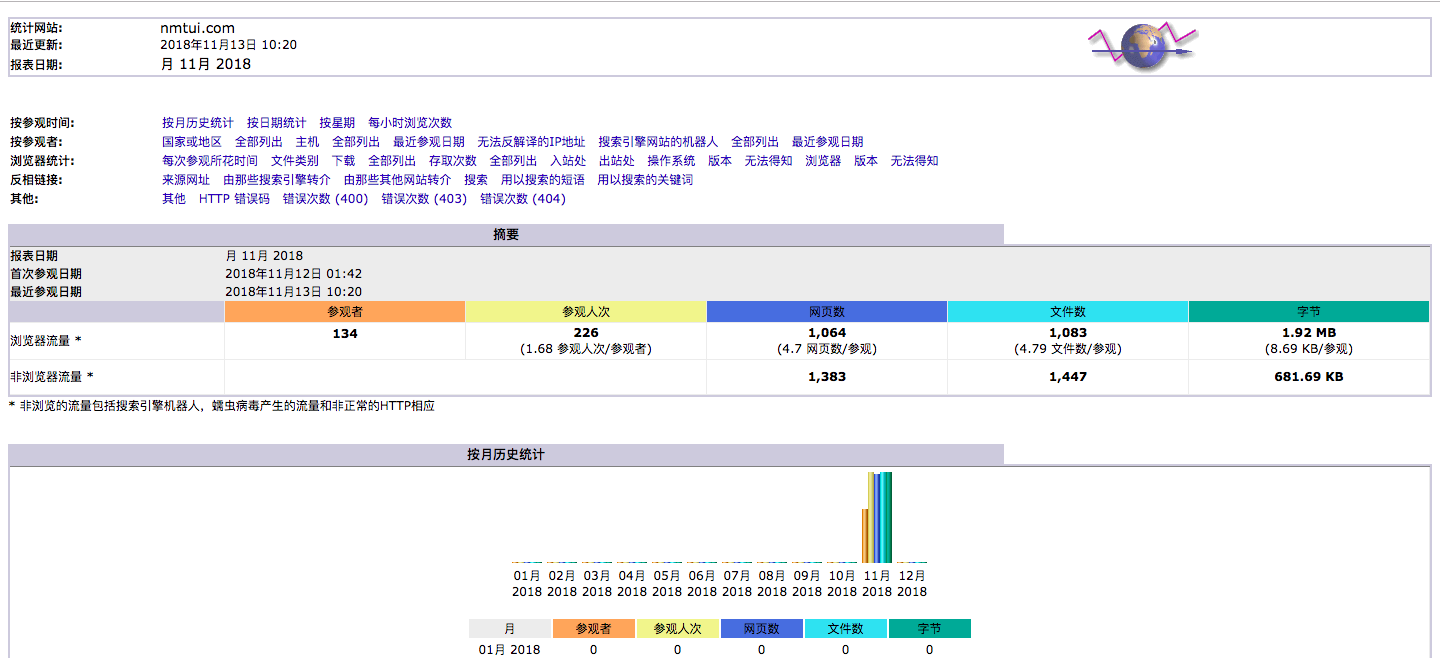
5.2 分析日志显示正常

6.参考文献
AWStats日志分析系统的更多相关文章
- astats日志分析系统
Awstats是一个免费非常简洁而且强大有个性的网站日志分析工具. 功能: 一:访问量,访问次数,页面浏览量,点击数,数据流量等 二:精确到每月.每日.每小时的数据 三:访问者国家 四:访问者IP 五 ...
- ELK_日志分析系统Logstash+ElasticSearch+Kibana4
elk 日志分析系统 Logstash+ElasticSearch+Kibana4 logstash 管理日志和事件的工具 ElasticSearch 搜索 Kibana4 功能强大的数据显示客户端 ...
- [原创]ubuntu14.04部署ELK+redis日志分析系统
ubuntu14.04部署ELK+redis日志分析系统 [环境] host1:172.17.0.4 搭建ELK+redis服务 host2:172.17.0.3 搭建logstash+nginx服务 ...
- Docker搭建ElasticSearch+Redis+Logstash+Filebeat日志分析系统
一.系统的基本架构 在以前的博客中有介绍过在物理机上搭建ELK日志分析系统,有兴趣的朋友可以看一看-------------->>链接戳我<<.这篇博客将介绍如何使用Docke ...
- ELK + Filebeat 日志分析系统
ELK + Filebeat 日志分析系统 架构图 环境 OS:CentOS 7.4 Filebeat: 6.3.2 Logstash: 6.3.2 Elasticsearch 6.3.2 Kiban ...
- 苏宁基于Spark Streaming的实时日志分析系统实践 Spark Streaming 在数据平台日志解析功能的应用
https://mp.weixin.qq.com/s/KPTM02-ICt72_7ZdRZIHBA 苏宁基于Spark Streaming的实时日志分析系统实践 原创: AI+落地实践 AI前线 20 ...
- Elasticsearch日志分析系统
Elasticsearch日志分析系统 作者:尹正杰 版权声明:原创作品,谢绝转载!否则将追究法律责任. 一.什么是Elasticsearch 一个采用Restful API标准的高扩展性的和高可用性 ...
- ELK日志分析系统简单部署
1.传统日志分析系统: 日志主要包括系统日志.应用程序日志和安全日志.系统运维和开发人员可以通过日志了解服务器软硬件信息.检查配置过程中的错误及错误发生的原因.经常分析日志可以了解服务器的负荷,性能安 ...
- Rsyslog+ELK日志分析系统
转自:https://www.cnblogs.com/itworks/p/7272740.html Rsyslog+ELK日志分析系统搭建总结1.0(测试环境) 因为工作需求,最近在搭建日志分析系统, ...
随机推荐
- POJ1459 Power Network 网络流 最大流
原文链接http://www.cnblogs.com/zhouzhendong/p/8326021.html 题目传送门 - POJ1459 题意概括 多组数据. 对于每一组数据,首先一个数n,表示有 ...
- asp gridview
<table> <tr> <td colspan="5">请选择试卷制定人员<span style="color:red&quo ...
- 使用loadrunner录制脚本的思路和注意要点
基本思路如下图: 注意要点有如下几点: 1.性能测试往往需要准备大批量的数据,大批量数据的生成方法有很多种,常见的有: (1)编写SQL语句来插入数据 (2)使用DataFactory等专业的数据生成 ...
- oracle的DBMS_JOB相关知识
http://langgufu.iteye.com/blog/1179235 查看当前定时任务 select job,next_date,next_sec,failures,broken from u ...
- box-shadow阴影 三面显示
想弄个只显示三面的阴影效果,网上一搜没有解决根本问题,最后还是在css3演示里面找到方法http://www.css88.com/tool/css3Preview/Box-Shadow.html 我把 ...
- 002. Ansible部署及配置介绍
一 Ansible的安装部署 1.1 PIP方式 安装PIP 略,可参考<001.Pip简介及使用>. 提示:建议将PIP升级到最新:pip install --upgrade pip. ...
- CSS基础以及属性
一.CSS 偷个懒,啥是CSS我就不介绍啦 二.CSS语法 CSS语法:选择符{属性:属性值:属性:属性值:}选择符表示要定义样式的对象,可以是元素本身,也可以是一类元素或者制定名称的元素.属性:属性 ...
- lvs负载均衡概述
- PAT (Advanced Level) Practise 1004 解题报告
GitHub markdownPDF 问题描述 解题思路 代码 提交记录 问题描述 Counting Leaves (30) 时间限制 400 ms 内存限制 65536 kB 代码长度限制 1600 ...
- BZOJ.3811.玛里苟斯(线性基)
BZOJ UOJ 感觉网上大部分题解对我这种数学基础差的人来说十分不友好...(虽然理解后也觉得没有那么难) 结合两篇写的比较好的详细写一写.如果有错要指出啊QAQ https://blog.csdn ...
