SharkApktool 源码攻略
作者:HAI_
原文来自:https://bbs.ichunqiu.com/thread-43219-1-1.html
0×00 前言
网上的资料对于apktool的源码分析,来来回回就那么几个,而且还是不尽人意,所以只好自己动手试一试,于是乎拿着最新的SharkApkTool搞一下。
1.apktool.Main 第一部分
从Main出发,这个是整个工具的入口点
1.1 public static void main
先来一个main方法的合集,可能有点小。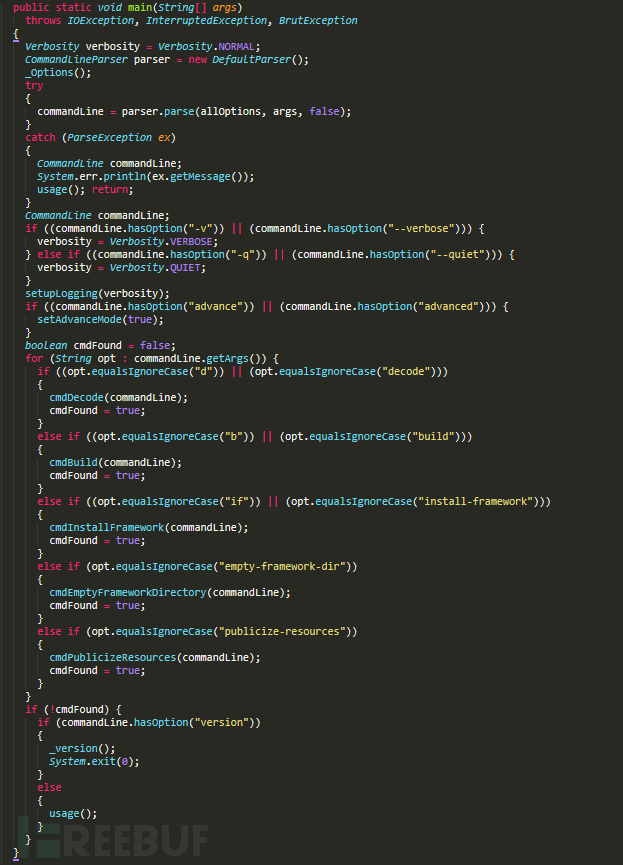
1.1.1 Verbosity verbosity = Verbosity.NORMAL;
我们先来看一下这个
 private static enum Verbosity

  {

    NORMAL,  VERBOSE,  QUIET;

    private Verbosity() {}

  }
很明显这是一个枚举类型,有三个成员
NORMA:正常的
VERBOSE:啰嗦的
QUIET:安静的
这里猜测可能是模式的选择。
1.1.2 CommandLineParser parser = new DefaultParser();
(1) CommandLineParser
package org.apache.commons.cli;

public abstract interface CommandLineParser

{

  public abstract CommandLine parse(Options paramOptions, String[] paramArrayOfString, boolean paramBoolean)

    throws ParseException;

}
CommandLineParser是一个接口,其中有一个抽象方法。返回了一个Commandline的类。
(2) DefaultParser()
然后来看看DefaultParser这里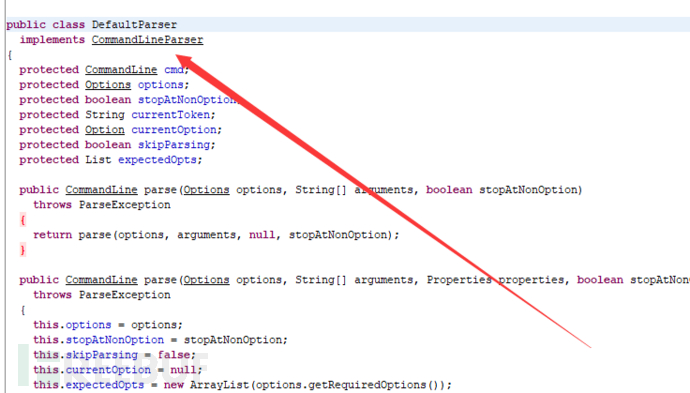
DefaultParser实现了CommandLineParser接口。
但是DefaultParser没有主动写构造方法,只实现系统默认的构造方法,相当于无操作
(3)
CommandLineParser parser = new DefaultParser();
这里的写法是可以实现接口的多态的
1.1.5 _Options();
找到_Options()方法,很长的一大串,但是格式都是类似的。应该是在做什么配置一类的。我们来抓住一个看一下。
Option versionOption = Option.builder("version").longOpt("version").desc("prints the version then exits").build();
这里使用了Builder设计模式
先来看看Option.builder(“version”)。
public static Builder builder(String opt)

  {

    return new Builder(opt, null);

  }
置换一下,相当于,我们现在拿到的是 new Builder(“version”,null)
接着来看Builder类
先找到对应的构造方法。
private Builder(String opt)

      throws IllegalArgumentException

    {

      OptionValidator.validateOption(opt);

      this.opt = opt;

    }
这里置换一下就是
传入了version,并且把当前的opt置换成了version。
然后还把version传入了OptionValidator.validateOption
继续了解一下
static void validateOption(String opt)

    throws IllegalArgumentException

  {

    if (opt == null) {

      return;

    }

    char ch;

    if (opt.length() == 1)

    {

      ch = opt.charAt(0);

      if (!isValidOpt(ch)) {

        throw new IllegalArgumentException("Illegal option name '" + ch + "'");

      }

    }

    else

    {

      for (char ch : opt.toCharArray()) {

        if (!isValidChar(ch)) {

          throw new IllegalArgumentException("The option '" + opt + "' contains an illegal character : '" + ch + "'");

        }

      }

    }

  }
分了三种情况。
第一种判空。
第二种opt.length() == 1
第三种其他情况
第一种没有什么好说的,先来看看第二种。
if (opt.length() == 1)

    {

      ch = opt.charAt(0);

      if (!isValidOpt(ch)) {

        throw new IllegalArgumentException("Illegal option name '" + ch + "'");

      }

    }
这里使用了
ch = opt.charAt(0);
这一步就是为了获取char 类型的ch
 if (!isValidOpt(ch)) {

        throw new IllegalArgumentException("Illegal option name '" + ch + "'");

      }
又来一个判断。继续跟进
private static boolean isValidOpt(char c)

  {

    return (isValidChar(c)) || (c == '?') || (c == '@');

  }
看到isValidChar,继续跟进
private static boolean isValidChar(char c)

  {

    return Character.isJavaIdentifierPart(c);

  }
看到return就知道这个跟完了,来说说Character.isJavaIdentifierPart(c)这个是在干嘛把。这个是在判断是否为一个合法的java变量所包含的字符
返回到isValidOpt,和(c == ‘?’),(c == ‘@’)进行判断,然后return
第二种情况结束,这里就是判断传入的字符判断是否为一个合法的java变量所包含的字符和字符等于?和@的情况。
第三种情况
for (char ch : opt.toCharArray()) {

        if (!isValidChar(ch)) {

          throw new IllegalArgumentException("The option '" + opt + "' contains an illegal character : '" + ch + "'");

        }

      }
和第二种情况类似,对每一个字符进行判断。
回到我们之前的OptionValidator.validateOption(opt);
也就是说这句的作用就是进行一个字符串的检测。
是不是觉得有一点绕?
这个时候就该使用一个强大的工具了。来进行一个汇总。
 有了这个可能就整齐一点了。最好的方式还是动手。
剩下的内容都是在做初始化了。
整体来说那个_Options()就是再做一个清单配置,相当于搭建一个合适的环境。
1.1.4 commandLine = parser.parse(allOptions, args, false);
这条语句是被try包裹起来的。
调用了parser.parse()方法,这里是三个参数,就是对应
 public CommandLine parse(Options options, String[] arguments, boolean stopAtNonOption)

    throws ParseException

  {

    return parse(options, arguments, null, stopAtNonOption);

  }
这个方法更改参数位置,又调用了
public CommandLine parse(Options options, String[] arguments, Properties properties, boolean stopAtNonOption)

    throws ParseException

  {

    this.options = options;

    this.stopAtNonOption = stopAtNonOption;

    this.skipParsing = false;

    this.currentOption = null;

    this.expectedOpts = new ArrayList(options.getRequiredOptions());

    for (Object localObject = options.getOptionGroups().iterator(); ((Iterator)localObject).hasNext();)

    {

      group = (OptionGroup)((Iterator)localObject).next();

      group.setSelected(null);

    }

    OptionGroup group;

    this.cmd = new CommandLine();

    if (arguments != null)

    {

      localObject = arguments;group = localObject.length;

      for (OptionGroup localOptionGroup1 = 0; localOptionGroup1 < group; localOptionGroup1++)

      {

        String argument = localObject[localOptionGroup1];

        handleToken(argument);

      }

    }

    checkRequiredArgs();

    handleProperties(properties);

    checkRequiredOptions();

    return this.cmd;

  }
这个方法一大堆,看来又有我们要忙的了。
    this.options = options;

    this.stopAtNonOption = stopAtNonOption;

    this.skipParsing = false;

    this.currentOption = null;

    this.expectedOpts = new ArrayList(options.getRequiredOptions());
初始化当前成员变量。
for (Object localObject = options.getOptionGroups().iterator(); ((Iterator)localObject).hasNext();)

    {

      group = (OptionGroup)((Iterator)localObject).next();

      group.setSelected(null);

    }
options.getOptionGroups().iterator() 返回一个迭代器用于遍历。
       group = (OptionGroup)((Iterator)localObject).next();

       group.setSelected(null);
将group的selected设为null
this.cmd = new CommandLine();
new 了一个CommandLine()
CommandLine()里也没有构造方法,所以只是单纯的new。
if (arguments != null)

    {

      localObject = arguments;group = localObject.length;

      for (OptionGroup localOptionGroup1 = 0; localOptionGroup1 < group; localOptionGroup1++)

      {

        String argument = localObject[localOptionGroup1];

        handleToken(argument);

      }

    }
这个部分就是对参数进行一个处理,我们传入了的是args。
然后就是对这个args进行遍历,把每一个值都传入handleToken这个方法里。
所以我们接下来就是对handleToken进行追进。
 private void handleToken(String token)

    throws ParseException

  {

    this.currentToken = token;

    if (this.skipParsing) {

      this.cmd.addArg(token);

    } else if ("--".equals(token)) {

      this.skipParsing = true;

    } else if ((this.currentOption != null) && (this.currentOption.acceptsArg()) && (isArgument(token))) {

      this.currentOption.addValueForProcessing(Util.stripLeadingAndTrailingQuotes(token));

    } else if (token.startsWith("--")) {

      handleLongOption(token);

    } else if ((token.startsWith("-")) && (!"-".equals(token))) {

      handleShortAndLongOption(token);

    } else {

      handleUnknownToken(token);

    }

    if ((this.currentOption != null) && (!this.currentOption.acceptsArg())) {

      this.currentOption = null;

    }

  }
这个就是handleToken
if (this.skipParsing) {

      this.cmd.addArg(token);

    }
判断skipParsing,成立则cmd.addArg(token)
这个addArg又是做什么的呢?
在Commandline中找到
protected void addArg(String arg)

  {

    this.args.add(arg);

  }
又跟进到args.add
发现args是一个List。
好了这里就是说把传入的arg加到list列表里。
回到handleToken
else if ("--".equals(token)) {

      this.skipParsing = true;

    }
这里判断传入的参数是不是–如果是–就让skipParsing打开,也就是说会让之后的内容传入到我们的cmd list中去。
else if ((this.currentOption != null) && (this.currentOption.acceptsArg()) && (isArgument(token))) {

      this.currentOption.addValueForProcessing(Util.stripLeadingAndTrailingQuotes(token));

    }
我们一点一点来看
this.currentOption != null很容易理解
this.currentOption.acceptsArg(),这里的acceptsArg()就是
boolean acceptsArg()

  {

    return ((hasArg()) || (hasArgs()) || (hasOptionalArg())) && ((this.numberOfArgs <= 0) || (this.values.size() < this.numberOfArgs));

  }
这里的hasArg()
 public boolean hasArg()

  {

    return (this.numberOfArgs > 0) || (this.numberOfArgs == -2);

  }
在Option中numberOfArgs默认为-1
再来看hasArgs()
public boolean hasArgs()

  {

    return (this.numberOfArgs > 1) || (this.numberOfArgs == -2);

  }
对numberOfArgs进行判断
这里猜测这个numberOfArgs就是对参数进行一个判断,名字也是这样的意思
hasOptionalArg()
 public boolean hasOptionalArg()

  {

    return this.optionalArg;

  }
当前的一个开关
做到这里其实就已经了解到整个判断流程了,就是对参数进行处理,处理方式按照不同人的习惯处理起来不同,不过多分析一下还是会学到的很多东西的。
至此,我们的分析的第一部分就已经完成了。
2.Main 第二部分
还是一点点一点来
2.1 commandLine.hasOption(“-v”)||(commandLine.hasOption(“–verbose”)
verbosity = Verbosity.VERBOSE;
选择工作状态
2.2 (commandLine.hasOption(“-q”)) || (commandLine.hasOption(“–quiet”))
verbosity = Verbosity.QUIET;
和上一个一样选择工作状态
2.3 setupLogging(verbosity)
又是一个比较长的方法
private static void setupLogging(Verbosity verbosity)

  {

    Logger logger = Logger.getLogger("");

    for (Handler handler : logger.getHandlers()) {

      logger.removeHandler(handler);

    }

    LogManager.getLogManager().reset();

    if (verbosity == Verbosity.QUIET) {

      return;

    }

    Object handler = new Handler()

    {

      public void publish(LogRecord record)

      {

        if (getFormatter() == null) {

          setFormatter(new SimpleFormatter());

        }

        try

        {

          String message = getFormatter().format(record);

          if (record.getLevel().intValue() >= Level.WARNING.intValue()) {

            System.err.write(message.getBytes());

          } else if (record.getLevel().intValue() >= Level.INFO.intValue()) {

            System.out.write(message.getBytes());

          } else if (this.val$verbosity == Main.Verbosity.VERBOSE) {

            System.out.write(message.getBytes());

          }

        }

        catch (Exception exception)

        {

          reportError(null, exception, 5);

        }

      }

      public void close()

        throws SecurityException

      {}

      public void flush() {}

    };

    logger.addHandler((Handler)handler);

    if (verbosity == Verbosity.VERBOSE)

    {

      ((Handler)handler).setLevel(Level.ALL);

      logger.setLevel(Level.ALL);

    }

    else

    {

      ((Handler)handler).setFormatter(new Formatter()

      {

        public String format(LogRecord record)

        {

          return

            record.getLevel().toString().charAt(0) + ": " + record.getMessage() + System.getProperty("line.separator");

        }

      });

    }

  }
读完这一段之后就可以彻底明白那三个状态是什么意思了,就是对log日志的不同的输出状态
如果是QUIET
if (verbosity == Verbosity.QUIET) {

      return;

    }
那么就打印少一点的日志或者不打印
如果是VERBOSE
if (verbosity == Verbosity.VERBOSE)

    {

      ((Handler)handler).setLevel(Level.ALL);

      logger.setLevel(Level.ALL);

    }
推测应该是打印所有的日志。至少会打印很多。
2.4 commandLine.hasOption(“advance”)) || (commandLine.hasOption(“advanced”)
setAdvanceMode(true);
查看更多的参数。
2.6 for (String opt : commandLine.getArgs())
对传入的参数进行遍历
2.6.1 (opt.equalsIgnoreCase(“d”)) || (opt.equalsIgnoreCase(“decode”)
decode的英文意思是译码
也就是我们说的反编译了。
cmdBuild(commandLine);

cmdFound = true;
我们接下来的重点那就是cmdBuild
2.6.2 cmdBuild
这个方法的内容有点多,我们就来一部分一部分搞。
2.6.2.1 ApkDecoder decoder = new ApkDecoder();
这里首先是new了一个ApkDecoder()
来看一下无参的构造方法
public ApkDecoder()

  {

    this(new Androlib());

  }
这里又new了一个 Androlib()
public Androlib()

  {

    this.apkOptions = new ApkOptions();

    this.mAndRes.apkOptions = this.apkOptions;

  }
这里的ApkOptions是空的,相当于是一个配置类。
那这里的mAndRes是什么
下Androlib中定义了一个变量
private final AndrolibResources mAndRes = new AndrolibResources();
给apkOptions变量赋值
总结一下,ApkDecoder decoder = new ApkDecoder();这句相当于是在为之后的反编译建立一个反编译环境。
2.6.2.2 int paraCount = cli.getArgList().size();
返回一个ArgList的大小,值的结果给paraCount。
2.6.2.3 tring apkName = (String)cli.getArgList().get(paraCount – 1);
获取APKname
2.6.2.4 (cli.hasOption(“s”)) || (cli.hasOption(“no-src”)
这里如果有s的话,代表不解析源码
decoder.setDecodeSources((short)0);
我们跟进serDecodeSources
public void setDecodeSources(short mode)

    throws AndrolibException

  {

    if ((mode != 0) && (mode != 1)) {

      throw new AndrolibException("Invalid decode sources mode: " + mode);

    }

    this.mDecodeSources = mode;

  }
这里就是把decoder的mDecodeSources值从1变为0。
2.6.2.5 if ((cli.hasOption(“d”)) || (cli.hasOption(“debug”)))
这里的d功能已经被移除
2.6.2.6 (cli.hasOption(“b”)) || (cli.hasOption(“no-debug-info”)
关闭debug-info
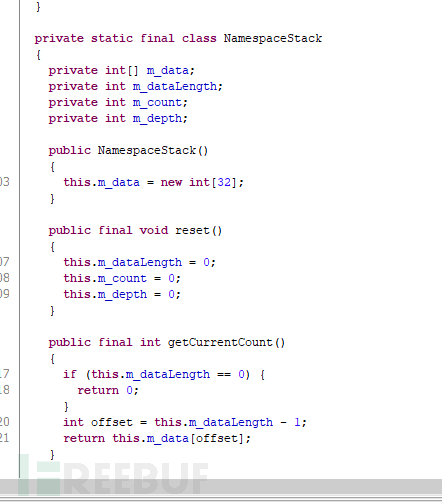
2.6.2.7 File outDir;
配置部分我们就跳过了,根据以上的分析,自己应该是很容易的。我们直接来看反编译部分。
2.6.2.8 创建输出文件
if ((cli.hasOption("o")) || (cli.hasOption("output")))

    {

      File outDir = new File(cli.getOptionValue("o"));

      decoder.setOutDir(outDir);

    }

    else

    {

      String outName = apkName;

      outName = outName + ".out";

      outName = new File(outName).getName();

      outDir = new File(outName);

      decoder.setOutDir(outDir);

    }
这里把文件命名为.out 然后设置ourdirfile
2.6.2.9 decoder.setApkFile(new File(apkName));
看到名字可以猜测到时拿到输入ApkFile
跟进
public void setApkFile(File apkFile)

  {

    if (this.mApkFile != null) {

      try

      {

        this.mApkFile.close();

      }

      catch (IOException localIOException) {}

    }

    this.mApkFile = new ExtFile(apkFile);

    this.mResTable = null;

  }
this.mApkFile = new ExtFile(apkFile);
这里确定mApkFile是ExtFil格式的,所以我们跟进ExtFile这个类
public ExtFile(File file)

  {

    super(file.getPath());

  }
拿到地址。
最后把mResTable的值变更为null;
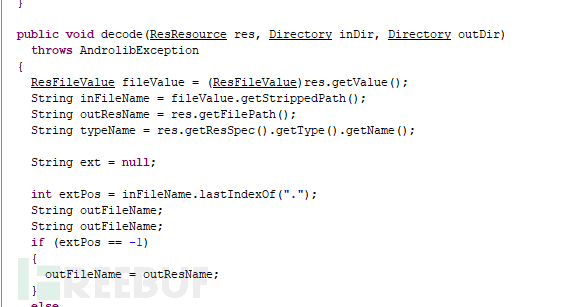
2.6.2.10 decoder.decode()
这个就是核心代码的地方
1. OS.rmdir(outDir);
先删除文件
2.outDir.mkdirs();
创建
3.if (hasResources())
这里对hasResources()方法进行跟进查看
 public boolean hasResources()

    throws AndrolibException

  {

    try

    {

      return this.mApkFile.getDirectory().containsFile("resources.arsc");

    }

    catch (DirectoryException ex)

    {

      throw new AndrolibException(ex);

    }

  }
mApkFile.getDirectory()方法
public Directory getDirectory()

    throws DirectoryException

  {

    if (this.mDirectory == null) {

      if (isDirectory()) {

        this.mDirectory = new FileDirectory(this);

      } else {

        this.mDirectory = new ZipRODirectory(this);

      }

    }

    return this.mDirectory;

  }
这里对FileDirectory(this)进行跟进
public FileDirectory(File dir)

    throws DirectoryException

  {

    if (!dir.isDirectory()) {

      throw new DirectoryException("file must be a directory: " + dir);

    }

    this.mDir = dir;

  }
这里传进来的是一个目录,所以mDir=dir;
回到ExtFile
this.mDirectory = new ZipRODirectory(this);
跟进到Zip
public ZipRODirectory(File zipFile)

    throws DirectoryException

  {

    this(zipFile, "");

  }
这里构造方法转换
  public ZipRODirectory(File zipFile, String path)

    throws DirectoryException

  {

    try

    {

      this.mZipFile = new ZipFile(zipFile);

    }

    catch (IOException e)

    {

      throw new DirectoryException(e);

    }

    this.mPath = path;

  }
这里相当于是拿到了一个压缩包
返回到hasResources
containsFile(“resources.arsc”);这里
然后对这个进行检测。
简单的说这个hasResources就是对resources.arsc进行检测。
4.hasManifest()
名字类似,这里不需要分析都知道是对Manifest.xml进行判断是否进行解析
3.Main第三部分-核心部分
this.mAndrolib.decodeResourcesFull(this.mApkFile, outDir, getResTable());
这个就是Resource反编译的核心语句
首先来看看decodeResourcesFull方法
public void decodeResourcesFull(ExtFile apkFile, File outDir, ResTable resTable)

    throws AndrolibException

  {

    this.mAndRes.decode(resTable, apkFile, outDir);

  }
这里调用了mAndRes的decode方法,我们继续跟进。
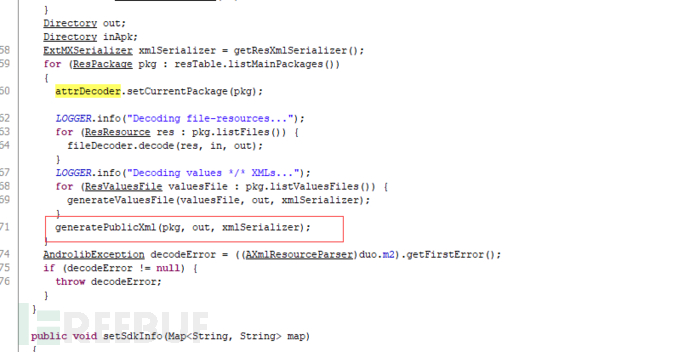
这里先列出来几句
    Duo<ResFileDecoder, AXmlResourceParser> duo = getResFileDecoder();

    ResFileDecoder fileDecoder = (ResFileDecoder)duo.m1;

    ResAttrDecoder attrDecoder = ((AXmlResourceParser)duo.m2).getAttrDecoder();

    attrDecoder.setCurrentPackage((ResPackage)resTable.listMainPackages().iterator().next());
这里有一个Duo的类我们跟进去看看
 public Duo(T1 t1, T2 t2)

  {

    this.m1 = t1;

    this.m2 = t2;

  }
这里指Duo存放了两个类
这里存放的是ResFileDecoder和AXmlResourceParser
我们先跟进ResFileDecoder。
看到decode,估计就是对res进行解析的,这个之后会再次调用
然后跟进AXmlResourceParser
应该是对xml格式文件进行解析的类。
接着往下看。
ResFileDecoder fileDecoder = (ResFileDecoder)duo.m1;
把duo.m1给fukeDecoder
ResAttrDecoder attrDecoder = ((AXmlResourceParser)duo.m2).getAttrDecoder();
这里是把m2也就时拿到AXmlResourceParser.getAttrDecoder()
我们跟进这个方法
public ResAttrDecoder getAttrDecoder()

  {

    return this.mAttrDecoder;

  }
return了一个ResAttrDecoder对象
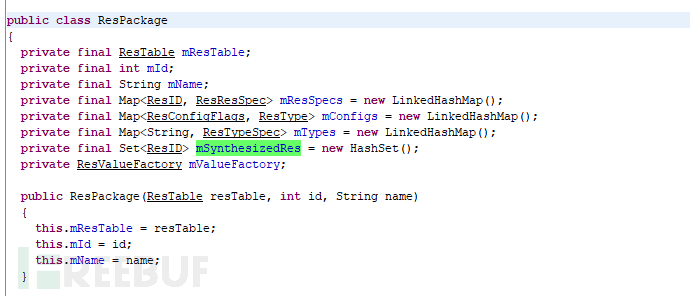
attrDecoder.setCurrentPackage((ResPackage)resTable.listMainPackages().iterator().next());
接着attrDecoder调用了setCurrentPackage方法,拿到了一个ResPackage对象
generatePublicXml(pkg, out, xmlSerializer);
最后解析的结果就是
总结
SharkApktool在进行编码的时候,对所有程序可能暂停的地方进行了规避,降低了通过软件来对apk进行保护的方式。
还有dex和Androidmanifist的解析模式是相同的。并且解析dex是调用了baksmali进行解析的,有兴趣也可以对baksmali进行解析。
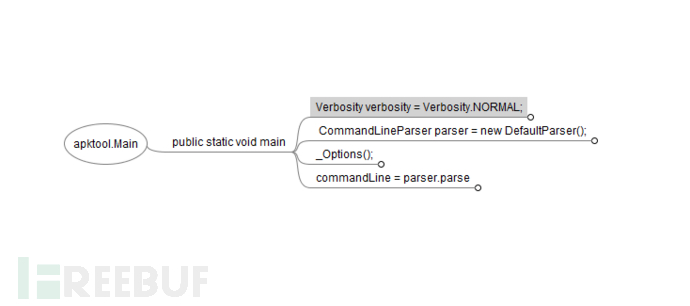
4. 简介版
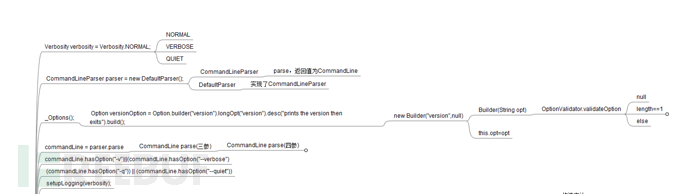
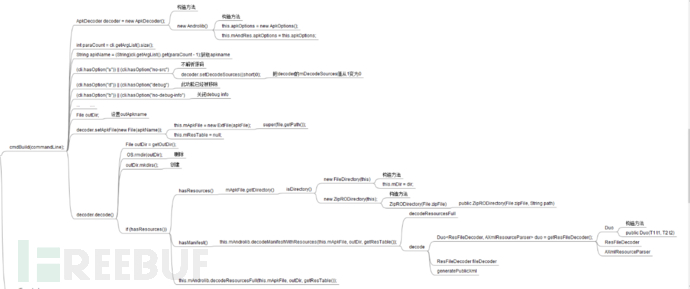
代码可能看起来脑壳痛,所以这里用freeMind做了一个简洁版,当然不是完整版,有兴趣可以扩充
总览

细分

有问题大家可以留言哦~也欢迎大家到春秋论坛中来玩耍呢!>>>点击跳转
SharkApktool 源码攻略的更多相关文章
- 【Spring】Spring IOC原理及源码解析之scope=request、session
一.容器 1. 容器 抛出一个议点:BeanFactory是IOC容器,而ApplicationContex则是Spring容器. 什么是容器?Collection和Container这两个单词都有存 ...
- React useEffect的源码解读
前言 对源码的解读有利于搞清楚Hooks到底做了什么,如果您觉得useEffect很"魔法",这篇文章也许对您有些帮助. 本篇博客篇幅有限,只看useEffect,力求简单明了,带 ...
- Netty 源码解析: Netty 的 ChannelPipeline
ChannelPipeline和Inbound.Outbound 我想很多读者应该或多或少都有 Netty 中 pipeline 的概念.前面我们说了,使用 Netty 的时候,我们通 ...
- Netty 源码解析(四): Netty 的 ChannelPipeline
今天是猿灯塔“365篇原创计划”第四篇. 接下来的时间灯塔君持续更新Netty系列一共九篇 Netty 源码解析(一): 开始 Netty 源码解析(二): Netty 的 Channel Netty ...
- 建议收藏!利用Spring解决循环依赖,深入源码给你讲明白!
前置知识 只有单例模式下的bean会通过三级缓存提前暴露来解决循环依赖的问题.而非单例的bean每次获取都会重新创建,并不会放入三级缓存,所以多实例的bean循环依赖问题不能解决. 首先需要明白处于各 ...
- 支持JDK19虚拟线程的web框架之四:看源码,了解quarkus如何支持虚拟线程
欢迎访问我的GitHub 这里分类和汇总了欣宸的全部原创(含配套源码):https://github.com/zq2599/blog_demos 前文链接 支持JDK19虚拟线程的web框架,之一:体 ...
- 源码讲解 node+mongodb 建站攻略(一期)第二节
源码讲解 node+mongodb 建站攻略(一期)第二节 上一节,我们完成了模拟数据,这次我们来玩儿真正的数据库,mongodb. 代码http://www.imlwj.com/download/n ...
- Davinci DM6446开发攻略——LINUX GPIO驱动源码移植
一. DM6446 GPIO的介绍 说到LINUX 驱动移植,没有移植过的朋友,或刚刚进入LINUX领域的朋友,最好去看看<LINUX 设备驱动程序>第三 ...
- Greenplum源码编译安装(单机及集群模式)完全攻略
公司有个项目需要安装greenplum数据库,让我这个gp小白很是受伤,在网上各种搜,结果找到的都是TMD坑货帖子,但是经过4日苦战,总算是把greenplum的安装弄了个明白,单机及集群模式都部署成 ...
随机推荐
- fastjson中对象转化为字符串时过滤某字段
fastjson中对象转化为字符串时过滤某字段,有两种方法: 一.在该字符定义上方添加"@JSONField(serialize=false)"注解: 二.调用含有Property ...
- LeetCode OJ 117. Populating Next Right Pointers in Each Node II
题目 Given a binary tree struct TreeLinkNode { TreeLinkNode *left; TreeLinkNode *right; TreeLinkNode * ...
- 深入理解Java中的IO
深入理解Java中的IO 引言: 对程序语言的设计者来说,创建一个好的输入/输出(I/O)系统是一项艰难的任务 < Thinking in Java > 本文的目录视图如下: ...
- Python学习—基础篇之文件操作
文件操作 文件操作也是编程中需要熟练掌握的技能,尤其是在后台接口编写和数据分析过程中,对各种类型的文件进行操作,获取文件信息或者对信息进行存储是十分重要的.本篇博客中将主要对常见的文本格式文件和Exc ...
- HDU 5828 Rikka with Sequence(线段树区间加开根求和)
Problem DescriptionAs we know, Rikka is poor at math. Yuta is worrying about this situation, so he g ...
- matlab--二维画图及三维画图的相关命令
clc;clear all;close all; % plot3是最简单的三维图% mesh是网格图% surf是曲面图%plot3-------------------------t1=0:pi/3 ...
- java得到当前日期的前一天或后一天
public String getNextDay(String startdate) throws ParseException{ Date date = (new SimpleDateFormat( ...
- eclipse 如何安装freemaker ftl 插件
借鉴原链接 https://blog.csdn.net/lsygood/article/details/80565933 在线安装的方法是:Help –> Install New Softw ...
- Alpha 冲刺 (7/10)
队名 火箭少男100 组长博客 林燊大哥 作业博客 Alpha 冲鸭鸭鸭鸭鸭鸭鸭! 成员冲刺阶段情况 林燊(组长) 过去两天完成了哪些任务 协调各成员之间的工作 学习MSI.CUDA 试运行软件并调试 ...
- Scrum冲刺阶段2
成员今日完成的任务 人员 任务 何承华 后端设计 陈宇 后端设计 丁培辉 后端设计 温志铭 主页面的设计 杨宇潇 主页面的设计 张主强 服务器构建 成员遇到的问题 人员 问题 何承华 暂无 陈宇 暂无 ...