使用harborv1.8.0-rc1 搭建docker私有镜像仓库
概述
搭建一个私有仓库
harbor介绍
harbor是一个开源的docker容器仓库,由下面几个组件组成
+ proxy:用来接收docker客户端和浏览器端的请求,并且把请求转发给后端的服务
+ registry:就是仓库,用来存储镜像的,
+ 核心服务:提供web ui,数据库,token认证,webhook等功能
+ 日志服务
- database:用来存储核心服务的一些数据
vmware出品,支持下面几种部署方式
- 在线安装
- 离线安装
- ova安装,这个直接在vcenter上导入就可以了
官方最小配置
- 2个cpu
- 4g内存
- 40g硬盘,因为是存储镜像的所以推荐硬盘大点
官方安装帮助
https://github.com/goharbor/harbor/blob/master/docs/installation_guide.md
Software
| Software | Version | Description |
|---|---|---|
| Python | version 2.7 or higher | Note that you may have to install Python on Linux distributions (Gentoo, Arch) that do not come with a Python interpreter installed by default |
| Docker engine | version 17.03.0-ce+ or higher | For installation instructions, please refer to: https://docs.docker.com/engine/installation/ |
| Docker Compose | version 1.18.0 or higher | For installation instructions, please refer to: https://docs.docker.com/compose/install/ |
| Openssl | latest is preferred | Generate certificate and keys for Harbor |
Network ports
| Port | Protocol | Description |
|---|---|---|
| 443 | HTTPS | Harbor portal and core API will accept requests on this port for https protocol |
| 4443 | HTTPS | Connections to the Docker Content Trust service for Harbor, only needed when Notary is enabled |
| 80 | HTTP | Harbor portal and core API will accept requests on this port for http protocol |
安装docker:
https://docs.docker.com/install/linux/docker-ce/centos/
可选安装docker方式1: curl -fsSL get.docker.com -o get-docker.sh
- 移除旧版
sudo yum remove docker \

                  docker-client \

                  docker-client-latest \

                  docker-common \

                  docker-latest \

                  docker-latest-logrotate \

                  docker-logrotate \

                  docker-engine
安装依赖包

```

sudo yum install -y yum-utils \

device-mapper-persistent-data \

lvm2

```

添加源

```

sudo yum-config-manager \

--add-repo \

https://download.docker.com/linux/centos/docker-ce.repo

```
安装和启动
sudo yum-config-manager --enable docker-ce-nightly
sudo yum install docker-ce docker-ce-cli containerd.io
sudo systemctl start docker
docker-compose安装:
- 安装和测试docker-compose
官网文档 https://docs.docker.com/compose/install/
下载docker-compose可执行文件
sudo curl -L "https://github.com/docker/compose/releases/download/1.24.0/docker-compose-$(uname -s)-$(uname -m)" -o /usr/local/bin/docker-compose
设可执行权限
sudo chmod +x /usr/local/bin/docker-compose
软连接到/usr/bin
sudo ln -s /usr/local/bin/docker-compose /usr/bin/docker-compose
查看安装是否成功
docker-compose --version
安装步骤:
Download the installer:
下载离线安装包:
https://github.com/goharbor/harbor/releasesOnline installer:
$ tar xvf harbor-online-installer-<version>.tgzOffline installer:
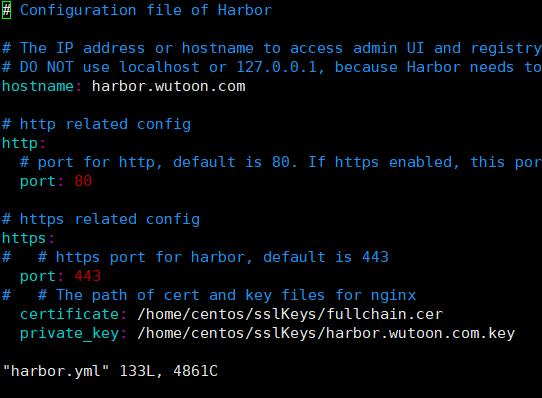
$ tar xvf harbor-offline-installer-<version>.tgzConfigure harbor.cfg/harbor.yml(新版已经改成harbor.yml);
- 修改配置,协议,证书,管理员密码
hostname = reg.lvusyy.com
ui_url_protocol = https
ssl_cert = ./ssl/reg.lvusyy.com.crt
ssl_cert_key = ./ssl/reg.lvusyy.com.key
harbor_admin_password = harbor12345 - 生成配置文件
证书可以从 letsencrypt 生成免费的证书..(默认浏览器和工具都不会提示不安全警告的.)
详情参考:https://github.com/Neilpang/acme.sh/wiki/说明
关于配置:
生成https证书(手动自签发的证书,没有根证书信任)
参考 https://github.com/goharbor/harbor/blob/master/docs/configure_https.md#生成key
`openssl genrsa -out ca.key 4096`
#根据key生成ca.crt
  openssl req -x509 -new -nodes -sha512 -days 3650 \

  -subj "/C=CN/ST=Hangzhou/L=Hangzhou/O=example/OU=Personal/CN=lvusyy.com" \

  -key ca.key \

  -out ca.crt
Create your own Private Key:
openssl genrsa -out reg.lvusyy.com.key 4096Generate a Certificate Signing Request:
openssl req -sha512 -new
-subj "/C=CN/ST=Hangzhou/L=Hangzhou/O=example/OU=Personal/CN=reg.lvusyy.com"
-key reg.lvusyy.com.key
-out reg.lvusyy.com.csrcat > v3.ext <<-EOF
authorityKeyIdentifier=keyid,issuer
basicConstraints=CA:FALSE
keyUsage = digitalSignature, nonRepudiation, keyEncipherment, dataEncipherment
extendedKeyUsage = serverAuth
subjectAltName = @alt_names [alt_names]
DNS.1=reg.lvusyy.com
DNS.2=lvusyy
DNS.3=harbor
EOF
openssl x509 -req -sha512 -days 3650
-extfile v3.ext
-CA ca.crt -CAkey ca.key -CAcreateserial
-in reg.lvusyy.com.csr
-out reg.lvusyy.com.crt
导入docker镜像
sudo docker load < harbor.v1.8.0.tar.gz生成配置
./prepare
- 修改配置,协议,证书,管理员密码
Run install.sh to install and start Harbor;
开始安装
- #注意网络问题哦
./install
到此 harbor 已经安装完成了。
- #注意网络问题哦
192.168.1.xx reg.lvusyy.com
你可以导入你的根证书让浏览器或wget 不报ssl警告
mkdir /usr/share/ca-certificates/harbor/
cp /media/makeit/Document/harborCa/ca.crt /usr/share/ca-certificates/harbor/
sudo update-ca-certificates
这样就ok了。
wget -q -O - https://reg.lvusyy.com
如果 curl 访问呢?
* Rebuilt URL to: https://reg.lvusyy.com/

*   Trying 10.1.1.53...

* TCP_NODELAY set

* Connected to reg.lvusyy.com (10.1.1.53) port 443 (#0)

* ALPN, offering http/1.1

* Cipher selection: ALL:!EXPORT:!EXPORT40:!EXPORT56:!aNULL:!LOW:!RC4:@STRENGTH

* successfully set certificate verify locations:

*   CAfile: /home/makeit/anaconda3/ssl/cacert.pem

  CApath: none
它使用 /home/makeit/anaconda3/ssl/cacert.pem ,我们把我们ca重定向进去就可以了呗。
转换格式 .cer 到 .pem
openssl x509 -inform der -in lvusyy.cer -out lvusyy.pem
追加到信任列表
cat lvusyy.pem >> /home/makeit/anaconda3/ssl/cacert.pem
妥了!
chrome呢,firefox,oprea呢
自己设置窗口导入即可。
enjoy!
使用harborv1.8.0-rc1 搭建docker私有镜像仓库的更多相关文章
- 基于 registry 搭建 Docker 私有镜像仓库
今天主要介绍使用 registry 来搭建 Docker私有镜像仓库,方便在公司内部项目中使用,registry 也是 Docker 官方提供的一个镜像,操作也很简单. dockerhub: http ...
- 搭建docker 私有镜像仓库
前期准备 服务器:centos 7.3 docker-ce: 18.06.1-ce docker-compose: 1.22.0 docker 安装 首先,更新系统 yum update yum up ...
- 使用Harbor搭建Docker私有镜像仓库
Harbor介绍:https://goharbor.io/ 前置条件 需要安装了docker和docker-compose 下载Harbor 在harbor下载页(https://github.com ...
- 搭建Harbor私有镜像仓库--v1.5.1
搭建Harbor私有镜像仓库--v1.5.1 1.介绍 Docker容器应用的开发和运行离不开可靠的镜像管理,虽然Docker官方也提供了公共的镜像仓库,但是从安全和效率等方面考虑,部署我们私有环境 ...
- 微服务架构 - 搭建docker本地镜像仓库并提供权限校验及UI界面
搭建docker本地镜像仓库并提供权限校验及UI界面 docker本地镜像仓库的作用跟maven私服差不多,特别是公司级或者是小组级开发好的docker仓库可以上传到本地镜像仓库中,需要用时,直接从本 ...
- Docker 私有镜像仓库的搭建及认证
DockerHub 为我们提供了很多官方镜像和个人上传的镜像,我们可以下载机构或个人提供的镜像,也可以上传我们自己的本地镜像,但缺点是: 由于网络的原因,从 DockerHub 下载和上传镜像速度可能 ...
- 容器技术之Docker私有镜像仓库docker-distribution
在前边的博客中我们说到docker的架构由docker客户端.服务端以及仓库组成:docker仓库就是用来存放镜像的地方:其实docker registry我们理解为存放docker镜像仓库的仓库比较 ...
- 容器技术之Docker私有镜像仓库harbor
前文我们聊到了docker的私有镜像仓库docker-distribution的搭建和简单的使用,回顾请参考https://www.cnblogs.com/qiuhom-1874/p/13058338 ...
- 使用Nexus3构建Docker私有镜像仓库
一.安装Nexus3 Nexus3是Sonatype提供的仓库管理平台,Nuexus Repository OSS3能够支持Maven.npm.Docker.YUM.Helm等格式数据的存储和发布:并 ...
随机推荐
- MySQL 解决source 命令导入数据库 乱码
在我把库.表.sql脚本的编码格式都设置为UTF-8后,任然有乱码,任然有报错: 于是按以下方式重新登录后,解决: mysql -u root -p --default-character-set=u ...
- Linux 截取日志命令
1.截取时间段 截取 2019-06-25 10:10 到 2019-06-25 10:20 之间的日志记录,apollo-service.log 为你要截取的文件名称, new2.log 截取之后保 ...
- MySQL高版本默认密码查找
解决方式如下: 1:找到mysql的安装目录到跟目录下找到Data文件夹 2:打开Data/文件夹找到一个以.err结尾的文件用记事本打开,里面记录了你安装Mysql的一些日志,其中就记录了你的初始密 ...
- Angular 惰性路由
根路由上的一个 loadChildren 属性,设置为一个字符串.这样就是惰性路由了. angular6 这样写:loadChildren: './background-check/backgroun ...
- HALC:用于长读取错误纠正的高吞吐量算法
背景: 第三代PacBio SMRT长读取可以有效地解决第二代测序技术的读长问题,但包含大约15%的测序错误.已经设计了几种纠错算法以有效地将错误率降低到1%,但是它们丢弃了大量未校正的碱基,因此导致 ...
- pytorch中使用多显卡训练以及训练时报错:expect more than 1 value per channel when training, got input size..
pytorch在训练中使用多卡: conf.device = torch.device('cuda:0' if torch.cuda.is_available() else "cpu&quo ...
- opengl 笔记
1. 本函数可以禁用多边形正面或背面上的光照.阴影和颜色计算及操作,消除不必要的渲染计算是因为无论对象如何进行旋转或变换,都不会看到多边形的背面.用GL_CULL_FACE参数调用glEnable和g ...
- restTemplate源码解析(一)构造restTemplate的Bean实例
所有文章 https://www.cnblogs.com/lay2017/p/11740855.html 正文 构造一个restTemplate的Bean实例很容易,只需这样配置 @Bean publ ...
- 小白_开始学Scrapy__原理
整体架构 引擎(Scrapy Engine),用来处理整个系统的数据流处理,触发事务. 调度器(Scheduler),用来接受引擎发过来的请求,压入队列中,并在引擎再次请求的时候返回. 下载器(Dow ...
- ORACLE归档日志满了之后,如何删除归档日志
当ORACLE归档日志满后如何正确删除归档日志 版权声明:本文为博主原创文章,未经博主允许不得转载. 当ORACLE 归档日志满了后,将无法正常登入ORACLE,需要删除一部分归档日志才能正常登入OR ...