第五篇--VS2017如何生成Dll文件
参考资料:
https://blog.csdn.net/qq_34097715/article/details/79540933
https://www.cnblogs.com/RascallySnake/p/3182807.html
生成Dll三步走
第一步:先建一个Dll项目
New --> Project --> Dynamic-Link Library(DLL) --> 取名,选路径 --> OK
第二步:编写头文件,例子是一个四则运算
selfTrainingDll.h


#pragma once

#ifdef DLL_TRAINING_API

#else

#define DLL_TRAINING_API _declspec(dllimport) //当编译时,头文件不参加编译,所以.cpp文件中先定义,后头文件被包含进来,因此外部使用时,为dllexport,而在内部编译时,则为dllimport

#endif

class DLL_TRAINING_API arithmetic_operation              //需要被外界调用的类(父类)

{

public:

    double Add(double a, double b);

    double Sub(double a, double b);

    double Multi(double a, double b);

    double Div(double a, double b);

};

int DLL_TRAINING_API export333();
第三步:编写CPP文件,实现方法
selfTrainingDll.cpp
// selfTrainingDll.cpp : Defines the exported functions for the DLL application.

//

#include "stdafx.h"

#define DLL_TRAINING_API _declspec(dllexport)

#include <iostream>

#include "selfTrainingDll.h"

using namespace std;

double DLL_TRAINING_API arithmetic_operation::Add(double a, double b) {

    return a+b;

}

double DLL_TRAINING_API arithmetic_operation::Sub(double a, double b) {

    return a - b;

}

double DLL_TRAINING_API arithmetic_operation::Multi(double a, double b) {

    return a * b;

}

double DLL_TRAINING_API arithmetic_operation::Div(double a, double b) {

    return a / b;

}

int DLL_TRAINING_API export333() {

    return 333;

}
第四步:生成Dll
Build --> Build Solution
至此,文件生成完毕
静态方法调用Dll文件
第一步:创建一个控制台程序
省略
第二步:编译运行,产生Debug文件夹
第三步:将之前Dll项目生成的selfTrainingDll.h和selfTrainingDll.lib放入项目文件夹下,将selfTrainingDll.dll放入Debug文件夹下
第四步:在项目中添加selfTrainingDll.h头文件
第五步:在Cpp中调用Dll
UseSelfDll.cpp
// UseSelfDll.cpp : This file contains the 'main' function. Program execution begins and ends there.

//

#include "pch.h"

#include <iostream>

using namespace std;

#include "selfTrainingDll.h"

#pragma comment(lib,"selfTrainingDll.lib")

int main()

{

    arithmetic_operation ao;

    cout << ao.Add(1,2) << endl;

    cout << ao.Sub(2,1) << endl;

    cout << ao.Multi(2,1) << endl;

    cout << ao.Div(6,4) << endl;

    cout << export333() << endl;

    cout << "Hello World!\n";

}
至此,调用成功
动态方法调用Dll文件
UseSelfDll.cpp
// UseSelfDll.cpp : This file contains the 'main' function. Program execution begins and ends there.

//

#include "pch.h"

#include <iostream>

using namespace std;

//#include "selfTrainingDll.h"

//#pragma comment(lib,"selfTrainingDll.lib")

#include <windows.h>

int main()

{

    typedef int(*_print)();

    cout << "1" << endl;

    HINSTANCE hDll = LoadLibrary(L"selfTrainingDll.dll");

    cout << "2" << endl;

    _print pAdd = (_print)GetProcAddress(hDll, (LPCSTR)MAKEINTRESOURCE(7));

    cout << "3" << endl;

    int a = pAdd();

    cout << a << endl;

    //arithmetic_operation ao;

    //cout << ao.Add(1,2) << endl;

    //cout << ao.Sub(2,1) << endl;

    //cout << ao.Multi(2,1) << endl;

    //cout << ao.Div(6,4) << endl;

    //cout << export333() << endl;

    cout << "Hello World!\n";

    FreeLibrary(hDll);

}
由于C++导出Dll时会出现名字更改的问题,因此这里用序列号代表函数,至于函数的序列号可以用如下方法查看:
用VS打开cmd窗口(Tools --> Visual Studio Command Prompt),运行dumpbin -exports xxx.dll 后面最好写DLL的绝对路径,否则可能会报错LNK1181: cannot open input file 'XXX.dll'。
可在EXE所在的目录下使用dumpbin -imports xxx.EXE来查看某EXE文件使用过哪些dll库.
64位EXE尽量去调用64位DLL,同理32位尽量调用32位。
如果想要直接使用函数名,那么在生成DLL时要加extern "C"
#pragma once

#ifdef __cplusplus               // if used by C++ code

extern "C" {                     // we need to export the C interface

#endif

#ifdef DLL_TRAINING_API

#else

#define DLL_TRAINING_API _declspec(dllimport) //当编译时,头文件不参加编译,所以.cpp文件中先定义,后头文件被包含进来,因此外部使用时,为dllexport,而在内部编译时,则为dllimport

#endif

    class DLL_TRAINING_API arithmetic_operation              //需要被外界调用的类(父类)

    {

    public:

        double Add(double a, double b);

        double Sub(double a, double b);

        double Multi(double a, double b);

        double Div(double a, double b);

    };

    int DLL_TRAINING_API export333();

#ifdef __cplusplus

}

#endif
// UseSelfDll.cpp : This file contains the 'main' function. Program execution begins and ends there.

//

#include "pch.h"

#include <iostream>

using namespace std;

//#include "selfTrainingDll.h"

//#pragma comment(lib,"selfTrainingDll.lib")

#include <windows.h>

int main()

{

    typedef int (*_print)();

    HINSTANCE hDll = LoadLibrary(L"selfTrainingDll.dll");

    _print pAdd = (_print)GetProcAddress(hDll, "export333");

    int a = pAdd();

    cout << a << endl;

    //arithmetic_operation ao;

    //cout << ao.Add(1,2) << endl;

    //cout << ao.Sub(2,1) << endl;

    //cout << ao.Multi(2,1) << endl;

    //cout << ao.Div(6,4) << endl;

    //cout << export333() << endl;

    cout << "Hello World!\n";

    FreeLibrary(hDll);

}
但是它仍然有局限性,只针对函数,不针对类。
另外对于带参数的函数,怎么动态调用呢。
HINSTANCE hDLL;

typedef DWORD(*GetPCICFG)(BYTE bBus, BYTE bDev, BYTE bFun, BYTE bIdx, PDWORD pdwPortVal, BYTE bSize);

GetPCICFG getPCICFG;

hDLL = LoadLibrary(L"PCI.dll");

if (hDLL == NULL)

    printf("Error!!!\n");

getPCICFG = (GetPCICFG)GetProcAddress(hDLL, "PCI_GetPCICFG");

FreeLibrary(hDLL);
另外,可以将dll和exe工具放在一起调试,会比较方便,当然,exe里面的用动态调试比较好。静态的可以看前面的链接。
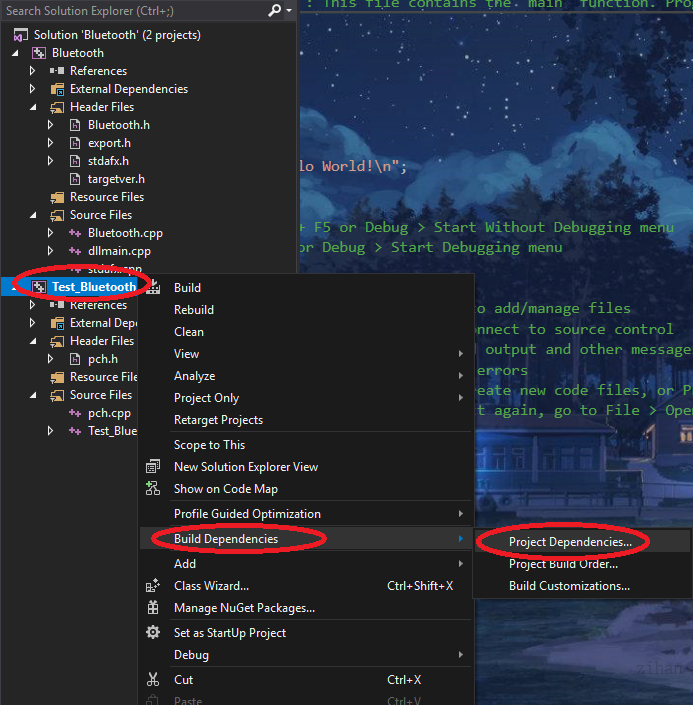
首先,我们写了一个DLL,然后在Solution里面点击添加-->新建项目,这个就是我们新建的exe程序。新建了exe程序后,可以看到Solution里面有了两个项目,这时我们右键exe的项目将其设为启动项目,这时每次调试时都会执行exe的项目,如果要让exe随着DLL的修改而修改,可以同步反应,那么就右键exe项目,为其添加依赖项,选择DLL为他的依赖就好了。这样exe和DLL就可以同步调试了。
静态调用DLL--同步调试
参考链接:https://blog.csdn.net/cynophile/article/details/79749524
一、新建一个DLL项目,编译。
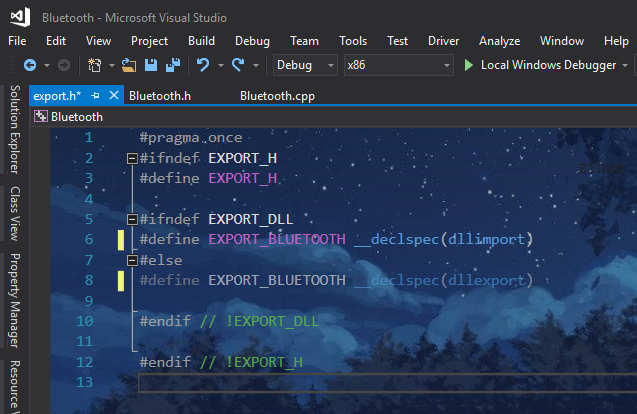
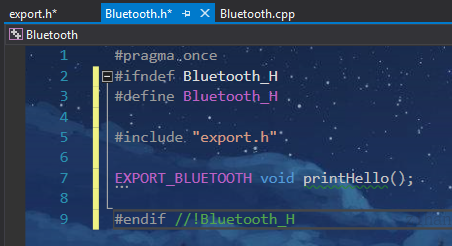
二、添加主cpp对应的头文件,然后添加一个“export.h”头文件。
三、修改项目配置

四、写主cpp的.h文件
五、写主cpp里面的函数,然后再次编译

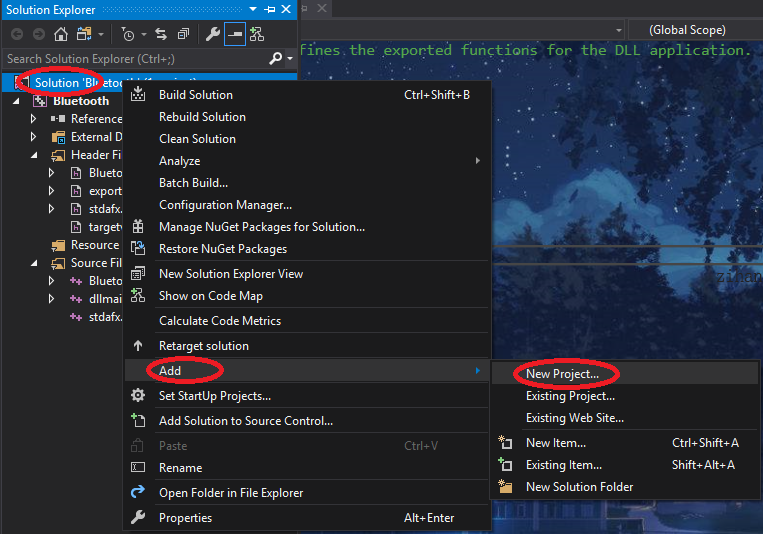
六、右键单击左侧列表中“解决方案”,然后在弹出菜单中选择“添加 > 新建项目”,向解决方案中添加一个新的控制台项目,用于测试Bluetooth中导出的printHello()函数是否可以正常访问;

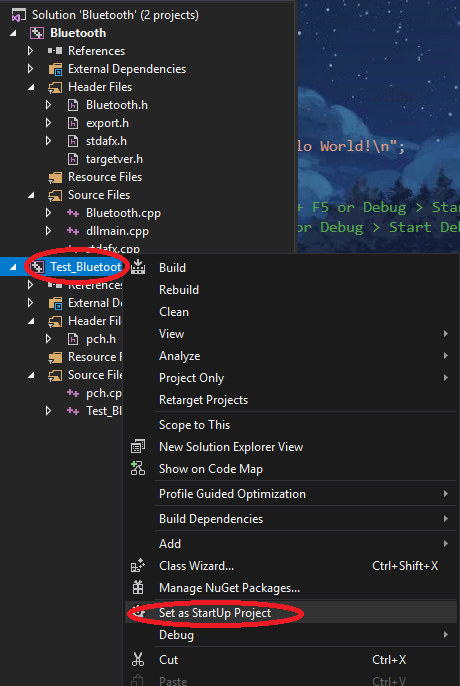
七、将控制台项目设为启动项目
八、将exe与dll链接起来,需要对项目进行配置

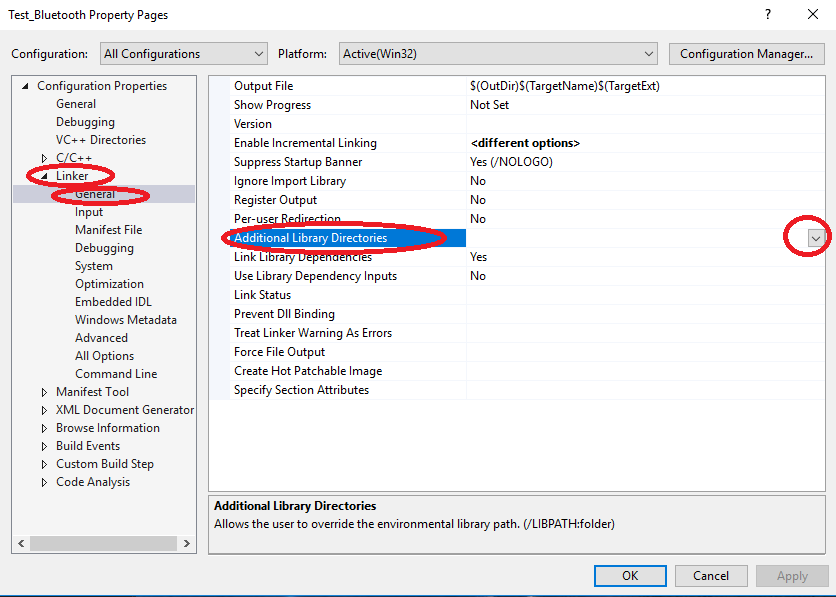
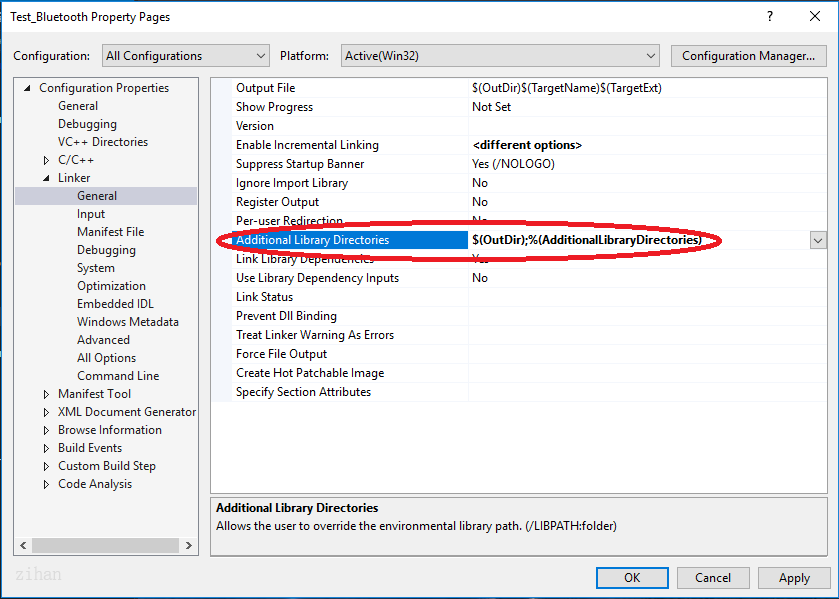
九、在控制台(exe)属性页窗口中,将配置设置为“所有配置”,然后在左侧“配置属性”列表中,选择“链接器 > 常规”,接着在右侧属性列表中选择“附加库目录”属性右方的编辑框,在弹出的下拉列表中选择“编辑”;$(OutDir)


十、配置完成,在exe中调用dll中的函数。

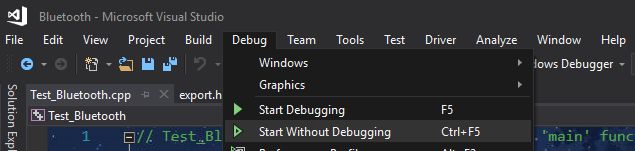
十一、运行函数Debug\Start Without Debugging
十二、结果
大功告成。
另外,如果想要dll以c的方式导出,可以修改主cpp的.h文件
#pragma once

#ifdef __cplusplus

extern "C" {

#endif

#ifndef Bluetooth_H

#define Bluetooth_H

#include "export.h"

EXPORT_BLUETOOTH void printHello();

#endif //!Bluetooth_H

#ifdef __cplusplus

}

#endif
动态调用DLL--同步调试
参考链接:http://www.mamicode.com/info-detail-2949884.html
依次执行静态调用DLL--同步测试的步骤:一、二、三、四、五、六、七、八
然后在Test_Bluetooth.cpp中调用printHello函数
// Test_Bluetooth.cpp : This file contains the 'main' function. Program execution begins and ends there.

//

#include "pch.h"

#include <iostream>

#include <Windows.h>

using namespace std;

class WinDll

{

public:

    WinDll(const char* dll) : mLib(::LoadLibraryA(dll)) {}

    WinDll(const wchar_t* dll) : mLib(::LoadLibrary(dll)) {}

    ~WinDll() { FreeLibrary(mLib); }

    WinDll(const WinDll&) = delete;

    WinDll& operator=(const WinDll&) = delete;

    operator bool() { return !!mLib; }

    template <typename Ret, typename... Args>

    Ret Invoke(const char* name, const Args& ...args)

    {

        auto proc = GetProcAddress(mLib, name);

        typedef Ret(__stdcall* Func)(Args...);

        return (proc) ? reinterpret_cast<Func>(proc)(args...) : (Ret());

    }

private:

    HMODULE mLib;

};

int main()

{

    WinDll bluetooth("Bluetooth.dll路径");

    if (bluetooth) {

        printf("start\n");

        bluetooth.Invoke<void>("printHello");

        bluetooth.~WinDll();

    }

}
如此可行。
动态调用封装模板
参考链接:https://www.cnblogs.com/wuyaSama/p/11510889.html
动态调用dll,用到一个函数就要写那一串,写得很烦,就想有没有简单的方法封装一下,以便调用,之前找到一个封装类WinDll,用一些简单的还不错,用得还蛮开心的,不过当有函数的参数是char*的话就会出现问题,因此又找了一种其他的封装方式。
template<typename _T> class Api;

template<typename _Res, typename... _ArgTypes>

class Api<_Res(_ArgTypes...)> {

public:

    Api(const char* dllName, const char* funcName) {

        _M_module = LoadLibraryA(dllName);

        _M_func = reinterpret_cast<_Func>(GetProcAddress(_M_module, funcName));

    }

    ~Api() {

        if (_M_module) FreeLibrary(_M_module);

    }

    _Res operator()(_ArgTypes... __args) const {

        return _M_func(__args...);

    }

private:

    typedef _Res(*_Func)(_ArgTypes...);

    _Func _M_func;

    HMODULE _M_module;

};

int main(int argc, char* argv[]){

    Api<int(char*, char*)> write_head("F:\\aaa.dll", "print_hello");

    int result = write_head("123", "456");

    write_head.~Api();

}
第五篇--VS2017如何生成Dll文件的更多相关文章
- C# 怎么生成DLL文件(转)
有两种方法: 但是一般这个使用 打开VS2008,依次点击:菜单->文件->新建项目->项目类型visual C#(这里假设为该项目所取的名字是DllBuild)-& ...
- 如何利用.snk文件生成DLL文件中的Publickeytoken
1.在该路径下C:\Program Files (x86)\Microsoft SDKs\Windows\v7.0A\bin查找是否有sn.exe. 没有的话,从网上下载,注意需要的版本. 2.打开c ...
- (Unity)Unity自定义Debug日志文件,利用VS生成Dll文件并使用Dotfuscated进展混淆,避免被反编译
Unity自定义Debug日志文件,利用VS生成Dll文件并使用Dotfuscated进行混淆,避免被反编译. 1.打开VS,博主所用版本是Visual Studio 2013. 2.新建一个VC项目 ...
- JNI中使用cl命令生成DLL文件
问题描述: 在使用JNI调用DLL时,首先需要生成DLL文件 问题解决: (1)现在使用VS2008的cl.exe程序,生成DLL文件 (1.1)cl.exe环境搭建 注: cl. ...
- 生成dll文件的示例
看了好多网上写的关于dll文件生成和实用的资料发现多尔不全,都是抄来抄去,有的干脆就是搬用msdn上的原文,实在没有创意和可看的东西.于是本着学和实用的目的自己实践的东西分享给大家. 大前提:使用VS ...
- vs2012中程序集生成无法自动在网站Bin目录下生成Dll文件?(已解决!)
最近,突然发现生成程序集后,网站bin目录下dll没有更新,也没有自动生成dll文件,通过近半个小时的摸索和实验,找到了解决方法: 1.右键网站,不是项目,选择[属性页],在左侧[引用]中如果没有,就 ...
- 如何寫一個自定義控件/vs2010生成Dll文件并引用dll(C#)
1.最簡單的例子 首先你先新建->項目->類庫.然後右鍵項目.添加一個用戶控件.設置其用戶控件繼承button. egg: namespace ClassLibrary1{ publ ...
- c# 类如何生成dll文件及引用
1.打开“工具”菜单下的“外部工具”子菜单: 2.点击“添加按钮,增加一个菜单,菜单内容填写如下: 注意参数那里为:/k "C:\vs2010\VC\vcvarsall.bat" ...
- vs工程生成dll文件及其调用方法
转载:https://blog.csdn.net/weixin_44536482/article/details/91519413 vs工程生成dll文件及其调用方法 ...
随机推荐
- Java中最大的数据结构:LinkedHashMap了解一下?
前言 Map 家族数量众多,其中 HashMap 和 ConcurrentHashMap 用的最多,而 LinkedHashMap 似乎则是不怎么用的,但是他却有着顺序.两种,一种是添加顺序,一种是访 ...
- .NET Core/.NET5/.NET6 开源项目汇总4:CMS、Blog项目
系列目录 [已更新最新开发文章,点击查看详细] 开源项目是众多组织与个人分享的组件或项目,作者付出的心血我们是无法体会的,所以首先大家要心存感激.尊重.请严格遵守每个项目的开源协议后再使用.尊 ...
- 『无为则无心』Python基础 — 6、Python的注释
目录 1.注释的作用 2.注释的分类 单行注释 多行注释 3.注释的注意事项 4.什么时候需要使用注释 5.总结 提示:完成了前面的准备工作,之后的文章开始介绍Python的基本语法了. Python ...
- 复习Spring第一课--Spring的基本知识及使用
关于Spring: spring容器是Spring的核心,该容器负责管理spring中的java组件, ApplicationContext ctx = new ClassPathXmlApplic ...
- 乘风破浪,遇见下一代操作系统Windows 11,迄今为止最美版本,原生支持安卓应用
遇见下一代操作系统Windows 11 全新Windows体验,让您与热爱的人和事物离得更近. Windows一直是世界创新的舞台.它是全球企业的基石,助力众多蓬勃发展的初创公司变得家喻户晓.网络在W ...
- UV贴图类型
凹凸贴图Bump Map.法线贴图Normal Map.高度贴图Height map.漫反射贴图Diffuse Map.高光贴图Specular Map.AO贴图Ambient Occlusion ...
- Linux中su和sudo的用法
su -#su - oldboy //当执行这个命令的时候表示切换到oldboy用户,并且重新读取用户环境相关配置文件,具体的来说就是执行下用户家目录下.bash_profile和.bashrc文件, ...
- CRM系统对企业管理的作用有多大?
随着市场经济的发展,对任何行业的企业来说,客户都是非常重要的一个部分.CRM系统帮助企业做到以客户为中心,它可以根据客户的具体要求进行跟进和反馈,在很大程度上提高公司的客户服务水平和客户满意度,进而提 ...
- Html:id,name,class之间的有什么区别?
name 一个name可以同时对应多个控件,比如checkbox和radio,主要用于获取提交表单的某表单域信息, 作为可与服务器交互数据的HTML元素的服务器端的标示,比如input.select. ...
- Linux:Linux安装配置JDK1.8
1 在/usr/local 文件夹下新建一个文件夹software ,将JDK放到此文件夹中 并在此文件夹下解压执行命令 tar zxvf jdk-8u144-linux-x64.tar. ...