Google Object detection配置与使用
Google Object detection
前言:
本文记录了使用Google发布的Object detection(July 1st, 2019)接口,完成了对标注目标的检测。参考了很多博文,在此记录配置过程,方便之后的再次调用。
首先贴出完整的代码地址:https://github.com/tensorflow/models
Tensorflow Object Detection API:https://github.com/tensorflow/models/tree/master/research/object_detection
一、环境配置
参考网址:https://github.com/tensorflow/models/blob/master/research/object_detection/g3doc/installation.md
所有的环境都搭建在Anaconda创建的环境下
在windows10和Ubuntu下我都进行了配置,下方的配置会注明操作系统的区别
依赖包安装
在上面参考网址上,已经明确给出了所需要的环境,直接用pip命令下载即可。
Protobuf 安装
下载地址:https://github.com/google/protobuf/releases
win:
win10系统下载了
protoc-3.9.1-win64.zip,解压后将其中的protoc.exe放置C:\Windows位置;通过命令窗口,定位到
models/research/目录下,运行如下指令:- # From /models/research/
- protoc object_detection/protos/*.proto --python_out=.
此处我出现了
No such file or directory的错误采用一个个文件名单独输入的方式即可,例如:
- # C:\Users\Zhucc\Desktop\ObjDec\models\research>protoc
- object_detection/protos/anchor_generator.proto --python_out=.
- # From /models/research/
Linux:
通过pip安装
pip install protobuf,我的版本为3.9.1定位到
models/research/目录下,运行如下指令:- # From /models/research/
- protoc object_detection/protos/*.proto --python_out=.
一行命令搞定,很舒服
- # From /models/research/
Python环境配置:
win
转到添加环境变量
可在系统变量/用户变量选项框中新建环境变量
变量名:PYTHONPATH
变量值:
C:\Users\Zhucc\Desktop\ObjDec\models\researchC:\Users\Zhucc\Desktop\ObjDec\models\research\slim
Linux
转到
./models/research目录下,运行如下命令:- # From /models/research/
- export PYTHONPATH=$PYTHONPATH:`pwd`:`pwd`/slim
- # From /models/research/
COCO API 安装
win:
COCO对于Windows是不支持的,因此需要通过其他的方式安装
跳转至:https://github.com/philferriere/cocoapi 将代码下载好
win+r+cmd运行终端,进入*/cocoapi-master/PythonAPI运行如下命令:
- python setup.py build_ext install
运行完成后,会发现
_mask.c此文件被更新我电脑本身就存在Visual Studio2015,未出现任何错误
然后将
PythonAPI中的pycocotools放到*/models/research目录下即可
参考网址:https://blog.csdn.net/benzhujie1245com/article/details/82686973
Linux:
只需按照官方的要求配置即可:
- git clone https://github.com/cocodataset/cocoapi.git
- cd cocoapi/PythonAPI
- make
- cp -r pycocotools <path_to_tensorflow>/models/research/
验证安装环境:
win:
进入
*/models/research/object_detection下用
Jupiter Notebook打开object_detection_tutorial.ipynb
代码解析:略,后续补充
运行即可,若出现被框出来的狗/人/风筝呀就说明你已经基本成功的在win10环境下配置了运行环境了
注意:其实官方的代码是不会显示图片的,具体原因见如下网址:
https://blog.csdn.net/benzhujie1245com/article/details/82686973
但是!我改了后显示图片的FIgure会出现未响应的情况
因为只是验证环境,将后两句显示的代码改为:
- img = Image.fromarray(image_np, 'RGB')
img.show()虽然有点傻,但是至少可以显示出图片来
Linux:
官方方法:
- python object_detection/builders/model_builder_test.py
- # 结果:
- # ................
- # ----------------------------------------------------------------------
- # Ran 16 tests in 0.285s
- # OK
采用Jupiter Notebook
在服务器上下载
Jupiter Notebook:https://blog.csdn.net/wssywh/article/details/79214569
未试过,待补充
二、准备数据
在配置完成ObjectDetection后,在训练模型前,需要对你要识别的物体数据进行处理。
首先说明文件夹目录:
- ├─Data
│ ├─test
| | ├─images
│ │ ├─labels
│ │ ├─test.csv
| | └─test.tfrecord
│ └─train
| ├─images
│ ├─labels
│ ├─train.csv
| └─train.tfrecord
| ├─xml2csv.py
| ├─csv2tfrecords.py
数据准备
根据你需要识别的物体,对该物体进行数据的收集。
例如:此次我对人脸进行识别,随意的找了80张图片,作为我此次的训练集(60)和验证集(20)。
为了方便起见,图采集的图像进行重命名,以下为参考代码:
- # coding:utf-8
- import os
- import random
- from PIL import Image
-
-
- def deleteImages(file_path, file_list):
- """
- 删除图片
- """
- for fileName in file_list:
- command = "del " + file_path + "\\" + fileName
- os.system(command)
-
-
- def change_image_name(file_path, file_list):
- """
- 修改图片名字
- """
- for index, fileName in enumerate(file_list):
- if fileName.find('.jpg') == -1:
- continue
- print(index, fileName)
- newFileName = str('%03d' % index) + ".jpg"
- print(newFileName)
- im = Image.open(file_path + '/' + fileName)
- im.save(file_path + '/' + newFileName)
-
-
- def main():
- # file_path = '.\\train\\images'
- file_path = '.\\test\\images'
- file_list = os.listdir(file_path)
- random.shuffle(file_list)
-
- change_image_name(file_path, file_list)
- deleteImages(file_path, file_list)
-
-
- if __name__ == '__main__':
- main()
数据标注
在寻找完数据后,需要对数据进行标注,标注采用的工具如下:https://github.com/tzutalin/labelImg,根据你自身的环境,按照工具的说明进行操作即可。
我的环境为Anaconda+Windows,因此操作流程为:
- # 1.Open the Anaconda Prompt and go to the labelImg directory
- # 2.
- conda install pyqt=5 # conda已经带有了,略过
- pyrcc5 -o libs/resources.py resources.qrc
- python labelImg.py
- python labelImg.py [IMAGE_PATH] [PRE-DEFINED CLASS FILE]
labelImage的安装与使用参考链接:https://blog.csdn.net/jesse_mx/article/details/53606897
将标注后生成的xml文件放到相应的train\labels或test\labels文件夹下
不过此过程及其枯燥且耗时
数据转换
数据转换的步骤为:xml->csv->tfrecords
为什么不直接从xml转换为tfrecords文件:-)
xml->csv代码:
- import glob
- import pandas as pd
- import xml.etree.ElementTree as ET
-
- # 需要修改地方:选择训练集train还是测试集test
- datasets = 'train'
- csv_path = '.\\' + datasets + '\\'
- xml_path = '.\\' + datasets + '\\labels\\'
-
-
- def xml_to_csv(path):
- """将xml转换成csv格式的数据"""
- xml_list = []
- for xml_file in glob.glob(path + '*.xml'):
- tree = ET.parse(xml_file)
- root = tree.getroot()
- for member in root.findall('object'):
- value = (root.find('filename').text,
- int(root.find('size')[0].text),
- int(root.find('size')[1].text),
- member[0].text,
- int(member[4][0].text),
- int(member[4][1].text),
- int(member[4][2].text),
- int(member[4][3].text)
- )
- xml_list.append(value)
- column_name = ['filename', 'width', 'height', 'class', 'xmin', 'ymin', 'xmax', 'ymax']
- xml_df = pd.DataFrame(xml_list, columns=column_name)
- return xml_df
-
-
- def main():
- xml_df = xml_to_csv(xml_path)
- xml_df.to_csv(csv_path + datasets + '.csv', index=None)
- print('Successfully converted %s\'s xml to csv.' % datasets)
-
-
- if __name__ == '__main__':
- main()
转换完成后格式如下:
filename,width,height,class,xmin,ymin,xmax,ymax 000,500,333,mouth,265,256,370,315 000,500,333,eye,201,119,276,160 000,500,333,eye,363,114,447,158 000,500,333,face,151,7,498,326
csv->tfrecords代码
- import os
- import io
- import pandas as pd
- import tensorflow as tf
-
- from PIL import Image
- from object_detection.utils import dataset_util
- from collections import namedtuple
-
- # 此时是训练集还是测试集
- datasets = 'train'
- flags = tf.app.flags
- flags.DEFINE_string('csv_input', './%s/%s.csv' % (datasets, datasets), 'Path to the CSV input')
- flags.DEFINE_string('output_path', './%s/%s.tfrecord' % (datasets, datasets), 'Path to output TFRecord')
- flags.DEFINE_string('train_or_test', '%s' % datasets, 'train/test datasets')
- FLAGS = flags.FLAGS
-
-
- # 这里将label修改成自己的类别
- def class_text_to_int(row_label):
- if row_label == 'face':
- return 1
- if row_label == 'eye':
- return 2
- if row_label == 'mouth':
- return 3
- else:
- None
-
-
- def split(df, group):
- data = namedtuple('data', ['filename', 'object'])
- gb = df.groupby(group)
- return [data(filename, gb.get_group(x)) for filename, x in zip(gb.groups.keys(), gb.groups)]
-
-
- def create_tf_example(group, path):
- # 根据之前修改图像名字时给图像的命令来修改
- with tf.gfile.GFile(os.path.join(path, '%03d.jpg' % group.filename), 'rb') as fid:
- encoded_jpg = fid.read()
- encoded_jpg_io = io.BytesIO(encoded_jpg)
- image = Image.open(encoded_jpg_io)
- width, height = image.size
-
- # 根据之前修改图像名字时给图像的命令来修改
- filename = ('%03d.jpg' % group.filename).encode('utf8')
- image_format = b'jpg'
- xmins = []
- xmaxs = []
- ymins = []
- ymaxs = []
- classes_text = []
- classes = []
-
- for index, row in group.object.iterrows():
- xmins.append(row['xmin'] / width)
- xmaxs.append(row['xmax'] / width)
- ymins.append(row['ymin'] / height)
- ymaxs.append(row['ymax'] / height)
- classes_text.append(row['class'].encode('utf8'))
- classes.append(class_text_to_int(row['class']))
-
- # 转换为tfrecords需要的格式
- tf_example = tf.train.Example(features=tf.train.Features(feature={
- 'image/height': dataset_util.int64_feature(height),
- 'image/width': dataset_util.int64_feature(width),
- 'image/filename': dataset_util.bytes_feature(filename),
- 'image/source_id': dataset_util.bytes_feature(filename),
- 'image/encoded': dataset_util.bytes_feature(encoded_jpg),
- 'image/format': dataset_util.bytes_feature(image_format),
- 'image/object/bbox/xmin': dataset_util.float_list_feature(xmins),
- 'image/object/bbox/xmax': dataset_util.float_list_feature(xmaxs),
- 'image/object/bbox/ymin': dataset_util.float_list_feature(ymins),
- 'image/object/bbox/ymax': dataset_util.float_list_feature(ymaxs),
- 'image/object/class/text': dataset_util.bytes_list_feature(classes_text),
- 'image/object/class/label': dataset_util.int64_list_feature(classes),
- }))
- return tf_example
-
-
- def main(_):
- writer = tf.python_io.TFRecordWriter(FLAGS.output_path)
- path = os.path.join(os.getcwd() + '\\' + FLAGS.train_or_test, 'images')
- examples = pd.read_csv(FLAGS.csv_input)
- grouped = split(examples, 'filename')
- for group in grouped:
- tf_example = create_tf_example(group, path)
- writer.write(tf_example.SerializeToString())
-
- writer.close()
- print('Successfully created the TFRecords: {}'.format(FLAGS.output_path))
-
-
- if __name__ == '__main__':
- tf.app.run()
三、训练模型
在完成上述两部后,你可以开始真正的训练你想要的模型了。
由于这种训练太消耗电脑资源,因此将此过程放置服务器上进行
出于方便,我在object_detection目录下新建了training文件夹,将所有自己添加的文件全部都放置改文件夹下,其目录结构为:
- ├─data
├─model
│ └─ssd_mobilenet_v1_coco_2018_01_28
│ └─saved_model
│ └─variables
├─output_model
│ └─saved_model
│ └─variables
└─test_image
模型下载
在此处提供了各种各样的可用于目标检测的模型供你下载,先选个最简单的ssd_mobilenet_v1_coco下载试试看效果;
解压后的目录结构如下:
- |─ssd_mobilenet_v1_coco_2018_01_28
│ checkpoint
│ frozen_inference_graph.pb
│ model.ckpt.data-00000-of-00001
│ model.ckpt.index
│ model.ckpt.meta
│ pipeline.config
│
└─saved_model
│ saved_model.pb
│
└─variables
模型配置文件修改
在
data目录下添加文件face_detection.pbtxt,其中的内容为:- item {
- name: "face"
- id: 1
- }
- item {
- name: "eye"
- id: 2
- }
- item {
- name: "mouth"
- id: 3
- }
这里面的id号和之前在csv中给定的id号需保持一致
- item {
将模型解压文件夹中的
pipeline.config,复制到training目录下进行如下修改:
将文件中的所有
PATH_TO_BE_CONFIGURED修改成为自己的对应的文件夹路径
- # 我修改如下:
- fine_tune_checkpoint: "training/model/ssd_mobilenet_v1_coco_2018_01_28/model.ckpt"
- label_map_path: "training/data/face_detection.pbtxt"
- input_path: "training/data/train.tfrecord"
- label_map_path: "training/data/face_detection.pbtxt"
- input_path: "training/data/test.tfrecord"
出于引用配置文件的
model_main.py在object_detection目录下,因此要加上training/将
num_classes,改为你要识别的类别数,此处为3将
eval_config下的num_examples修改成你测试集的图片量,此处为20
至此,配置文件已经修改完成。
模型的训练
之前所有的铺垫都是为了此次模型的训练,也终于要开始对模型进行训练了。
通过命令
nvidia-smi查看可利用的空闲的GPU资源;通过命令
conda activate tensorflow1.12激活之前配置的环境;进入
models/research/object_detection文件夹中,为了方便起见,新建train_cmd.sh;用vim编辑
train_cmd.sh,输入:- # train
- #! /bin/bash
- CUDA_VISIBLE_DEVICES=1 \ # 指定gpu资源
- python model_main.py \ # 需要运行的文件
- --model_dir=training/model \ # 训练中生成的模型保存的地方
- --pipeline_config_path=training/pipeline.config \ # 配置文件地址
- --num_train_steps=50000 # 训练的步数
- # train
控制终端中输入
bash train_cmd.sh,即开始进行训练若出现无法找到object_detection模块的问题,则回到
research目录下,运行如下语句:
- export PYTHONPATH=$PYTHONPATH:`pwd`:`pwd`/slim
查看训练情况
改文件训练时,并不会输出loss与accuracy的情况,因此需要通过tensorboard进行查看。
在服务器使用tensorboard的方法:https://blog.csdn.net/sinat_35512245/article/details/82960937
进行上述配置后,进入object_detection文件中,输入命令:
- tensorboard --logdir=./training/model --port=6006
之后在本地的浏览器中输入:localhost:12345即可查看远程的tensorboard
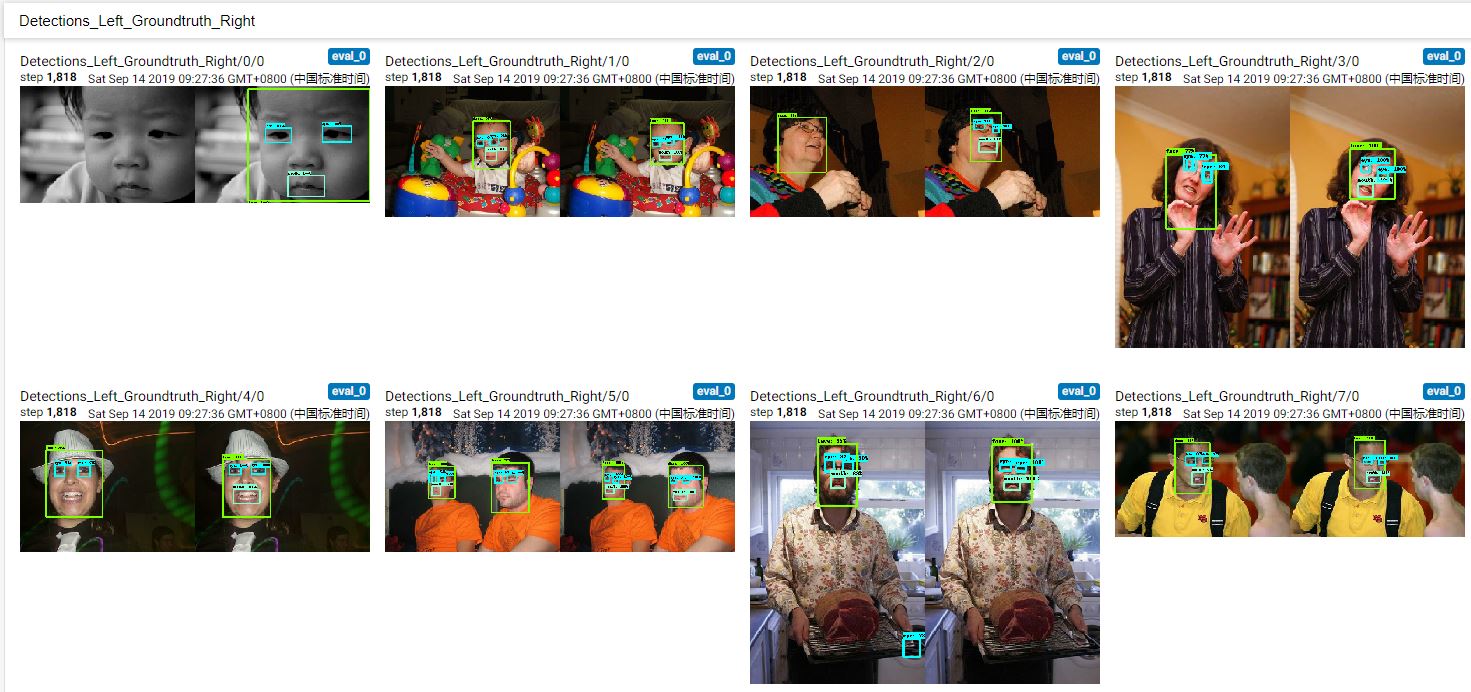
tensorboard查看情况
IMAGES:在这里你可以查看你之前转换的数据是否正确,例如此时我的数据如下:
GRAPHS:图结构就定义在此处,有毅力有兴趣者可以仔细看看数据时如何处理的,模型是如何架构的,方便后期的调参;
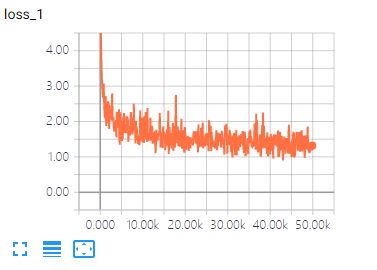
SCALARS:此处为训练时的各种参数,例如loss值,learning_rate等参数,以下是经过50000次训练后的结果图:
模型的导出
在完成训练后,我们需要将训练生成的模型进行导出操作,将模型导出成为.pd的格式,操作流程如下:
在
object_detection目录下新建create_pd.sh;将其中内容修改为:
- # use export_inference_graph.py to create .pd file
- #! /bin/bash
- CUDA_VISIBLE_DEVICES=1 \
- python export_inference_graph.py \
- --input_type=image_tensor \
- --pipeline_config_path=./training/pipeline.config \
- --trained_checkpoint_prefix=training/model/model.ckpt-50000 \
- --output_directory=./training/output_model
测试效果在win环境下进行,因此将生成的模型文件再导入到windows下
四、训练结果测试
测试环境为本人的win10系统,在object_detection目录下新建了model_test.py文件,代码内容如下:
- import os
- import cv2
- import sys
- import numpy as np
- from PIL import Image
- import tensorflow as tf
-
- # This is needed since the notebook is stored in the object_detection folder.
- sys.path.append("..")
- from object_detection.utils import ops as utils_ops
- from object_detection.utils import label_map_util
- from object_detection.utils import visualization_utils as vis_util
-
-
- # -----------------------------摄像头类定义----------------------------- #
- class Camera(object):
- def __init__(self, channel):
- self.capture = cv2.VideoCapture(channel)
-
- self.fps = int(self.capture.get(cv2.CAP_PROP_FPS))
- self.video_height = int(self.capture.get(cv2.CAP_PROP_FRAME_HEIGHT))
- self.video_width = int(self.capture.get(cv2.CAP_PROP_FRAME_WIDTH))
-
- self.capture.set(cv2.CAP_PROP_FRAME_WIDTH, self.video_width)
- self.capture.set(cv2.CAP_PROP_FRAME_HEIGHT, self.video_height)
- self.capture.set(cv2.CAP_PROP_FPS, self.fps)
-
- def get_image(self):
- """
- 获取图像
- """
- if self.capture.isOpened():
- ret, frame = self.capture.read()
- if ret is True:
- print('get picture success')
- return frame
- else:
- print('get picture failed')
- return None
-
- def release_camera(self):
- """
- 释放摄像机资源
- """
- self.capture.release()
- cv2.destroyAllWindows()
-
- # ------------------------------识别类定义----------------------------- #
- class SSD_Model(object):
- def __init__(self, PATH_TO_FROZEN_GRAPH, PATH_TO_LABELS):
- self.PATH_TO_FROZEN_GRAPH = PATH_TO_FROZEN_GRAPH
- # 添加需要识别的标签
- PATH_TO_LABELS = PATH_TO_LABELS
- self.category_index = label_map_util.create_category_index_from_labelmap(PATH_TO_LABELS, use_display_name=True)
- self.detection_graph = self.load_model()
-
- def load_model(self):
- # 载入模型文件
- detection_graph = tf.Graph()
- with detection_graph.as_default():
- od_graph_def = tf.GraphDef()
- with tf.gfile.GFile(self.PATH_TO_FROZEN_GRAPH, 'rb') as fid:
- serialized_graph = fid.read()
- od_graph_def.ParseFromString(serialized_graph)
- tf.import_graph_def(od_graph_def, name='')
- return detection_graph
-
- def run_inference_for_single_image(self, image):
- '''
- 对单幅图像进行推断
- '''
- graph = self.detection_graph
- with graph.as_default():
- with tf.Session() as sess:
- # Get handles to input and output tensors
- ops = tf.get_default_graph().get_operations()
- all_tensor_names = {output.name for op in ops for output in op.outputs}
- tensor_dict = {}
- for key in [
- 'num_detections', 'detection_boxes', 'detection_scores',
- 'detection_classes', 'detection_masks']:
- tensor_name = key + ':0'
- if tensor_name in all_tensor_names:
- tensor_dict[key] = tf.get_default_graph().get_tensor_by_name(
- tensor_name)
- if 'detection_masks' in tensor_dict:
- # The following processing is only for single image
- detection_boxes = tf.squeeze(tensor_dict['detection_boxes'], [0])
- detection_masks = tf.squeeze(tensor_dict['detection_masks'], [0])
- # Reframe is required to translate mask from box coordinates to image coordinates and fit the image size.
- real_num_detection = tf.cast(tensor_dict['num_detections'][0], tf.int32)
- detection_boxes = tf.slice(detection_boxes, [0, 0], [real_num_detection, -1])
- detection_masks = tf.slice(detection_masks, [0, 0, 0], [real_num_detection, -1, -1])
- detection_masks_reframed = utils_ops.reframe_box_masks_to_image_masks(
- detection_masks, detection_boxes, image.shape[1], image.shape[2])
- detection_masks_reframed = tf.cast(
- tf.greater(detection_masks_reframed, 0.5), tf.uint8)
- # Follow the convention by adding back the batch dimension
- tensor_dict['detection_masks'] = tf.expand_dims(
- detection_masks_reframed, 0)
- image_tensor = tf.get_default_graph().get_tensor_by_name('image_tensor:0')
-
- # Run inference
- output_dict = sess.run(tensor_dict,
- feed_dict={image_tensor: image})
-
- # all outputs are float32 numpy arrays, so convert types as appropriate
- output_dict['num_detections'] = int(output_dict['num_detections'][0])
- output_dict['detection_classes'] = output_dict[
- 'detection_classes'][0].astype(np.int64)
- output_dict['detection_boxes'] = output_dict['detection_boxes'][0]
- output_dict['detection_scores'] = output_dict['detection_scores'][0]
- if 'detection_masks' in output_dict:
- output_dict['detection_masks'] = output_dict['detection_masks'][0]
- return output_dict
-
-
- def main():
- # 开启摄像头
- camera = Camera(0)
- # 输入模型
- recognize = SSD_Model('./training/output_model/frozen_inference_graph.pb',
- './training/data/face_detection.pbtxt')
-
- while camera.capture.isOpened():
- # if True:
- image = camera.get_image()
- # image = cv2.imread('./training/test_image/007.jpg')
- # the array based representation of the image will be used later in order to prepare the
- # result image with boxes and labels on it.
- image_np = np.array(image)
- # Expand dimensions since the model expects images to have shape: [1, None, None, 3]
- image_np_expanded = np.expand_dims(image_np, axis=0)
- # Actual detection.
- output_dict = recognize.run_inference_for_single_image(image_np_expanded)
- # Visualization of the results of a detection.
- vis_util.visualize_boxes_and_labels_on_image_array(
- image_np,
- output_dict['detection_boxes'],
- output_dict['detection_classes'],
- output_dict['detection_scores'],
- recognize.category_index,
- instance_masks=output_dict.get('detection_masks'),
- use_normalized_coordinates=True,
- line_thickness=2)
-
- cv2.imshow('image', image_np)
- cv2.waitKey(20)
-
-
- if __name__ == "__main__":
- main()
-
测试结果效果如下,上一张本人的帅照:-)
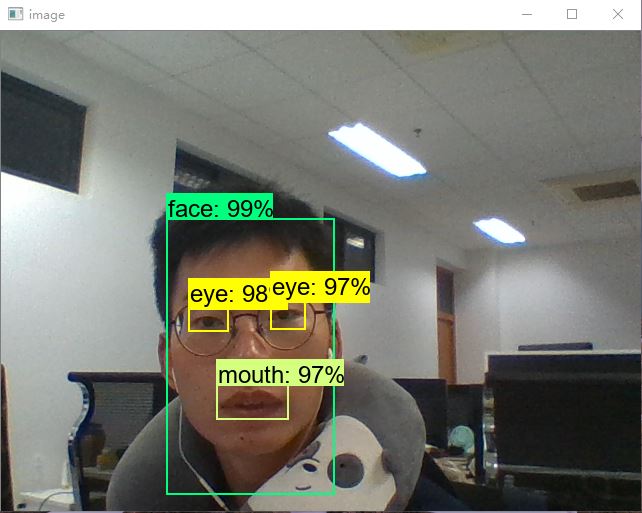
可见,训练出来的结果是有效果的:-)
五、总结
首先感谢Google,封装了那么健全的库,能大大缩减开发的时间,提高开发的效率;
本次训练采用了应该是最为基础的模型,后续会尝试更多的模型,比较不同模型之间的效果;
对于训练的参数为做修改,例如学习率、优化方式等,后续会继续努力理解代码,进行修改来达到更好的效果;
参考:
https://blog.csdn.net/dy_guox/article/details/79111949
https://blog.csdn.net/Orienfish/article/details/81199911
https://blog.csdn.net/exploer_try/article/details/81434985
还有些配置之类的参考链接在文中已经指出了,因此并未在此列出
Google Object detection配置与使用的更多相关文章
- 使用TensorFlow Object Detection API+Google ML Engine训练自己的手掌识别器
上次使用Google ML Engine跑了一下TensorFlow Object Detection API中的Quick Start(http://www.cnblogs.com/take-fet ...
- TensorFlow object detection API应用--配置
目标检测在图形识别的基础上有了更进一步的应用,但是代码也更加繁琐,TensorFlow专门为此开设了一个object detection API,接下来看看怎么使用它. object detectio ...
- tensorfolw配置过程中遇到的一些问题及其解决过程的记录(配置SqueezeDet: Unified, Small, Low Power Fully Convolutional Neural Networks for Real-Time Object Detection for Autonomous Driving)
今天看到一篇关于检测的论文<SqueezeDet: Unified, Small, Low Power Fully Convolutional Neural Networks for Real- ...
- 目标检测比赛---Google AI Open Images - Object Detection Track
https://www.kaggle.com/c/google-ai-open-images-object-detection-track#Evaluation Submissions are eva ...
- TensorFlow object detection API
cloud执行:https://github.com/tensorflow/models/blob/master/research/object_detection/g3doc/running_pet ...
- Tensorflow object detection API ——环境搭建与测试
1.开发环境搭建 ①.安装Anaconda 建议选择 Anaconda3-5.0.1 版本,已经集成大多数库,并将其作为默认python版本(3.6.3),配置好环境变量(Anaconda安装则已经配 ...
- 第三十二节,使用谷歌Object Detection API进行目标检测、训练新的模型(使用VOC 2012数据集)
前面已经介绍了几种经典的目标检测算法,光学习理论不实践的效果并不大,这里我们使用谷歌的开源框架来实现目标检测.至于为什么不去自己实现呢?主要是因为自己实现比较麻烦,而且调参比较麻烦,我们直接利用别人的 ...
- Tensorflow object detection API 搭建物体识别模型(一)
一.开发环境 1)python3.5 2)tensorflow1.12.0 3)Tensorflow object detection API :https://github.com/tensorfl ...
- TensorFlow object detection API应用
前一篇讲述了TensorFlow object detection API的安装与配置,现在我们尝试用这个API搭建自己的目标检测模型. 一.准备数据集 本篇旨在人脸识别,在百度图片上下载了120张张 ...
随机推荐
- 离线安装Windows Terminal
Windows Terminal颜值高.适配好.速度快,是Windows 10下命令行工具的不二选择. 最近在公司电脑上安装Windows Terminal时遇到一个问题,由于公司电脑不能直接连接外网 ...
- python实现遥感图像阈值分割
1.阈值分割 import os import cv2 import numpy as np import matplotlib.pyplot as plt from osgeo import gda ...
- Servlet生命周期和方法
一.五个生命周期方法,有三个很重要,初始化方法.提供服务方法和销毁方法 1.三个主要方法 2.另外两个重写的成员方法只做了解 二.生命周期详解 其中,每次刷新页面都是一次对servlet访问: 页面访 ...
- .Net性能调优-MemoryPool
简单用法 //获取MemoryPool实例,实际返回了一个ArrayMemoryPool<T> MemoryPool<char> Pool = MemoryPool<ch ...
- J2EE分布式微服务云开发架构 Spring Cloud+Mybatis+ElementUI 前后端分离J2EE分布式微服务云开发架构 Spring Cloud+Mybatis+ElementUI 前后端分离
鸿鹄云架构[系统管理平台]是一个大型企业.分布式.微服务.云架构的JavaEE体系快速研发平台,基于模块化.微服务化.原子化.热部署的设计思想,使用成熟领先的无商业限制的主流开源技术(Spring ...
- NOIP初赛:完善程序做题技巧
最近写的文章好像还很多的.那么今天我们来讨论NOIP初赛的题型--完善程序.完善程序相对是比较难的题目了.全卷100分,完善程序占了大概26分,占比非常大.如果和英语考试试卷做比较,相当于首字母填空( ...
- [NOIP2015 普及组] 扫雷游戏
[NOIP2015 普及组] 扫雷游戏 难度:入门 题目描述 扫雷游戏是一款十分经典的单机小游戏.在nn行mm列的雷区中有一些格子含有地雷(称之为地雷格),其他格子不含地雷(称之为非地雷格).玩家翻开 ...
- Mysql backup and Recovery Data Type.
数据库备份方法: 备份类型:物理备份和逻辑备份: 物理备份是指直接复制存储数据库内容的目录和文件,这种类型的备份适用于出现问题时需要快速恢复的大型重要数据库.逻辑备份保存以逻辑数据库结构(create ...
- C# lambda 实现 Ascii 排序
var dir = new Dictionary<string, string>(); dir.Add("channelId", "1& ...
- 怎么通俗的理解Netty呢?
目录 Netty(3.X) 简单体验 Netty的事件驱动机制 Netty的源码阅读 Netty(3.X) 有了Netty,你可以实现自己的HTTP服务器,FTP服务器,UDP服务器,RPC服务器,W ...