Taro -- 微信小程序密码弹窗
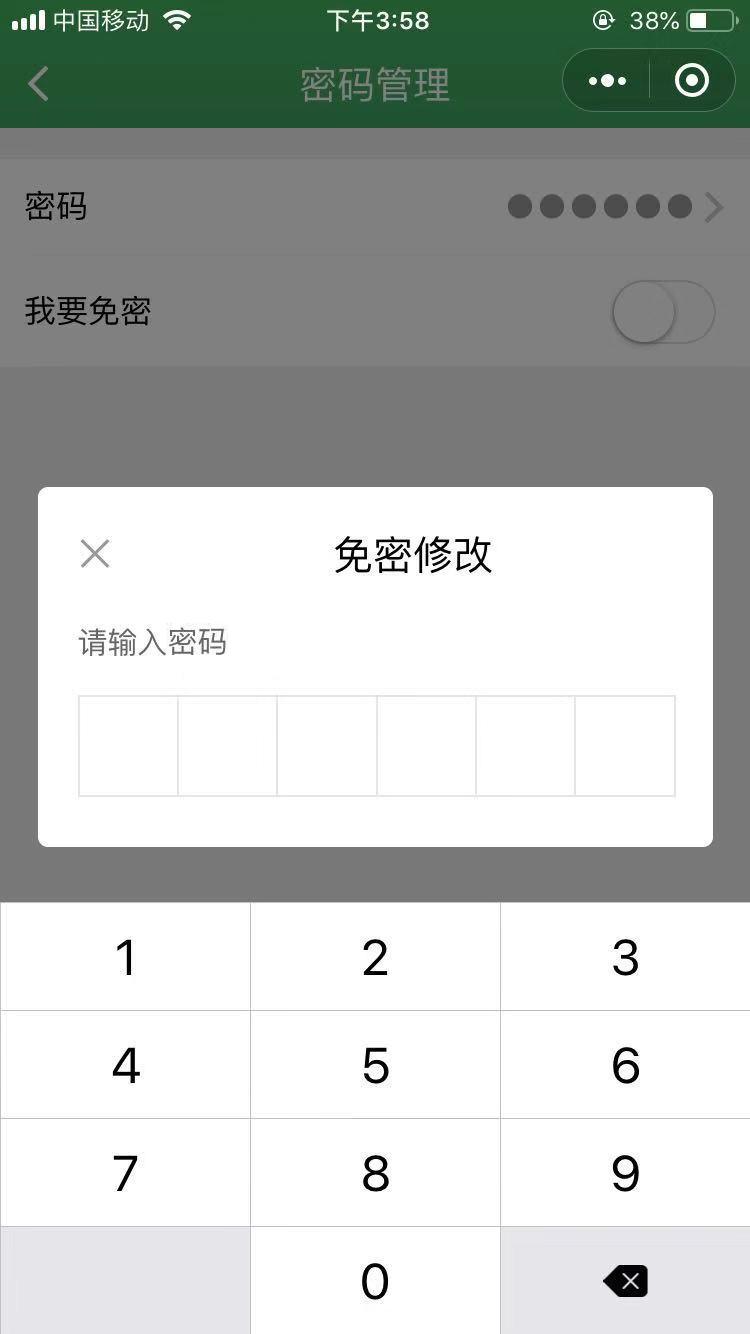
记录一个类似支付密码的弹窗写法,实现是否免密功能。如图:

index.js
class Index extends Component {

  constructor() {

    super(...arguments)

    this.state = ({

      switchIsCheck: false,

      showPayPwdInput: false,

      payFocus: true,

      pwdVal: '',
      toastText: '',
      isOpened: false
    })

  }

// 打开关闭免密  用了在Switch开关上面遮挡一个透明的View,来显示弹窗,控制Switch的开关

  switchIsCheckBtn = () => {

    this.setState({

      showPayPwdInput: true

    })

  }

  closeClick = () => {

    this.setState({

      showPayPwdInput: false

    })

  }

  // 检验密码 输完6位数字密码时候调用

  hidePayLayer = () => {

    let val = this.state.pwdVal
    this.setState({

      showPayPwdInput: false,

      pwdVal: ''

    }, () => {

      Taro.request({

        method: 'post',

        url:

          API.URL,

        header: {

          'Content-Type': 'application/json',

          'Data-Type':'json',

          'weixinauth': this.state.tookenData

        },

        data:JSON.stringify({

          password:val

        }),

        success: res => {

          if (res.data.status == ) {

            this.setState({

              switchIsCheck: !this.state.switchIsCheck

            })

          }else{

            this.setState({

              isOpened: true,

              toastText: '密码错误'

            })

          }

        }

      })

    })

  }

  // 密码输入

  inputPwd = (e) => {

    this.setState({

      pwdVal: e.detail.value

    },() => {

      if (e.detail.value.length >= ) {

        this.hidePayLayer()

      }

    })

  }

  render() {
    const {isOpened, toastText} = this.state

    return (

      <View className='box-passward'>

        <View className="password-top">

          <View className="no-password">

            <AtList>

              <AtListItem title='密码' extraText='●●●●●●' arrow='right' onClick={this.handleClickChange} />

              <AtListItem

                switchColor='#40ac4b'

                title='我要免密'

                isSwitch

                onSwitchChange={this.handleChange}

                switchIsCheck={this.state.switchIsCheck}

              />

              <View className="password-btn" onClick={this.switchIsCheckBtn}></View>

            </AtList>

            <View className='forget-password' onClick={this.forgetPwd}>忘记密码?</View>

          </View>

        </View>

        {

          this.state.showPayPwdInput ?

            <View className="dialog">

              <View className="input_main">

                <View className="input_title">

                  <AtIcon onClick={this.closeClick} value='close' size=''className="input_title-close"></AtIcon>

                  <Text>免密修改</Text>

                </View>

                <View className="write-title">请输入密码</View>

                <View className="input_row">

                  {

                    [,,,,,].map((item,index) => {

                      return (

                        <View key={index} className="pwd_item">

                          {

                            this.state.pwdVal.length>index ? <Text className="pwd_itemtext"></Text> : null

                          }

                        </View>

                      )

                    })

                  }

                </View>

                <Input focus={this.state.payFocus} password type="number" maxLength="" onInput={this.inputPwd} className="input_control"></Input>

              </View>

            </View>

            : null

        }
      </View>

    )

  }

}
index.scss
.box-passward {

  display: flex;

  flex-direction: column;

  height: 100vh;

  background: #f2f2f2;

    .signature-passward-bg {

      background: linear-gradient(#21b459, #24a262);

      position: relative;

    }

    .tabContant-certificate {

        padding-top: %;

        .image-certificate{

            width:360px;

            height: 360px;

            margin: auto;

            image{

               width: %;

               height: %;

            }

        }

        .text-certificate{

            font-size:30px;

            width:508px;

            margin: auto;

        }

    }

    .password-top{

      margin-top:32px;

      .no-password{

        .at-list__item .item-extra__info{

          font-size: 24px;

        }

      }

      .at-list{

         border-top: 1px solid #e5e5e5;

         border-bottom: 1px solid #e5e5e5;

      }

      .password-btn{

         width:105px;

         height: 70px;

         position: absolute;

         right:35px;

         bottom:20px;

      }

      .forget-password{

         padding:20px;

         color:#40ac4b;

         font-size: 28px;

      }

      .my-body {

        .account-tip {

           width: %;

           color: #;

           font-size: 28px;

           line-height: 50px;

           padding:  30px 20px;

           font-family: "PingFang-SC-Medium";

          .active{

             color: #40ac4b;

             font-size: 26px;

          }

        }

        .my-body-content {

           background-color: #fff;

           border-top:1px solid #e5e5e5;

           border-bottom:1px solid #e5e5e5;

        }

        .at-button{

           margin:60px 30px;

        }

      }

    }

  .dialog {

     width: %;

     height: %;

     position: fixed;

     left:;

     top:;

     z-index: ;

     background: rgba(,,,0.5);

    .input_main {

      position: fixed;

      left: %;

      bottom: %;

      margin-bottom:-180px;

      margin-left: -%;

      width: %;

      height: 360px;

      background-color: #fff;

      z-index: ;

      border-radius: 10px;

      .input_title {

        width: %;

        height: 135px;

        line-height: 135px;

        text-align: center;

        font-size: 40px;

        .input_title-close{

          color:rgb(,,);

          float: left;

          margin-top:50px;

          margin-left: 40px;

        }

        .input_back {

          position: absolute;

          left: ;

          top: ;

          width: 80px;

          height: 90px;

          display: flex;

          justify-content: center;

          align-items: center;

          .input_backtext {

            width: 20px;

            height: 20px;

            background-color: white;

            border: 2px solid #aaa;

            border-width: 5px   5px;

            transform: rotate(-45deg);

          }

        }

      }

      .write-title{

        color:rgb(,,);

        font-size: 30px;

        padding-left:40px;

        margin-bottom: 30px;

      }

      .input_row {

        width: %;

        margin:  40px;

        height: 98px;

        position: relative;

        display: flex;

        align-items: center;

        border: 2px solid rgb(,,);

        .pwd_item{

          flex: ;

          display: flex;

          align-items: center;

          justify-content: center;

          height: %;

          border-right: 2px solid rgb(,,);

          position: relative;

          .pwd_itemtext {

            width: 30px;

            height: 30px;

            border-radius: 30px;

            background-color: #;

          }

        }

        .pwd_item:last-child {

          border-right: none;

        }

      }

      .forget_pwd {

        float: right;

        margin: 30px;

        width: 100px;

        text-align: right;

        font-size: 24px;

        color: #ff7800;

      }

      .input_control {

        position: relative;

        left: -300px;

        bottom: ;

        width: 100px;

        height: 100px;

      }

    }

  }

}
Taro -- 微信小程序密码弹窗的更多相关文章
- Taro -- 微信小程序wxParse达到html转换wxml
Taro微信小程序可以用wxParse来达到html转换wxml的效果:https://github.com/NervJS/taro-components-test/blob/master/src/p ...
- Taro -- 微信小程序登录
Taro微信小程序登录 1.调用Taro.login()获取登录凭证code: 2.调用Taro.request()将code传到服务器: 3.服务器端调用微信登录校验接口(appid+appsecr ...
- 微信小程序自定义弹窗wcPop插件|仿微信弹窗样式
微信小程序自定义组件弹窗wcPop|小程序消息提示框|toast自定义模板弹窗 平时在开发小程序的时候,弹窗应用场景还是蛮广泛的,但是微信官方提供的弹窗比较有局限性,不能自定义修改.这个时候首先想到的 ...
- Taro 微信小程序 上传文件到minio
小程序前端上传文件不建议直接引用minio的js npm包,一来是这个包本身较大,会影响小程序的体积,二来是ak sk需要放到前端存储,不够安全,因此建议通过请求后端拿到签名数据后上传. 由于小程序的 ...
- taro 微信小程序原生作用域获取
在 Taro 的页面和组件类中,this 指向的是 Taro页面或组件实例. 但是一般我们需要获取 Taro的页面和组件 所对应的 小程序原生页面和组件实例,这个时候我们可以通过 this.$scop ...
- 微信小程序---密码输入
设计支付密码的输入框 效果如下: 源码:github地址:https://github.com/fiveTree/-_- 干货: <view class="pay"> ...
- 微信小程序底部弹窗动画
第一步,在组件里编写弹窗的代码 <!-- 活动类型弹框 --> <view class='bottomModel' wx:if="{{modelFlag}}" c ...
- 微信小程序 - 自定义弹窗组件
2019-01-06:简化了一些代码,以及增加了可用性. // 弹窗配置 dialogConfig: { // 弹窗 dialogvisible: false, options: { // 显示关闭按 ...
- 微信小程序自定义弹窗(可通用)
效果图 .wxml <cover-view class='mask' wx:if='{{isShow}}'> <cover-view class='modal'> <co ...
随机推荐
- c++复习——类(2)
1.this指针 this指针是一个指向对象的指针. this指针是一个隐含于成员函数中的对象指针. this指针是一个指向正在调用成员函数的对象的指针. 类的静态成员函数没有this指针 ...
- Internet History, Technology, and Security(week6)——Technology: Transport Control Protocol(TCP)
前言: 这周开始学习分层网络模型的第三层,传输层. Transport/Reliability: Transport Layer TCP层的目的是补偿IP层中可能出现的错误,并充分利用可用资源.由于I ...
- 笨办法学Python(learn python the hard way)--练习程序41
下面是练习41,基于python3 #ex41.py 1 #打印文档字符串 print(函数名.__doc__) 2 from sys import exit 3 from random import ...
- SpringBoot:使用IDEA快速构建项目
西部开源-秦疆老师:基于SpringBoot 2.1.6 的博客教程 秦老师交流Q群号: 664386224 未授权禁止转载!编辑不易 , 转发请注明出处!防君子不防小人,共勉! SpringBoot ...
- git 指定从其他分支拉取commit
git cherry-pick commit-id (github 上的短号)
- Android单行跑马灯效果实现
参考网址:https://www.jianshu.com/p/e6c1b825d322 起初,使用了如下XML布局: <TextView android:id="@+id/tv_per ...
- Python Django的安装配置
学习Django前,我们要确定电脑上是否已经安装了Python,目前Python有两个版本,不过这两个版本并不互相兼容,所以根据个人选择合适的版本. 因为从Django2.0开始将不再支持Python ...
- Python编程:从入门到实践—变量和简单数据类型
变量的命名和使用 #!/usr/bin/env python# -*- encoding:utf-8 -*- message ="Hello Python world!"print ...
- PROD异机全备份恢复验证实施文档
PROD异机全备份恢复验证实施文档 ******利用10月25日的全量备份.10月26日当天的归档日志及当前redo日志,恢复数据库到故障前数据库状态****** 准备工作:source 源库:PRO ...
- PHP执行外部程序
备份/恢复数据库 exec - 执行一个外部程序(在php文件所在目录进行执行) 很久以前写的,很多方法是项目中的直接复制粘体用不了,只能提供下思路. 用到执行外部程序的就这一句: exec(&quo ...
