003.Heartbeat MySQL双主复制
一 基础环境
|
节点
|
系统版本
|
MySQL版本
|
业务IP
|
心跳IP
|
|
Master01
|
CentOS 7.5
|
MySQL 5.6
|
192.168.88.100
|
192.168.77.100
|
|
Master02
|
CentOS 7.5
|
MySQL 5.6
|
192.168.88.101
|
192.168.77.101
|
|
VIP
|
192.168.88.88
|
|||
二 实际部署
2.1 安装MySQL
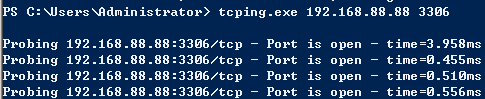
 [root@master1 ~]# yum list installed | grep mysql	        #查看是否存在其他MySQL组件

 [root@master1 ~]# yum -y remove mysql*			#为避免冲突引,卸载已存在的组件

 [root@master1 ~]# yum -y install mariadb mariadb-server

 [root@master1 ~]# systemctl start mariadb.service
2.2 初始化MySQL
 [root@master1 ~]# mysql_secure_installation		#设置root密码

 [root@master1 ~]# systemctl restart mariadb.service
2.3 master01 my.cf配置
 [root@master1 ~]# vi /etc/my.cnf

 [mysqld]

 ……

 server-id=1				#设置主服务器master的id

 log-bin=mysql-bin			#配置二进制变更日志命名格式

 replicate-wild-ignore-table=mysql.%

 replicate-wild-ignore-table=test.%

 replicate-wild-ignore-table=information_schema.%
 binlog-ignore-db = mysql

 binlog-ignore-db = test

 binlog-ignore-db = information_schema
binlog-do-db = mysqltest
 replicate-wild-ignore-table=mysql.%	        #从库配置不同步表

 replicate-wild-do-table=test.%		#从库配置需要同步的表
2.4 创建账号
 [root@master1 ~]# mysql -uroot -p

 Enter password:

 MariaDB [(none)]>  grant replication slave on *.* to 'repl_user'@'192.168.88.101' identified by 'x12345678';

 MariaDB [(none)]>  grant all privileges on *.* to 'root'@'192.168.88.%'  identified by 'x120952576' with grant option;

 MariaDB [(none)]>  flush privileges;

 [root@master1 ~]# systemctl restart mariadb.service

 [root@master1 ~]# mysql -uroot -p

 Enter password:

 MariaDB [(none)]>  show master status;

2.5 master02 my.cf配置配置
 [root@master2 ~]# vi /etc/my.cnf

 [mysqld]

 server-id=2				#设置主服务器master的id

 log-bin=mysql-bin			#配置二进制变更日志命名格式

 replicate-wild-ignore-table=mysql.%

 replicate-wild-ignore-table=test.%

 replicate-wild-ignore-table=information_schema.%

 read_only=1
2.6 创建账号
 [root@master2 ~] mysql -uroot -p

 Enter password:

 MariaDB [(none)]>  grant replication slave on *.* to 'repl_user'@'192.168.88.100' identified by 'x12345678';

 MariaDB [(none)]>  grant all privileges on *.* to 'root'@'192.168.88.%'  identified by 'x120952576' with grant option;

 MariaDB [(none)]>  flush privileges;

 [root@master2 ~]# systemctl restart mariadb.service

 [root@master2 ~]# mysql -uroot -p

 Enter password:

 MariaDB [(none)]>  show master status;

三 启动主从
3.1 手动同步
3.2 启动Master01的slave功能
[root@master1 ~]# mysql -uroot -p
Enter password:
MariaDB [(none)]> change master to master_host='192.168.88.101',
master_user='repl_user',
master_password='x12345678',
master_log_file='mysql-bin.000001',
master_port=3306,
master_log_pos=245;
MariaDB [(none)]> start slave;
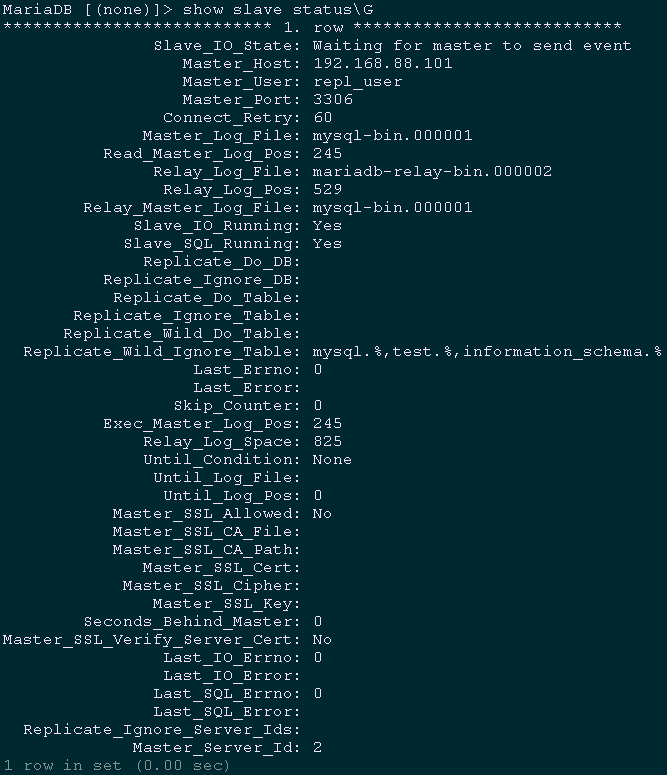
MariaDB [(none)]> show slave status\G #查看slave状态
3.3 启动Master02的slave功能
[root@Master02 ~]# mysql -uroot -p
Enter password:
MariaDB [(none)]> change master to master_host='192.168.88.100',
master_user='repl_user',
master_password='x12345678',
master_log_file='mysql-bin.000001',
master_log_pos=245;
MariaDB [(none)]> start slave;
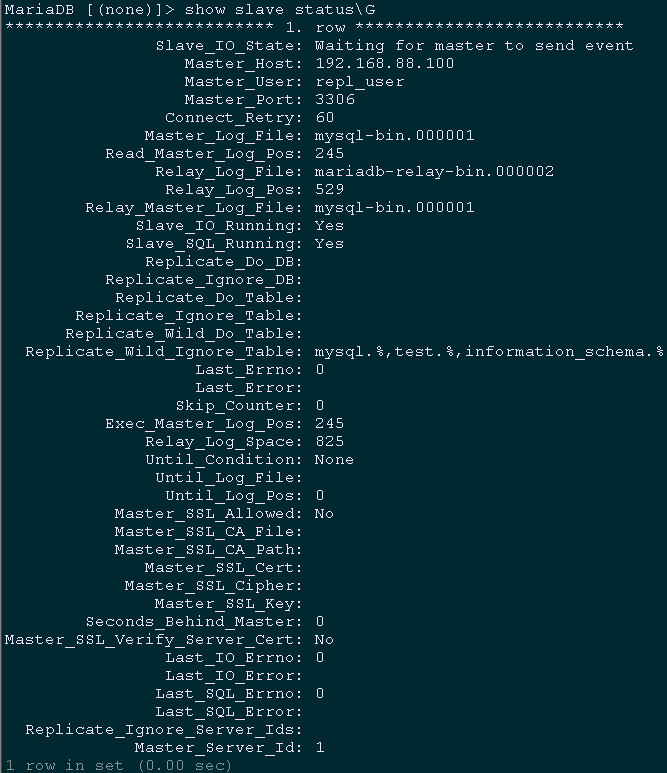
MariaDB [(none)]> show slave status\G #查看slave状态
四 安装Heartbeat
五 配置Heartbeat
5.1 配置authkeys
 [root@master1 ~]# vi /usr/local/heartbeat/etc/ha.d/authkeys

 auth 3

 3 md5 Yes!
5.2 配置Heartbeat
 [root@master1 ~]# vi /usr/local/heartbeat/etc/ha.d/ha.cf

 logfile /var/log/ha-log			#记录Heartbeat其他相关日志信息

 logfacility     local0			#设置heartbeat的日志,这里用的是系统日志

 keepalive 2				        #设定心跳(监测)时间间隔为2秒

 deadtime 15				        #宣告死亡时间

 warntime 10				        #心跳延时时间

 initdead 60				        #初始化时间

 udpport 694				        #用于通信的UDP端口

 bcast   eth1				#接受广播心跳的网卡接口

 ucast eth1 192.168.77.101		        #置对方机器心跳检测的IP

 auto_failback off			        #关闭自动切回恢复正常的主节点

 node master1.yewu.com			#集群节点的名称,必须匹配uname -n的结果。

 node master2.yewu.com

 ping 192.168.88.1

 respawn hacluster /usr/local/heartbeat/libexec/heartbeat/ipfail
5.3 配置haresources
 [root@master1 ~]# ll /usr/local/heartbeat/etc/ha.d/resource.d/	#查看现有资源类型

 [root@master1 ~]# vi /usr/local/heartbeat/etc/ha.d/haresources

 master1.yewu.com IPaddr::192.168.88.88/24/eth0 mariadb

 [root@master1 ~]# scp /usr/local/heartbeat/etc/ha.d/{ha.cf,haresources,authkeys} 192.168.88.101:/usr/local/heartbeat/etc/ha.d/		                                                #将所有配置复制至master2节点

 [root@master2 ~]# vi /usr/local/heartbeat/etc/ha.d/ha.cf

 ucast eth1 192.168.77.100		                                #置对方机器心跳检测的IP

 [root@master1 ~]# systemctl stop mariadb.service

 [root@master1 ~]# systemctl disable mariadb.service

 [root@master2 ~]# systemctl stop mariadb.service

 [root@master2 ~]# systemctl disable mariadb.service
六 验证Heartbeat
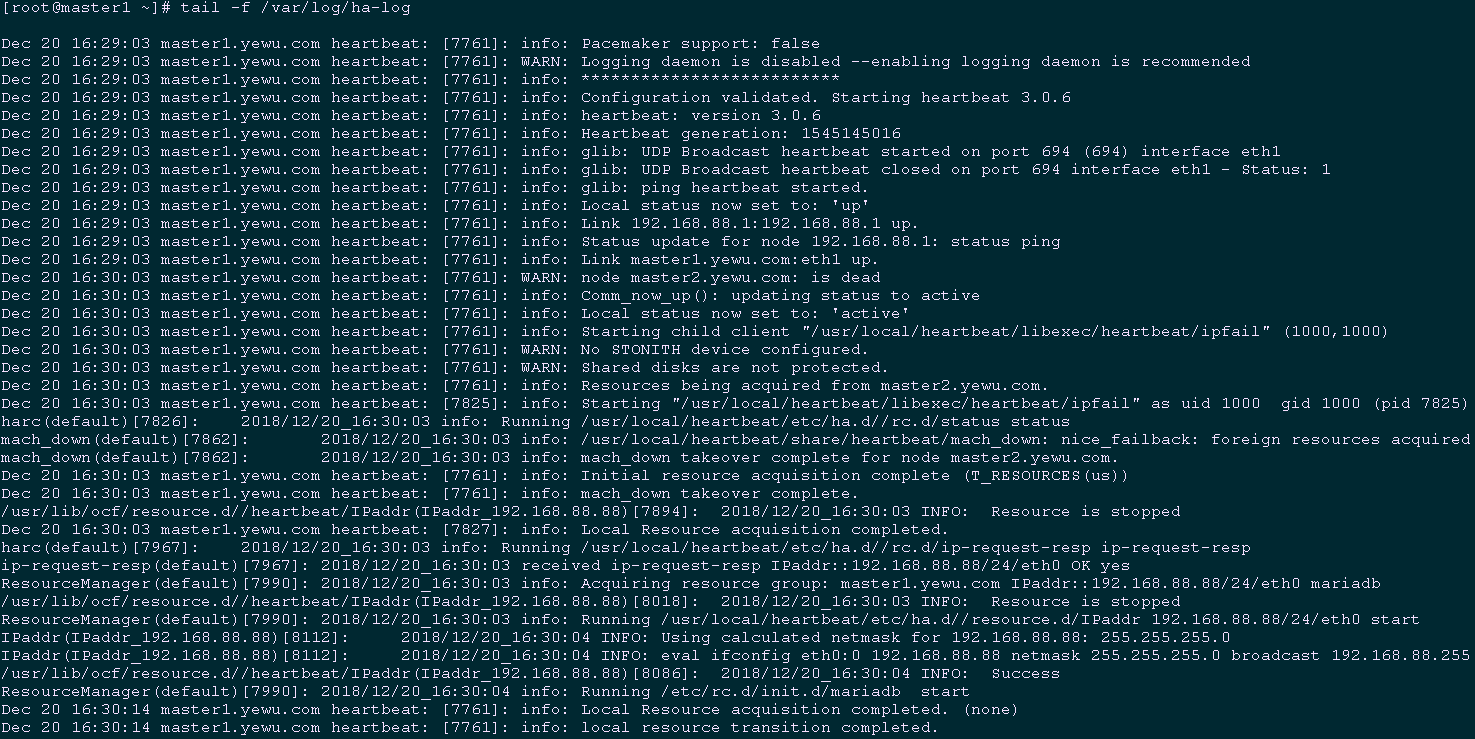
6.1 master1单节点启动验证
 [root@master1 ~]# systemctl start heartbeat.service

 [root@master1 ~]# systemctl enable heartbeat.service

 [root@master1 ~]# tail -f /var/log/ha-log		#验证日志
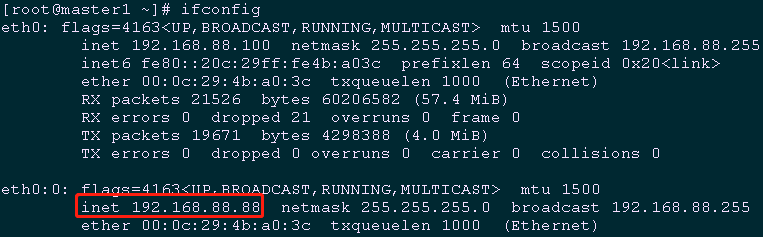
[root@master1 ~]# ifconfig #查看活的的vip

6.2 master2启动并验证
[root@master2 ~]# systemctl start heartbeat.service
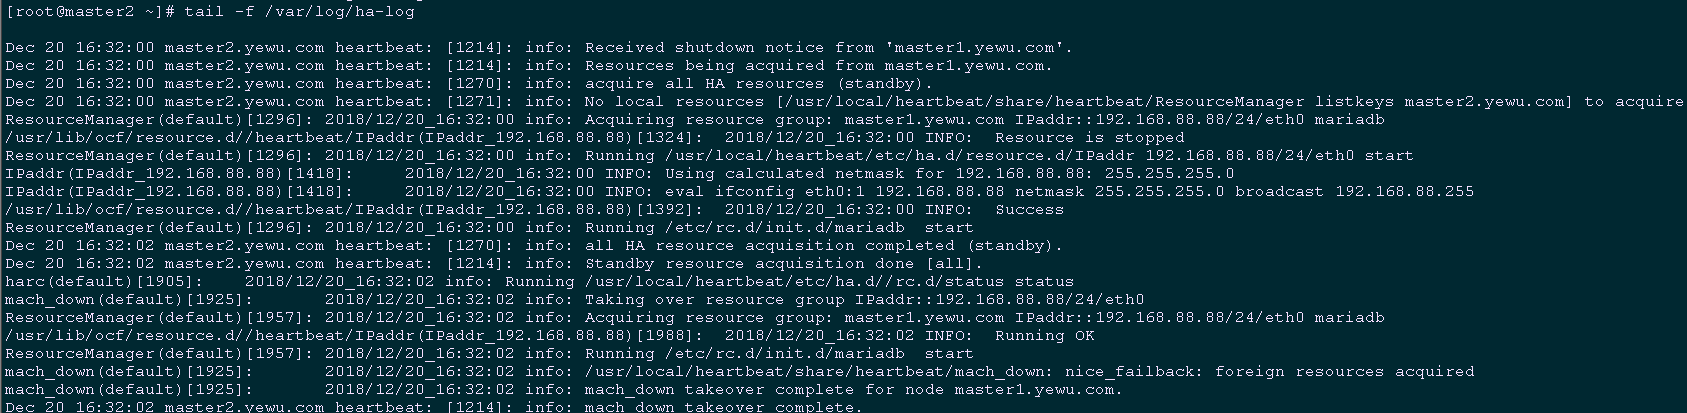
[root@master1 ~]# tail -f /var/log/ha-log #观察master2节点启动后的master1日志

 [root@master1 ~]# shutdownr			#模拟master1节点宕机

 [root@master2 ~]# tail -f /var/log/ha-log	#观察master2节点的切换log
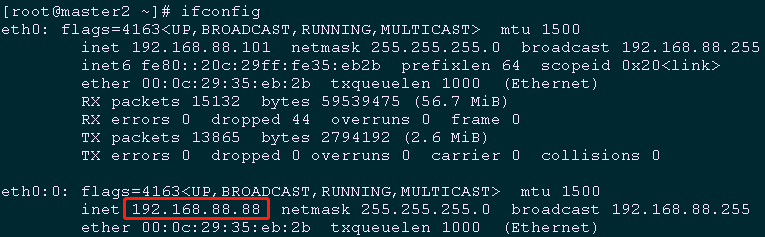
[root@master2 ~]# ifconfig #master2节点会自动接管vip

七 其他优化
7.1 检测脚本
 #!/bin/sh

 #****************************************************************#

 # ScriptName: mysql_down.sh

 # Author: xhy

 # Create Date: 2018-12-20 16:40

 # Modify Author: xhy

 # Modify Date: 2018-12-20 16:40

 # Version:

 #***************************************************************#

 Date=$(date +%F" "%T)

 IP=$(ifconfig eth0 |grep "inet addr" |cut -d":" -f2 |awk '{print $1}')

 Mail="baojingtongzhi@163.com"

 pkill keepalived

 echo "$Date $IP The mysql service failure,kill keepalived." |mail -s "Master-Backup MySQL Monitor" $Mail
 #!/bin/sh

 #****************************************************************#

 # ScriptName: mysql_down.sh

 # Author: xhy

 # Create Date: 2018-12-20 16:40

 # Modify Author: xhy

 # Modify Date: 2018-12-20 16:40

 # Version:

 #***************************************************************#

 MYSQL=/usr/bin/mysql

 MYSQL_HOST=localhost

 MYSQL_USER=root

 MYSQL_PASSWORD=x120952576

 date=`date +%y%m%d-%H:%M:`

 echo $date

 $MYSQL -h $MYSQL_HOST -u $MYSQL_USER -p$MYSQL_PASSWORD -e "show status;" >/dev/null 2>&1

 #$mysqlclient --host=$host --port=$port--user=$user --password=$password  -e"show databases;" > /dev/null 2>&1

 if [ $? == 0 ]

 then

    echo " $host mysql login successfully "

    exit 0

 else

    echo " $host mysql login faild"

    /etc/init.d/heartbeat stop

    exit 2

 fi
7.2 定时检测任务
 [root@master2 ~]# crontab -e

 */1 * * * * /root/mysql_down.sh >>/root/check_mysql.log
003.Heartbeat MySQL双主复制的更多相关文章
- Heartbeat MySQL双主复制
目录 一 基础环境 二 实际部署 2.1 安装MySQL 2.2 初始化MySQL 2.3 master01 my.cf配置 2.4 创建账号 2.5 master02 my.cf配置配置 2.6 创 ...
- 分布式数据存储 - MySQL双主复制
上篇文章<分布式数据存储 - MySQL主从复制>,我们说到MySQL主从复制很好的保障了从库,读的高可用性.so,问题来了: 1.针对主库,写的高可用性又是如何做到高可用性? 2.如果需 ...
- keepalived+mysql双主复制高可用方案
MySQL双主复制,即互为Master-Slave(只有一个Master提供写操作),可以实现数据库服务器的热备,但是一个Master宕机后不能实现动态切换.而Keepalived通过虚拟IP,实现了 ...
- MySQL双主复制
原文发表于cu:2017-06-12 本文简单介绍MySQL双主复制原理及1个简单是双主复制验证. 一.MySQL双主复制原理 1. 双主复制原理 master-master复制的两台服务器,既是ma ...
- mysql双主复制总结
双主复制: 1).在两台服务器上各自建立一个具有复制权限的用户: 2).修改配置文件: # 主服务器A上 [mysqld] server-id = 10 log-bin = mysql-bin rel ...
- linux环境下配置mysql双主复制
简单来说,双主复制就是让两台mysql服务器中的数据保持同步,可以用来实现灾备和负载均衡 主机1 IP:192.168.200.128 主机2 IP:192.168.200.131 两台主机系统均为c ...
- mysql 双主复制 centos7
mysql 安装请看:http://www.cnblogs.com/leohe/p/6839705.html 双主复制设置 1. 两台虚拟机,都是 centos7 主: 10.1.1.115 从: 1 ...
- 利用LVS+Keepalived搭建Mysql双主复制高可用负载均衡环境
应用背景: MySQL复制(主主,主从...)能在保证数据的备份的同时也能够做读写分离分摊系统压力,但是发生单点故障时,需要手动 切换到另外一台主机.LVS和Keppalived可以设定一个VIP来实 ...
- keeplived + mysql双主复制部署 --原创
环境: master 1: 192.168.100.10 oracle linux 7.4 mysql 5.7.1 master 2: 192.168.100.11 oracle linux ...
随机推荐
- 洛谷P2014 选课
首先分析题目,这是一道树形dp的题目,是树形背包类的问题,以为每门课的先修课只有一门,所以这一定可以 构成一个森林结构,于是我们可以设计一个虚拟的根节点作为森林的根. 状态转移方程如下 dp[v][k ...
- NIO(三)
使用直接缓冲区完成文件的复制(内存映射文件) package com.cppdy.nio; import java.nio.MappedByteBuffer; import java.nio.chan ...
- mysql 修改配置文件my.cnf失败
一.连接Mysql提示无法通过socket的解决方法连接到本地MySQL服务器 http://www.aiezu.com/db/mysql_cant_connect_through_socket.ht ...
- laravel 分类的列表查询
public function index(Request $request, ResponseFactoryContract $response, QuestionModel $questionMo ...
- AI-序列化-查-做接口
序列化最终代码(下边的可以不看) from rest_framework.views import APIView from rest_framework import serializers fro ...
- ZOJ 4057 XOR Clique(位运算)
XOR Clique BaoBao has a sequence a1,a2,...,an. He would like to find a subset S of {1,2,...,n} s ...
- 记录sql server中数据创建时间和最后修改时间,方便查找问题
getdate()用例: 2008-12-29 16:25:46.635 1.创建时间:将字段设置为datetime类型,并设置默认值为 getdate() 2.修改时间:通过触发器,在 update ...
- 微信小程序如何自动弹出提示微信授权?
我想在一进入页面的时候就进行判断提示并且弹出提示授权!请问该如何处理比较合理 wx.authorize({}) //可以通过 wx.getSetting 先查询一下用户是否授权了 "scop ...
- Ubuntu安装TensorFlow
使用清华大学开源软件镜像站:https://mirrors.tuna.tsinghua.edu.cn/ 下载. 在主界面右侧找到[相关链接]->[使用帮助],然后在出现的页面左侧找到Tensor ...
- 微信公众平台开发教程Java版(六) 事件处理(菜单点击/关注/取消关注)
https://blog.csdn.net/tuposky/article/details/40589325