20165223 实验四 Android开发基础
实验四 Android开发基础
目录
一、实验报告封面
北京电子科技学院(BESTI)
实 验 报 告
| ◆ | ◇ | ◆ | ◇ |
|---|---|---|---|
| 课程 | Java程序设计 | 班级 | 1652班 |
| 姓名 | 蔡霓 | 学号 | 20165223 |
| 成绩 | 指导教师 | 娄嘉鹏 | |
| 实验日期 | 2018年5月14日 | 实验密级 | 非密级 |
| 预习程度 | 已预习 | 实验时间 | 13:45 - 15:25 |
| 必修/选修 | 选修 | 实验序号 | 四 |
实验名称:Android开发基础
二、具体实验内容
(一)Android Stuidio的安装测试
参考Android开发简易教程,安装 Android Stuidio。
完成Hello World, 要求修改res目录中的内容,Hello World后要显示自己的学号,自己学号前后一名同学的学号。
学习Android Stuidio调试应用程序。
(1)实验步骤
- 创建project后,从
app→res→layout→activity_main.xml中找到text - 将
android:text="Hello World!"改为android:text="Hello World! 20165222 20165223 20165224" - 修改完成后运行
app→java→MainActivity→run→creat new vitual devices得到结果
(2)实验代码
activity_main.xml
<?xml version="1.0" encoding="utf-8"?>

<android.support.constraint.ConstraintLayout

    xmlns:android="http://schemas.android.com/apk/res/android"

    xmlns:tools="http://schemas.android.com/tools"

    xmlns:app="http://schemas.android.com/apk/res-auto"

    android:layout_width="match_parent"

    android:layout_height="match_parent"

    tools:context="com.example.dell1.helloworld.MainActivity">

    <TextView

        android:layout_width="wrap_content"

        android:layout_height="wrap_content"

        android:text="Hello World! 20165222 20165223 20165224"

        app:layout_constraintBottom_toBottomOf="parent"

        app:layout_constraintLeft_toLeftOf="parent"

        app:layout_constraintRight_toRightOf="parent"

        app:layout_constraintTop_toTopOf="parent" />

</android.support.constraint.ConstraintLayout>
(3)实验截图

(二)Activity测试
(1)实验步骤
- 参考《Java和Android开发学习指南(第二版)(EPUBIT,Java for Android 2nd)》第二十五章:
- 构建项目,运行教材相关代码
- 创建 ThirdActivity, 在ThirdActivity中显示自己的学号,修改代码让MainActivity启动ThirdActivity
- 提交代码运行截图和码云Git链接,截图要有学号水印,否则会扣分
(2)实验代码
MainActivity.java
package cn.edu.besti.is.cn20165223;

import android.os.Bundle;

import android.app.Activity;

import android.content.Intent;

import android.view.Menu;

import android.view.MotionEvent;

import android.view.View;

import android.view.View.OnTouchListener;

import android.widget.TextView;

public class MainActivity extends Activity implements

        OnTouchListener {

    @Override

    protected void onCreate(Bundle savedInstanceState) {

        super.onCreate(savedInstanceState);

        setContentView(R.layout.activity_main);

        TextView tv = (TextView) findViewById(R.id.textView1);

        tv.setOnTouchListener(this);

    }

    @Override

    public boolean onCreateOptionsMenu(Menu menu) {

// Inflate the menu; this adds items to the action bar if it

// is present.

        getMenuInflater().inflate(R.menu.menu_main, menu);

        return true;

    }

    @Override

    public boolean onTouch(View arg0, MotionEvent event) {

        Intent intent = new Intent(this, ThirdActivity.class);

        intent.putExtra("message", "20165223蔡霓");

        startActivity(intent);

        return true;

    }

}
ThirdActivity.java
package cn.edu.besti.is.cn20165223;

import android.content.Intent;

import android.support.v7.app.AppCompatActivity;

import android.os.Bundle;

import android.view.Menu;

import android.widget.TextView;

public class ThirdActivity extends AppCompatActivity {

    @Override

    protected void onCreate(Bundle savedInstanceState) {

        super.onCreate(savedInstanceState);

        setContentView(R.layout.activity_third);

        Intent intent = getIntent();

        String message = intent.getStringExtra("message");

        ((TextView) findViewById(R.id.textView1)).setText(message);

    }

    @Override

    public boolean onCreateOptionsMenu(Menu menu) {

        getMenuInflater().inflate(R.menu.menu_third, menu);

        return true;

    }

}
(3)实验截图

(三)UI测试
(1)实验步骤
- 参考《Java和Android开发学习指南(第二版)(EPUBIT,Java for Android 2nd)》第二十六章:
- 构建项目,运行教材相关代码
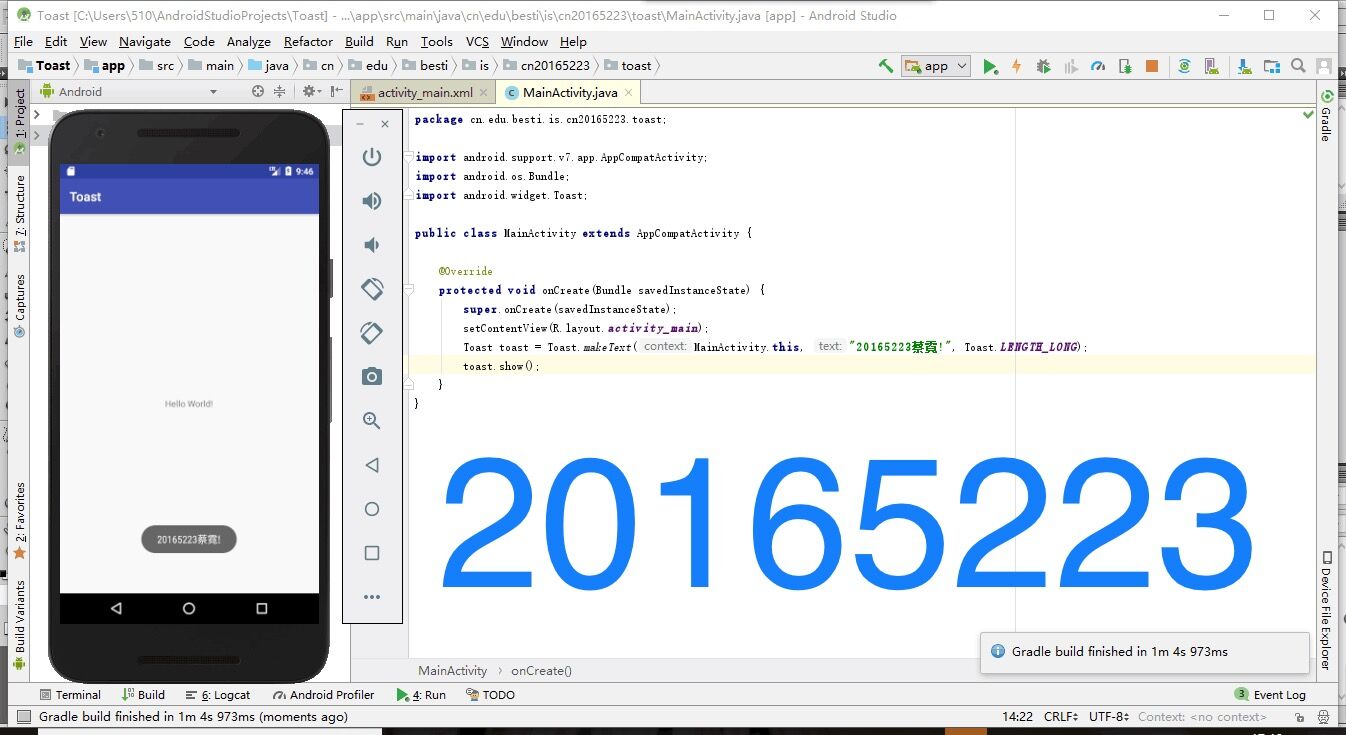
- 修改代码让Toast消息中显示自己的学号信息
- 提交代码运行截图和码云Git链接,截图要有学号水印,否则会扣分
(2)实验代码
package cn.edu.besti.is.cn20165223.toast;

import android.support.v7.app.AppCompatActivity;

import android.os.Bundle;

import android.widget.Toast;

public class MainActivity extends AppCompatActivity {

    @Override

    protected void onCreate(Bundle savedInstanceState) {

        super.onCreate(savedInstanceState);

        setContentView(R.layout.activity_main);

        Toast toast = Toast.makeText(MainActivity.this, "20165223蔡霓", Toast.LENGTH_LONG);

        toast.show();

    }

}
(3)实验截图
(四)布局测试
(1)实验步骤
- 参考《Java和Android开发学习指南(第二版)(EPUBIT,Java for Android 2nd)》第二十七章:
- 构建项目,运行教材相关代码
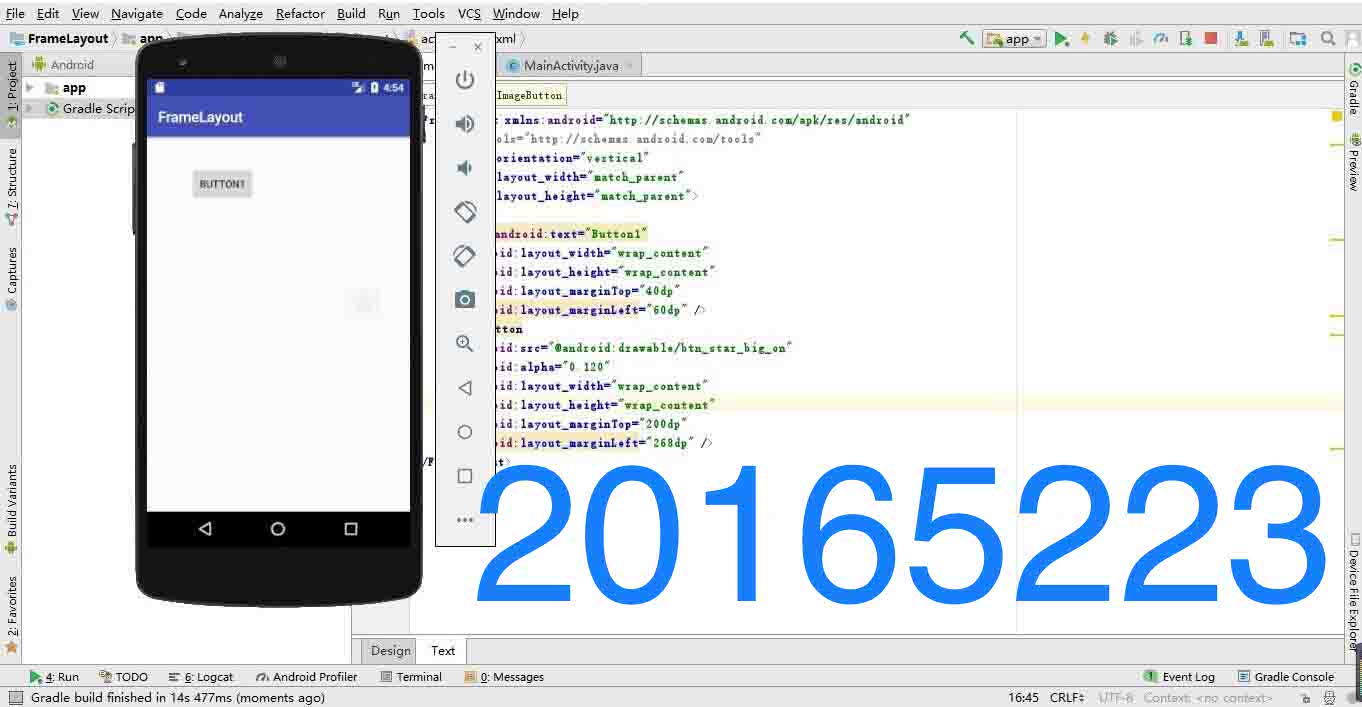
- 修改布局让P290页的界面与教材不同
- 提交代码运行截图和码云Git链接,截图要有学号水印,否则会扣分
(2)实验代码
activity_main.xml
<?xml version="1.0" encoding="utf-8"?>

<android.support.constraint.ConstraintLayout xmlns:android="http://schemas.android.com/apk/res/android"

    xmlns:app="http://schemas.android.com/apk/res-auto"

    xmlns:tools="http://schemas.android.com/tools"

    android:layout_width="match_parent"

    android:layout_height="match_parent"

    tools:context=".MainActivity">

    <Button

        android:id="@+id/button3"

        android:layout_width="wrap_content"

        android:layout_height="wrap_content"

        android:layout_marginLeft="8dp"

        android:layout_marginRight="8dp"

        android:layout_marginTop="228dp"

        android:text="Cancel"

        app:layout_constraintHorizontal_bias="0.971"

        app:layout_constraintLeft_toLeftOf="parent"

        app:layout_constraintRight_toRightOf="parent"

        app:layout_constraintTop_toTopOf="parent" />

    <Button

        android:id="@+id/button2"

        android:layout_width="wrap_content"

        android:layout_height="wrap_content"

        android:layout_marginLeft="8dp"

        android:layout_marginRight="8dp"

        android:layout_marginTop="48dp"

        android:text="Delete"

        app:layout_constraintHorizontal_bias="1.0"

        app:layout_constraintLeft_toLeftOf="parent"

        app:layout_constraintRight_toLeftOf="@+id/button"

        app:layout_constraintTop_toTopOf="parent" />

    <ImageView

        android:id="@+id/imageView"

        android:layout_width="96dp"

        android:layout_height="84dp"

        android:layout_marginBottom="180dp"

        android:layout_marginLeft="8dp"

        android:layout_marginRight="8dp"

        app:layout_constraintBottom_toBottomOf="parent"

        app:layout_constraintLeft_toLeftOf="parent"

        app:layout_constraintRight_toRightOf="parent"

        app:srcCompat="@android:drawable/presence_audio_online" />

    <Button

        android:id="@+id/button"

        android:layout_width="wrap_content"

        android:layout_height="wrap_content"

        android:layout_marginBottom="80dp"

        android:layout_marginLeft="8dp"

        android:layout_marginRight="8dp"

        android:layout_marginTop="8dp"

        android:text="Filter"

        app:layout_constraintBottom_toTopOf="@+id/imageView"

        app:layout_constraintHorizontal_bias="0.971"

        app:layout_constraintLeft_toLeftOf="parent"

        app:layout_constraintRight_toRightOf="parent"

        app:layout_constraintTop_toTopOf="parent"

        app:layout_constraintVertical_bias="0.192" />

    <Button

        android:id="@+id/button4"

        android:layout_width="wrap_content"

        android:layout_height="wrap_content"

        android:layout_marginBottom="8dp"

        android:layout_marginLeft="8dp"

        android:layout_marginRight="8dp"

        android:layout_marginTop="55dp"

        android:text="Save"

        app:layout_constraintBottom_toBottomOf="parent"

        app:layout_constraintHorizontal_bias="0.0"

        app:layout_constraintLeft_toLeftOf="parent"

        app:layout_constraintRight_toLeftOf="@+id/button5"

        app:layout_constraintTop_toBottomOf="@+id/button2"

        app:layout_constraintVertical_bias="0.592" />

    <Button

        android:id="@+id/tableRow"

        android:layout_width="wrap_content"

        android:layout_height="wrap_content"

        android:layout_marginBottom="8dp"

        android:layout_marginLeft="8dp"

        android:layout_marginRight="8dp"

        android:layout_marginTop="55dp"

        android:text="Share"

        app:layout_constraintBottom_toBottomOf="parent"

        app:layout_constraintHorizontal_bias="0.0"

        app:layout_constraintLeft_toLeftOf="parent"

        app:layout_constraintRight_toLeftOf="@+id/button5"

        app:layout_constraintTop_toBottomOf="@+id/button2"

        app:layout_constraintVertical_bias="0.032" />

    <TableRow

        android:id="@+id/button5"

        android:layout_width="wrap_content"

        android:layout_height="wrap_content"

        tools:layout_editor_absoluteX="160dp"

        tools:layout_editor_absoluteY="196dp">

        <ImageView android:src="@android:drawable/btn_star_big_off" />

        <TextClock />

        <ImageView android:src="@android:drawable/btn_star_big_on" />

    </TableRow>

</android.support.constraint.ConstraintLayout>
(3)实验截图
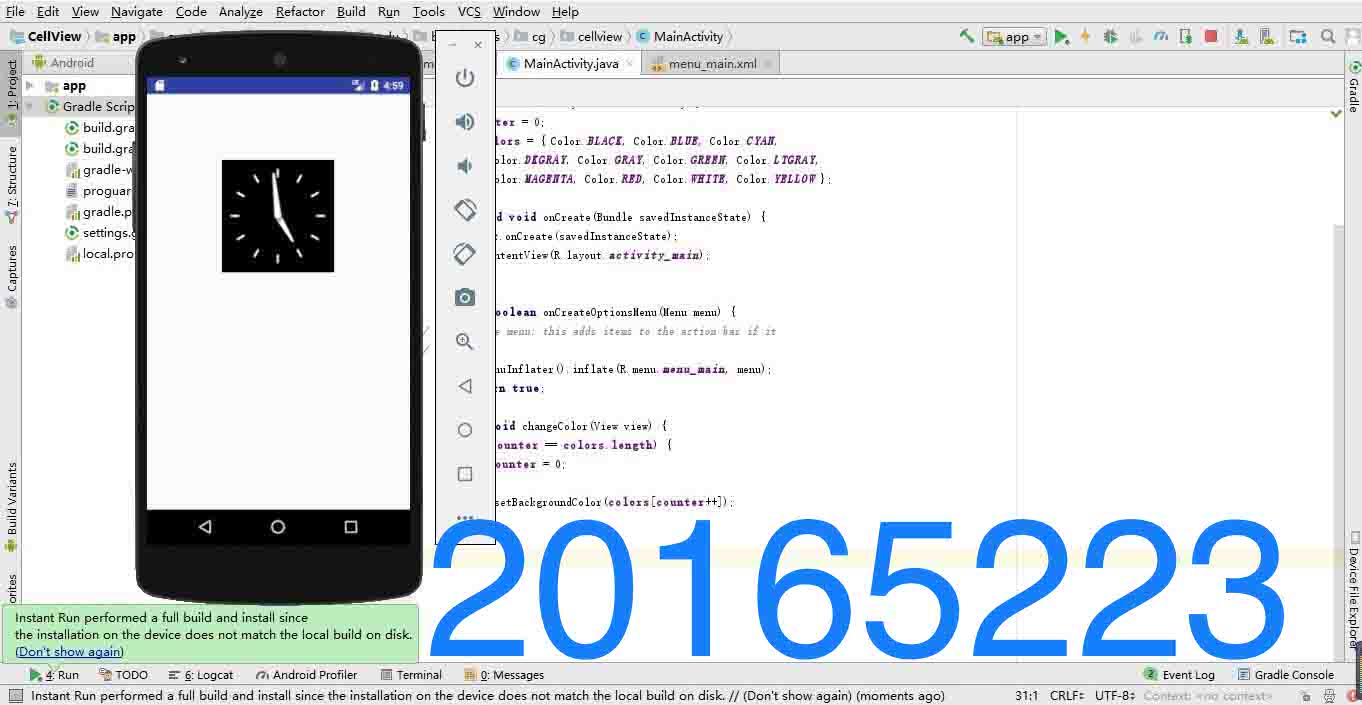
(五)事件处理测试
(1)实验步骤
- 参考《Java和Android开发学习指南(第二版)(EPUBIT,Java for Android 2nd)》第二十八章
- 构建项目,运行教材相关代码
- 提交代码运行截图和码云Git链接,截图要有学号水印,否则会扣分
(2)实验代码
MainActivity.java
package cn.edu.besti.is.cn20165223;

import android.support.v7.app.AppCompatActivity;

import android.widget.AnalogClock;

import android.app.Activity;

import android.graphics.Color;

import android.os.Bundle;

import android.view.Menu;

import android.view.View;

import com.example.multicolorclock.R;

public class MainActivity extends AppCompatActivity {

    int counter = 0;

    int[] colors = {Color.BLACK, Color.BLUE, Color.CYAN, Color.DKGRAY, Color.GRAY, Color.GREEN, Color.LTGRAY, Color.MAGENTA, Color.RED, Color.WHITE, Color.YELLOW};

    @Override

    protected void onCreate(Bundle savedInstanceState) {

        super.onCreate(savedInstanceState);

        setContentView(R.layout.activity_main);

    }

    @Override

    public boolean onCreateOptionsMenu(Menu menu) {

        // Inflate the menu; this adds items to the action bar if it

        // is present.

        getMenuInflater().inflate(R.menu.menu_main, menu);

        return true;

    }

    public void changeColor(View view) {

        if (counter == colors.length) {

            counter = 0;

        }

        view.setBackgroundColor(colors[counter++]);

    }

}
(3)实验截图
三、实验总结
- 遇到的问题:
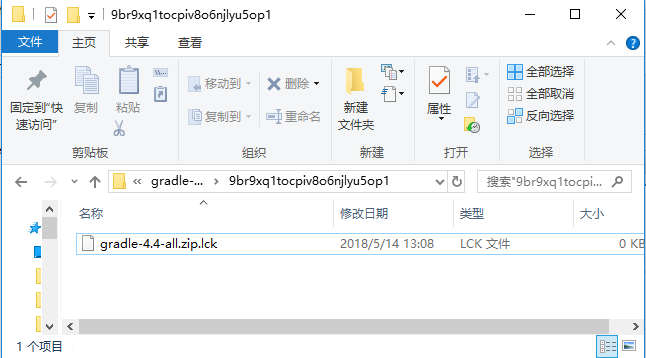

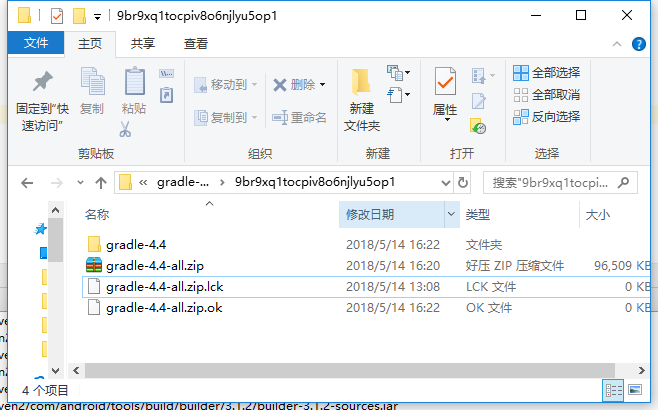
在下载gradle安装包的时候,第一次直接按照教程走,让电脑自行下载却出现上图的问题,打开模拟器的时候无法运行,提示是安装包有损坏,因此也没有出现运行成功的.ok文件。在网上查询资料后得知需要重新下载完整的安装包直接替换掉损坏的gradle包,于是我重新在网上找到合适的zip包下载后拖动进wapper这个隐藏文件夹后,再次运行就成功了。之后的安装也就顺理进行下去,没有再出什么错误。
- 分析与总结:
这次实验最困难的地方是第一个提交点,如何正确将Android开发系统安装进电脑里。这一步花费了我两天的时间才成功安装好,不仅是因为下载速度慢、安装内容多,还因为各种层出不穷的大小错误,最终还是逐个击破,其中艰难不必多说。其他几个提交点只是老师给出的最简单的看书修改范畴内的实验内容,在仔细看了《Java和Android开发学习指南(第二版)(EPUBIT,Java for Android 2nd)》需要学习的章节内容后,修改起来还是比较容易的,但也同时让我了解到一个全新的领域,还需要我进一步学习。
- 参考资料:
- Intellj IDEA 简易教程-Android开发
- Android开发简易教程
- 《Java和Android开发学习指南(第二版)(EPUBIT,Java for Android 2nd)》
四、PSP时间
| 实验步骤 | 耗时 | 百分比 |
|---|---|---|
| 题目分析 | 1h | 10% |
| 思路设计 | 2h | 20% |
| 代码实现 | 5h | 50% |
| 调试测试 | 1h | 10% |
| 实验总结 | 1h | 10% |
20165223 实验四 Android开发基础的更多相关文章
- 20145213 《Java程序设计》实验四 Android开发基础
20145213 <Java程序设计>实验四 Android开发基础 说在前面的话 不同以往实验,对于这次实验具体内容我是比较茫然的.因为点我,打开实验四的链接居然能飘出一股熟悉的味道,这 ...
- 实验四 Android开发基础
实验四 Android开发基础 实验内容 1.安装Android Studio 2.运行安卓AVD模拟器 3.使用安卓运行出虚拟手机并显示HelloWorld以及自己的学号 (一)SDK的安装 (二) ...
- 20145337实验四Android开发基础
20145337实验四Android开发基础 实验内容 基于Android Studio开发简单的Android应用并部署测试; 了解Android组件.布局管理器的使用: 掌握Android中事件处 ...
- 20145225《Java程序设计》 实验四 Android开发基础
20145225<Java程序设计> 实验四 Android开发基础 实验报告 实验内容 安装Android Studio 运行安卓AVD模拟器 使用安卓运行出虚拟手机并显示HelloWo ...
- 20145208 实验四 Android开发基础
20145208 实验四 Android开发基础 安装Android Studio 安装的具体步骤在老师的链接中已经很详细了,在此就不做赘述了. 在此提出我觉得安装的时候需要注意的两个地方 一是安装地 ...
- 20145215实验四 Android开发基础
20145215实验四 Android开发基础 实验内容 基于Android Studio开发简单的Android应用并部署测试; 了解Android组件.布局管理器的使用: 掌握Android中事件 ...
- 20155324 《Java程序设计》实验四 Android开发基础
20155324 <Java程序设计>实验四 Android开发基础 实验内容 1.基于Android Studio开发简单的Android应用并部署测试; 2.了解Android.组件. ...
- 20155228 实验四 Android开发基础
20155228 实验四 Android开发基础 实验内容 1.基于Android Studio开发简单的Android应用并部署测试; 2.了解Android.组件.布局管理器的使用: 3.掌握An ...
- 20155219实验四 Android开发基础设计实验报告
20155219实验四 Android开发基础设计实验报告 实验内容 安装Andriod Studio并配置软件 使用Andriod Studio软件实现Hello World!+学号的小程序 实验步 ...
随机推荐
- VMware虚拟机中常见的问题汇总
在使用虚拟机进行开发工作的时候,经常会遇到各种各样的问题, 总结再次, 防微杜渐 1. wget: unable to resolve host address的解决方法 原因分析: DNS域名解析的 ...
- 1px实现方案
JS处理 首先,可以通过 window.devicePixelRatio 拿到设备的像素比,然后给 html 标签加上的相应的样式. function retina () { // 高分辨率屏幕处理 ...
- oracle创建表空间、创建用户、授权角色和导入导出用户数据
使用数据库管理员身份登录 -- log as sysdba sqlplus / as sysdba; 创建临时表空间 -- create temporary tablespace create tem ...
- [转帖]BRD、MRD 和 PRD
来源: https://www.zhihu.com/question/19655491 BRD 商业需求文档 Business Requirement Document MRD 市场需求文档 Mark ...
- 用mescroll实现无限上拉增加数据,下拉刷新数据 (学习笔记)
最近自己做一个web app需要用到上拉查询下页数据,网上看了很多很多帖子,发现并不能快速的套用,总是会出现各种问题无法使用,于是无奈自己跑去看了官方api文档,终于做了出来,至此做个笔记,以后用到可 ...
- 在python中定义二维数组
发表于 http://liamchzh.0fees.net/?p=234&i=1 一次偶然的机会,发现python中list非常有意思. 先看一段代码 [py]array = [0, 0, 0 ...
- WPF中关于对前台Xaml中Triggers的一些重要思考。
今天在做一个小Demo的时候碰到了一个比较奇怪的问题,就是其中一个Trigger始终无法执行,<Trigger Property="Popup.IsOpen" Value=& ...
- mysql定时任务event——清理过期数据
需要删除数据的表名:t_req_log 建表sql CREATE TABLE `t_req_log` ( `id` ) NOT NULL AUTO_INCREMENT, `host` ) DEFAUL ...
- JQuery operate xml
msg is <?xml ?> <Parameters> <WorkflowName>...</WorkflowName> </Parameter ...
- 51nod1016
1016 水仙花数 V2 1 秒 131,072 KB 160 分 6 级题 水仙花数是指一个 n 位数 ( n≥3 ),它的每个位上的数字的 n 次幂之和等于它本身.(例如:1^3 + 5^3 ...