Nginx+uwsgi部署 Diango(生产环境)
环境:CentOS6.5 + Nginx1.11.5 + Python3.5.2
1. 安装基础软件包
yum install -y zlib-devel bzip2-devel \

pcre-devel openssl-devel ncurses-devel sqlite-devel \

readline-devel tk-devel
2. 安装Python3.5.2版本
wget https://www.python.org/ftp/python/3.5.2/Python-3.5.2.tar.xz

tar xf Python-3.5.2.tar.xz

cd Python-3.5.2

./configure

make -j 2

make altinstall
PS:Python3.x默认已经安装pip等包管理工具,如果没有需要手动安装`pip`包管理工具
3. uWSGI的安装与使用
什么是uwsgi,what?
uWSGI是一个Web服务器,它实现了WSGI协议、uwsgi、http等协议。Nginx中HttpUwsgiModule的作用是与uWSGI服务器进行交换。
要注意 WSGI / uwsgi / uWSGI 这三个概念的区分。
- WSGI是一种Web服务器网关接口。它是一个Web服务器(如nginx,uWSGI等服务器)与web应用(如用Flask框架写的程序)通信的一种规范。
- uwsgi是一种线路协议而不是通信协议,在此常用于在uWSGI服务器与其他网络服务器的数据通信。
- 而uWSGI是实现了uwsgi和WSGI两种协议的Web服务器。
- uwsgi协议是一个uWSGI服务器自有的协议,它用于定义传输信息的类型(type of information),每一个uwsgi packet前4byte为传输信息类型描述,它与WSGI相比是两样东西。
uWSGI的主要特点如下
- 超快的性能
- 低内存占用(实测为apache2的mod_wsgi的一半左右)
- 多app管理(终于不用冥思苦想下个app用哪个端口比较好了-.-)
- 详尽的日志功能(可以用来分析app性能和瓶颈)
- 高度可定制(内存大小限制,服务一定次数后重启等)
安装uWSGI
# Install the latest stable release:

pip install uwsgi

# ... or if you want to install the latest LTS (long term support) release,

pip install https://projects.unbit.it/downloads/uwsgi-lts.tar.gz
基本测试
创建测试文件
# test.py

def application(env, start_response):

    start_response('200 OK', [('Content-Type','text/html')])

    return [b"Hello World"] # python3

    #return ["Hello World"] # python2
运行
uwsgi --http :8000 --wsgi-file test.py
使用浏览器访问`http://ip:8000`验证
使用uWSGI运行Django
uwsgi --http :8000 --module mysite.wsgi
使用浏览器访问`http://ip:8000`验证
可以将参数写到一个配置文件中
[root@localhost Django_test]# vim mysite_uwsgi.ini

[uwsgi]

http = :9000

#the local unix socket file than commnuincate to Nginx

socket = 127.0.0.1:8001

# the base directory (full path)

chdir = /usr/local/Django_test

# Django's wsgi file

wsgi-file = Django_test/wsgi.py

# maximum number of worker processes

processes = 4

#thread numbers startched in each worker process

threads = 2

#monitor uwsgi status

stats = 127.0.0.1:9191

# clear environment on exit or restart

vacuum          = true
启动
uwsgi --ini mysite_uwsgi.ini
使用浏览器访问`http://ip:9000`验证
3. 安装并配置Nginx
useradd -M -s /sbin/nologin nginx

tar zxf nginx-1.11.5.tar.gz

cd nginx-1.11.5

./configure --prefix=/usr/local/nginx --user=nginx --group=nginx --with-http_stub_status_module --with-http_gzip_static_module

make && make install

ln -s /usr/local/nginx/sbin/nginx /usr/local/sbin/
修改nginx配置文件
#修改主配置文件,引入下面要写的uwsgi的配置文件,也可以在当前配置文件中写

# vim /usr/local/nginx/conf/nginx.conf

#在http区段中

include mysite_uwsgi_nginx.conf;
创建一个uwsgi的配置文件
# vim /usr/local/nginx/conf/mysite_uwsgi_nginx.conf

# the upstream component nginx needs to connect to

upstream django {

    # server unix:///path/to/your/mysite/mysite.sock; # for a file socket

    server 127.0.0.1:8001; # for a web port socket (we'll use this first)

}

# configuration of the server

server {

    # the port your site will be served on

    listen      8000;

    # the domain name it will serve for

    server_name .example.com; # substitute your machine's IP address or FQDN

    charset     utf-8;

    # max upload size

    client_max_body_size 75M;   # adjust to taste

    location /static {

        alias /usr/local/Django_test/static; # your Django project's static files - amend as required

    }

    # Finally, send all non-media requests to the Django server.

    location / {

        uwsgi_pass  django;

        include     uwsgi_params; # the uwsgi_params file you installed

    }

}
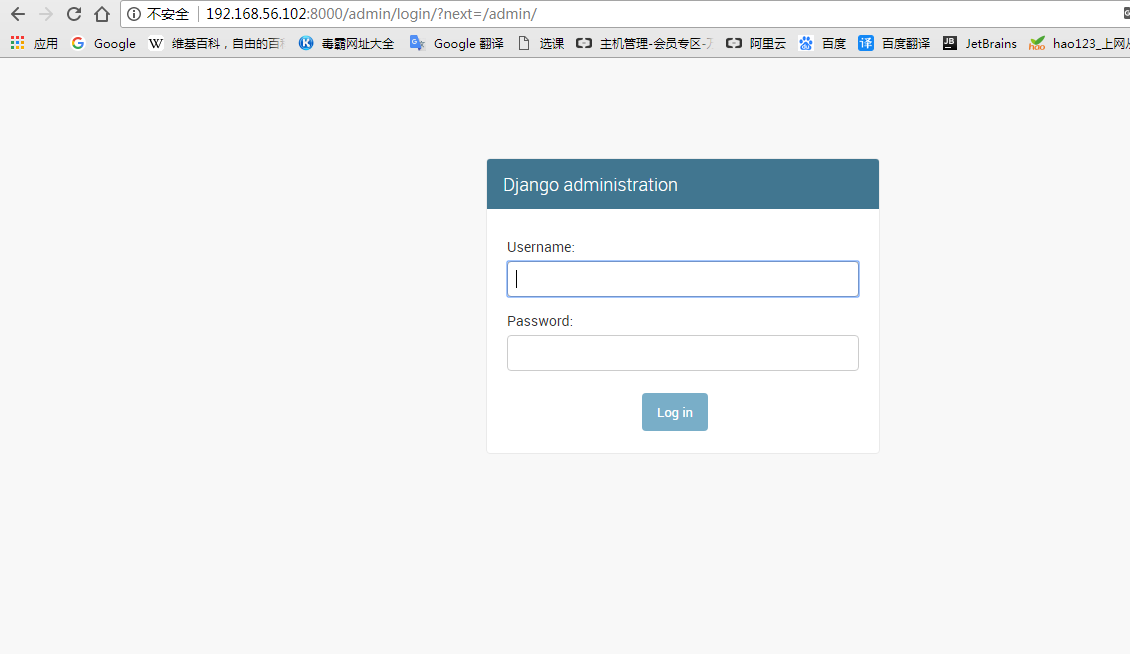
到此Django项目部署已经基本部署完成,你可以访问我们写的页面,但是访问`http://ip:8000/admin`却发现没有样式,waht?


这个问题是由于admin的样式文件都在django内部,而不是在我们的项目的静态文件的目录中,到此我们需要把所有的静态文件汇聚到一个目录中
1. 修改项目目录中的`setting.py`文件,添加 (all_statics可以自己指定目录)
STATIC_ROOT = os.path.join(BASE_DIR, "all_statics/")
2.run (提示输入yes)
python manage.py collectstatic
3.现在我们需要去修改nginx的配置文件,将静态文件的目录修改为汇聚后的静态文件的目录
location /static {

        alias /usr/local/Django_test/all_statics;

    }
现在去启动nginx和uwsgi
[root@localhost Django_test]# # nginx

[root@localhost Django_test]# uwsgi mysite_uwsgi.ini &
现在admin页面总算可以看了

Nginx+uwsgi部署 Diango(生产环境)的更多相关文章
- CentOS7 + Python3 + Django(rest_framework) + MySQL + nginx + uwsgi 部署 API 开发环境, 记坑篇
CentOS7 + Python3 + Django(rest_framework) + MySQL + nginx + uwsgi 部署 API 开发环境 CentOS7 + Python3 + D ...
- Debian7下初次尝试Nginx+Uwsgi部署Django开发环境
之前一直都用的是新浪的SAE,但是由于各种限制,各种不爽,终于下定决心开始折腾VPS,于是在搬瓦工上买了个年付VPS,开始折腾之旅. 由于对Linux一窍不通,所以不知道如何在Linux上部署开发环境 ...
- 使用Nginx+uWSGI部署Django项目
1.linux安装python3环境 参考链接:https://www.cnblogs.com/zzqit/p/10087680.html 2.安装uwsgi pip3 install uwsgi l ...
- Ubuntu下nginx+uwsgi+flask的执行环境搭建
选择web framwork是个非常艰难的事情, 主要分为轻量级和重量级框架. 因为没有搭建站点这样的须要, 所以回避SSH, Django这样的框架, 而选择一个轻量级框架. 自己也比較青睐pyth ...
- 填坑!!!virtualenv 中 nginx + uwsgi 部署 django
一.为什么会有这篇文章 第一次接触 uwsgi 和 nginx ,这个环境搭建,踩了太多坑,现在记录下来,让后来者少走弯路. 本来在 Ubuntu14.04 上 搭建好了环境,然后到 centos7. ...
- nginx + uwsgi 部署 Django+Vue项目
nginx + uwsgi 部署 Django+Vue项目 windows 本地 DNS 解析 文件路径 C:\Windows\System32\drivers\etc 单机本地测试运行方式,调用dj ...
- Python3.6+nginx+uwsgi部署Django程序到阿里云Ubuntu16.04系统
Python3.6+nginx+uwsgi部署Django程序到阿里云Ubuntu16.04系统 这个是写好的Django程序在本地机运行的情况,一个查询接口. 准备工作 1.首先购买一台阿里云的EC ...
- ubuntu+Django + nginx + uwsgi 部署
ubuntu+Django + nginx + uwsgi 部署 0.前期准备 注意:以下几件事都必须在激活虚拟环境下完成 运行以下命令生成项目所需的依赖列表,会在项目根目录生成一个requireme ...
- 把Sharepoint Desinger 工作流部署到生产环境
下面是比较简单的方法,把Designer工作流从开发环境部署到生产环境. 在Sharepoint Desinger 2013 中点击需要部署的工作流. 点击保存,发布. 点Export to Visi ...
随机推荐
- 很详细全部的WinDbg学习资料
[ 分类 ]- windbg - hgy413的专栏(﹎゛Never Give Up Your Dream ..ヽ..) - CSDN博客 .
- ubuntu 添加开机启动服务
新建umpserver.service [Unit] Description=UMPServer After=syslog.target network.target remote-fs.target ...
- H5 22-通配符选择器
22-通配符选择器 我是标题 我是段落 我是超链接 --> 我是标题 我是段落 我是超链接 <!DOCTYPE html> <html lang="en"& ...
- 关于getHibernateTemplate().get()方法
返回的对象值唯一,方法带有两个参数 第一个是意图查询实体的Class 如User.Class ;第二个参数是该实体在数据库中对应的主键值,而且参数的类型要和映射文件相对应. 如 Role role ...
- session与cookie的区别以及HTML5中WebStorage理解
一.session与cookie的区别 二.HTML5中WebStorage理解 WebStorage的目的是克服由cookie所带来的一些限制,当数据需要被严格控制在客户端时,不需要持续的将数据发回 ...
- Linux 典型应用之服务管理
crontab 定时任务 用户所建立的crontab文件中,每一行都代表一项任务,每行的每个字段代表一项设置,它的格式共分为六个字段,前五段是时间设定段,第六段是要执行的命令段,格式如下: minut ...
- 练习MD5加密jar包编写
简介 参数签名可以保证开发的者的信息被冒用后,信息不会被泄露和受损.原因在于接入者和提供者都会对每一次的接口访问进行签名和验证. 签名sign的方式是目前比较常用的方式. 第1步:接入者把需求访问的接 ...
- Oracle SQL优化原则
原文:http://bbs.landingbj.com/t-0-240353-1.html 1.选用适合的 ORACLE 优化器 2.访问 Table 的方式 3.共享SQL语句 共享的语句必须满足三 ...
- Python3练习题 018:打印星号菱形
Python的内置方法 str.center(width [, fillchar]) 就能轻而易举打印出来:str即是数量不等的星号,width即是最大宽度(7个空格),默认填充字符fillchar就 ...
- postgreSQL使用杂谈
由于当时是在美国安装的postgreSQL ,导致回到上海后使用时,发现时间数据显示不正确. To acomplish the timezone change in Postgres 9.6 you ...
