android PakageManagerService启动流程分析
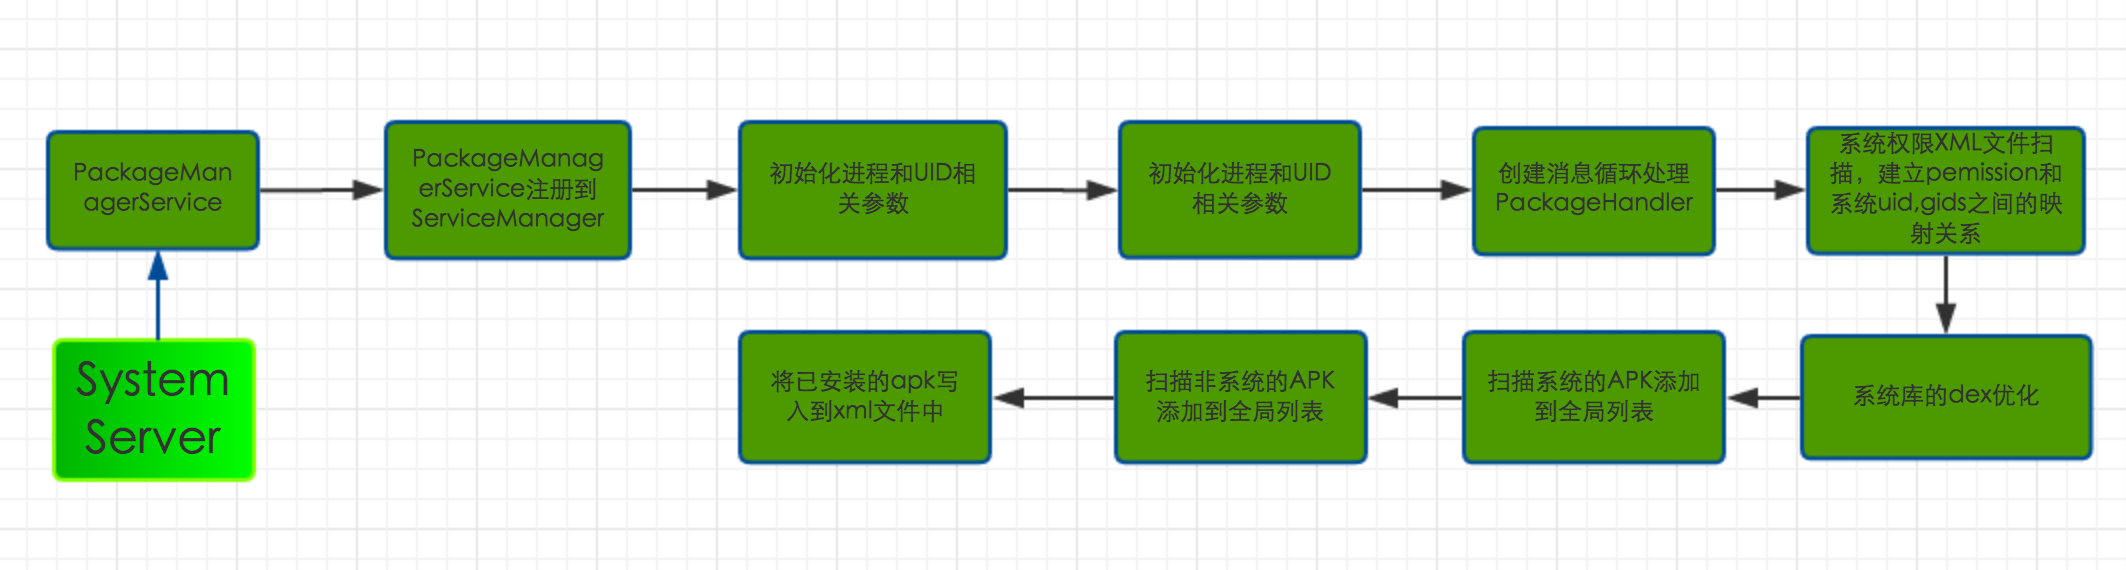
PakageManagerService的启动流程图
1.PakageManagerService概述
PakageManagerService是android系统中一个核心的服务,它负责系统中Package的管理,应该程序的安装、卸载等。后面PakageManagerService简称PMS。
2.SystemServer启动PackageManagerService
我之前的ATA文章有说到,SystemServer进程是Zygote孵化出的第一个进程,该进程主要的工作是启动android系统服务进程,其中包括PackageManagerService服务,SystemServer启动PMS关键源码如下:
    private void startBootstrapServices() {
        //...
         //调用PMS的main函数
         mPackageManagerService = PackageManagerService.main(mSystemContext, installer,
                mFactoryTestMode != FactoryTest.FACTORY_TEST_OFF, mOnlyCore);
         //判断本次是否为初次启动,当Zygote或者SystemServer退出时,init会再次启动它们,所以这里
         //的firstBoot指的是开机后的第一次启动
        mFirstBoot = mPackageManagerService.isFirstBoot();
        mPackageManager = mSystemContext.getPackageManager();
      //...
    }
关键点
- PMS的main函数,该函数是PKM的核心。
3.PMS的main方法
PackageManagerService的主要功能是,扫描Android系统中几个目标文件夹的APK,建立对应的数据结构来管理Package信息、四大组件信息、权限信息等各种信息。例如PKMS解析APK包中的AndroidMainfest.xml,并根据其中声明的Activity标签来创建对应的对象并加以保管。PMS的main方法的代码如下:
 public static PackageManagerService main(Context context, Installer installer,
            boolean factoryTest, boolean onlyCore) {
        //new 一个PackageManagerService对象
        PackageManagerService m = new PackageManagerService(context, installer,
                factoryTest, onlyCore);
        //PKM注册到ServiceManager上。ServiceManager相当于安卓系统服务的DNS服务器
        ServiceManager.addService("package", m);
        return m;
 }
该方法看似很简单,只有几行代码,然而执行事件却比较长,这是因为PMS在其构造函数中做了很多的“重体力活”,这也是android启动速度慢的主要因素之一。安装的应用越多,系统启动开机时间越长。
PMS构造函数的主要工作流程
- 扫描目标文件夹之前的准备工作。
- 扫描目标文件夹。
- 扫描之后的工作。
4.PMS的前期准备工作
4.1探究Setting
public PackageManagerService(Context context, Installer installer,
            boolean factoryTest, boolean onlyCore) {
        EventLog.writeEvent(EventLogTags.BOOT_PROGRESS_PMS_START,
                SystemClock.uptimeMillis());

        if (mSdkVersion <= 0) {
            Slog.w(TAG, "**** ro.build.version.sdk not set!");
        }

        mContext = context;
        //是否在工厂测试模式下,假定为false
        mFactoryTest = factoryTest;
        mOnlyCore = onlyCore;
        //如果此系统是“eng”版,扫描Package后,不对package做dex优化
        mLazyDexOpt = "eng".equals(SystemProperties.get("ro.build.type"));
        //用于存储与显示屏相关的一些属性,例如屏幕的宽高分辨率等。
        mMetrics = new DisplayMetrics();
        mSettings = new Settings(mPackages);
        //第一个参数是字符串“android.uid.system”;第二个是SYSTEM_UID,其值为1000,
        //第三个是FLAG_SYSTEM标志,用于标识系统Package。
        mSettings.addSharedUserLPw("android.uid.system", Process.SYSTEM_UID,
                ApplicationInfo.FLAG_SYSTEM, ApplicationInfo.PRIVATE_FLAG_PRIVILEGED);
        mSettings.addSharedUserLPw("android.uid.phone", RADIO_UID,
                ApplicationInfo.FLAG_SYSTEM, ApplicationInfo.PRIVATE_FLAG_PRIVILEGED);
        mSettings.addSharedUserLPw("android.uid.log", LOG_UID,
                ApplicationInfo.FLAG_SYSTEM, ApplicationInfo.PRIVATE_FLAG_PRIVILEGED);
        mSettings.addSharedUserLPw("android.uid.nfc", NFC_UID,
                ApplicationInfo.FLAG_SYSTEM, ApplicationInfo.PRIVATE_FLAG_PRIVILEGED);
        mSettings.addSharedUserLPw("android.uid.bluetooth", BLUETOOTH_UID,
                ApplicationInfo.FLAG_SYSTEM, ApplicationInfo.PRIVATE_FLAG_PRIVILEGED);
        mSettings.addSharedUserLPw("android.uid.shell", SHELL_UID,
                ApplicationInfo.FLAG_SYSTEM, ApplicationInfo.PRIVATE_FLAG_PRIVILEGED);
4.1.1Android系统中UID/GID
UID为用户ID的缩写,GID为用户组ID的缩写,这两个概念均与Linux系统中进程的权限管理有关。一般来说,每一个进程都有一个对应的UID,表示该进程属于哪个用户,不同用户有不同权限。一个进程也可分属不同的用户组,每个用户组都有对应的权限。
在android系统中,系统定义的UID/GID在Process.java文件中,关键源码如下所示
    /**
     * Defines the UID/GID under which system code runs.
     */
    public static final int SYSTEM_UID = 1000;

    /**
     * Defines the UID/GID under which the telephony code runs.
     */
    public static final int PHONE_UID = 1001;

    /**
     * Defines the UID/GID for the user shell.
     * @hide
     */
    public static final int SHELL_UID = 2000;

    /**
     * Defines the UID/GID for the log group.
     * @hide
     */
    public static final int LOG_UID = 1007;

    /**
     * Defines the UID/GID for the WIFI supplicant process.
     * @hide
     */
    public static final int WIFI_UID = 1010;

    /**
     * Defines the UID/GID for the mediaserver process.
     * @hide
     */
    public static final int MEDIA_UID = 1013;

    /**
     * Defines the UID/GID for the DRM process.
     * @hide
     */
    public static final int DRM_UID = 1019;

    /**
     * Defines the UID/GID for the group that controls VPN services.
     * @hide
     */
    public static final int VPN_UID = 1016;

    /**
     * Defines the UID/GID for the NFC service process.
     * @hide
     */
    public static final int NFC_UID = 1027;

    /**
     * Defines the UID/GID for the Bluetooth service process.
     * @hide
     */
    public static final int BLUETOOTH_UID = 1002;

    /**
     * Defines the GID for the group that allows write access to the internal media storage.
     * @hide
     */
    public static final int MEDIA_RW_GID = 1023;

    /**
     * Access to installed package details
     * @hide
     */
    public static final int PACKAGE_INFO_GID = 1032;

    /**
     * Defines the UID/GID for the shared RELRO file updater process.
     * @hide
     */
    public static final int SHARED_RELRO_UID = 1037;

    /**
     * Defines the start of a range of UIDs (and GIDs), going from this
     * number to {@link #LAST_APPLICATION_UID} that are reserved for assigning
     * to applications.
     */
    public static final int FIRST_APPLICATION_UID = 10000;

    /**
     * Last of application-specific UIDs starting at
     * {@link #FIRST_APPLICATION_UID}.
     */
    public static final int LAST_APPLICATION_UID = 19999;

    /**
     * First uid used for fully isolated sandboxed processes (with no permissions of their own)
     * @hide
     */
    public static final int FIRST_ISOLATED_UID = 99000;

    /**
     * Last uid used for fully isolated sandboxed processes (with no permissions of their own)
     * @hide
     */
    public static final int LAST_ISOLATED_UID = 99999;
4.1.2 探究SharedUserSetting
Setting中有一个mShareUsers成员,该成员存储的是字符串变量name与SharedUserSetting健值对。
SharedUserSetting addSharedUserLPw(String name, int uid, int pkgFlags, int pkgPrivateFlags) {
        //mSharedUsers是一个HashMap.key为字符串,值为ShareUserSetting对象
        SharedUserSetting s = mSharedUsers.get(name);
        if (s != null) {
            if (s.userId == uid) {
                return s;
            }
           //...
                       return null;
        }
        创建一个SharedUserSetting对象,并设置为userid为uid
        s = new SharedUserSetting(name, pkgFlags, pkgPrivateFlags);
        s.userId = uid;
        if (addUserIdLPw(uid, s, name)) {
            mSharedUsers.put(name, s);
            return s;
        }
        return null;
    }
例如在SystemUI.apk的AndroidManifest.xml文件中,有关键代码:
<mainfest xmlns:android="http://schemas.android.com/apk/res/android"
        package="com.android.systemui"
        coreApp="true"
        android:sharedUserId="android.uid.system"
        android:process="system">
        ....
在该标签中,声明了一个android:sharedUserId的属性,其值为“android.uid.system”。sharedUserId和UID有关,它的作用是
- 两个或者多个声明了同一种sharedUserid的APK可共享彼此的数据,并且可运行在同一进程中。
- 通过声明特定的sharedUserId,该APK所在的进程将被赋予指定UID。
例如SystemUI声明了system的uid,运行SystemUI的进程就可享有system用户所对应的权限了,实际上就是将该进程的UID设置为system的uid了
接下来分析addUserIdLPw的功能,它主要就是将SharedUserSettings对象保存到对应的数组中,代码如下
private boolean addUserIdLPw(int uid, Object obj, Object name) {
        //uid不能超出限制,Android对uid进行归纳,系统APK所在进程小于10000
        //应用APK所在进程的uid从10000开始
        if (uid > Process.LAST_APPLICATION_UID) {
            return false;
        }
        //FIRST_APPLICATION_UID = 10000,属于应用APK
        if (uid >= Process.FIRST_APPLICATION_UID) {
            int N = mUserIds.size();
            //计算索引,其值是uid和FIRST_APPLICATION_UID的差
            final int index = uid - Process.FIRST_APPLICATION_UID;
            while (index >= N) {
                mUserIds.add(null);
                N++;
            }
            //如果索引位置不为空,返回
            if (mUserIds.get(index) != null) {
                PackageManagerService.reportSettingsProblem(Log.ERROR,
                        "Adding duplicate user id: " + uid
                        + " name=" + name);
                return false;
            }
            //mUserIds保存应用Package的uid,obj是SharedUserSettings
            mUserIds.set(index, obj);
        } else {
            if (mOtherUserIds.get(uid) != null) {
                PackageManagerService.reportSettingsProblem(Log.ERROR,
                        "Adding duplicate shared id: " + uid
                                + " name=" + name);
                return false;
            }
            mOtherUserIds.put(uid, obj);
        }
        return true;
    }
4.2 XML文件扫描
接下来是扫描系统目录下与系统权限相关的xml文件,将其存放到PKM中,关键源码如下:
        // 获取系统相关的权限,它主要是解析系统目录下xml文件,获得设备相关的权限
        SystemConfig systemConfig = SystemConfig.getInstance();
        mGlobalGids = systemConfig.getGlobalGids();
        mSystemPermissions = systemConfig.getSystemPermissions();
        mAvailableFeatures = systemConfig.getAvailableFeatures();

        synchronized (mInstallLock) {
        // writer
        synchronized (mPackages) {
            //创建一个ThreadHandler对象,实际就是创建一个带消息队列循环处理的线程,
            //该线程的工作是:程序的安装和卸载等。
            mHandlerThread = new ServiceThread(TAG,
                    Process.THREAD_PRIORITY_BACKGROUND, true /*allowIo*/);
            mHandlerThread.start();
            //以ThreadHandler线程的消息循环(Looper对象)作为参数new一个
            //PackageHandler,因此该Handler的handlemessage方法将运行在此线程上
            mHandler = new PackageHandler(mHandlerThread.getLooper());
            Watchdog.getInstance().addThread(mHandler, WATCHDOG_TIMEOUT);
            // /data目录
            File dataDir = Environment.getDataDirectory();
            // /data/data目录
            mAppDataDir = new File(dataDir, "data");
            // /data/app目录
            mAppInstallDir = new File(dataDir, "app");
            // /data/app-lib目录
            mAppLib32InstallDir = new File(dataDir, "app-lib");
            // /data/app-asec目录
            mAsecInternalPath = new File(dataDir, "app-asec").getPath();
            // /data/user目录
            mUserAppDataDir = new File(dataDir, "user");
            // /data/app-private目录
            mDrmAppPrivateInstallDir = new File(dataDir, "app-private");
            //new一个UserManager对象,目前没有什么作用,但其前途不可限量。
            //google设想,未来手机将支持多个User,每个User安装自己的应用
            //该功能为android智能手机推向企业用户打下基础
            sUserManager = new UserManagerService(context, this,
                    mInstallLock, mPackages);

            // 获取系统相关的权限,它主要是解析系统目录下xml文件,获得设备相关的权限
            ArrayMap<String, SystemConfig.PermissionEntry> permConfig
                    = systemConfig.getPermissions();
            for (int i=0; i<permConfig.size(); i++) {
                SystemConfig.PermissionEntry perm = permConfig.valueAt(i);
                BasePermission bp = mSettings.mPermissions.get(perm.name);
                if (bp == null) {
                    bp = new BasePermission(perm.name, "android", BasePermission.TYPE_BUILTIN);
                    mSettings.mPermissions.put(perm.name, bp);
                }
                if (perm.gids != null) {
                    bp.setGids(perm.gids, perm.perUser);
                }
            }
            //获得系统的Libraries,也就是系统的一些jar
            ArrayMap<String, String> libConfig = systemConfig.getSharedLibraries();
            for (int i=0; i<libConfig.size(); i++) {
                mSharedLibraries.put(libConfig.keyAt(i),
                        new SharedLibraryEntry(libConfig.valueAt(i), null));
            }

            mFoundPolicyFile = SELinuxMMAC.readInstallPolicy();

            mRestoredSettings = mSettings.readLPw(this, sUserManager.getUsers(false),
                    mSdkVersion, mOnlyCore);

            String customResolverActivity = Resources.getSystem().getString(
                    R.string.config_customResolverActivity);
            if (TextUtils.isEmpty(customResolverActivity)) {
                customResolverActivity = null;
            } else {
                mCustomResolverComponentName = ComponentName.unflattenFromString(
                        customResolverActivity);
            }

            long startTime = SystemClock.uptimeMillis();
进一步我们再观察SystemConfig是如何解析系统权限xml文件的,在SystemConfig的构造函数中,它会去分别读取etc目录下的sysconfig,permissions,sysconfig目录下的文件。
        SystemConfig() {
        // Read configuration from system
        readPermissions(Environment.buildPath(
                Environment.getRootDirectory(), "etc", "sysconfig"), false);
        // Read configuration from the old permissions dir
        readPermissions(Environment.buildPath(
                Environment.getRootDirectory(), "etc", "permissions"), false);
        // Only read features from OEM config
        readPermissions(Environment.buildPath(
                Environment.getOemDirectory(), "etc", "sysconfig"), true);
        readPermissions(Environment.buildPath(
                Environment.getOemDirectory(), "etc", "permissions"), true);
    }
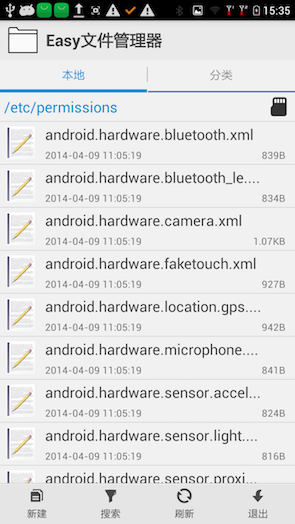
我们看看到底这些目录下放着什么样的文件,例如/etc/permissions目录下的文件如下图:
我们再打开第一个文件来探究,没错,这个文件代表蓝牙权限,表示该设备支持蓝牙。具体代码如下
<?xml version="1.0" encoding="utf-8"?>

<permissions>
    <feature name="android.hardware.bluetooth" />
</permissions>
总结一下PMS的前期工作,其实就是扫描并解析XML文件,将其中的信息保存到特定的数据结构中。
5.PMS扫描Package
第二个阶段的工作主要是扫描系统中的APK,由于需要逐个扫描apk文件,因此手机上安装的程序越多,PKM的工作量越大,系统启动速度越慢,也就是开机时间越长。
5.1系统库的dex优化
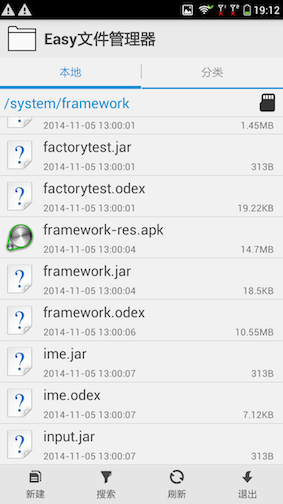
以下的代码主要是对系统库BOOTCLASSPATH指定,或platform.xml定义,或者/system/frameworks目录下的jar
和apk包进行一次检查,该dex优化的优化.dex优化后会在相应的目录生成.odex文件。/system/frameworks如下图:
关键源码如下:
            // Set flag to monitor and not change apk file paths when
            // scanning install directories.
            //定义扫描参数
            final int scanFlags = SCAN_NO_PATHS | SCAN_DEFER_DEX | SCAN_BOOTING | SCAN_INITIAL;
            //用于存储已经dex优化过或者不需要优化的包
            final ArraySet<String> alreadyDexOpted = new ArraySet<String>();

            /**
             * Add everything in the in the boot class path to the
             * list of process files because dexopt will have been run
             * if necessary during zygote startup.
             */
             //获取java启动类库的路径,在init.rc文件中通过BOOTCLASSPATH环境变量输出
             //主要是/system/framework/下的系统jar包
            final String bootClassPath = System.getenv("BOOTCLASSPATH");
            final String systemServerClassPath = System.getenv("SYSTEMSERVERCLASSPATH");
            if (bootClassPath != null) {
                String[] bootClassPathElements = splitString(bootClassPath, ':');
                //循环遍历/system/framework/下的系统jar包的绝对路径,添加到alreadyDexOpted
                for (String element : bootClassPathElements) {
                    alreadyDexOpted.add(element);
                }
            }
            if (mSharedLibraries.size() > 0) {
                //...
                 if (dexoptNeeded != DexFile.NO_DEXOPT_NEEDED) {
                                alreadyDexOpted.add(lib);
                                //dex优化
                                mInstaller.dexopt(lib, Process.SYSTEM_UID, true, dexCodeInstructionSet, dexoptNeeded);

                }
            }

            //...

            File frameworkDir = new File(Environment.getRootDirectory(), "framework");
            //framework-res.apk定义了系统常用的资源,还有几个重要的Activity,如长按Power键弹出选择框
            //不需要dex优化
            alreadyDexOpted.add(frameworkDir.getPath() + "/framework-res.apk");

            alreadyDexOpted.add(frameworkDir.getPath() + "/core-libart.jar");

            //扫描framework/下的apk或者jar进行dex优化
            String[] frameworkFiles = frameworkDir.list();
            if (frameworkFiles != null) {
                // TODO: We could compile these only for the most preferred ABI. We should
                // first double check that the dex files for these commands are not referenced
                // by other system apps.
                for (String dexCodeInstructionSet : dexCodeInstructionSets) {
                    for (int i=0; i<frameworkFiles.length; i++) {
                        File libPath = new File(frameworkDir, frameworkFiles[i]);
                        String path = libPath.getPath();
                        // 跳过已经存在的包
                        if (alreadyDexOpted.contains(path)) {
                            continue;
                        }
                        // 不是apk或者jar的不做处理
                        if (!path.endsWith(".apk") && !path.endsWith(".jar")) {
                            continue;
                        }
                        int dexoptNeeded = DexFile.getDexOptNeeded(path, null, dexCodeInstructionSet, false);
                        if (dexoptNeeded != DexFile.NO_DEXOPT_NEEDED) {
                            //dex优化
                           mInstaller.dexopt(path, Process.SYSTEM_UID, true, dexCodeInstructionSet, dexoptNeeded);
                            }

                    }
                }
            }
5.2扫描系统的APK
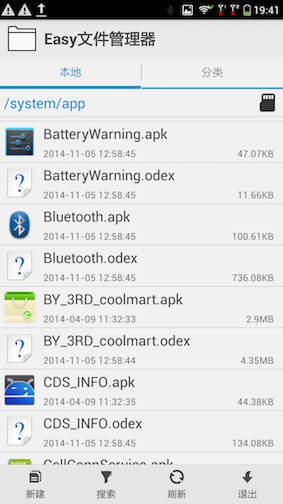
对apk或者jar进行dex优化后,现在PKM进入了重点阶段,扫描系统的APK,每一个APK对应一个Package对象,主要是扫描APK的AndroidManifest.xml,解析application标签及其子标签actvity、service、recever等,也就是android的四大组件,解析后将它们保存到Package对应的数据结构中,最后将它们注册到PKM中,要扫描以下几个目录:
- /system/frameworks:该目录下的文件都是系统库,例如service.jar、framework.jar、framework-res.apk。不过只扫描framework-res.apk文件
- /system/app:该目录下全是默认的系统应用和厂商特定的APK文件,例如Buletooth.apk、和SystemUI.apk等
解析AndroidManifest.xml关键的源码如下:
private Package parseBaseApk(Resources res, XmlResourceParser parser, int flags,
            String[] outError) throws XmlPullParserException, IOException {

             while ((type = parser.next()) != XmlPullParser.END_DOCUMENT
                && (type != XmlPullParser.END_TAG || parser.getDepth() > outerDepth)) {
            if (type == XmlPullParser.END_TAG || type == XmlPullParser.TEXT) {
                continue;
            }

            String tagName = parser.getName();
            //解析<application>
            if (tagName.equals("application")) {
                if (foundApp) {
                    if (RIGID_PARSER) {
                        outError[0] = "<manifest> has more than one <application>";
                        mParseError = PackageManager.INSTALL_PARSE_FAILED_MANIFEST_MALFORMED;
                        return null;
                    } else {
                        Slog.w(TAG, "<manifest> has more than one <application>");
                        XmlUtils.skipCurrentTag(parser);
                        continue;
                    }
                }

                foundApp = true;
                //解析<application>及其子标签
                if (!parseBaseApplication(pkg, res, parser, attrs, flags, outError)) {
                    return null;
                }
            //解析<application>
            } else if (tagName.equals("overlay")) {

            } else if (tagName.equals("key-sets")) {

            } else if (tagName.equals("permission-group")) {

            } else if (tagName.equals("permission")) {

            } else if (tagName.equals("permission-tree")) {
            //解析<uses-permission>
            } else if (tagName.equals("uses-permission")) {

            } else if (tagName.equals("uses-permission-sdk-m")
                    || tagName.equals("uses-permission-sdk-23")) {

            } else if (tagName.equals("uses-configuration")) {

            } else if (tagName.equals("uses-feature")) {

            } else if (tagName.equals("feature-group")) {

            } else if (tagName.equals("uses-sdk")) {

            } else if (tagName.equals("supports-screens")) {

            } else if (tagName.equals("instrumentation")) {

            } else if (tagName.equals("original-package")) {

            } else if (tagName.equals("adopt-permissions")) {

            } else if (tagName.equals("uses-gl-texture")) {

            } else if (tagName.equals("compatible-screens")) {

            } else if (tagName.equals("supports-input")) {

            } else if (tagName.equals("eat-comment")) {

            } else if (RIGID_PARSER) {

            } else {

            }
        }
}
具体看一下怎么解析application标签下的四大组件的,依次解析activity,receiver,service,provider,其中可以发现,receiver被当成activity来解析了,PKM通过PackageParser类将解析后的四大组件保存到对应数据结构中,也就是存放到PackageParser的activities,receivers,providers,services对象中。关键源码如下:
private boolean parseBaseApplication(Package owner, Resources res,
            XmlPullParser parser, AttributeSet attrs, int flags, String[] outError){
            //...
 while ((type = parser.next()) != XmlPullParser.END_DOCUMENT
                && (type != XmlPullParser.END_TAG || parser.getDepth() > innerDepth)) {
            if (type == XmlPullParser.END_TAG || type == XmlPullParser.TEXT) {
                continue;
            }

            String tagName = parser.getName();
            //activity标签
            if (tagName.equals("activity")) {
                //解析activity标签
                Activity a = parseActivity(owner, res, parser, attrs, flags, outError, false,
                        owner.baseHardwareAccelerated);
                //添加activity到owner.activities中
                owner.activities.add(a);
            //receiver标签
            } else if (tagName.equals("receiver")) {
                //解析receiver标签,receiver其实被当成Activity来解析了。
                Activity a = parseActivity(owner, res, parser, attrs, flags, outError, true, false);
                if (a == null) {
                    mParseError = PackageManager.INSTALL_PARSE_FAILED_MANIFEST_MALFORMED;
                    return false;
                }
            //添加activity到owner.activities中
                owner.receivers.add(a);
            //service标签
            } else if (tagName.equals("service")) {
                //解析service标签
                Service s = parseService(owner, res, parser, attrs, flags, outError);
                if (s == null) {
                    mParseError = PackageManager.INSTALL_PARSE_FAILED_MANIFEST_MALFORMED;
                    return false;
                }
            //添加service到owner.services中
                owner.services.add(s);
            //provider标签
            } else if (tagName.equals("provider")) {
                Provider p = parseProvider(owner, res, parser, attrs, flags, outError);
                if (p == null) {
                    mParseError = PackageManager.INSTALL_PARSE_FAILED_MANIFEST_MALFORMED;
                    return false;
                }

                owner.providers.add(p);

            } else if (tagName.equals("activity-alias")) {
            } else if (parser.getName().equals("meta-data")) {

            } else if (tagName.equals("uses-library")) {

            } else if (tagName.equals("uses-package")) {
            }
        }
}
在PackageParser扫描完一个APK后,此时系统已经根据APK中的AndroidMainifest.xml,创建了一个Package对象,下一步是将该Package加入到系统中。此时调用scanPackageDirtyLI方法,scanPackageDirtyLI首先会对packageName为“android”的apk做单独的处理,该apk其实就是framework-res.apk,它包含了几个常见的activity
- ChooserActivity:当startActivity有多个Acitvity符合时,系统会弹出此Acitivity,由用户选择合适的应用来处理
- ShutDownActivity:关机前弹出的选择对话框
- RingtonePickerAcitivity:铃声选择Activity
scanPackageDirtyLI关键代码如下:
private PackageParser.Package scanPackageDirtyLI(PackageParser.Package pkg, int parseFlags,
            int scanFlags, long currentTime, UserHandle user) throws PackageManagerException {
        final File scanFile = new File(pkg.codePath);
        if (pkg.applicationInfo.getCodePath() == null ||
                pkg.applicationInfo.getResourcePath() == null) {
            // Bail out. The resource and code paths haven't been set.
            throw new PackageManagerException(INSTALL_FAILED_INVALID_APK,
                    "Code and resource paths haven't been set correctly");
        }

        if ((parseFlags&PackageParser.PARSE_IS_SYSTEM) != 0) {
            pkg.applicationInfo.flags |= ApplicationInfo.FLAG_SYSTEM;
        } else {
            // Only allow system apps to be flagged as core apps.
            pkg.coreApp = false;
        }

        if ((parseFlags&PackageParser.PARSE_IS_PRIVILEGED) != 0) {
            pkg.applicationInfo.privateFlags |= ApplicationInfo.PRIVATE_FLAG_PRIVILEGED;
        }

        if (mCustomResolverComponentName != null &&
                mCustomResolverComponentName.getPackageName().equals(pkg.packageName)) {
            setUpCustomResolverActivity(pkg);
        }

        if (pkg.packageName.equals("android")) {
            synchronized (mPackages) {
                if (mAndroidApplication != null) {
                   //...
                }

                //保存该package信息
                mPlatformPackage = pkg;
                pkg.mVersionCode = mSdkVersion;
                //保存该package的ApplicationInfo
                mAndroidApplication = pkg.applicationInfo;

                if (!mResolverReplaced) {
                    //mResolveActivity为ChooserActivity信息的ActivityInfo
                    mResolveActivity.applicationInfo = mAndroidApplication;
                    mResolveActivity.name = ResolverActivity.class.getName();
                    mResolveActivity.packageName = mAndroidApplication.packageName;
                    mResolveActivity.processName = "system:ui";
                    mResolveActivity.launchMode = ActivityInfo.LAUNCH_MULTIPLE;
                    mResolveActivity.documentLaunchMode = ActivityInfo.DOCUMENT_LAUNCH_NEVER;
                    mResolveActivity.flags = ActivityInfo.FLAG_EXCLUDE_FROM_RECENTS;
                    mResolveActivity.theme = R.style.Theme_Holo_Dialog_Alert;
                    mResolveActivity.exported = true;
                    mResolveActivity.enabled = true;
                    //mResolveInfo用于存储系统解析Intent后得到的结果信息,在从PKM查询满足某个Intent的
                    //Activity时,返回的就是ResolveInfo,再根据ResolveInfo的activityInfo的信息得到                         //Activity
                    mResolveInfo.activityInfo = mResolveActivity;
                    mResolveInfo.priority = 0;
                    mResolveInfo.preferredOrder = 0;
                    mResolveInfo.match = 0;
                    mResolveComponentName = new ComponentName(
                            mAndroidApplication.packageName, mResolveActivity.name);
                }
            }
        }
 }
“android“该Package与系统有非常重要的作用,这里保存特殊处理保存该Package的信息,主要是为了提高运行过程中的效率,例如ChooserActivity使用的地方非常多。
接下里scanPackageDirtyLI方法会对系统其它的Package做处理,关键源码如下:
//mPackages用于保存系统内的所有Package,以packageName为key
 if (mPackages.containsKey(pkg.packageName)
                || mSharedLibraries.containsKey(pkg.packageName)) {
           //...
                   }

        if ((scanFlags & SCAN_REQUIRE_KNOWN) != 0) {
            if (mExpectingBetter.containsKey(pkg.packageName)) {
                logCriticalInfo(Log.WARN,
                        "Relax SCAN_REQUIRE_KNOWN requirement for package " + pkg.packageName);
            } else {
                PackageSetting known = mSettings.peekPackageLPr(pkg.packageName);
                if (known != null) {
                    if (DEBUG_PACKAGE_SCANNING) {
                        Log.d(TAG, "Examining " + pkg.codePath
                                + " and requiring known paths " + known.codePathString
                                + " & " + known.resourcePathString);
                    }
                    if (!pkg.applicationInfo.getCodePath().equals(known.codePathString)
                            || !pkg.applicationInfo.getResourcePath().equals(known.resourcePathString)) {
                        throw new PackageManagerException(INSTALL_FAILED_PACKAGE_CHANGED,
                                "Application package " + pkg.packageName
                                + " found at " + pkg.applicationInfo.getCodePath()
                                + " but expected at " + known.codePathString + "; ignoring.");
                    }
                }
            }
        }

        // Initialize package source and resource directories
        File destCodeFile = new File(pkg.applicationInfo.getCodePath());
        File destResourceFile = new File(pkg.applicationInfo.getResourcePath());

        SharedUserSetting suid = null;
        PackageSetting pkgSetting = null;

        if (!isSystemApp(pkg)) {
            // Only system apps can use these features.
            pkg.mOriginalPackages = null;
            pkg.mRealPackage = null;
            pkg.mAdoptPermissions = null;
        }
        //...
        final String pkgName = pkg.packageName;

        final long scanFileTime = scanFile.lastModified();
        final boolean forceDex = (scanFlags & SCAN_FORCE_DEX) != 0;
        //确定运行该package的进程名,一般用package作为进程名
        pkg.applicationInfo.processName = fixProcessName(
                pkg.applicationInfo.packageName,
                pkg.applicationInfo.processName,
                pkg.applicationInfo.uid);

        File dataPath;
        if (mPlatformPackage == pkg) {
            // The system package is special.
            dataPath = new File(Environment.getDataDirectory(), "system");

            pkg.applicationInfo.dataDir = dataPath.getPath();

        } else {
            // This is a normal package, need to make its data directory.
            //该函数返回data/data/packageName
            dataPath = Environment.getDataUserPackageDirectory(pkg.volumeUuid,
                    UserHandle.USER_OWNER, pkg.packageName);

            boolean uidError = false;
            if (dataPath.exists()) {
                //..
            } else {
                if (DEBUG_PACKAGE_SCANNING) {
                    if ((parseFlags & PackageParser.PARSE_CHATTY) != 0)
                        Log.v(TAG, "Want this data dir: " + dataPath);
                }
                //该方法调用installer发送install命令,其实就是在/data/data/目录下建立packageName目录
                //然后为系统所有的user安装此apk
                int ret = createDataDirsLI(pkg.volumeUuid, pkgName, pkg.applicationInfo.uid,
                        pkg.applicationInfo.seinfo);
                //安装错误
                if (ret < 0) {
                    // Error from installer
                    throw new PackageManagerException(INSTALL_FAILED_INSUFFICIENT_STORAGE,
                            "Unable to create data dirs [errorCode=" + ret + "]");
                }

            }

            pkgSetting.uidError = uidError;
        }

        final String path = scanFile.getPath();
        final String cpuAbiOverride = deriveAbiOverride(pkg.cpuAbiOverride, pkgSetting);
        //在/data/data/pageName/lib下建立和CPU类型对应的目录,例如ARM平台的事arm/,MIP平台的事mips/
        if ((scanFlags & SCAN_NEW_INSTALL) == 0) {
            derivePackageAbi(pkg, scanFile, cpuAbiOverride, true /* extract libs */);

            //系统package的native库统一放在/system/lib下,
            //所以系统不会提取系统package目录apk包中的native库
            if (isSystemApp(pkg) && !pkg.isUpdatedSystemApp() &&
                    pkg.applicationInfo.primaryCpuAbi == null) {
                setBundledAppAbisAndRoots(pkg, pkgSetting);
                setNativeLibraryPaths(pkg);
            }

        } else {
            if ((scanFlags & SCAN_MOVE) != 0) {
            //
            setNativeLibraryPaths(pkg);
        }
        //...
        if ((scanFlags & SCAN_NO_DEX) == 0) {
            //对该APK做dex优化
            int result = mPackageDexOptimizer.performDexOpt(pkg, null /* instruction sets */,
                    forceDex, (scanFlags & SCAN_DEFER_DEX) != 0, false /* inclDependencies */);
      //如果该apk已经存在,要先杀掉该APK的进程
         if ((scanFlags & SCAN_REPLACING) != 0) {
            killApplication(pkg.applicationInfo.packageName,
                        pkg.applicationInfo.uid, "replace pkg");
        }
        //在此之前,四大组件信息都是Package对象的私有的,在这里把它们注册到PKM内部的财产管理对象中。
        //这样,PKMS就可对外提供统一的组件信息。
        synchronized (mPackages) {
                ...
            //注册该Package中的provider到PKM的mProviders上
            int N = pkg.providers.size();
            StringBuilder r = null;
            int i;
            for (i=0; i<N; i++) {
                PackageParser.Provider p = pkg.providers.get(i);
                p.info.processName = fixProcessName(pkg.applicationInfo.processName,
                        p.info.processName, pkg.applicationInfo.uid);
                mProviders.addProvider(p);
                p.syncable = p.info.isSyncable;
                if (p.info.authority != null) {
                   //...
                    }
            //注册该Package中的service到PKM的mServices上
            N = pkg.services.size();
            r = null;
            for (i=0; i<N; i++) {
                PackageParser.Service s = pkg.services.get(i);
                s.info.processName = fixProcessName(pkg.applicationInfo.processName,
                        s.info.processName, pkg.applicationInfo.uid);
                mServices.addService(s);
                if ((parseFlags&PackageParser.PARSE_CHATTY) != 0) {
                    if (r == null) {
                        r = new StringBuilder(256);
                    } else {
                        r.append(' ');
                    }
                    r.append(s.info.name);
                }
            }
            if (r != null) {
                if (DEBUG_PACKAGE_SCANNING) Log.d(TAG, "  Services: " + r);
            }
            //注册该Package中的receiver到PKM的mReceivers上
            N = pkg.receivers.size();
            r = null;
            for (i=0; i<N; i++) {
                PackageParser.Activity a = pkg.receivers.get(i);
                a.info.processName = fixProcessName(pkg.applicationInfo.processName,
                        a.info.processName, pkg.applicationInfo.uid);
                mReceivers.addActivity(a, "receiver");
                if ((parseFlags&PackageParser.PARSE_CHATTY) != 0) {
                    if (r == null) {
                        r = new StringBuilder(256);
                    } else {
                        r.append(' ');
                    }
                    r.append(a.info.name);
                }
            }
            if (r != null) {
                if (DEBUG_PACKAGE_SCANNING) Log.d(TAG, "  Receivers: " + r);
            }
            //注册该Package中的activity到PKM的mActivities上
            N = pkg.activities.size();
            r = null;
            for (i=0; i<N; i++) {
                PackageParser.Activity a = pkg.activities.get(i);
                a.info.processName = fixProcessName(pkg.applicationInfo.processName,
                        a.info.processName, pkg.applicationInfo.uid);
                mActivities.addActivity(a, "activity");
                if ((parseFlags&PackageParser.PARSE_CHATTY) != 0) {
                    if (r == null) {
                        r = new StringBuilder(256);
                    } else {
                        r.append(' ');
                    }
                    r.append(a.info.name);
                }
            }
            if (r != null) {
                if (DEBUG_PACKAGE_SCANNING) Log.d(TAG, "  Activities: " + r);
            }
            //...
          return pkg;
    }
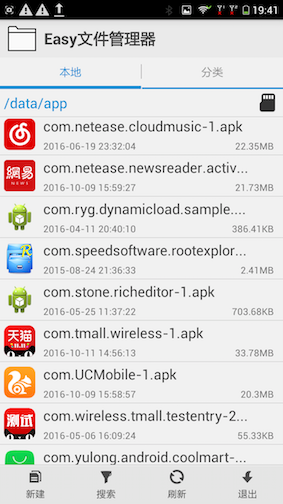
5.3扫描非系统apk
在PackageManagerService构造函数扫描完系统apk后,接下来就是扫描非系统apk,这些apk在/data/app或者/data/app-private中。如下图:
下面是关键源码,scanDirLI已经在前面分析过了。跟系统apk的调用过程差不多。
        if (!mOnlyCore) {
                EventLog.writeEvent(EventLogTags.BOOT_PROGRESS_PMS_DATA_SCAN_START,
                        SystemClock.uptimeMillis());
                scanDirLI(mAppInstallDir, 0, scanFlags | SCAN_REQUIRE_KNOWN, 0);

                scanDirLI(mDrmAppPrivateInstallDir, PackageParser.PARSE_FORWARD_LOCK,
                        scanFlags | SCAN_REQUIRE_KNOWN, 0);
        }
5.4扫描结果保存到文件中
在PackageManagerService构造函数收尾阶段,PMS将前面收集的信息再整理一次,将已安装的apk信息写到package.xml、pacakage.list和package-stopped.xml中
            //整理更新Permisssion的信息
            updatePermissionsLPw(null, null, updateFlags);
            //...

            //将信息写到package.xml,pacakage.list和package-stopped.xml中
            mSettings.writeLPr();

            EventLog.writeEvent(EventLogTags.BOOT_PROGRESS_PMS_READY,
                    SystemClock.uptimeMillis());

            mRequiredVerifierPackage = getRequiredVerifierLPr();
            mRequiredInstallerPackage = getRequiredInstallerLPr();

        } // synchronized (mPackages)
        } // synchronized (mInstallLock)

        //gc
        Runtime.getRuntime().gc();
- packages.xml:系统对程序安装,卸载和更新等操作时会更新该文件,PMS扫描完目标文件夹后创建该文件,保存了Package相关的信息。
- packages.list:保存着系统中所有的非系统自带的APK信息,程序安装,卸载和更新会更新该文件。
- packages-stoped.xml:保存系统中被用户强制停止的Package的信息。
5.4扫描系统和非系统apk总结
PKM在这个过程中工作任务非常繁重,要创建很多的对象,所以它是一个耗时耗内存的操作,从流程来看,PKM在这个过程中无非是扫描XML或者APK文件,但是其中涉及的数据结构及它们的关系较为复杂。
android PakageManagerService启动流程分析的更多相关文章
- Cocos2d-x3.3RC0的Android编译Activity启动流程分析
本文将从引擎源代码Jni分析Cocos2d-x3.3RC0的Android Activity的启动流程,以下是具体分析. 1.引擎源代码Jni.部分Java层和C++层代码分析 watermark/2 ...
- Android5 Zygote 与 SystemServer 启动流程分析
Android5 Zygote 与 SystemServer 启动流程分析 Android5 Zygote 与 SystemServer 启动流程分析 前言 zygote 进程 解析 zygoterc ...
- android开机启动流程说明
android开机启动流程说明 第一步:启动linux 1.Bootloader 2.Kernel 第二步android系统启动:入口为init.rc(system\core\rootdir) 1./ ...
- u-boot启动流程分析(2)_板级(board)部分
转自:http://www.wowotech.net/u-boot/boot_flow_2.html 目录: 1. 前言 2. Generic Board 3. _main 4. global dat ...
- u-boot启动流程分析(1)_平台相关部分
转自:http://www.wowotech.net/u-boot/boot_flow_1.html 1. 前言 本文将结合u-boot的“board—>machine—>arch—> ...
- Android WIFI 启动流程(TIP^^)
前几天因为解决一堆Bug,没时间写.我不会每天都写,就是为了存档一些资料. 内容来源:工作中接触到的+高手博客+文档(Books)=自己理解 仅限参考^^ 此博客是上一个<<Android ...
- Netty 拆包粘包和服务启动流程分析
Netty 拆包粘包和服务启动流程分析 通过本章学习,笔者希望你能掌握EventLoopGroup的工作流程,ServerBootstrap的启动流程,ChannelPipeline是如何操作管理Ch ...
- Uboot启动流程分析(转载)
最近一段时间一直在做uboot移植相关的工作,需要将uboot-2016-7移植到单位设计的ARMv7的处理器上.正好元旦放假三天闲来无事,有段完整的时间来整理下最近的工作成果.之前在学习uboot时 ...
- Storm集群启动流程分析
Storm集群启动流程分析 程序员 1.客户端运行storm nimbus时,会调用storm的python脚本,该脚本中为每个命令编写了一个方法,每个方法都可以生成一条相应的Java命令. 命令格式 ...
随机推荐
- QCA4028软件平台启用双WAN指导
1 为何要启用双WAN QCA4028的硬件方案,基板上部署了一个LTE模块插槽,同时又外留了一个USB3.0接口,因此,就可以在此硬件平台上调试基于LTE的双WAN,预期实现: A 链路备份,在任意 ...
- Java多线程基础总结
一.线程和进程关系 二.创建方式1.继承Thread类,重写run方法2.实现Runable接口,重写run方法3.使用匿名内部类 三.API接口start()currentThread() 获取当前 ...
- jvm(二):内存管理
jvm内存区域总体分为5大块:方法区,java堆,虚拟机栈,本地方法栈,程序计数器,按照线程来分的话又分为线程共享区和线程独占区 程序计数器: a.程序计数器是一块较小的内存空间,可以看做是当前线程所 ...
- 关闭默认共享,禁止ipc$空连接
关闭默认共享,禁止ipc$空连接 要防止别人用ipc$和默认共享入侵,需要禁止ipc$空连接,避免入侵者取得用户列表,并取消默认共享 禁止ipc$空连接进行枚举运行regedit,找到如下组键[HKE ...
- jquery easyui datagrid 编辑行 类型combobox
完成编辑瞬间datagrid中显示的是combobox的value 而非text var rows=$('#tb1').datagrid('getRows'); for(var i=0;i<ro ...
- 阿里云部署Node.js项目(CentOS)
Node.js 是一个基于 Chrome V8 引擎的 JavaScript 运行环境,用来方便地搭建快速的易于扩展的网络应用.Node.js 使用了一个事件驱动.非阻塞式 I/O 的模型,使其轻量又 ...
- 8.1 使用Python操作SQLite数据库
SQLite是内嵌在Python中的轻量级.基于磁盘文件袋额数据库管理系统,不需要安装和配置服务,支持使用SQL语句来访问数据库.该数据库使用C语言开发,支持大多数SQL91标准,支持原子的.一致的. ...
- Python安装与环境变量
Python安装与环境变量的配置 python下载: Python安装包下载地址:http://www.python.org/ 根据实际的操作系统,安装合适的安装版本. Python安装: 本 ...
- iOS支付宝,微信,银联支付集成封装调用(下)
一.越来越多的app增加第三方的功能,可能app有不同的页面但调用相同的支付方式,例如界面如下: 这两个页面都会使用第三方支付支付:(微信,支付宝,银联)如果在每一个页面都直接调用第三方支付的接口全部 ...
- 网络安全之在Kali Linux上安装Openvas
本文目录: 一.解决和配置更新源问题 二.安装Openvas 三.自定义登陆密码 四.升级Openvas 五.查看Openvas运行情况 六.修改OpenVAS远程链接 =============== ...