LISA是ARM公司开发的一款开源工具。在内核开发过程中,苦于无法针对修改内容进行一些量化或者可视化结果的测量,而无感。LISA对于模型调优,回归测试都有较强的支持。

什么是LISA?

LISA是Linux Interactive System Analysis的缩写,从字面意思可以看出是一个分析工具,具有交互性特点,这有赖于ipython脚本。

LISA是一个Linux环境下用于回归测试和对于各种workload进行交互测试的工具集。目前LISA主要专注于scheduler、power management和thermal框架的分析。但不仅于此,LISA提供一个框架且可以轻松扩展到其他用途。

LISA提供一些列API用于测试条例编写和回归测试条例开发。一系列针对内核核心功能的回归测试条例已经提供。另外,LISA使用卓越的IPython Notebook框架和一些示例用于进行实验。

LISA用来干什么?

  1. 有助于学习已有的功能
  2. 有助于开发新的代码
  3. 有助于发现问题,并且找到原因
  4. 有助于分享可复制的测试:
    1. 足够的弹性保证在不同待测设备上重复同样的实验
    2. 简化预定义workload的生成和执行
    3. 定义一系列方法来评估内核行为
    4. 更简单的获取数据文件来生成统计信息和报表

LISA框架结构

待续:devlib/workload/trappy/bart/target什么功能?扩展?

TRAPpy

TRAPpy,即Trace Analysis and Plotting in Python,是一个用于分析数据的可视化工具。它分析类ftrace日志文件,然后基于分析数据创建图表和数据分析。

TRAPpy需要一些其他工具的支持才能正常工作,比如trace-cmd、kernelshark。trace-cmd用于将trace.dat转换成trace.txt文件。

TRAPpy安装

Install additional tools required for some tests and functionalities

sudo apt install trace-cmd kernelshark

安装pip等工具:

sudo apt install python-pip python-dev

安装依赖库文件:

sudo apt install libfreetype6-dev libpng12-dev python-nose

sudo pip install numpy matplotlib pandas ipython[all]

安装TRAPpy:

sudo pip install --upgrade trappy

TRAPpy使用

启动一个ipython notebook服务:

ipython notebook

会弹出一个浏览器,可以在里面创建,修改,执行脚本。

API文档:https://pythonhosted.org/TRAPpy/

BART

BART,即Behavioural Analysis and Regression Toolkit,基于TRAPpy,分析kernel输出的ftrace来诊断当前的行为是否符合预期。

安装BART

Install additional tools required for some tests and functionalities

$ sudo apt install trace-cmd kernelshark

Install the Python package manager

$ sudo apt install python-pip python-dev

Install required python packages

$ sudo apt install libfreetype6-dev libpng12-dev python-nose
$ sudo pip install numpy matplotlib pandas ipython[all]
$ sudo pip install --upgrade trappy

ipython[all] will install IPython Notebook, a web based interactive python programming interface. It is required if you plan to use interactive plotting in BART.

Install BART

$ sudo pip install --upgrade bart-py

BART的用途

BART具有广泛的用途,主要用于帮助开发者进行一些难以测试功能的自动化测试。

内核开发者:确保代码的正确性

性能优化工程师:图形化/诊断不同内核版本之间的性能表现。

质量管理、版本工程师:验证不同模块/patch集成特性。

API文档:https://pythonhosted.org/bart-py

devlib

代码路径:https://github.com/ARM-software/devlib

devlib提供一个基于Linux操作系统设备,用于交互和获取测量结果的接口。

wlgen/workload

用于生成各种负荷,目前主要支持rt-app。

LISA使用

准备工作

下载LISA:git clone https://github.com/ARM-software/lisa.git

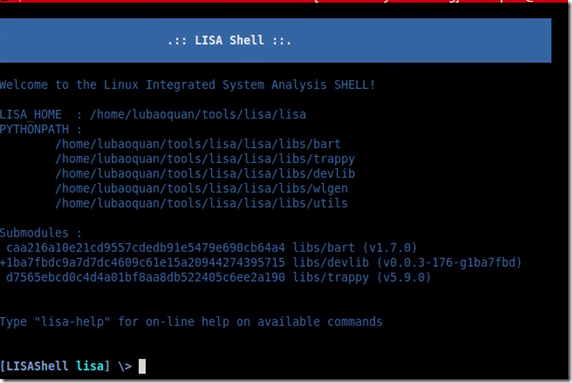
运行LISA:source init_env,如下:
更新LISA依赖模块

lisa-update

使用LISA进行测试

lisa-test tests/eas/acceptance.py

使用LISA分析

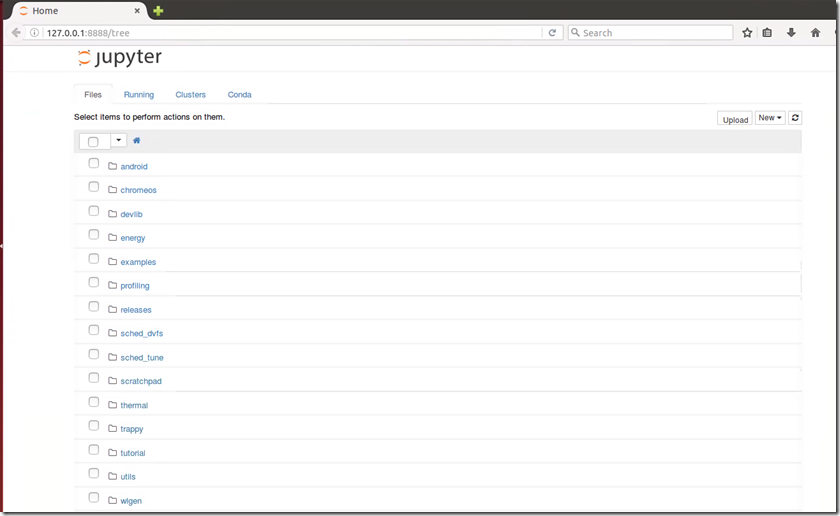
执行lisa-ipython后,会打开浏览器。在浏览器中可以通过创建IPython脚本进行LISA相关测试。
LISA代码分析

下面是LISA根目录的二级树,LISA具有明显的模块化区分,基于已有的框架可以轻松编写测试用例tests,编写自己想要的测试结果ipynb。

可以看出libs/utils提供LISA基础框架,
libs/devlib支持和待测设备之间交互连接,
测试用例在tests中,
libs/wlgen产生特定workload,
测试结果在results中,
使用ipynb下各种基本进行分析,
ipynb需要的python库在libs中。

├── assets
│   └── mp3-short.json
├── init_env source的环境脚本
├── ipynb  用来分析的ipython脚本
│   ├── chromeos
│   ├── energy
│   ├── examples
│   ├── profiling
│   ├── releases
│   ├── sched_dvfs
│   ├── sched_tune
│   ├── scratchpad
│   ├── thermal
│   └── tutorial
├── libs  各类基础功能和第三方应用
│   ├── bart
│   ├── devlib
│   ├── __init__.py
│   ├── trappy
│   ├── utils
│   └── wlgen
├── LICENSE.txt
├── LisaShell.txt
├── logging.conf
├── README.md
├── results  执行结果
│   └── LisaInANutshell_Backup
├── src  shell配置文件
│   └── shell
├── target.config  待测设备配置文件
├── tests  测试用例编写脚本,host用到的x86和target用到的arm
│   ├── eas
│   ├── sfreq
│   └── stune
├── tools  测试用到的工作
│   ├── arm64
│   ├── armeabi
│   ├── LICENSE.perf
│   ├── LICENSE.rt-app
│   ├── LICENSE.sysbench
│   ├── LICENSE.taskset
│   ├── LICENSE.trace-cmd
│   ├── plots.py
│   ├── report.py
│   ├── scripts
│   └── x86_64
└── Vagrantfile

下面重点分析libs/utils、libs/wlgen、libs/devlib、libs/trappy、libs/bart,然后如何写自己的测试用例,并作分析。

libs/utils

class LisaTest是LISA测试用例的基类,调用class TestEnv配置测试环境,调用class Executor生成Executor。

@classmethod
def _runExperiments(cls):
    """
    Default experiments execution engine
    """

cls.logger.info('Setup tests execution engine...')
    test_env = TestEnv(test_conf=cls._getTestConf())  基于test_conf文件生成TestEnv

experiments_conf = cls._getExperimentsConf(test_env)
    cls.executor = Executor(test_env, experiments_conf)  基于experiments_conf生成Executor

# Alias executor objects to make less verbose tests code
    cls.te = cls.executor.te
    cls.target = cls.executor.target

# Execute pre-experiments code defined by the test
    cls._experimentsInit()  测试前初始化

cls.logger.info('Experiments execution...')
    cls.executor.run()  测试执行实体

# Execute post-experiments code defined by the test
    cls._experimentsFinalize()  测试后收尾工作

class TestEnv用于配置LISA执行环境,基于target_conf配置待测设备,基于test_conf配置需要针对测试进行设置,还进行工作目录、测试工具等设置。

def __init__(self, target_conf=None, test_conf=None, wipe=True,
             force_new=False):

super(TestEnv, self).__init__()

# Keep track of android support
    self.LISA_HOME = os.environ.get('LISA_HOME', '/vagrant')
    self.ANDROID_HOME = os.environ.get('ANDROID_HOME', None)
    self.CATAPULT_HOME = os.environ.get('CATAPULT_HOME',
            os.path.join(self.LISA_HOME, 'tools', 'catapult'))

# Setup logging
    self._log = logging.getLogger('TestEnv')

# Compute base installation path
    self._log.info('Using base path: %s', basepath)

# Setup target configuration
    if isinstance(target_conf, dict):
        self._log.info('Loading custom (inline) target configuration')
        self.conf = target_conf
    elif isinstance(target_conf, str):
        self._log.info('Loading custom (file) target configuration')
        self.conf = self.loadTargetConfig(target_conf)
    elif target_conf is None:
        self._log.info('Loading default (file) target configuration')
        self.conf = self.loadTargetConfig()
    self._log.debug('Target configuration %s', self.conf)

# Setup test configuration
    if test_conf:
        if isinstance(test_conf, dict):
            self._log.info('Loading custom (inline) test configuration')
            self.test_conf = test_conf
        elif isinstance(test_conf, str):
            self._log.info('Loading custom (file) test configuration')
            self.test_conf = self.loadTargetConfig(test_conf)
        else:
            raise ValueError('test_conf must be either a dictionary or a filepath')
        self._log.debug('Test configuration %s', self.conf)

# Setup target working directory
    if 'workdir' in self.conf:
        self.workdir = self.conf['workdir']

# Initialize binary tools to deploy
    if 'tools' in self.conf:
        self.__tools = self.conf['tools']
    # Merge tests specific tools
    if self.test_conf and 'tools' in self.test_conf and \
       self.test_conf['tools']:
        if 'tools' not in self.conf:
            self.conf['tools'] = []
        self.__tools = list(set(
            self.conf['tools'] + self.test_conf['tools']
        ))

# Initialize ftrace events
    # test configuration override target one
    if self.test_conf and 'ftrace' in self.test_conf:
        self.conf['ftrace'] = self.test_conf['ftrace']
    if 'ftrace' in self.conf and self.conf['ftrace']:
        self.__tools.append('trace-cmd')

# Initialize features
    if '__features__' not in self.conf:
        self.conf['__features__'] = []

self._init()

# Initialize FTrace events collection
    self._init_ftrace(True)

# Initialize RT-App calibration values
    self.calibration()

# Initialize local results folder
    # test configuration override target one

res_lnk = os.path.join(basepath, LATEST_LINK)
    if os.path.islink(res_lnk):
        os.remove(res_lnk)
    os.symlink(self.res_dir, res_lnk)

# Initialize energy probe instrument
    self._init_energy(True)

class Executor是实际生成workload的部分,worload的具体情况在experiments_conf中配置。

def __init__(self, test_env, experiments_conf):
    """
    Tests Executor

A tests executor is a module which support the execution of a
    configured set of experiments. Each experiment is composed by:
    - a target configuration
    - a worload to execute

The executor module can be configured to run a set of workloads (wloads)
    in each different target configuration of a specified set (confs). These
    wloads and confs can be specified by the "experiments_conf" input
    dictionary. Each (workload, conf, iteration) tuple is called an
    "experiment".

All the results generated by each experiment will be collected a result
    folder which is named according to this template:
        results/<test_id>/<wltype>:<conf>:<wload>/<run_id>
    where:
    - <test_id> : the "tid" defined by the experiments_conf, or a timestamp
                  based folder in case "tid" is not specified
    - <wltype>  : the class of workload executed, e.g. rtapp or sched_perf
    - <conf>    : the identifier of one of the specified configurations
    - <wload>   : the identified of one of the specified workload
    - <run_id>  : the progressive execution number from 1 up to the
                  specified iterations

After the workloads have been run, the Executor object's `experiments`
    attribute is a list of Experiment objects. The `out_dir` attribute of
    these objects can be used to find the results of the experiment.
    """

# Initialize globals
    self._default_cgroup = None
    self._cgroup = None

# Setup logging
    self._log = logging.getLogger('Executor')

# Setup test configuration  解析experiments_conf,这些参数都会传递给wlgen执行。

self._print_section('Experiments configuration')  打印此实验配置

Executor.run根据Executor.__init__解析的配置,以workload为单位开始执行。

def run(self):
    self._print_section('Experiments execution')

self.experiments = []

# Run all the configured experiments
    exp_idx = 0
    for tc in self._experiments_conf['confs']:
        # TARGET: configuration
        if not self._target_configure(tc): 配置待测设备
            continue
        for wl_idx in self._experiments_conf['wloads']:
            # TEST: configuration
            wload, test_dir = self._wload_init(tc, wl_idx)  workload初始化
            for itr_idx in range(1, self._iterations + 1):
                exp = Experiment(
                    wload_name=wl_idx,
                    wload=wload,
                    conf=tc,
                    iteration=itr_idx,
                    out_dir=os.path.join(test_dir, str(itr_idx)))
                self.experiments.append(exp)

# WORKLOAD: execution
                self._wload_run(exp_idx, exp)  worload执行
                exp_idx += 1
        self._target_cleanup(tc)

self._print_section('Experiments execution completed')
    self._log.info('Results available in:')
    self._log.info('      %s', self.te.res_dir)

Executor._wload_run执行单个workload:

def _wload_run(self, exp_idx, experiment):
    tc = experiment.conf
    wload = experiment.wload
    tc_idx = tc['tag']

self._print_title('Experiment {}/{}, [{}:{}] {}/{}'\
            .format(exp_idx, self._exp_count,
                    tc_idx, experiment.wload_name,
                    experiment.iteration, self._iterations))

# Setup local results folder
    self._log.debug('out_dir set to [%s]', experiment.out_dir)
    os.system('mkdir -p ' + experiment.out_dir)

# Freeze all userspace tasks that we don't need for running tests
    need_thaw = False
    if self._target_conf_flag(tc, 'freeze_userspace'):
        need_thaw = self._freeze_userspace()

# FTRACE: start (if a configuration has been provided)
    if self.te.ftrace and self._target_conf_flag(tc, 'ftrace'):
        self._log.warning('FTrace events collection enabled')  准备抓取ftrace
        self.te.ftrace.start()

# ENERGY: start sampling  抓取Power Meter数据
    if self.te.emeter:
        self.te.emeter.reset()

# WORKLOAD: Run the configured workload
    wload.run(out_dir=experiment.out_dir, cgroup=self._cgroup)  执行workload

下面是收集Power Meter和ftrace数据。

# ENERGY: collect measurements
    if self.te.emeter:
        self.te.emeter.report(experiment.out_dir)

# FTRACE: stop and collect measurements
    if self.te.ftrace and self._target_conf_flag(tc, 'ftrace'):
        self.te.ftrace.stop()

trace_file = experiment.out_dir + '/trace.dat'
        self.te.ftrace.get_trace(trace_file)
        self._log.info('Collected FTrace binary trace:')
        self._log.info('   %s',
                       trace_file.replace(self.te.res_dir, '<res_dir>'))

stats_file = experiment.out_dir + '/trace_stat.json'
        self.te.ftrace.get_stats(stats_file)
        self._log.info('Collected FTrace function profiling:')
        self._log.info('   %s',
                       stats_file.replace(self.te.res_dir, '<res_dir>'))

# Unfreeze the tasks we froze
    if need_thaw:
        self._thaw_userspace()

self._print_footer()

为了尽量降低测试的干扰,引入了freeze_userspace这个flag,这是基于CGroup的freezer子系统实现的。将必须要保留的进程之外的进程,全部冻结。

critical_tasks = {
    'linux': ['init', 'systemd', 'sh', 'ssh'],
    'android': [
        'sh', 'adbd', 'init',
        'usb', 'transport',
        # We don't actually need this task but on Google Pixel it apparently
        # cannot be frozen, so the cgroup state gets stuck in FREEZING if we
        # try to freeze it.
        'thermal-engine'
    ]
}

在Executor._wload_conf根据wordload配置,调用wlgen生成workload。

def _wload_conf(self, wl_idx, wlspec):

# CPUS: setup execution on CPUs if required by configuration
    cpus = self._wload_cpus(wl_idx, wlspec)

# CGroup: setup CGroups if requried by configuration
    self._cgroup = self._default_cgroup
    if 'cgroup' in wlspec:
        if 'cgroups' not in self.target.modules:
            raise RuntimeError('Target not supporting CGroups or CGroups '
                               'not configured for the current test configuration')
        self._cgroup = wlspec['cgroup']

if wlspec['type'] == 'rt-app':
        return self._wload_rtapp(wl_idx, wlspec, cpus)  rtapp类型的workload
    if wlspec['type'] == 'perf_bench':
        return self._wload_perf_bench(wl_idx, wlspec, cpus)  perf_bench类型的workload

raise ValueError('unsupported "type" value for [{}] '
                     'workload specification'
                     .format(wl_idx))

platforms下存放的是不同类型主板的配置文件。

analysis目录下存放的是针对不同关注点(比如,cpus、eas、frequency、idle)等解析trace.txt的脚本,经过这些脚本处理。ipython Notebook可以生成可视化图表。

class CpusAnalysis

如何扩展?

需要编写自己设备的配置文件target.conf:

{
    /* Platform */
    /* - linux   : accessed via SSH connection                    */
    /* - android : accessed via ADB connection                    */
    /* - host    : run on the local host                          */
    "platform" : "android", 不同类型的Target,对应不同类型的Connection

/* Board */
    /* Currently supported boards are:                            */
    /*  juno  : target is a JUNO board                            */
    /*  tc2   : target is a TC2 board                             */
    /* Leave commented if your board is not listed above          */
    "board" : "hikey",  主板类型对应libs/utils/platforms/hikey.json文件。

/* Target Android device ID */
    "device" : "0123456789abcdef",  adb设备的ID

/* Login username (has to be sudo enabled) */
    "username" : "root",

/* Devlib modules to enable/disbale for all the experiments */
    "modules"         : [],
    "exclude_modules" : [],

/* List of test environment features to enable */
    /*  no-kernel : do not deploy kernel/dtb images               */
    /*  no-reboot : do not force reboot the target at each        */
    /*              configuration change                          */
    /*  debug     : enable debugging messages                     */
    "__features__" : "no-kernel no-reboot"
}

在utils/analysis下,基于class AnalysisModule扩展自己的分析脚本,生成图表。

libs/wlgen

class Workload作为各种workload的基类,class RTA是class Workload子类。

class Workload的__init__最主要的是进行参数的初始化,使用target.config配置。

run是class Workload的核心,该方法是负荷的执行主体。如果需要抓取ftrace,也会在这里收集。

def run(self,
        ftrace=None,
        cgroup=None,
        cpus=None,
        background=False,
        out_dir='./',
        as_root=False,
        start_pause_s=None,
        end_pause_s=None):

self.cgroup = cgroup

# Compose the actual execution command starting from the base command
    # defined by the base class
    _command = self.command

if not _command:
        self._log.error('Error: empty executor command')

# Prepend eventually required taskset command
    if cpus or self.cpus:  如果需要设置CPU亲和性,使用taskset进行设置。
        cpus_mask = self.getCpusMask(cpus if cpus else self.cpus)
        self.taskset_cmd = '{}/taskset 0x{:X}'\
                .format(self.target.executables_directory,
                        cpus_mask)
        _command = '{} {}'\
                .format(self.taskset_cmd, _command)

if self.cgroup and hasattr(self.target, 'cgroups'):
        # Get a reference to the CGroup to use
        _command = self.target.cgroups.run_into_cmd(self.cgroup, _command)

# Start FTrace (if required)
    if ftrace:  设置ftrace相关sysfs节点,启动ftrace抓取
        ftrace.start()

# Wait `start_pause` seconds before running the workload
    if start_pause_s:
        self._log.info('Waiting %f seconds before starting workload execution',
                       start_pause_s)
        sleep(start_pause_s)

# Start task in background if required
    if background:  是否作为背景进程运行
        self._log.debug('WlGen [background]: %s', _command)
        self.target.background(_command, as_root=as_root)
        self.output['executor'] = ''

# Start task in foreground
    else:
        self._log.info('Workload execution START:')
        self._log.info('   %s', _command)
        # Run command and wait for it to complete
        results = self.target.execute(_command, as_root=as_root)  在class TestEnv的_init_target创建了class Target的子类class AndroidTarget。此处execute都是通过adb shell执行。
        self.output['executor'] = results

# Wait `end_pause` seconds before stopping ftrace
    if end_pause_s:
        self._log.info('Waiting %f seconds before stopping trace collection',
                       end_pause_s)
        sleep(end_pause_s)

# Stop FTrace (if required)
    ftrace_dat = None
    if ftrace:  停止ftrace抓取,并导出ftrace内容。
        ftrace.stop()
        ftrace_dat = out_dir + '/' + self.test_label + '.dat'
        dirname = os.path.dirname(ftrace_dat)
        if not os.path.exists(dirname):
            self._log.debug('Create ftrace results folder [%s]',
                            dirname)
            os.makedirs(dirname)
        self._log.info('Pulling trace file into [%s]...', ftrace_dat)
        ftrace.get_trace(ftrace_dat)

if not background:
        self.__callback('postrun', destdir=out_dir)
        self._log.debug('Workload execution COMPLETED')

return ftrace_dat

在了解了基类Workload之后,稍微了解一下class RTA。

RTA根据需要增加了calibrate,用于在执行rtapp workload之前,校准cpu的性能。

另外扩展了四种任务类型,class Ramp、class Step、class Pulse和class Periodic。

如何扩展?

workload的扩展都是基于class Workload进行。如果需要创建自己的workload,就需要参照rta.py,写一个自己的子类;class LocalLinuxTarget作为class LinuxTarget的子类,用于测试本地host设备。

libs/devlib

target.py中定义了基类class Target,以及两种类型的子类class LinuxTarget和class AndroidTarget,针对ssh连接设备和adb连接设备。

class Workload的三个子类,分别对应三种不同类型的连接class AdbConnection、class SshConnection和class LocalConnection。

class FtraceController进行ftrace抓取前buffer大小、filter等的设置,导出ftrace,进行trace.dat到trace.txt的转变,以及抓取结束后的清理工作。

instrument的__init__.py中定义了基类class Instrument,用于扩展不同类型的测量仪器,一般对应的是物理上存在的设备。

class DaqInstrument、class EnergyProbeInstrument和class HwmonInstrument分别对应DAQ、Energy Probe和hwmon三种设备。

class Module基类用于针对不同模块进行配置,有的是配置某一模块的内核sysfs节点,有的是使用命令执行操作。

比如class BigLittleModule,online/offline不同cluster的CPU,或者获取CPU的各种信息。

class CpufreqModule显示/设置CPU的governor、最高频率、当前频率等等信息。

bin存放devlib用到的可执行文件,比如busybox、trace-cmd等。

如何扩展?

所以综合下来,在devlib中可能根据class Workload需要扩展不同类型的连接。

如果有新的测试仪器,需要扩展class Instrument。

有时候为了方便对摸快操作,可以基于class Module进行扩展。

libs/trappy

从TRAPpy的缩写即可知道,一是解析trace,二是对解析结果进行可视化显示。

在trappy/trappy下有很多python脚本,里面注册了很多ftrace的解析器,register_ftrace_parser和register_dynamic_ftrace。

libs/bart

在进行了这些分析之后,可以看出test、experiment、workload之间的关系。

一个test可以对应一个或多个experiment;一个experiment可以对应一个或多个workload。

test对应tests目录中的脚本,experiment对应Executor,workload对应wlgen。

编写测试用例

编写分析脚本

参考资料

  1. LISA Wiki:https://github.com/ARM-software/lisa/wiki
  2. LISA Git:https://github.com/ARM-software/lisa

LISA介绍及其使用方法的更多相关文章

  1. block(代码块)的介绍以及使用方法和变量之间的关系

    http://blog.csdn.net/menxu_work/article/details/8762848 block(代码块)的介绍以及使用方法和变量之间的关系 block(代码块)的介绍以及使 ...

  2. 【转】【Android UI设计与开发】第07期:底部菜单栏(二)Fragment的详细介绍和使用方法

    原始地址:http://blog.csdn.net/yangyu20121224/article/category/1431917/1 由于TabActivity在Android4.0以后已经被完全弃 ...

  3. react-native热更新之CodePush详细介绍及使用方法

    react-native热更新之CodePush详细介绍及使用方法 2018年03月04日 17:03:21 clf_programing 阅读数:7979 标签: react native热更新co ...

  4. DELPHI中枚举类型数据的介绍和使用方法

    在看delphi程序的时候看到aa=(a,b,c,d);这样的东西,还以为是数组,同事说是函数,呵呵,当然这两个都不屑一击,原来这样式子是在声明并付值一个枚举类型的数据.下边写下来DELPHI中枚举类 ...

  5. JQuery onload、ready概念介绍及使用方法

    页面加载完成有两种事件,一是ready,表示文档结构已经加载完成,onload,ready概念容易混淆,下面为大家详细介绍下   页面加载完成有两种事件,一是ready,表示文档结构已经加载完成(不包 ...

  6. CSRF简单介绍及利用方法-跨站请求伪造

    0x00 简要介绍 CSRF(Cross-site request forgery)跨站请求伪造,由于目标站无token/referer限制,导致攻击者可以用户的身份完成操作达到各种目的.根据HTTP ...

  7. C++ stringstream介绍,使用方法与例子

    From: http://www.usidcbbs.com/read-htm-tid-1898.html C++引入了ostringstream.istringstream.stringstream这 ...

  8. ASP中文件上传组件ASPUpload介绍和使用方法

    [导读]要实现该功能,就要利用一些特制的文件上传组件.文件上传组件网页非常多,这里介绍国际上非常有名的ASPUpload组件 1 下载和安装ASPUpload  要实现该功能,就要利用一些特制的文件上 ...

  9. hexo工具介绍及使用方法

    Hexo is a fast, simple & powerful blog framework 安装方法:npm install hexo-cli -g; require:node.js g ...

随机推荐

  1. IIS服务器多域名证书绑定443端口解决方案

    一个服务器IIS要绑定多个HTTPS站点(该方法在此之前,有进行测试其他网站域名的ssl证书,测试没有问题) 默认情况一个服务器的IIS只能绑定一个HTTPS也就是443端口 要实现多个站点对应HTT ...

  2. EF 在controller 带参数跳转到新的网址

    参考文章:http://blog.csdn.net/zhensoft163/article/details/7174661 我用到了这一种方式: 跳转到同一Controller 里面的不同Action ...

  3. MSSQL练习题

    下列属于SQL Server的系统数据库是( ) A.modelB.publicC.NorthwindD.System 答案:http://hovertree.com/tiku/bjaf/06nvv7 ...

  4. Entity Framework 教程——EF体系结构

    EF体系结构 下图是一张EF体系结构的全景图,让我们单独了解各个组件的用处. EDM (Entity Data Model): EDM由3个主要部分组成,概念模块(Conceptual Model), ...

  5. Java传值和传址

    调用函数时,传的参数过去可能是传值,也可能是传址.如果是传值,函数内部的操作对参数的值没有影响:如果是传址,函数内部的操作是对参数指向的内存进行操作,会影响参数的值. Java到底是传值还是传址?用下 ...

  6. MVC Request.IsAuthenticated一直false Request.Cookie获取不到cookie

    项目中,在做登录验证时,用到了cookie,同一账户登陆,可以.切换其他账号时,就在也登录不上了,用原来的也不行.检查Request.IsAuthenticated一直false,而且Request. ...

  7. Hibernate一对多单向(双向)关联映射

    (1).编写配置文件 Hibernate通过读写默认的XML配置文件hibernate.cfg.xml加载数据库配置信息.代码如下: <hibernate-configuration> & ...

  8. IE 浏览器各个版本 JavaScript 支持情况一览表

    语言元素 语言元素 突发.IE6 标准.IE7 标准 IE8 标准 IE 9 标准 IE 10 标准 边缘 Windows 应用商店应用程序 __proto__ 属性 (Object) (JavaSc ...

  9. AJAX表单提交以及数据接收

    ajax是一种传输方式,数据不是提交给ajax,而是 数据 由 ajax提交到后台(并不刷新页面) 要实现一个简单的ajax请求,要这3样东西,一个html页,一段js代码,一个可以响应请求的后台 这 ...

  10. php-fpm优化

    pid = run/php-fpm.pid #pid设置,默认在安装目录中的var/run/php-fpm.pid,建议开启 error_log = log/php-fpm.log #错误日志,默认在 ...