Android开发 ---xml布局元素
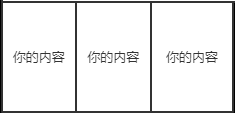
1、android:orientation="vertical/horizontal"
vertical为垂直布局,
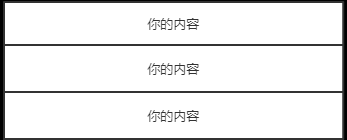
horizontal为水平布局
2、android:layout_width="wrap_content",android:layout_height="wrap_content"
描述:
高亮部分的layout_width的值和layout_height的值都设置为wrap_content,那么这个布局将会和内容自适应,内容多大,布局就多大
<LinearLayout xmlns:android="http://schemas.android.com/apk/res/android"

    android:id="@+id/activity_main"

    android:layout_width="wrap_content"

    android:layout_height="wrap_content"

    android:orientation="vertical">

    <TextView

        android:layout_width="match_parent"

        android:layout_height="wrap_content"

        android:text="内容1"

        />

    <TextView

        android:layout_width="wrap_content"

        android:layout_height="wrap_content"

        android:text="内容2"

        />

</LinearLayout>
效果:

3、android:layout_width="",android:layout_height=""
描述:
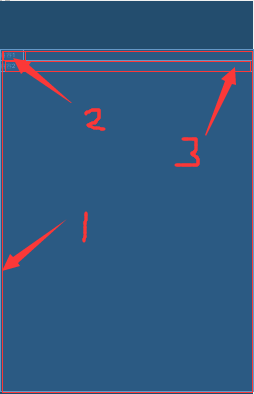
1部分:layout_width和layout_height的值都设置为match_parent,则它们会找到它们的父级元素,父级元素有多宽,它就会多宽,父级元素有多高,它就会多高。
2部分:layout_width和layout_height的值都设置为wrap_content,则它们会与内容自适应,内容有多宽,布局就会有多宽,内容有多高,布局就会多高。
3部分:layout_width的值设置为match_parent,则布局的宽会是父级元素的宽,layout_height的值设置为wrap_content,则布局的高是与内容自适应的。
<LinearLayout xmlns:android="http://schemas.android.com/apk/res/android"

    android:id="@+id/activity_main"

    android:layout_width="match_parent"

    android:layout_height="match_parent"----------------1部分

    android:orientation="vertical">

    <TextView

        android:layout_width="wrap_content"

        android:layout_height="wrap_content"--------------2部分

        android:text="内容1"

        />

    <TextView

        android:layout_width="match_parent"

        android:layout_height="wrap_content"-----------------------3部分

        android:text="内容2"

        />

</LinearLayout>
效果图:
4、文本输入控件 ---EditText
描述:
EdiText控件是专门用来接收用户输入的信息的控件
inputType用来设置该控件的类型, 值为textPassword是用来输入密码的,
android:inputType="none"
android:inputType="text"
android:inputType="textCapCharacters"//前3个输入普通字符
android:inputType="textCapWords"//单词首字母大写
<EditText

        android:id="@+id/upwd"

        android:layout_width="match_parent"

        android:layout_height="wrap_content"

        android:layout_marginTop="5dp"

        android:inputType="textPassword"  --密码输入框

        android:hint="请输入密码"

        />
5、按钮控件 --Button
<Button

        android:layout_width="match_parent"

        android:layout_height="wrap_content"

        android:textSize="30sp"

        android:onClick="toRegister" --给按钮设置单击事件

        android:text="用户注册"

        />
6、线性布局---LinearLayout
描述:
线性布局下,每个元素占一行,或一列,这取决于orientation的值是vertical还是horizontal
<?xml version="1.0" encoding="utf-8"?>

<LinearLayout xmlns:android="http://schemas.android.com/apk/res/android"

    android:id="@+id/activity_main"

    android:layout_width="match_parent"

    android:layout_height="match_parent"

    android:orientation="vertical">

    <TextView

        android:layout_width="wrap_content"

        android:layout_height="wrap_content"

        android:text="内容1"

        />

    <TextView

        android:layout_width="wrap_content"

        android:layout_height="wrap_content"

        android:text="内容2"

        />

</LinearLayout>
效果图:
描述:内容1占一行,内容2占一行

<?xml version="1.0" encoding="utf-8"?>

<LinearLayout xmlns:android="http://schemas.android.com/apk/res/android"

    android:id="@+id/activity_main"

    android:layout_width="match_parent"

    android:layout_height="match_parent"

    android:orientation="horizontal">

    <TextView

        android:layout_width="wrap_content"

        android:layout_height="wrap_content"

        android:text="内容1"

        />

    <TextView

        android:layout_width="wrap_content"

        android:layout_height="wrap_content"

        android:text="内容2"

        />

</LinearLayout>
效果图:
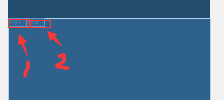
描述:内容1占一列,内容2占一列
<?xml version="1.0" encoding="utf-8"?>

<LinearLayout xmlns:android="http://schemas.android.com/apk/res/android"

    android:id="@+id/activity_main"

    android:layout_width="match_parent"

    android:layout_height="match_parent"

    android:orientation="horizontal">

    <TextView

        android:layout_width="fill_parent"

        android:layout_height="wrap_content"

        android:text="内容1"

        />

    <TextView

        android:layout_width="wrap_content"

        android:layout_height="wrap_content"

        android:text="内容2"

        />

</LinearLayout>
效果图:
描述:只显示内容1,内容2不见了,原因就是第一个TextView中的layout_width的值设置为fill_parent造成的

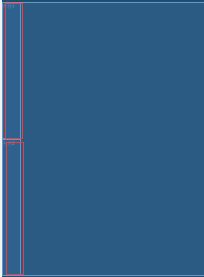
7、layout_weight ---按比例分布,值为数字
<?xml version="1.0" encoding="utf-8"?>

<LinearLayout xmlns:android="http://schemas.android.com/apk/res/android"

    android:id="@+id/activity_main"

    android:layout_width="match_parent"

    android:layout_height="match_parent"

    android:orientation="vertical">

    <TextView

        android:layout_width="wrap_content"

        android:layout_weight="1"

        android:layout_height="wrap_content"

        android:text="内容1"

        />

    <TextView

        android:layout_width="wrap_content"

        android:layout_weight="1"

        android:layout_height="wrap_content"

        android:text="内容2"

        />

</LinearLayout>
效果图:
<?xml version="1.0" encoding="utf-8"?>

<LinearLayout xmlns:android="http://schemas.android.com/apk/res/android"

    android:id="@+id/activity_main"

    android:layout_width="match_parent"

    android:layout_height="match_parent"

    android:orientation="horizontal">

    <TextView

        android:layout_width="wrap_content"

        android:layout_weight="1"

        android:layout_height="wrap_content"

        android:text="内容1"

        />

    <TextView

        android:layout_width="wrap_content"

        android:layout_weight="1"

        android:layout_height="wrap_content"

        android:text="内容2"

        />

</LinearLayout>
效果图:

8、RelativeLayout--相对布局
dimens.xml
<?xml version="1.0" encoding="utf-8"?>

<resources>

    <!-- Default screen margins, per the Android Design guidelines. -->

    <dimen name="activity_horizontal_margin">16dp</dimen>

    <dimen name="activity_vertical_margin">16dp</dimen>

</resources>
引用dimens.xml文件中的数据设置边距的值,符号@
<?xml version="1.0" encoding="utf-8"?>

<RelativeLayout xmlns:android="http://schemas.android.com/apk/res/android"

    xmlns:tools="http://schemas.android.com/tools"

    android:id="@+id/activity_dialog"

    android:layout_width="match_parent"

    android:layout_height="match_parent"

    android:paddingBottom="@dimen/activity_vertical_margin" ---内边距

    android:paddingLeft="@dimen/activity_horizontal_margin" ---左内边距

    android:paddingRight="@dimen/activity_horizontal_margin" ---右内边距

    android:paddingTop="@dimen/activity_vertical_margin"  ---上内边距

    >

    <Button

        android:layout_width="match_parent"

        android:layout_height="wrap_content"

        android:textSize="30sp"

        android:text="用户登录"

        />

</RelativeLayout>
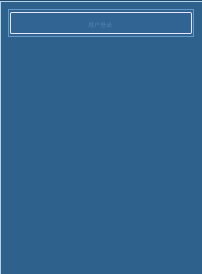
效果图:
9、RadioGroup ---单选按钮组
描述:一组单选按钮中选取其中一个
RadioButton --一个单选按钮
checked ="true" 表示默认选中
<?xml version="1.0" encoding="utf-8"?>

<LinearLayout xmlns:android="http://schemas.android.com/apk/res/android"

    android:id="@+id/activity_linear"

    android:layout_width="match_parent"

    android:layout_height="match_parent"

    android:orientation="vertical">

    <RadioGroup

        android:layout_width="match_parent"

        android:layout_height="wrap_content"

        android:orientation="horizontal"

        android:checkedButton="0">

        <RadioButton

            android:id="@+id/usex1"

            android:checked="true"

            android:layout_width="wrap_content"

            android:layout_height="wrap_content"

            android:text="男"/>

        <RadioButton

            android:id="@+id/usex2"

            android:layout_width="wrap_content"

            android:layout_height="wrap_content"

            android:text="女"/>

    </RadioGroup>

</LinearLayout>
效果图:

10、CheckBox ---复选按钮
<?xml version="1.0" encoding="utf-8"?>

<LinearLayout xmlns:android="http://schemas.android.com/apk/res/android"

    android:id="@+id/activity_linear"

    android:layout_width="match_parent"

    android:layout_height="match_parent"

    android:orientation="vertical">

    <CheckBox

        android:id="@+id/showPwd"

        android:text="显示密码"

        android:layout_width="match_parent"

        android:layout_height="wrap_content" />

</LinearLayout>
效果图:

11、maxLength ---设置文本框能输入的最大值
<?xml version="1.0" encoding="utf-8"?>

<LinearLayout xmlns:android="http://schemas.android.com/apk/res/android"

    android:id="@+id/activity_linear"

    android:layout_width="match_parent"

    android:layout_height="match_parent"

    android:orientation="vertical">

    <EditText

        android:id="@+id/uname"

        android:hint="请输入6-12位用户名"

        android:maxLength="12"

        android:layout_width="match_parent"

        android:layout_height="wrap_content" />

</LinearLayout>
效果图:

12、minLines ---至少3行 maxLines---最大三行
<?xml version="1.0" encoding="utf-8"?>

<LinearLayout xmlns:android="http://schemas.android.com/apk/res/android"

    android:id="@+id/activity_linear"

    android:layout_width="match_parent"

    android:layout_height="match_parent"

    android:orientation="vertical">

    <EditText

        android:id="@+id/uname"

        android:hint="请输入6-12位用户名"

        android:minLines="3"

        android:maxLength="12"

        android:layout_width="match_parent"

        android:layout_height="wrap_content" />

</LinearLayout>
效果图:

13、在相对布局下:
layout_alignBaseline = "@id/*" ---新元件与特定元件的基准线对齐
layout_toRightOf="@id/*" ---新元素与特定元素的右基准线对齐
layout_below="@id/*" ---新元素位于特定元素的下方
layout_alignBottom="@id/*" ---新元素与特定元素的底部基准线对齐
<?xml version="1.0" encoding="utf-8"?>

<RelativeLayout xmlns:android="http://schemas.android.com/apk/res/android"

    android:id="@+id/activity_relative"

    android:layout_width="match_parent"

    android:layout_height="match_parent"

    android:padding="3dp">

    <TextView

        android:id="@+id/title"

        android:text="添加学生"

        android:textSize="30sp"

        android:gravity="center"

        android:layout_width="match_parent"

        android:layout_height="wrap_content" />

    <TextView

        android:id="@+id/lblsname"

        android:text="姓名:"

        android:layout_below="@id/title"

        android:textSize="25sp"

        android:layout_marginTop="5dp"

        android:layout_width="wrap_content"

        android:layout_height="wrap_content" />

    <EditText

        android:id="@+id/sname"

        android:hint="请输入姓名"

        android:layout_width="match_parent"

        android:layout_height="wrap_content"

        android:layout_alignBaseline="@id/lblsname"

        android:layout_toRightOf="@id/lblsname" />

</RelativeLayout>
效果图:

14、表格布局
详细属性请看博客:
Android开发 -- 界面布局:边距、线性布局、表格布局、相对布局、框架(层叠)布局、绝对布局
<?xml version="1.0" encoding="utf-8"?>

<TableLayout xmlns:android="http://schemas.android.com/apk/res/android"

    android:id="@+id/activity_table"

    android:layout_width="match_parent"

    android:stretchColumns="0,1,2,3"

    android:collapseColumns="0"

    android:shrinkColumns="3"

    android:layout_height="match_parent">

    <TableRow>

        <TextView android:text="编号" android:gravity="center" android:textStyle="bold" android:textSize="25sp"/>

        <TextView android:text="姓名" android:gravity="center" android:textStyle="bold" android:textSize="25sp"/>

        <TextView android:text="年龄" android:gravity="center" android:textStyle="bold" android:textSize="25sp"/>

        <TextView android:text="地址" android:gravity="center" android:textStyle="bold" android:textSize="25sp"/>

    </TableRow>

    <TableRow>

        <TextView android:text="1" android:gravity="center"  android:textSize="25sp"/>

        <TextView android:text="Jack" android:gravity="center"  android:textSize="25sp"/>

        <TextView android:text="20" android:gravity="center"  android:textSize="25sp"/>

        <TextView android:text="南方IT学院教学楼" android:gravity="center"  android:textSize="25sp"/>

    </TableRow>

    <TableRow>

        <TextView android:text="2" android:gravity="center"  android:textSize="25sp"/>

        <TextView android:text="Lucy" android:gravity="center"  android:textSize="25sp"/>

        <TextView android:text="22" android:gravity="center" android:textSize="25sp"/>

        <TextView android:text="南方IT学院教学楼" android:gravity="center" android:textSize="25sp"/>

    </TableRow>

    <TableRow>

        <TextView android:text="3" android:gravity="center"  android:textSize="25sp"/>

        <TextView android:text="Toms" android:gravity="center"  android:textSize="25sp"/>

        <TextView android:text="23" android:gravity="center"  android:textSize="25sp"/>

        <TextView android:text="南方IT学院教学楼" android:gravity="center"  android:textSize="25sp"/>

    </TableRow>

    <TableRow>

        <TextView android:text="4" android:gravity="center"  android:textSize="25sp"/>

        <TextView android:text="Marry" android:gravity="center"  android:textSize="25sp"/>

        <TextView android:text="20" android:gravity="center"  android:textSize="25sp"/>

        <TextView android:text="南方IT学院教学楼" android:gravity="center"  android:textSize="25sp"/>

    </TableRow>

    <TableRow>

        <Button

            android:layout_width="150dp"

            android:layout_height="wrap_content"

            android:text="点击返回"

            android:layout_column="2"

            android:layout_span="2"

            android:onClick="doBack"

            />

    </TableRow>

</TableLayout>
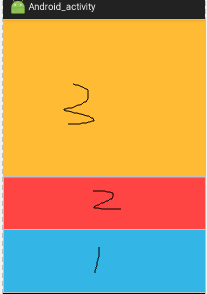
15、FrameLayout ---层叠布局
<?xml version="1.0" encoding="utf-8"?>

<FrameLayout xmlns:android="http://schemas.android.com/apk/res/android"

    android:id="@+id/activity_frame"

    android:layout_width="match_parent"

    android:layout_height="match_parent"

    >

    <LinearLayout

        android:id="@+id/one"

        android:orientation="vertical"

        android:background="@android:color/holo_blue_light"

        android:layout_width="match_parent"

        android:layout_height="match_parent"

    />

    <LinearLayout

        android:id="@+id/two"

        android:orientation="vertical"

        android:background="@android:color/holo_red_light"

        android:layout_width="match_parent"

        android:layout_height="400dp"/>

    <LinearLayout

        android:id="@+id/three"

        android:orientation="vertical"

        android:background="@android:color/holo_orange_light"

        android:layout_width="match_parent"

        android:layout_height="300dp"/>

</FrameLayout>
效果图:
ImageView --图像控件
<?xml version="1.0" encoding="utf-8"?>

<LinearLayout xmlns:android="http://schemas.android.com/apk/res/android"

    android:id="@+id/activity_frame2"

    android:layout_width="match_parent"

    android:layout_height="match_parent"

    android:orientation="horizontal">

    <TextView

        android:layout_width="wrap_content"

        android:layout_height="wrap_content"

        android:text="用户名:"

        android:textSize="25dp"

        />

    <FrameLayout

        android:layout_width="match_parent"

        android:layout_height="wrap_content">

        <EditText

            android:id="@+id/upwd"

            android:inputType="textPassword"

            android:maxLength="12"

            android:layout_width="match_parent"

            android:layout_height="wrap_content" />

        <ImageView

            android:layout_gravity="right"

            android:layout_width="30dp"

            android:layout_height="30dp"

            android:src="@mipmap/ic_launcher"

            android:onClick="showPwd"

            />

    </FrameLayout>

</LinearLayout>
效果图:

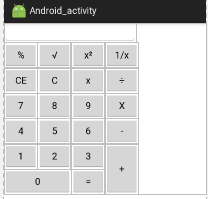
16、GridLayout ---网格布局
<?xml version="1.0" encoding="utf-8"?>

<GridLayout xmlns:android="http://schemas.android.com/apk/res/android"

    android:id="@+id/activity_grid"

    android:layout_width="match_parent"

    android:layout_height="wrap_content"

    android:rowCount="6"

    android:columnCount="4">

    <EditText

        android:id="@+id/showNumber"

        android:layout_columnSpan="4"

        android:layout_width="251dp"

        android:gravity="right"

        android:inputType="none"

        />

    <Button

        android:id="@+id/b1"

        android:text="%"

        />

    <Button

        android:id="@+id/b2"

        android:text="√"

        />

    <Button

        android:id="@+id/b3"

        android:text="x²"

        />

    <Button

        android:id="@+id/b4"

        android:text="1/x"

        />

    <Button

        android:id="@+id/b5"

        android:text="CE"

        />

    <Button

        android:id="@+id/b6"

        android:text="C"

        />

    <Button

        android:id="@+id/b7"

        android:text="x"

        />

    <Button

        android:id="@+id/b8"

        android:text="÷"

        />

    <Button

        android:id="@+id/b9"

        android:text="7"

        />

    <Button

        android:id="@+id/b10"

        android:text="8"

        />

    <Button

        android:id="@+id/b11"

        android:text="9"

        />

    <Button

        android:id="@+id/b12"

        android:text="X"

        />

    <Button

        android:id="@+id/b13"

        android:text="4"

        />

    <Button

        android:id="@+id/b14"

        android:text="5"

        />

    <Button

        android:id="@+id/b15"

        android:text="6"

        />

    <Button

        android:id="@+id/b16"

        android:text="-"

        />

    <Button

        android:id="@+id/b17"

        android:text="1"

        />

    <Button

        android:id="@+id/b18"

        android:text="2"

        />

    <Button

        android:id="@+id/b19"

        android:text="3"

        />

    <Button

        android:id="@+id/b20"

        android:text="+"

        android:layout_rowSpan="2" //该按钮占两行

        android:layout_gravity="fill_vertical" //相对于父元素垂直布局

        />

    <Button

        android:id="@+id/b21"

        android:layout_columnSpan="2" //该按钮占两列

        android:layout_gravity="fill_horizontal" //相对于父元素水平布局

        android:text="0"

        />

    <Button

        android:id="@+id/b22"

        android:text="="

        />

</GridLayout>
效果图:
17、开关按钮
<ToggleButton

        android:checked="true"

        android:layout_width="wrap_content"

        android:layout_height="wrap_content" />
效果图

18、进度条
<SeekBar

        android:id="@+id/seekBar"

        android:max="60"

        android:progress="0"

        android:layout_width="match_parent"

        android:layout_height="wrap_content" />
效果图:

19、平分条
<RatingBar

        android:id="@+id/ratingBar"

        android:max="5"

        android:progress="0"

        android:stepSize="0.5"

        android:layout_width="wrap_content"

        android:layout_height="wrap_content" />
效果图:

20、转圈式进度条
<ProgressBar

        android:id="@+id/pb1"

        android:max="100"

        android:layout_width="match_parent"

        android:layout_height="wrap_content" />
效果图:

<ProgressBar

        android:id="@+id/pb2"

        android:max="100"

        style="?android:progressBarStyleLarge"

        android:layout_width="match_parent"

        android:layout_height="wrap_content" />
效果图:

21、进度条
<ProgressBar

        android:id="@+id/pb3"

        android:max="100"

        android:progress="10"

        style="?android:progressBarStyleHorizontal"

        android:layout_width="match_parent"

        android:layout_height="wrap_content" />

    <LinearLayout

        android:layout_width="match_parent"

        android:orientation="horizontal"

        android:layout_height="wrap_content">

        <Button

            android:layout_width="match_parent"

            android:layout_weight="1"

            android:text="开始"

            android:onClick="doStart"

            android:layout_height="wrap_content" />

        <Button

            android:layout_width="match_parent"

            android:layout_weight="1"

            android:text="停止"

            android:onClick="doStop"

            android:layout_height="wrap_content" />

    </LinearLayout>
效果图:

22、设置是否当文本为URL链接/email/电话号码/map时,文本显示为可点击的链接。可选值(none/web/email/phone/map/all)
<?xml version="1.0" encoding="utf-8"?>

<LinearLayout xmlns:android="http://schemas.android.com/apk/res/android"

    xmlns:tools="http://schemas.android.com/tools"

    android:id="@+id/activity_text_view"

    android:layout_width="match_parent"

    android:layout_height="match_parent"

    android:orientation="vertical">

    <TextView

        android:layout_width="match_parent"

        android:layout_height="wrap_content"

        android:text="@string/police"

        android:textSize="30sp"

        android:gravity="center"

        android:autoLink="phone"

        />

    <TextView

        android:layout_width="match_parent"

        android:layout_height="wrap_content"

        android:text="http://192.168.0.168"

        android:textSize="30sp"

        android:gravity="center"

        android:autoLink="web"

        />

    <EditText

        android:layout_width="match_parent"

        android:layout_height="60dp"

        android:hint="请输入电话号码"

        android:maxLines="1"

        android:inputType="phone"

        />

    <EditText

        android:layout_width="match_parent"

        android:layout_height="60dp"

        android:hint="请输入姓名"

        android:maxLines="1"

        android:inputType="text"

        />

    <EditText

        android:layout_width="match_parent"

        android:layout_height="60dp"

        android:hint="请输密码"

        android:maxLines="1"

        android:inputType="textPassword"

        />

</LinearLayout>
23、下拉列表
strings.xml
<resources>

    <array name="jobs">

        <item>法师</item>

        <item>坦克</item>

        <item>射手</item>

        <item>刺客</item>

    </array>

</resources>
<Spinner

     android:id="@+id/hjob"

     android:entries="@array/jobs"

     android:spinnerMode="dropdown"

     android:layout_width="match_parent"

     android:layout_height="wrap_content">

</Spinner>
24、实现动态匹配输入的内容
<?xml version="1.0" encoding="utf-8"?>

<LinearLayout xmlns:android="http://schemas.android.com/apk/res/android"

    android:id="@+id/activity_auto_complete"

    android:layout_width="match_parent"

    android:layout_height="match_parent"

    android:orientation="vertical">

    <AutoCompleteTextView

        android:id="@+id/autoText"

        android:completionHint="根据名称查找"

        android:completionThreshold="1"

        android:layout_width="match_parent"

        android:layout_height="wrap_content" />

</LinearLayout>
Android开发 ---xml布局元素的更多相关文章
- Android开发---网格布局案例
Android开发---网格布局案例 效果图: 1.MainActivity.java package com.example.android_activity; import android.ap ...
- Android开发 --代码布局
Android开发 --代码布局 在线性布局LinearLayout里加入view比较简单,因为属性比较少,布局简单 示例,加入一个TextView LinearLayout layout = (Li ...
- Android开发 UI布局
Android开发 UI布局一.线性布局LinearLayout 什么是线性布局? 其实呢,线性布局就是把所有的孩子摆在同一条线上 <?xml version="1.0" e ...
- Android开发-动态布局小记
android动态布局相比静态布局,动态布局不用再将xml转变了布局代码,提高了一定的效率,当然可以忽略不记.动态布局主要是比较灵活,可以很快的在代码中直接修改布局,并直接使用控件进行业务逻辑开发.但 ...
- Android中将xml布局文件转化为View树的过程分析(下)-- LayoutInflater源码分析
在Android开发中为了inflate一个布局文件,大体有2种方式,如下所示: // 1. get a instance of LayoutInflater, then do whatever yo ...
- Android开发之布局优化
1.抽象布局标签 (1) <include>标签 include标签经常使用于将布局中的公共部分提取出来供其它layout共用,以实现布局模块化.这在布局编写方便提供了大大的便利. 以下以 ...
- Android开发总体布局
<?xml version="1.0" encoding="utf-8"?> <LinearLayout xmlns:android=&quo ...
- Android开发 ---xml构建选项菜单、上下文菜单(长按显示菜单)、发通知、发送下载通知
1.activity_main.xml 描述: 定义了一个TextView和三个按钮 <?xml version="1.0" encoding="utf-8&quo ...
- Android开发6——布局中的wrap_content和fill_parent以及match_parent
一.言简意赅 fill_parent 是让控件宽或者高占全屏 wrap_content是让控件的高或宽仅仅把控件里的内容包裹住而不是全屏 二.分别来看 1 fill_parent 设置一个构件的布局 ...
随机推荐
- English trip M1 - PC7 Can I Borrow Your Ping-Pong? Teacher:Patrick
In this lesson you will learn to desribe abilities. 这节课你将学习到描述你的能力 课上内容(Lesson) 三种常见情态动词 can aux. 能 ...
- java.lang.RuntimeException: com.netflix.client.ClientException: Load balancer does not have available server for client: service-one
一.异常信息 java.lang.RuntimeException: com.netflix.client.ClientException: Load balancer does not have a ...
- JavaScript的几个概念简单理解(深入解释见You Don't know JavaScript这本书)
ES201X是JavaScript的一个版本. ES2015新的feature let, const Scope, 块作用域 Hoisting Closures DataStructures: Obj ...
- caffe 动态库 Release X64
Release X64平台 createdll.h#ifndef CREARDLL_H_#define CREARDLL_H_ extern "C" _declspec(dllex ...
- Ubuntu深度学习环境搭建 tensorflow+pytorch
目前电脑配置:Ubuntu 16.04 + GTX1080显卡 配置深度学习环境,利用清华源安装一个miniconda环境是非常好的选择.尤其是今天发现conda install -c menpo o ...
- css 选择器二
2.4 盒模型 2.4.1 定义 在CSS中,"box model"这一术语是用来设计和布局时使用,然后在网页中基本上都会显示一些方方正正的盒子.我们称为这种盒子叫盒模型. 盒模型 ...
- HTTP请求/响应报文结构
HTTP协议版本有两种:HTTP1.0和HTTP1.1 它们俩的区别在于:HTTP1.0对于每个连接都只能传送一个请求和响应,请求后就会关闭,HTTP1.0没有Host字段:而HTTP1.1在同一个连 ...
- bzoj3884: 上帝与集合的正确用法 扩展欧拉定理
题意:求\(2^{2^{2^{2^{...}}}}\%p\) 题解:可以发现用扩展欧拉定理不需要很多次就能使模数变成1,后面的就不用算了 \(a^b\%c=a^{b\%\phi c} gcd(b,c) ...
- 移除input框type="number"在部分浏览器的默认上下按钮
input::-webkit-outer-spin-button, input::-webkit-inner-spin-button { -webkit-appearance: none !impor ...
- 厉害了WORD大S
REPORT YLYTEST01. ) TYPE C VALUE 'ABC'. WRITE LV_C TO LV_C RIGHT-JUSTIFIED. '. WRITE LV_C. 结果: 另外收藏一 ...
