SSM(Spring+SpringMVC+Mybatis)框架环境搭建(整合步骤)(一)
1. 前言
最近在写毕设过程中,重新梳理了一遍SSM框架,特此记录一下。
附上源码:https://gitee.com/niceyoo/jeenotes-ssm
2. 概述
在写代码之前我们先了解一下这三个框架分别是干什么的?
SpringMVC:它用于web层,相当于controller(等价于传统的servlet和struts的action),用来处理用户请求。举个例子,用户在地址栏输入http://网站域名/login,那么springmvc就会拦截到这个请求,并且调用controller层中相应的方法,(中间可能包含验证用户名和密码的业务逻辑,以及查询数据库操作,但这些都不是springmvc的职责),最终把结果返回给用户,并且返回相应的页面(当然也可以只返回json/xml等格式数据)。springmvc就是做前面和后面过程的活,与用户打交道!!
Spring:太强大了,以至于我无法用一个词或一句话来概括它。但与我们平时开发接触最多的估计就是IOC容器,它可以装载bean(也就是我们java中的类,当然也包括service dao里面的),有了这个机制,我们就不用在每次使用这个类的时候为它初始化,很少看到关键字new。另外spring的aop,事务管理等等都是我们经常用到的。
MyBatis:如果你问我它跟鼎鼎大名的Hibernate有什么区别?我只想说,他更符合我的需求。第一,它能自由控制sql,这会让有数据库经验的人(当然不是说我啦~捂脸~)编写的代码能搞提升数据库访问的效率。第二,它可以使用xml的方式来组织管理我们的sql,因为一般程序出错很多情况下是sql出错,别人接手代码后能快速找到出错地方,甚至可以优化原来写的sql。
3. SSM框架整合配置
3.1 开发环境
IDE: Eclipse Mars2
Jdk: 1.7
数据库: MySQL
注:本例演示采用的开发工具是Eclipse,不要让开发工具限制了你的学习,按照自己的需要来创建就好,用什么工具就按照什么步骤来创建。
3.2 创建Java WEB项目
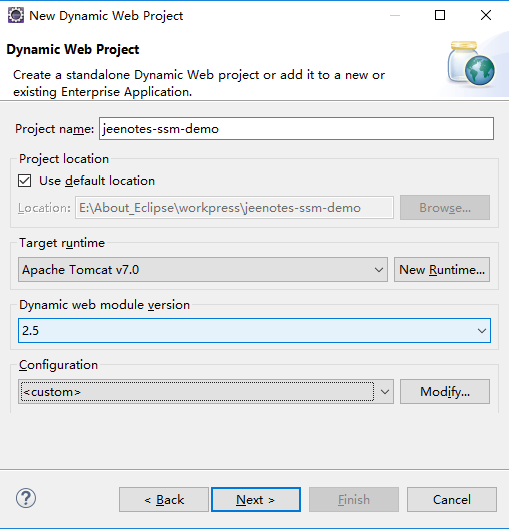
新建Dynamic Web Project
File->New->Other->Web->Dynamic Web Project
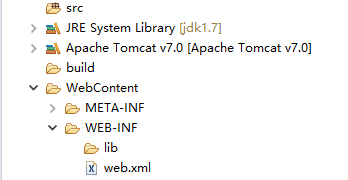
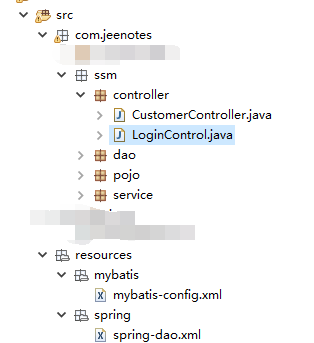
以下是在Package Explorer 视图下的完整目录结构,具体内容看图:

3.3 导入所需jar包
- spring(包括springmvc)
- mybatis
- mybatis-spring整合包
- 数据库驱动
- 第三方连接池。
- Json依赖包Jackson
jar包最后会提供下载地址。
3.4 整合思路
1、Dao层:
Mybatis的配置文件:mybatis-config.xml
不需要配置任何内容,需要有文件头。文件必须存在。
spring-dao.xml:mybatis整合spring,通过由spring创建数据库连接池,spring管理SqlSessionFactory、mapper代理对象。需要mybatis和spring的整合包。
2、Service层:
spring-service.xml:所有的service实现类都放到spring容器中管理。并由spring管理事务。
3、表现层:
Springmvc框架,由springmvc管理controller。
Springmvc的三大组件。
3.5 加入配置文件
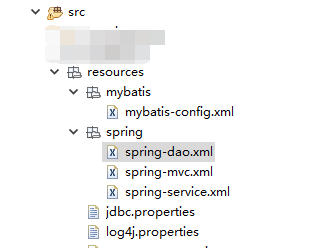
首先来张图,有图有真相,打马赛克部分暂时用不到,在src下创建resources文件夹... 如下图所示依次创建。
mybatis——mybatis配置
spring——spring+springmvc+spring和mybatis配置
jdbc.properties——数据库配置文件
log4j.properties——log日志
补充:spring包下的文件配置有个知识点需要注意一下,因为spring的配置太多,在这里分为spring-dao、spring-service、spring-mvc(相当于spring-web,本身springmvc就是起到web层的作用)三层,通常我们在别人的项目里看到的就只有spring-context、spring-mvc,其实你可以理解成:sprig-context = spring-dao + spring-service ,我拆分开只是为了更加直观,无论是拆成几个,本身内容是不会变的,只要最后在web.xml把文件配置进去能够实例化即可,无须纠结。
如下xml顺序不分排名,按照上方截图依次提供
1、mybatis-config(mybatis配置)
 <?xml version="1.0" encoding="UTF-8" ?>

 <!DOCTYPE configuration PUBLIC "-//mybatis.org//DTD Config 3.0//EN"

 "http://mybatis.org/dtd/mybatis-3-config.dtd">

 <configuration>

     <!-- 别名 -->

     <!-- 起別名后,不用在mappring resultType 填写全类名 -->

     <typeAliases>

         <package name="com.jeenotes.ssm.pojo"/>

     </typeAliases>

 </configuration>
2、spring-dao(持久层,spring和mybatis的结合)
 <?xml version="1.0" encoding="UTF-8"?>

 <beans xmlns="http://www.springframework.org/schema/beans"

     xmlns:context="http://www.springframework.org/schema/context" xmlns:p="http://www.springframework.org/schema/p"

     xmlns:aop="http://www.springframework.org/schema/aop" xmlns:tx="http://www.springframework.org/schema/tx"

     xmlns:xsi="http://www.w3.org/2001/XMLSchema-instance"

     xsi:schemaLocation="http://www.springframework.org/schema/beans http://www.springframework.org/schema/beans/spring-beans-4.0.xsd

     http://www.springframework.org/schema/context http://www.springframework.org/schema/context/spring-context-4.0.xsd

     http://www.springframework.org/schema/aop http://www.springframework.org/schema/aop/spring-aop-4.0.xsd http://www.springframework.org/schema/tx http://www.springframework.org/schema/tx/spring-tx-4.0.xsd

     http://www.springframework.org/schema/util http://www.springframework.org/schema/util/spring-util-4.0.xsd">

     <!-- 配置 读取properties文件 jdbc.properties -->

     <context:property-placeholder location="classpath:resources/jdbc.properties" />

     <!-- 配置 数据源 -->

     <bean id="dataSource" class="com.alibaba.druid.pool.DruidDataSource">

         <property name="driverClassName" value="${jdbc.driver}" />

         <property name="url" value="${jdbc.url}" />

         <property name="username" value="${jdbc.username}" />

         <property name="password" value="${jdbc.password}" />

     </bean>

     <!-- 配置SqlSessionFactory -->

     <bean class="org.mybatis.spring.SqlSessionFactoryBean">

         <!-- 设置MyBatis核心配置文件 -->

         <property name="configLocation" value="classpath:resources/mybatis/mybatis-config.xml" />

         <!-- 设置数据源 -->

         <property name="dataSource" ref="dataSource" />

         <!-- 它表示我们的Mapper文件存放的位置,当我们的Mapper文件跟对应的Mapper接口处于同一位置的时候可以不用指定该属性的值。 -->

         <property name="mapperLocations" value="classpath:/mappings/**/*.xml" />

         <!-- 那么在Mapper文件里面就可以直接写对应的类名 而不用写全路径名了  -->

         <!-- 跟mybatis中<typeAliases>作用一样 -->

         <!-- <property name="typeAliasesPackage" value="com.jeenotes.ssm.pojo"/> -->

     </bean>

     <!-- 配置Mapper扫描 -->

     <bean class="org.mybatis.spring.mapper.MapperScannerConfigurer">

         <!-- 设置Mapper扫描包 -->

         <property name="basePackage" value="com.jeenotes.ssm.dao" />

     </bean>

 </beans>
3、spring-service(配置service扫描)
 <?xml version="1.0" encoding="UTF-8"?>

 <beans xmlns="http://www.springframework.org/schema/beans"

     xmlns:context="http://www.springframework.org/schema/context" xmlns:p="http://www.springframework.org/schema/p"

     xmlns:aop="http://www.springframework.org/schema/aop" xmlns:tx="http://www.springframework.org/schema/tx"

     xmlns:xsi="http://www.w3.org/2001/XMLSchema-instance"

     xsi:schemaLocation="http://www.springframework.org/schema/beans http://www.springframework.org/schema/beans/spring-beans-4.0.xsd

     http://www.springframework.org/schema/context http://www.springframework.org/schema/context/spring-context-4.0.xsd

     http://www.springframework.org/schema/aop http://www.springframework.org/schema/aop/spring-aop-4.0.xsd http://www.springframework.org/schema/tx http://www.springframework.org/schema/tx/spring-tx-4.0.xsd

     http://www.springframework.org/schema/util http://www.springframework.org/schema/util/spring-util-4.0.xsd">

     <!-- 配置Service扫描 -->

     <context:component-scan base-package="com.jeenotes.ssm.service" />

 </beans>
4、spring-mvc
 <?xml version="1.0" encoding="UTF-8"?>

 <beans xmlns="http://www.springframework.org/schema/beans"

     xmlns:xsi="http://www.w3.org/2001/XMLSchema-instance" xmlns:p="http://www.springframework.org/schema/p"

     xmlns:context="http://www.springframework.org/schema/context"

     xmlns:mvc="http://www.springframework.org/schema/mvc"

     xsi:schemaLocation="http://www.springframework.org/schema/beans http://www.springframework.org/schema/beans/spring-beans-4.0.xsd

         http://www.springframework.org/schema/mvc http://www.springframework.org/schema/mvc/spring-mvc-4.0.xsd

         http://www.springframework.org/schema/context http://www.springframework.org/schema/context/spring-context-4.0.xsd">

     <!-- 配置Controller扫描 -->

     <context:component-scan base-package="com.jeenotes.ssm.controller" />

     <!-- 配置注解驱动 -->

     <mvc:annotation-driven />

     <!-- 对静态资源放行  -->

     <mvc:resources location="/css/" mapping="/css/**"/>

     <mvc:resources location="/js/" mapping="/js/**"/>

     <mvc:resources location="/fonts/" mapping="/fonts/**"/>

     <mvc:resources location="/frame/" mapping="/frame/**"/>

     <mvc:resources location="/images/" mapping="/images/**"/>

     <mvc:resources location="/style/" mapping="/style/**"/>

     <!-- 配置视图解析器 -->

     <bean class="org.springframework.web.servlet.view.InternalResourceViewResolver">

         <!-- 前缀 -->

         <property name="prefix" value="/WEB-INF/jsp/" />

         <!-- 后缀 -->

         <property name="suffix" value=".jsp" />

     </bean>

 </beans>
5、jdbc.properties
 jdbc.driver=com.mysql.jdbc.Driver

 jdbc.url=jdbc:mysql://localhost:3306/crm?characterEncoding=utf-8

 jdbc.username=root

 jdbc.password=****
6、log4j.properties
 # Global logging configuration

 log4j.rootLogger=DEBUG, stdout

 # Console output...

 log4j.appender.stdout=org.apache.log4j.ConsoleAppender

 log4j.appender.stdout.layout=org.apache.log4j.PatternLayout

 log4j.appender.stdout.layout.ConversionPattern=%5p [%t] - %m%n
3.6 试搭建环境
到这里,其实整个框架的搭建已经基本了,毕竟整点就是上边这堆配置文件嘛,接下来,就是测试一下了。
是时候让你看一下部分马赛克了,参照如下架构可自行创建包
com.jeenotes.ssm:存放control、dao、pojo、service
随便创建一个control,可参考如下:
@Controller

@RequestMapping(value = "user")

public class LoginControl {

    @RequestMapping("login")

    public String dologin() {

        return "index";

    }

}
然后再创建一个index.jsp,jsp文件最好放在WEB-INF目录下,至于为何,自行百度。

在这我就直接放在外面了,其实尽管不去请求url,项目运行同样会进入index.jsp,原因就在于web.xml配置文件中这段配置,
welcome-file-list是一个配置在web.xml中的一个欢迎页,用于当用户在url中输入工程名称或者输入web容器url(如http://localhost:8080/jeenotes-ssm/)时直接跳转的页面.
<welcome-file-list>

    <welcome-file>index.html</welcome-file>

    <welcome-file>index.htm</welcome-file>

    <welcome-file>index.jsp</welcome-file>

    <welcome-file>default.html</welcome-file>

    <welcome-file>default.htm</welcome-file>

    <welcome-file>default.jsp</welcome-file>

</welcome-file-list>
程序运行后,在浏览器访问http://localhost:8080/jeenotes-ssm/user/login 同样可以访问到index.jsp证明测试成功。
3.7 SSM框架应用实例
如上只是对web层的一次请求测试,接下来就是对整个ssm环境进行测试了,在这我们通过一个例子继续。
待补充
SSM(Spring+SpringMVC+Mybatis)框架环境搭建(应用实例)(二)
项目地址:https://gitee.com/niceyoo/jeenotes-ssm
Maven版本改造地址:https://www.cnblogs.com/niceyoo/p/12960903.html
我创建了一个java相关的公众号,用来记录自己的学习之路,感兴趣的小伙伴可以关注微信公众号:niceyoo

SSM(Spring+SpringMVC+Mybatis)框架环境搭建(整合步骤)(一)的更多相关文章
- SSM(Spring +SpringMVC + Mybatis)框架搭建
SSM(Spring +SpringMVC + Mybatis)框架的搭建 最近通过学习别人博客发表的SSM搭建Demo,尝试去搭建一个简单的SSMDemo---实现的功能是对用户增删改查的操作 参考 ...
- SSM(Spring,SpringMVC,Mybatis)框架整合项目
快速上手SSM(Spring,SpringMVC,Mybatis)框架整合项目 环境要求: IDEA MySQL 8.0.25 Tomcat 9 Maven 3.6 数据库环境: 创建一个存放书籍数据 ...
- 用IntelliJ IDEA 开发Spring+SpringMVC+Mybatis框架 分步搭建二:配置MyBatis 并测试(1 构建目录环境和依赖)
引言:在用IntelliJ IDEA 开发Spring+SpringMVC+Mybatis框架 分步搭建一 的基础上 继续进行项目搭建 该部分的主要目的是测通MyBatis 及Spring-dao ...
- Spring+SpringMvc+Mybatis框架集成搭建教程
一.背景 最近有很多同学由于没有过SSM(Spring+SpringMvc+Mybatis , 以下简称SSM)框架的搭建的经历,所以在自己搭建SSM框架集成的时候,出现了这样或者那样的问题,很是苦恼 ...
- 用IntelliJ IDEA 开发Spring+SpringMVC+Mybatis框架 分步搭建二:配置MyBatis 并测试(2 配置spring-dao和测试)
用IntelliJ IDEA 开发Spring+SpringMVC+Mybatis框架 分步搭建二:配置MyBatis 并测试(1 搭建目录环境和依赖) 四:在\resources\spring 下面 ...
- 用IntelliJ IDEA 开发Spring+SpringMVC+Mybatis框架 分步搭建一:建立MAVEN Web项目
一:创建maven web项目er
- SSM(Spring + Springmvc + Mybatis)框架面试题
JAVA SSM框架基础面试题https://blog.csdn.net/qq_39031310/article/details/83050192 SSM(Spring + Springmvc + M ...
- 用IntelliJ IDEA 开发Spring+SpringMVC+Mybatis框架 分步搭建四:配置springmvc
在用IntelliJ IDEA 开发Spring+SpringMVC+Mybatis框架 分步搭建三:配置spring并测试的基础上 继续进行springmvc的配置 一:配置完善web.xml文件
- 用IntelliJ IDEA 开发Spring+SpringMVC+Mybatis框架 分步搭建三:配置spring并测试
这一部分的主要目的是 配置spring-service.xml 也就是配置spring 并测试service层 是否配置成功 用IntelliJ IDEA 开发Spring+SpringMVC+M ...
随机推荐
- Kiss MySQL goodbye for development and say hello to HSQLDB
The days of using MySQL, DB2, PostgreSQL etc for development is over.. I don’t know why any program ...
- ORA-00001: unique constraint (...) violated并不一定是数据冲突
原文链接:http://blog.163.com/jet_it_life/blog/static/205097083201301410303931/ 收到一位测试人员RAISE的JIRA,说在某张表上 ...
- winform利用ImageList控件和ListView控件组合制作图片文件浏览器
winform利用ImageList控件和ListView控件组合制作图片文件浏览器,见图,比较简单,实现LISTVIEW显示文件夹图片功能. 1.选择文件夹功能代码: folderBrowserDi ...
- python中利用redis构建任务队列(queue)
Python中的使用标准queue模块就可以建立多进程使用的队列,但是使用redis和redis-queue(rq)模块使这一操作更加简单. Part 1. 比如首先我们使用队列来简单的储存数据:我们 ...
- 推荐一款好用的文件/文件夹对比工具 —— Beyond Compare
推荐一款好用的文件/文件夹对比工具 —— Beyond Compare! 有需要的人,用了都说好: 不知道这个是干嘛用的,说再多也没用.
- element的form表单中如何一行显示多el-form-item标签
效果图: HTML代码: <script src="//unpkg.com/vue/dist/vue.js"></script> <script sr ...
- Unity3D Shader水波效果
水波效果 Shader "Custom/WaterWave" { Properties { _MainTex ("Base (RGB)", 2D) = &quo ...
- day_5.20 py
列表去重的两种方法 1.自己写程序 for循环 2.直接变为set类型
- ssh登录慢解决办法
这两天ssh登录局域网的一台服务器非常慢,严重影响工作效率,怎么办?查了一下网上的解决办法,总结一下: 使用命令ssh -v xxx@x.x.x.x 可以看到debug信息,找到问题出在哪: debu ...
- MySQL-记一次备份失败的排查过程
山竹来临,窝在家里整理个人文档. 本篇文章主要讲解排查问题的思路,涉及linux 删除文件的原理.实例误删数据恢复.MySQL实例初始化参数优先级别等,虽然涉及知 ...