从头学Android之Android布局管理:LinerLayout线性布局
LinerLayout线性布局:
这种布局方式是指在这个里面的控件元素显线性,我们可以通过setOrientation(int orientation)来指定线性布局的显示方式,其值有:HORIZONTAL(0)、VERTICAL(1)。默认为HORIZONTAL。与之相关的我们也可以在布局文件中通过android:orientation来指定。同理,其值也有:horizontal、vertical
LinearLayout是线性布局控件,它包含的子控件将以横向或竖向的方式排列,按照相对位置来排列所有的widgets或者其他的containers,超过边界时,某些控件将缺失或消失,不能完全显示。因此垂直方式排列时,每一行只会有一个 widget或者是container,而不管他们有多宽,而水平方式排列是将会只有一个行高(高度为最高子控件的高度加上边框高度)。LinearLayout保持其所包含的 widget或者是container之间的间隔以及互相对齐(相对一个控件的右对齐、中间对齐或者左对齐)。
关于layout_weight:
LinearLayout还支持为其包含的widget或者是container指定填充权值。允许其包含的widget或者是container可以填充屏幕上的剩余空间。剩余的空间会按这些widgets或者是containers指定的权值比例分配屏幕。默认的 weight 值为0 ,表示按照widgets或者是containers实际大小来显示,若高于0的值,则将 Container剩余可用空间分割,分割大小具体取决于每一个widget或者是 container的layout_weight及该权值在所有widgets或者是containers中的比例。例如,如果有三个文本框,前两个文本框的取值一个为2,一个为1,显示第三个文本框后剩余的空间的2/3给权值为2的,1/3大小给权值为1的。而第三个文本框不会放大,按实际大小来显示。也就是权值越大,重要度越大,显示时所占的剩余空间越大。
示例1:
 <?xml version="1.0" encoding="utf-8"?>

 <LinearLayout xmlns:android="http://schemas.android.com/apk/res/android"

    android:orientation="vertical" android:layout_width="match_parent"

    android:layout_height="match_parent">

    <EditText android:id="@+id/txt01" android:layout_width="fill_parent"

       android:layout_height="wrap_content" android:layout_weight="1"

       android:text="1111" />

    <EditText android:id="@+id/txt02" android:layout_width="fill_parent"

       android:layout_height="wrap_content" android:layout_weight="2"

       android:text="2222" />

    <EditText android:id="@+id/txt03" android:layout_width="fill_parent"

       android:layout_height="wrap_content" android:text="3333" />

 </LinearLayout>

几个常用的XML属性的详解:
|
属性名称 |
相关方法 |
描述 |
|
android:baselineAligned |
setBaselineAligned (boolean baselineAligned) |
是否允许用户调整它内容的基线。 |
|
android:baselineAlignedChildIndex |
setBaselineAlignedChildIndex (int i) |
是当前LinearLayout与其它View的对齐方式 |
|
android:gravity |
setGravity (int gravity) |
指定控件中内容的基本内容的对齐方式(本元素里的所有元素的重力方向)。其值有: |
|
android:layout_gravity |
|
是当前元素相对于父元素的重力方向 |
|
android:measureWithLargestChild |
|
当被设置为真时,所有的子控件将被认为是具有重量最小面积最大的子控件 |
|
android:orientation |
setOrientation (int orientation) |
置它内容的对其方向,有两个可以选择的值: horizontal和vertical。分别表示水平排列和垂直排列。 |
|
android:weightSum |
在Android里我们可以通过两种方式来设置布局文件,一种是可以通过XML文件来设置布局,这也是官方推荐,另外一种方式就是我们可以通过代码来设置我们的布局模式
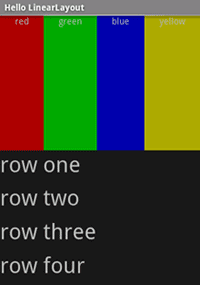
方式一:通过XML文件。只要在onCreate()方法里通过setContentView()指定布局文件即可
 <?xml version="1.0" encoding="utf-8"?>

 <LinearLayout xmlns:android="http://schemas.android.com/apk/res/android"

     android:orientation="vertical"

     android:layout_width="fill_parent"

     android:layout_height="fill_parent">

   <LinearLayout

       android:orientation="horizontal"

       android:layout_width="fill_parent"

       android:layout_height="fill_parent"

       android:layout_weight="1">

       <TextView

           android:text="red"

           android:gravity="center_horizontal"

           android:background="#aa0000"

           android:layout_width="wrap_content"

           android:layout_height="fill_parent"

           android:layout_weight="1"/>

       <TextView

           android:text="green"

           android:gravity="center_horizontal"

           android:background="#00aa00"

           android:layout_width="wrap_content"

           android:layout_height="fill_parent"

           android:layout_weight="1"/>

       <TextView

           android:text="blue"

           android:gravity="center_horizontal"

           android:background="#0000aa"

           android:layout_width="wrap_content"

           android:layout_height="fill_parent"

           android:layout_weight="1"/>

       <TextView

           android:text="yellow"

           android:gravity="center_horizontal"

           android:background="#aaaa00"

           android:layout_width="wrap_content"

           android:layout_height="fill_parent"

           android:layout_weight="1"/>

   </LinearLayout>

   <LinearLayout

     android:orientation="vertical"

     android:layout_width="fill_parent"

     android:layout_height="fill_parent"

     android:layout_weight="1">

     <TextView

         android:text="row one"

         android:textSize="15pt"

         android:layout_width="fill_parent"

         android:layout_height="wrap_content"

         android:layout_weight="1"/>

     <TextView

         android:text="row two"

         android:textSize="15pt"

         android:layout_width="fill_parent"

         android:layout_height="wrap_content"

         android:layout_weight="1"/>

     <TextView

         android:text="row three"

         android:textSize="15pt"

         android:layout_width="fill_parent"

         android:layout_height="wrap_content"

         android:layout_weight="1"/>

     <TextView

         android:text="row four"

         android:textSize="15pt"

         android:layout_width="fill_parent"

         android:layout_height="wrap_content"

         android:layout_weight="1"/>

   </LinearLayout>

 </LinearLayout>
方式二:代码方式
LinerLayout类的常用方法及常量
|
方法及常量 |
类型 |
描述 |
|
public static final int HORIZONTAL |
常量 |
设置水平对齐 |
|
public static final int VERTICAL |
常量 |
设置垂直对齐 |
|
public LinerLayout(Context context) |
构造方法 |
创建LinerLayout类的对象 |
|
public void addView(View child, ViewGroup.LayoutParams params) |
普通方法 |
增加组组件并且指定布局参数 |
|
public void addView(View childView) |
普通方法 |
增加组件 |
|
public void setOrientation(int orientaiton) |
普通方法 |
设置对齐方式 |
LinerLayout.LayoutParams用于指定线性布局的参数
类结构图:
|
↳ |
|||
|
|
↳ |
||
|
|
|
↳ |
android.widget.LinearLayout.LayoutParams |
常用布局参数:
public static final int FILL_PARENT
public static final int WRAP_CONTENT
 package com.jiahui.activity;

 import android.app.Activity;

 import android.content.Intent;

 import android.os.Bundle;

 import android.view.View;

 import android.view.ViewGroup;

 import android.view.View.OnClickListener;

 import android.widget.Button;

 import android.widget.LinearLayout;

 import android.widget.TextView;

 import android.widget.LinearLayout.LayoutParams;

 /**

  * 动态设置布局

  *

  * @author Administrator

  *

  */

 public class Dyanmic_Layout_Activity extends Activity {

        public void onCreate(Bundle savedInstanceState) {

               super.onCreate(savedInstanceState);

               // 定义线性布局管理器

               LinearLayout layout = new LinearLayout(this);

               // 定义布局管理器的指定宽和高

               LinearLayout.LayoutParams params = new LinearLayout.LayoutParams(

                             ViewGroup.LayoutParams.FILL_PARENT,

                             ViewGroup.LayoutParams.FILL_PARENT);

               layout.setOrientation(LinearLayout.VERTICAL);

               // 定义要显示组件的布局管理器

               LinearLayout.LayoutParams txtParam = new LinearLayout.LayoutParams(

                             ViewGroup.LayoutParams.FILL_PARENT,

                             ViewGroup.LayoutParams.WRAP_CONTENT);

               TextView textView = new TextView(this);

               // 显示的文字

               textView.setText("动态设置布局增加的TextView组件");

               // 设置文本的参数

               textView.setLayoutParams(txtParam);

               // 增加组件

               layout.addView(textView, txtParam);

               // 增加新的布局管理器

               super.setContentView(layout, params);

        }

 }
实现效果

源代码下载:http://download.csdn.net/detail/jiahui524/3677960
从头学Android之Android布局管理:LinerLayout线性布局的更多相关文章
- Android学习系列(二)布局管理器之线性布局的3种实现方式
转载请注明出处:http://blog.csdn.net/lhy_ycu/article/details/39643669 LinearLayout是Android控件中的线性布局控件,它包括的子控件 ...
- Android BGABadgeView:BGABadgeLinearLayout以整体线性布局作为BadgeView(3)
Android BGABadgeView:BGABadgeLinearLayout以整体线性布局作为BadgeView(3) Android BGABadgeView不仅可以把某个View作为B ...
- 三十三、Java图形化界面设计——布局管理器之null布局(空布局)
摘自http://blog.csdn.net/liujun13579/article/details/7774267 三十三.Java图形化界面设计--布局管理器之null布局(空布局) 一般容器都有 ...
- Android -- UI布局管理,相对布局,线性布局,表格布局,绝对布局,帧布局
1. 相对布局 <RelativeLayout xmlns:android="http://schemas.android.com/apk/res/android" xmln ...
- 【Android】7.2 LinearLayout(线性布局)
分类:C#.Android.VS2015: 创建日期:2016-02-10 一.简介 LinearLayout将容器内的组件一个挨着一个地横向或纵向依次堆叠起来(不重叠).该布局和WPF的StackP ...
- Java 图形编程 二:布局管理器之顺序布局
package second; import java.awt.*; import java.awt.event.WindowAdapter; import java.awt.event.Window ...
- 转:三十三、Java图形化界面设计——布局管理器之null布局(空布局)——即SWT中的绝对布局
http://blog.csdn.net/liujun13579/article/details/7774267 一般容器都有默认布局方式,但是有时候需要精确指定各个组建的大小和位置,就需要用到 ...
- Java图形化界面设计——布局管理器之null布局(空布局)
一般容器都有默认布局方式,但是有时候需要精确指定各个组建的大小和位置,就需要用到空布局. 操作方法: 1) 首先利用setLayout(null)语句将容器的布局设置为null布局(空布局 ...
- Android课程---布局管理器之相对布局(二)
这次示例代码是相对布局中兄弟组件之间,设置按钮的位置,难度:*****,一定要注意有同方向和反方向之分: 1.同方向 1)layout_alignLeft 同方向左对齐 2)layout_alignR ...
随机推荐
- ios NSThred多线程简单使用
关于NSThred开启多线程的方法 - (void)performSelectorInBackground:(SEL)aSelector withObject:(id)arg [self perfor ...
- [题解]UVa 10635 Prince and Princess
讲一下题目大意,就是有两个长度为p + 1和q + 1的序列,求它们的LCS. 如果用O(pq)的算法对于这道题来说还是太慢了.所以要另外想一些方法.注意到序列中的所有元素都不相同,所以两个序列中数对 ...
- ADT bundle和Eclipse和Android Studio有什么区别?安卓开发该用哪个?
这三个版本的出现有一定的历史的原因:1.最开始只有eclipse+独立的adt一种开发环境,但是由于eclipe作为一种通用的ide,带来的问题太多,经常出现eclipse的版本不兼容adt的情况,或 ...
- DB2 UDB DBA 核对清单
本文摘自 http://www-128.ibm.com/developerworks/cn/db2/library/techarticles/dm-0404snow/index.htmlDB2 UDB ...
- 【转】 全世界最短的IE判定
以前最短的IE判定借助于IE不支持垂直制表符的特性搞出来的. var ie = !+"\v1"; 仅仅需要7bytes!讲述外国人是如何把IE的判定从32 bytes一步步缩简成7 ...
- WebService 基本操作
1.新建asp.net web 应用程序 2.添加web 服务webservice.asmx public string HelloWorld(int a) { if (a==1) { return ...
- 用scala实现一个sql执行引擎-(下)
执行 上一篇讲述了如何通过scala提供的内置DSL支持,实现一个可以解析sql的解析器,这篇讲如何拿到了解析结果-AST以后,如何在数据上进行操作,得到我们想要的结果.之前说到,为什么选择scala ...
- log4net Tutorial
Introduction One of the greatest logging tools out there for .NET is log4net. This software is the g ...
- Create executable jar
META-INF Manifest-Version: 1.0 Class-Path: . Main-Class: package.ClassName package package ClassName ...
- PAM禁止root用户登录,限制普通用户使用su切换到root
系统环境是CentOS 6.5, 介绍下PAM(Pluggable Authentication Modules)在ssh服务上的简单配置过程. 1.必须先添加普通用户,并属于wheel组:保证有除r ...