基于IDEA实现SSM整合框架的搭建配置流程
1、创建数据库表,以员工信息表为例子:
DROP TABLE IF EXISTS `em_info`;

CREATE TABLE `em_info` (

    `em_id` INT(50) NOT NULL AUTO_INCREMENT COMMENT '员工ID',

    `em_name` VARCHAR(100) NOT NULL COMMENT '员工姓名',

    `em_sex` VARCHAR(30) NOT NULL COMMENT '性别',

    `em_birthday` DATE NOT NULL COMMENT '出生日期',

    `em_hiredate` DATE NOT NULL COMMENT '入职日期',

    `em_salary` DOUBLE NOT NULL COMMENT '工资',

    PRIMARY KEY (`em_id`)

)ENGINE=INNODB DEFAULT CHARSET=utf8mb4;

INSERT INTO `em_info` VALUES (NULL,'小李飞刀','男','1999-2-8','2019-6-6','9999');
2、创建maven工程

2.1创建Module(web、service、dao、domain、utils子模块)

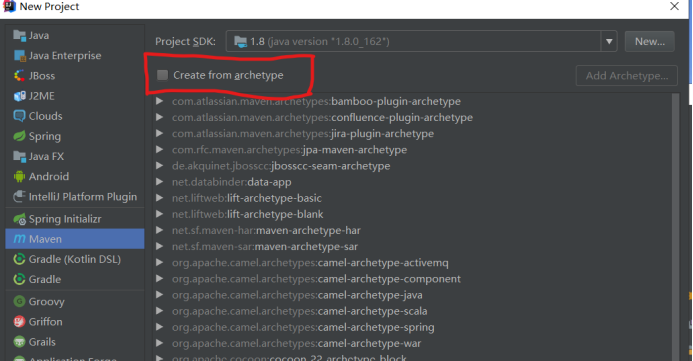
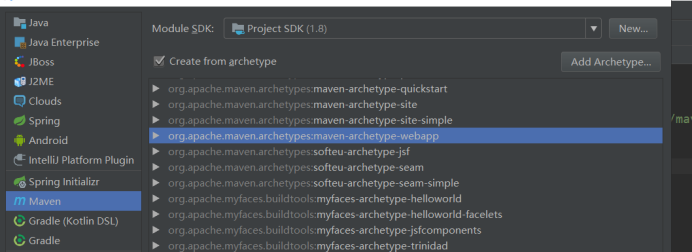
注意创建web子模块需要选择骨架,如下:

2.2、在domain子模块下创建实体类员工信息表Em_info,并提供get和set方法

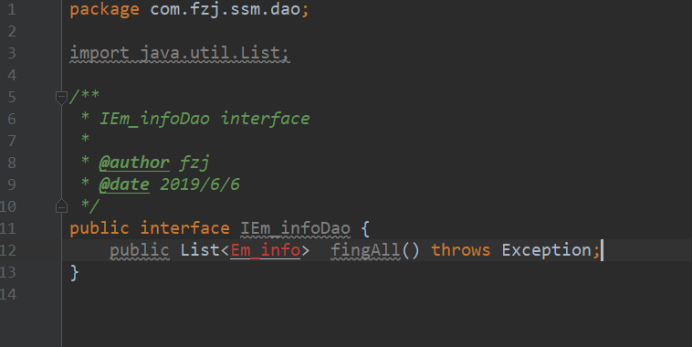
2.3、DAO下创建IEm_infoDao接口,写查找方法findAll()。需要连续两次快捷键Alt+Enter,添加依赖和导入,导包才消除红色不报错

2.4、同2.3步奏,service下创建IEm_infoService接口,写查找方法findAll()。需要连续两次快捷键Alt+Enter,添加依赖和导入,导包才消除红色不报错。
2.5创建service实体类,实现接口,重写方法

2.6在web.Mian包下手动创建java和resources两个包并指定为源码包和资源部

在resouces包下创建applicationContext.xml和spring-mvc.xml文件
2.7applicationContext.xml导入约束
<?xml version="1.0" encoding="UTF-8"?>

<beans xmlns="http://www.springframework.org/schema/beans"

       xmlns:xsi="http://www.w3.org/2001/XMLSchema-instance"

       xmlns:context="http://www.springframework.org/schema/context"

       xmlns:aop="http://www.springframework.org/schema/aop"

       xmlns:tx="http://www.springframework.org/schema/tx"

       xsi:schemaLocation="http://www.springframework.org/schema/beans

   http://www.springframework.org/schema/beans/spring-beans.xsd

   http://www.springframework.org/schema/context

   http://www.springframework.org/schema/context/spring-context.xsd

   http://www.springframework.org/schema/aop

   http://www.springframework.org/schema/aop/spring-aop.xsd

   http://www.springframework.org/schema/tx

   http://www.springframework.org/schema/tx/spring-tx.xsd">

</beans>
2.7.1、在添加下面配置扫描service和dao和配置连接池
<!-- 开启注解扫描,管理service和dao -->

<context:component-scan base-package="com.fzj.ssm.service">

</context:component-scan>

<context:component-scan base-package="com.fzj.ssm.dao">

</context:component-scan>

<context:property-placeholder location="classpath:db.properties"/>

<!-- 配置连接池 -->

<bean id="dataSource" class="com.mchange.v2.c3p0.ComboPooledDataSource">

    <property name="driverClass" value="${jdbc.driver}" />

    <property name="jdbcUrl" value="${jdbc.url}" />

    <property name="user" value="${jdbc.username}" />

    <property name="password" value="${jdbc.password}" />

</bean>

<!-- 把交给IOC管理 SqlSessionFactory -->

<bean id="sqlSessionFactory" class="org.mybatis.spring.SqlSessionFactoryBean">

<property name="dataSource" ref="dataSource" />
2.7.2、加入配置事务
<!-- 配置Spring的声明式事务管理 -->

<!-- 配置事务管理器 -->

<bean id="transactionManager" class="org.springframework.jdbc.datasource.DataSourceTransactionManager">

    <property name="dataSource" ref="dataSource"/>

</bean>

<tx:annotation-driven transaction-manager="transactionManager"/>
2.8、sources下创db.properties
jdbc.driver=com.mysql.jdbc.Driver

jdbc.url=jdbc:mysql://192.168.232.128:3306/ssm?useUnicode=true&characterEncoding=utf8

jdbc.username=root

jdbc.password=root
2.9、spring-mvc
加入约束头
<?xml version="1.0" encoding="UTF-8"?>

<beans xmlns="http://www.springframework.org/schema/beans"

       xmlns:mvc="http://www.springframework.org/schema/mvc"

       xmlns:context="http://www.springframework.org/schema/context"

       xmlns:xsi="http://www.w3.org/2001/XMLSchema-instance"

       xmlns:aop="http://www.springframework.org/schema/aop"

       xsi:schemaLocation="

           http://www.springframework.org/schema/beans

           http://www.springframework.org/schema/beans/spring-beans.xsd

           http://www.springframework.org/schema/mvc

           http://www.springframework.org/schema/mvc/spring-mvc.xsd

           http://www.springframework.org/schema/context

           http://www.springframework.org/schema/context/spring-context.xsd

           http://www.springframework.org/schema/aop

      http://www.springframework.org/schema/aop/spring-aop.xsd

           ">

</beans>
2.9.1、加入如下配置:
<!-- 扫描controller的注解,别的不扫描 -->

<context:component-scan base-package="com.itheima.ssm.controller">

</context:component-scan>

<!-- 配置视图解析器 -->

<bean id="viewResolver" class="org.springframework.web.servlet.view.InternalResourceViewResolver">

    <!-- JSP文件所在的目录 -->

    <property name="prefix" value="/pages/" />

    <!-- 文件的后缀名 -->

    <property name="suffix" value=".jsp" />

</bean>

<!-- 设置静态资源不过滤 -->

<mvc:resources location="/css/" mapping="/css/**" />

<mvc:resources location="/img/" mapping="/img/**" />

<mvc:resources location="/js/" mapping="/js/**" />

<mvc:resources location="/plugins/" mapping="/plugins/**" />

<!-- 开启对SpringMVC注解的支持 -->

<mvc:annotation-driven />

<!--

    支持AOP的注解支持,AOP底层使用代理技术

    JDK动态代理,要求必须有接口

    cglib代理,生成子类对象,proxy-target-class="true" 默认使用cglib的方式

-->

<aop:aspectj-autoproxy proxy-target-class="true"/>
3.0、web.xml相关配置
<?xml version="1.0" encoding="UTF-8"?>

<web-app xmlns:xsi="http://www.w3.org/2001/XMLSchema-instance"

         xmlns="http://xmlns.jcp.org/xml/ns/javaee"

         xsi:schemaLocation="http://xmlns.jcp.org/xml/ns/javaee http://xmlns.jcp.org/xml/ns/javaee/web-app_3_1.xsd"

         version="3.1">

  <!-- 配置加载类路径的配置文件 -->

  <context-param>

    <param-name>contextConfigLocation</param-name>

    <param-value>classpath*:applicationContext.xml</param-value>

  </context-param>

  <!-- 配置监听器 -->

  <listener>

    <listener-class>org.springframework.web.context.ContextLoaderListener</listener-class>

  </listener>

  <!-- 配置监听器,监听request域对象的创建和销毁的 -->

  <listener>

    <listener-class>org.springframework.web.context.request.RequestContextListener</listener-class>

  </listener>

  <!-- 前端控制器(加载classpath:springmvc.xml 服务器启动创建servlet) -->

  <servlet>

    <servlet-name>dispatcherServlet</servlet-name>

    <servlet-class>org.springframework.web.servlet.DispatcherServlet</servlet-class>

    <!-- 配置初始化参数,创建完DispatcherServlet对象,加载springmvc.xml配置文件 -->

    <init-param>

      <param-name>contextConfigLocation</param-name>

      <param-value>classpath:spring-mvc.xml</param-value>

    </init-param>

    <!-- 服务器启动的时候,让DispatcherServlet对象创建 -->

    <load-on-startup>1</load-on-startup>

  </servlet>

  <servlet-mapping>

    <servlet-name>dispatcherServlet</servlet-name>

    <url-pattern>*.do</url-pattern>

  </servlet-mapping>

  <!-- 解决中文乱码过滤器 -->

  <filter>

    <filter-name>characterEncodingFilter</filter-name>

    <filter-class>org.springframework.web.filter.CharacterEncodingFilter</filter-class>

    <init-param>

      <param-name>encoding</param-name>

      <param-value>UTF-8</param-value>

    </init-param>

  </filter>

  <filter-mapping>

    <filter-name>characterEncodingFilter</filter-name>

    <url-pattern>/*</url-pattern>

  </filter-mapping>

  <welcome-file-list>

    <welcome-file>index.html</welcome-file>

    <welcome-file>index.htm</welcome-file>

    <welcome-file>index.jsp</welcome-file>

    <welcome-file>default.html</welcome-file>

    <welcome-file>default.htm</welcome-file>

    <welcome-file>default.jsp</welcome-file>

  </welcome-file-list>

</web-app>
3.1、在web下面创建controller类(com.fzj.sss.controller.Em_infoController)
编写findAll()方法,把返回值list加入modelAndView,
@Controller

@RequestMapping("/em_info")

public class Em_infoController {

    @Autowired

    private IEm_infoService em_infoService;

    @RequestMapping("/findAll.do")

    public ModelAndView findAll() throws Exception{

        ModelAndView mv =new ModelAndView();

        List<Em_info> em_infoList = em_infoService.findAll();

        for (Em_info em:em_infoList

             ) {

            System.out.println(em.getEm_name());

        }

        mv.addObject("em_infoList",em_infoList);

        mv.setViewName("em_info");

        return mv;

    }

}
4、页面:
Index.Jsp 添加超连接
<a href="${pageContext.request.contextPath}/em_info/findAll.do">查询所有</a>
创建结果展示页面em_info.jsp
通过${em_infoList}EL表达式获取值,并表格通过foreche循环展现数值
把项目web的war包部署到tomcat


运行结果:日期格式没有转换!因为目的证明SSM框架搭建成功而已

对比Sqlyog结果:

基于IDEA实现SSM整合框架的搭建配置流程的更多相关文章
- SSM整合框架实现ajax校验
SSM整合框架实现ajax校验 刚学习了ssm框架,ajax校验成功,分享下 1.导入jar包
- 基于Maven的SSM整合的web工程
此文章主要有以下几个知识点: 一.如何创建 Maven的Web 工程 二.整合SSM(Spring,SpringMvc,Mybatis),包括所有的配置文件 三.用 mybatis 逆向工程生成对应的 ...
- 转载-Linux下svn搭建配置流程
Linux下svn搭建配置流程 一. 源文件编译安装.源文件共两个,为: 1. 下载subversion源文件 subversion-1.6.1.tar.gz http://d136 ...
- SSM整合之---环境搭建
SSM整合---环境搭建 l 查询所有用户的信息,保存用户信息 1.pom.xml配置项目所需的jar包 <dependencies> <dependency> <gr ...
- 使用Yii框架完整搭建网站流程入门
下载地址: http://www.yiiframework.com/ http://www.yiichina.com/ 由美籍华人薛强研究而出, Yii 这个名字(读作易(Yee))代表 简单(eas ...
- 基于IDEA采用springboot+Mybatis搭建ssm框架简单demo项目的搭建配置流程
一.通过对比可以原始SSM搭建流程,spring boot省去了大量的配置,极大提高了开发者的效率.原始SSM框架搭建流程见博客: https://www.cnblogs.com/No2-explor ...
- 框架进行时——SSM整合基础环境搭建
一.导入相关的依赖 1 <!--打war包--> 2 <packaging>war</packaging> 3 4 <!--版本锁定--> 5 < ...
- maven集成SSM项目,Tomcat部署运行——SSM整合框架搭建(二)之问题
问题一.当放开controller中的方法,出现如下问题 ### Error querying database. Cause: org.springframework.jdbc.CannotGetJ ...
- SSM整合框架(基于IDEA的配置)
Pom文件 <?xml version="1.0" encoding="UTF-8"?><project xmlns="http:/ ...
随机推荐
- hdu 2015校赛1002 Dual horsetail (思维题 )
Dual horsetail Time Limit: 2000/1000 MS (Java/Others) Memory Limit: 32768/32768 K (Java/Others)To ...
- 迁移学习——使用Tensorflow和VGG16预训模型进行预测
使用Tensorflow和VGG16预训模型进行预测 from:https://zhuanlan.zhihu.com/p/28997549 fast.ai的入门教程中使用了kaggle: dogs ...
- lucene内置的评分函数
For multiterm queries, Lucene takes the Boolean model, TF/IDF, and the vector space model and combin ...
- Java集合的有序无序问题和线程安全与否问题
首先,清楚有序和无序是什么意思: 集合的有序.无序是指插入元素时,保持插入的顺序性,也就是先插入的元素优先放入集合的前面部分. 而排序是指插入元素后,集合中的元素是否自动排序.(例如升序排序) 1.有 ...
- BZOJ_3672_ [Noi2014]购票_CDQ分治+斜率优化
BZOJ_3672_ [Noi2014]购票_CDQ分治+斜率优化 Description 今年夏天,NOI在SZ市迎来了她30周岁的生日.来自全国 n 个城市的OIer们都会从各地出发,到SZ市参 ...
- 【Lintcode】033.N-Queens II
题目: Follow up for N-Queens problem. Now, instead outputting board configurations, return the total n ...
- docker的操作
查询容器 docker ps 只能查询到正在运行的docker镜像: 如果添加上-a的选项,则会显示所有的(包括已经exit,未启动)的容器 基于一个镜像来构建(run)容器,并启动 docker ...
- java递归demo---
递归思想: 递归就是方法里调用自身 在使用递归策略时,必须有一个明确的递归结束条件,称为递归出口 递归算法代码显得很简洁,但递归算法解题的运行效率较低.所以不提倡用递归设计程序. 在递归调用的过程中系 ...
- RHEL6.3卸载OpenJDK操作示范:
安装好的CentOS会自带OpenJdk,用命令 java -version ,会有下面的信息: java version "1.6.0" OpenJDK Runtime Envi ...
- <c和指针>学习笔记4之字符串
1 字符串基础 NUL字节是字符串的终止符,但它本身并不是字符串的一部分,所以字符串的长度并不包括NUL字节. (1)字符串长度 size_t strlen(char const * string)注 ...
