Struts2的拦截器是如何使用AOP工作的
拦截器(interceptor)是Struts2最强大的特性之一,也可以说是struts2的核心,拦截器可以让你在Action和result被执行之前或之后进行一些处理。同时,拦截器也可以让你将通用的代码模块化并作为可重用的类。Struts2中的很多特性都是由拦截器来完成的。拦截是AOP的一种实现策略。在Webwork的中文文档的解释为:拦截器是动态拦截Action调用的对象。它提供了一种机制可以使开发者可以定义在一个action执行的前后执行的代码,也可以在一个action执行前阻止其执行。同时也是提供了一种可以提取action中可重用的部分的方式。谈到拦截器,还有一个词大家应该知道——拦截器链(Interceptor Chain,在Struts 2中称为拦截器栈Interceptor Stack)。拦截器链就是将拦截器按一定的顺序联结成一条链。在访问被拦截的方法或字段时,拦截器链中的拦截器就会按其之前定义的顺序被调用。
一.拦截器的实现原理:

上面的过程可以这样理解:一个请求在Struts2框架中的处理大概分为以下几个步骤:
1、客户端初始化一个指向Servlet容器(例如Tomcat)的请求;
2、这个请求经过一系列的过滤器(Filter)(这些过滤器中有一个叫做ActionContextCleanUp的可选过滤器,这个过滤器对于Struts2和其他框架的集成很有帮助,例如:SiteMesh Plugin);
3、接着FilterDispatcher被调用,FilterDispatcher询问ActionMapper来决定这个请求是否需要调用某个Action;
4、如果ActionMapper决定需要调用某个Action,FilterDispatcher把请求的处理交给ActionProxy;
5、ActionProxy通过ConfigurationManager询问框架的配置文件,找到需要调用的Action类;
6、ActionProxy创建一个ActionInvocation的实例。
7、ActionInvocation实例使用命名模式来调用,在调用Action的过程前后,涉及到相关拦截器(Intercepter)的调用。
8、一旦Action执行完毕,ActionInvocation负责根据struts.xml中的配置找到对应的返回结果。返回结果通常是(但不总是,也可能是另外的一个Action链)一个需要被表示的JSP或者FreeMarker的模版。在表示的过程中可以使用Struts2框架中继承的标签。在这个过程中需要涉及到ActionMapper。
大部分时候,拦截器方法都是通过代理的方式来调用的。Struts 2的拦截器实现相对简单。当请求到达Struts 2的ServletDispatcher时,Struts 2会查找配置文件,并根据其配置实例化相对的拦截器对象,然后串成一个列表(list),最后一个一个地调用列表中的拦截器。事实上,我们之所以能够如此灵活地使用拦截器,完全归功于“动态代理”的使用。动态代理是代理对象根据客户的需求做出不同的处理。对于客户来说,只要知道一个代理对象就行了。那Struts2中,拦截器是如何通过动态代理被调用的呢?当Action请求到来的时候,会由系统的代理生成一个Action的代理对象,由这个代理对象调用Action的execute()或指定的方法,并在struts.xml中查找与该Action对应的拦截器。如果有对应的拦截器,就在Action的方法执行前(后)调用这些拦截器;如果没有对应的拦截器则执行Action的方法。其中系统对于拦截器的调用,是通过ActionInvocation来实现的。代码如下:
- if (interceptors.hasNext()) {
- Interceptor interceptor=(Interceptor)interceptors.next();
- resultCode = interceptor.intercept(this);
- } else {
- if (proxy.getConfig().getMethodName() == null) {
- resultCode = getAction().execute();
- } else {
- resultCode = invokeAction(getAction(), proxy.getConfig());
- }
- }
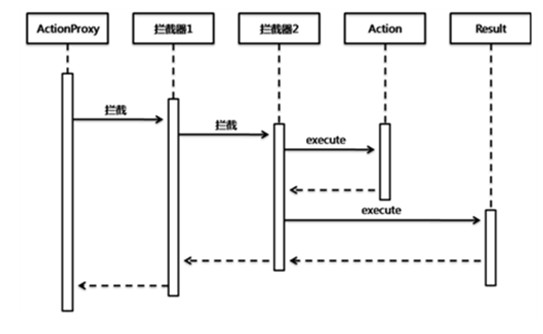
可以发现Action并没有与拦截器发生直接关联,而完全是“代理”在组织Action与拦截器协同工作。如下图:
二.拦截器执行分析
我们大家都知道,Interceptor的接口定义没有什么特别的地方,除了init和destory方法以外,intercept方法是实现整个拦截器机制的核心方法。而它所依赖的参数ActionInvocation则是著名的Action调度者。我们再来看看一个典型的Interceptor的抽象实现类:
- public abstract class AroundInterceptor extends AbstractInterceptor {
- /* (non-Javadoc)
- * @see com.opensymphony.xwork2.interceptor.AbstractInterceptor#intercept(com.opensymphony.xwork2.ActionInvocation)
- */
- @Override
- public String intercept(ActionInvocation invocation) throws Exception {
- String result = null;
- before(invocation);
- // 调用下一个拦截器,如果拦截器不存在,则执行Action
- result = invocation.invoke();
- after(invocation, result);
- return result;
- }
- public abstract void before(ActionInvocation invocation) throws Exception;
- public abstract void after(ActionInvocation invocation, String resultCode) throws Exception;
- }
在这个实现类中,实际上已经实现了最简单的拦截器的雏形。这里需要指出的是一个很重要的方法invocation.invoke()。这是ActionInvocation中的方法,而ActionInvocation是Action调度者,所以这个方法具备以下2层含义:
1. 如果拦截器堆栈中还有其他的Interceptor,那么invocation.invoke()将调用堆栈中下一个Interceptor的执行。
2. 如果拦截器堆栈中只有Action了,那么invocation.invoke()将调用Action执行。
所以,我们可以发现,invocation.invoke()这个方法其实是整个拦截器框架的实现核心。基于这样的实现机制,我们还可以得到下面2个非常重要的推论:
1. 如果在拦截器中,我们不使用invocation.invoke()来完成堆栈中下一个元素的调用,而是直接返回一个字符串作为执行结果,那么整个执行将被中止。
2. 我们可以以invocation.invoke()为界,将拦截器中的代码分成2个部分,在invocation.invoke()之前的代码,将会在Action之前被依次执行,而在invocation.invoke()之后的代码,将会在Action之后被逆序执行。
由此,我们就可以通过invocation.invoke()作为Action代码真正的拦截点,从而实现AOP。
三.源码解析
下面我们通过查看源码来看看Struts2是如何保证拦截器、Action与Result三者之间的执行顺序的。之前我曾经提到,ActionInvocation是Struts2中的调度器,所以事实上,这些代码的调度执行,是在ActionInvocation的实现类中完成的,这里,我抽取了DefaultActionInvocation中的invoke()方法,它将向我们展示一切。
- /**
- * @throws ConfigurationException If no result can be found with the returned code
- */
- public String invoke() throws Exception {
- String profileKey = "invoke: ";
- try {
- UtilTimerStack.push(profileKey);
- if (executed) {
- throw new IllegalStateException("Action has already executed");
- }
- // 依次调用拦截器堆栈中的拦截器代码执行
- if (interceptors.hasNext()) {
- final InterceptorMapping interceptor = (InterceptorMapping) interceptors.next();
- UtilTimerStack.profile("interceptor: "+interceptor.getName(),
- new UtilTimerStack.ProfilingBlock<String>() {
- public String doProfiling() throws Exception {
- // 将ActionInvocation作为参数,调用interceptor中的intercept方法执行
- resultCode = interceptor.getInterceptor().intercept(DefaultActionInvocation.this);
- return null;
- }
- });
- } else {
- resultCode = invokeActionOnly();
- }
- // this is needed because the result will be executed, then control will return to the Interceptor, which will
- // return above and flow through again
- if (!executed) {
- // 执行PreResultListener
- if (preResultListeners != null) {
- for (Iterator iterator = preResultListeners.iterator();
- iterator.hasNext();) {
- PreResultListener listener = (PreResultListener) iterator.next();
- String _profileKey="preResultListener: ";
- try {
- UtilTimerStack.push(_profileKey);
- listener.beforeResult(this, resultCode);
- }
- finally {
- UtilTimerStack.pop(_profileKey);
- }
- }
- }
- // now execute the result, if we're supposed to
- // action与interceptor执行完毕,执行Result
- if (proxy.getExecuteResult()) {
- executeResult();
- }
- executed = true;
- }
- return resultCode;
- }
- finally {
- UtilTimerStack.pop(profileKey);
- }
- }
从源码中,我们可以看到Action层的4个不同的层次,在这个方法中都有体现,他们分别是:拦截器(Interceptor)、Action、PreResultListener和Result。在这个方法中,保证了这些层次的有序调用和执行。由此我们也可以看出Struts2在Action层次设计上的众多考虑,每个层次都具备了高度的扩展性和插入点,使得程序员可以在任何喜欢的层次加入自己的实现机制改变Action的行为。
在这里,需要特别强调的,是其中拦截器部分的执行调用:
- resultCode = interceptor.getInterceptor().intercept(DefaultActionInvocation.this);
表面上,它只是执行了拦截器中的intercept方法,如果我们结合拦截器来看,就能看出点端倪来:
- public String intercept(ActionInvocation invocation) throws Exception {
- String result = null;
- before(invocation);
- // 调用invocation的invoke()方法,在这里形成了递归调用
- result = invocation.invoke();
- after(invocation, result);
- return result;
- }
原来在intercept()方法又对ActionInvocation的invoke()方法进行递归调用,ActionInvocation循环嵌套在intercept()中,一直到语句result = invocation.invoke()执行结束。这样,Interceptor又会按照刚开始执行的逆向顺序依次执行结束。一个有序链表,通过递归调用,变成了一个堆栈执行过程,将一段有序执行的代码变成了2段执行顺序完全相反的代码过程,从而巧妙地实现了AOP。这也就成为了Struts2的Action层的AOP基础。
拦截器和过滤器之间有很多相同之处,但是两者之间存在根本的差别。其主要区别为以下几点:
Struts2的拦截器是如何使用AOP工作的的更多相关文章
- 谈谈 Struts2 的拦截器
套话 相信非常多人都用过 Struts2 了,当然,对 Struts2 的原理也都比較了解.之前在一个项目中就已经用到了,当初的理解也不过局限在应用的层面上,对于更深层次的原理.机制,了解的并非非常多 ...
- Spring的AOP,Struts2的拦截器(Interceptor),以及springMVC的(interceptor)
参考外链:http://www.ibm.com/developerworks/cn/java/j-lo-springaopfilter/ 1.首先,spring的AOP作用范围很广,可以使用Aspec ...
- struts2总结六: Struts2的拦截器
一.Struts2的系统结构图
- 【struts2】拦截器基础
1)拦截器是什么? 拦截器(Interceptor)是Struts2最强大的特性之一,它是一种可以让你在Action执行之前和Result执行之后进行一些功能处理的机制.来回顾一下官方给出的Strut ...
- Struts2的拦截器技术
1. 拦截器的概述 * 拦截器就是AOP(Aspect-Oriented Programming,面向切面)的一种实现.(AOP是指用于在某个方法或字段被访问之前,进行拦截然后在之前或之后加入某些操作 ...
- JavaWeb框架_Struts2_(三)---->Struts2的拦截器
2. Struts2的拦截器(使用拦截器实现权限控制) 2.1 拦截器的概述 拦截器是Struts2的核心组成部分,它可以动态的拦截Action调用的对象,类似与Servlet中的过滤器.Struts ...
- (转)Struts2的拦截器
http://blog.csdn.net/yerenyuan_pku/article/details/68648101 Struts2的拦截器 拦截器的概述 拦截器,在AOP(Aspect-Orien ...
- 【Struts2】拦截器
一.概述 二.在Struts2中使用拦截器 2.1 步骤 2.2 分析拦截器原理 2.3 关于interceptor与Filter区别: 三.案例 一.概述 介绍拦截器: struts2拦截器使用的是 ...
- (六)Struts2的拦截器
一.简介 拦截器体系是struts2重要的组成部分.正是大量的内建拦截器完成了该框架的大部分操作. 比如params拦截器将请求参数解析出来,设置Action的属性.servletConfig拦截器负 ...
随机推荐
- flowplayer视频播放插件[转]
最近项目中需要添加播放视频的功能,视频文件是flv格式的.在网上找了一些jQuery视频播放插件,还是觉得“flowplayer”要好一些.特将使用方法记录一下. flowplayer也有html5版 ...
- 〖Android〗(how-to) fix k860/k860i buletooth.
bluedroid.so for k860/k860i 1./media/Enjoy/AndroidCode/cm10.1/device/lenovo/stuttgart/bluetooth/blue ...
- [Done]FindBugs: boxing/unboxing to parse a primitive
在开发过程中遇到了以下问题: FindBugs: boxing/unboxing to parse a primitive 查看代码(左边是老代码,右边是新的): 问题出在 自动装箱和拆箱的检查. 参 ...
- java线程-synchronized实现可见性代码
以下是一个普通线程代码: package com.Sychronized; public class SychronizedDemo { //共享变量 private boolean ready=fa ...
- Spring 基于Aspectj切面表达式
package com.proc; import org.aspectj.lang.JoinPoint; import org.aspectj.lang.ProceedingJoinPoint; im ...
- Zookeeper研究和应用
http://www.searchtb.com/2011/01/zookeeper-research.html zookeeper简介 zookeeper是一个开源分布式的服务,它提供了分布式协作,分 ...
- 摘:"error LNK2019: 无法解析的外部符号 该符号在函数 中被引用" 错误原因
例如“error LNK2019: 无法解析的外部符号error LNK2001: 无法解析的外部符号“private: static struct _OVERLAPPED CUsbCom::g_Wr ...
- Spring Cloud 模块简介2
前面一篇文章谈到微服务基础框架,而Netflix的多个开源组件一起正好可以提供完整的分布式微服务基础架构环境,而对于Spring Cloud正是对Netflix的多个开源组件进一步的封装而成,同时又实 ...
- Java中RunTime类介绍
Runtime 类代表着Java程序的运行时环境,每个Java程序都有一个Runtime实例,该类会被自动创建,我们可以通过Runtime.getRuntime() 方法来获取当前程序的Runtime ...
- 编译g++后更新libstdc++.so.6链接
若不更新链接,运行时可能会发生错误: ./a.out: /usr/lib/libstdc++.so.6: version `GLIBCXX_3.4.14' not found (required by ...