提取Jar2Exe源代码,JavaAgent监控法
最近遇见一个麻烦,明明知道是java写的小软件,但是打包成了exe,木得办法,之前打包的都有缓存能在TEMP文件夹找到。这次可不一样了,特此记录一下。
为此特地搜集了一些java打包成exe的软件。
一、exe4j。
说明:exe4j可以将Jar文件制作成exe文件,但需jre支持,也可将Jar文件放在外面。
软件性质:共享软件
下载地址:http://www.ej-technologies.com/products/exe4j/overview.html
二、JBuilder。
说明:新版本的JBuilder可以直接把工程制作成各系统的可执行文件,包括Windows系统。
软件性质:商业软件
下载地址:略。我是从eMule下载的。
三、NativeJ。
说明:与exe4j功能类似。
软件性质:共享软件
下载地址:http://www.dobysoft.com/products/nativej/download.html
四、Excelsior JET。
说明:可以直接将Java类文件制作成exe文件,除AWT和Swing及第三方图形接口外可不需jre支持(Java5.0不行)。
软件性质:共享软件
下载地址:http://excelsior-usa.com/home.html
五、jshrink。
说明:可将Jar文件打包进exe文件。同时具有混淆功能(这才是它的主要功能)。
软件性质:共享软件
下载地址:http://www.e-t.com/jshrink.html
六、InstallAnywhere。
说明:打包工具,对Java打包最好用。可打包成各操作系统运行包。包括Windows系统。
软件性质:商业软件。
下载地址:http://www.zerog.com/
七、InstallShieldX。
说明:与InstallAnywhere类似,但比InstallAnywhere功能强大。相对的,比较复杂,不易上手,我现在还没学会。
软件性质:商业软件。
下载地址:http://www.installshield.com/八、Jar2Exe.
这是今天特地要说的java打包成EXE的软件
Jar2Exe
- 明文:简单的打包方式,解压软件解压一下所有Class文件都在里面。
- 隐藏,Jar包会被经过简单的加密之后存储在EXE程序中的资源内。
- 加密+隐藏:Jar包会被加密,并且所有文件名都会被哈希,之后存储在EXE程序资源中,这是最常见的一种加密,也是最麻烦的一种提取方式。
面对后两种情况下,通常来说,我们如果想要提取完整的jar包,必须用ODB调程序执行到解密完成调用jar的位置,然后dump内存把所有内容dump下来。
这里学习一种方法(但是方法有一定缺点,我们后面讲把)
首先构建一个Java代理(JavaAgent),目的是让程序员可以更加灵活的监控Java虚拟机的运行。我们要实现的是监控ClassLoader,在它要加载一个类的时候,dump出这个类来并写入一个jar文件中。
然后激活该JavaAgent,接着运行Jar2Exe编译的Exe程序。尽可能多的测试程序中的功能,点击不同的按钮,让更多的类文件被加载到内存中,这样它们就会被dump出来。
但是缺点是很明显的
1.如果class没有加载就dump不到了
2.jar中的图片、音频等资源是得不到的。
重点来了!下面讲步骤
1.准备工作
下载地址:https://github.com/HaoQinLandv/e2j
然后放到同一个目录下
打开命令行并进入要破解的程序所在目录,在命令行输入以下命令设置JavaAgent的加载
set JAVA_TOOL_OPTIONS=-javaagent:e2j-agent.jar
该命令是让java程序在加载一个类时会自动调用JavaAgent
2.操作
命令行运行你需要提取源代码的软件即可。
这种方法有缺陷,但是最简单的办法,下面来看国外大神如何提取的。
http://reverseengineeringtips.blogspot.com/2014/12/unpacking-jar2exe-21-extracting-jar.html
这个连接天朝境内无法访问。
=========================================================================================
这里是分割线
==========================================================================================
Unpacking Jar2Exe 2.1: Extracting The Jar File At All 3 Protection Levels
Welcome to this extensive tutorial for unpacking Jar2Exe. Jar2Exe is a java executable wrapper which works by taking your original java archive, wrapping it into an executable, and executing it through a virtual environment using the jvm.dll provided with each java distribution. It also provides the ability to hide your archive and encrypt the class names making recovery difficult. The goal of this tutorial is to demonstrate how to recover a jar file at the 3 different protection levels provided by Jar2Exe.
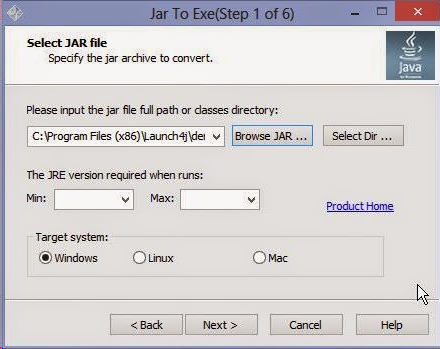
In this tutorial, I will be using the file SimpleApp.jar which is included with launch4j. You can protect it with the same settings to reverse along with me.
Tools Needed:
Resource Hacker
Winhex
Ollydbg 1.10+ MemoryDump 0.9 and Olly Advanced or StrongOD Plugin(for advanced ctrl+g).
DJ Java Decompiler
7-Zip or Winrar
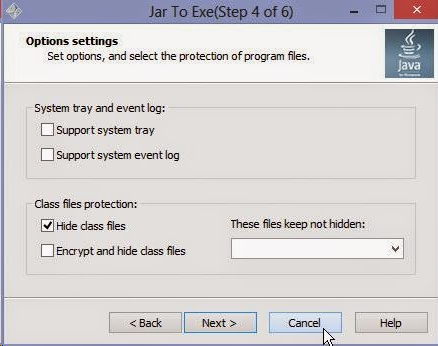
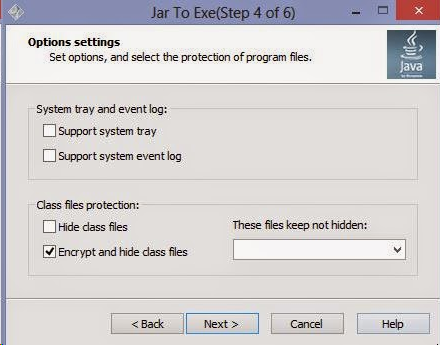
Jar2Exe Level 1: No Hiding, No Encryption:
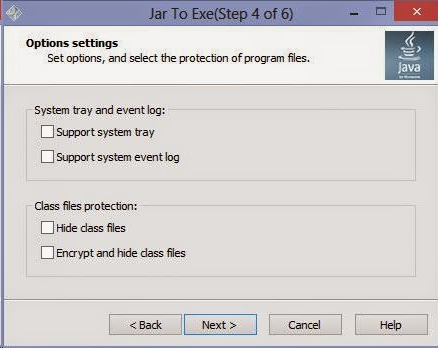
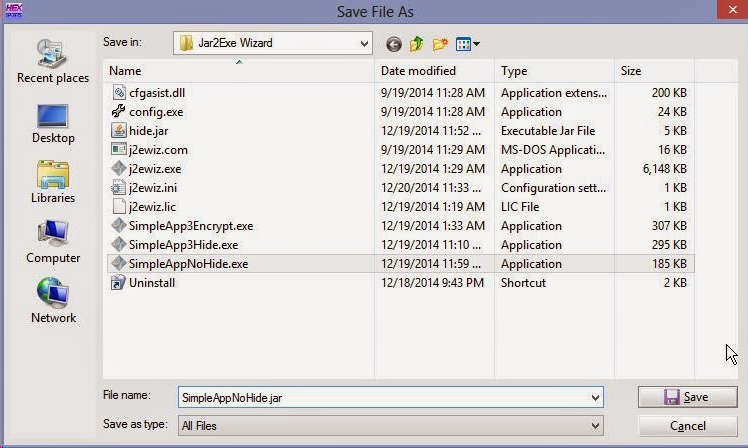
This is the default wrapping level which provides no protection to your java file. As you can see, the Hide class files and Encrypt and hide class files options are left unchecked. This level of protection simply takes your java archive/jar file, concatenates it to the end of the executable, and embeds its java files inside of it. This java archive can be recovered using a hex editor, just like we did with launch4j in the previous tutorial. To begin, we will open sample file called 'SimpleAppNoHide.exe' in winhex. To find the archive, scroll to the bottom of the file. Another option you can try other than scrolling is to search for the ascii string "serial "(with the space). This should take you directly to the archive, but I cannot guarantee that this approach will always be successful.

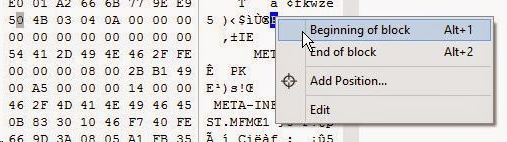
Once you are here, the first occurrence of 'PK' labels the start of our archive. We can label this as our beginning of block:
Once you have done so, right click the selected block and click Edit. In the new pane, go to Copy Block -> Into New File.
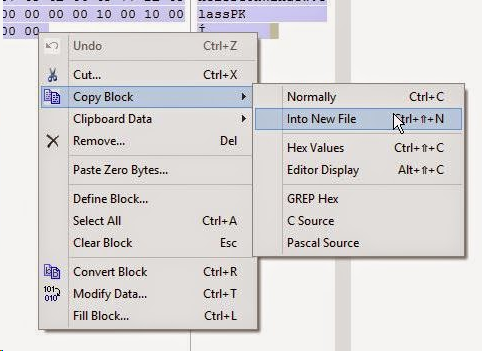
Afterwards, we can save it as a jar file. I used the name SimpleAppNoHide.jar:
Once we are finished, the program will run correctly, but to be tidy, we need to delete the extra files that Jar2Exe added to our archive. Let's open the archive in 7-zip or winrar(whichever you fancy).

Once it is opened, you can see that Jar2Exe adds an additional directory called 'com'. While some other java applications may use this directory, Jar2Exe adds an additional subdirectory called regexlab.

After entering the com directory, we see that regexlab is the only subdirectory it contains, meaning that the entire com folder is unused and can simply be deleted from the archive, let's go ahead and delete it:
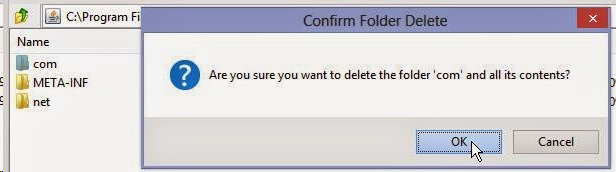
After confirming the deletion, we can close the archive and run the jar file.
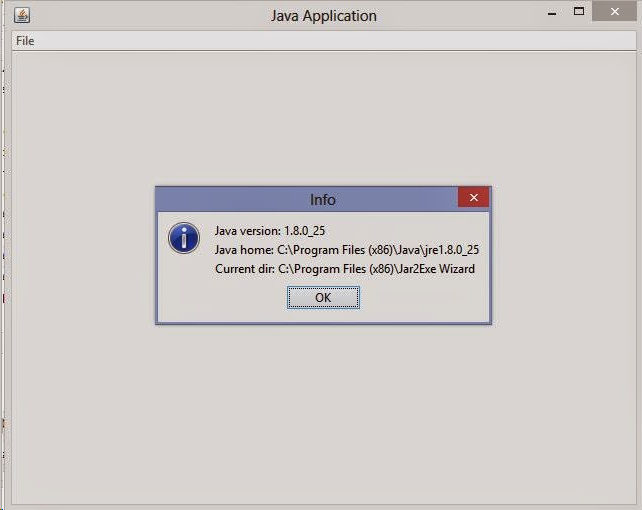
If you did everything correctly, the application should run without problems and our work is finished.
Jar2Exe Level 2: Hidden Archive:
With the level 2 protection, Jar2Exe takes our java archive, encrypts it, and adds it as an RCData entry in the resource directory. To find the offset of the encrypted archive, we need to open our executable which I named 'SimpleAppHide.exe' in a resource editor. For this, I prefer resource hacker:
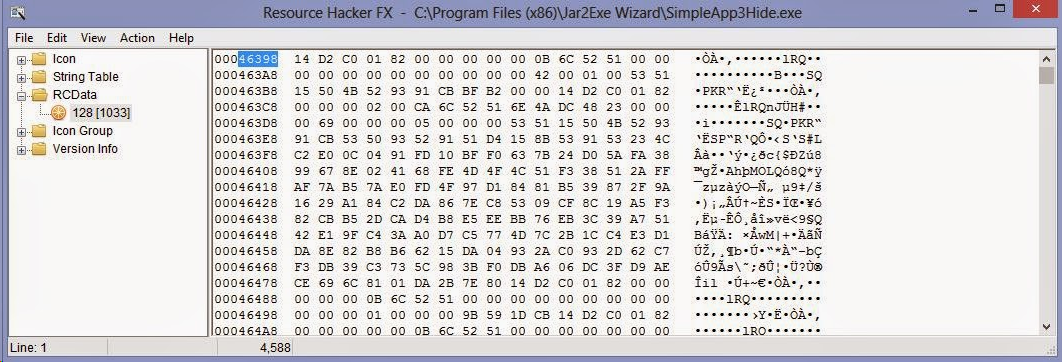
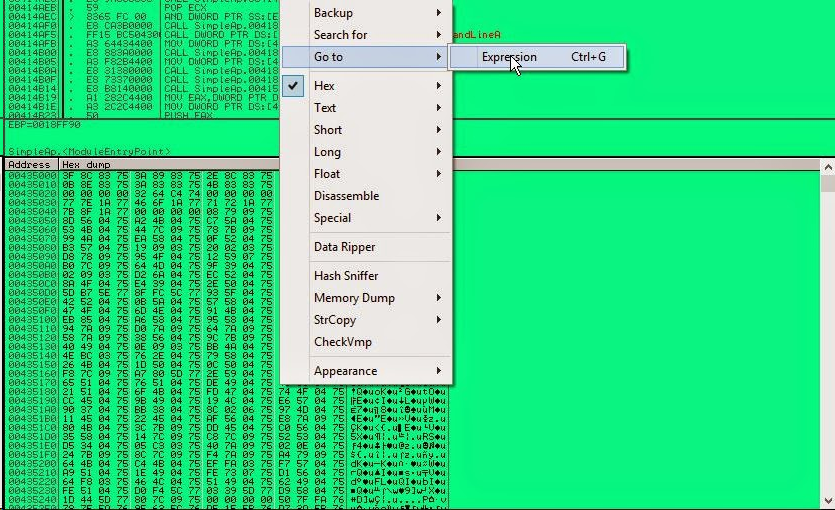
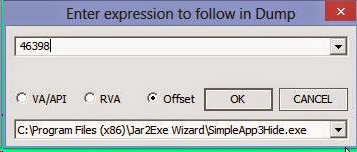
Above, we have located the encrypted data in the "RCData" section of the resource table. In this case, our offset is 46398h. Keep a note of this and open the application in Ollydbg. Once you have it opened, go to the hex dump section and go to the offset above:
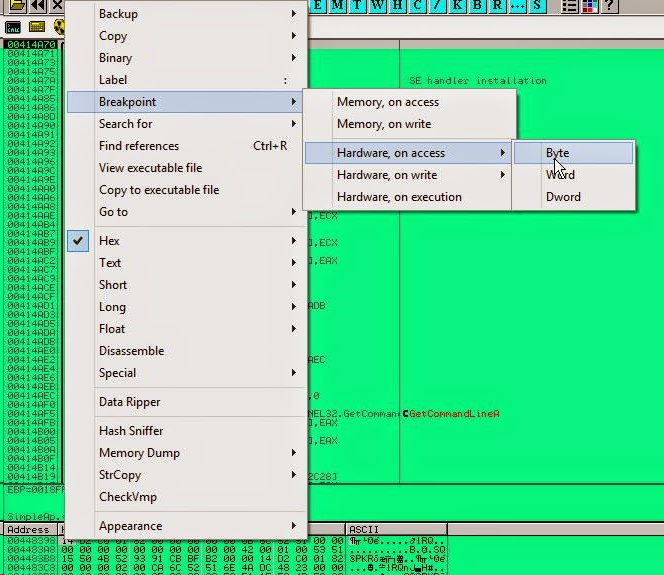
Once you arrive at the offset, right click the byte and add a Hardware Breakpoint On Access -> Byte:
Now, let's run the program and wait for the break to occur. We should arrive here:
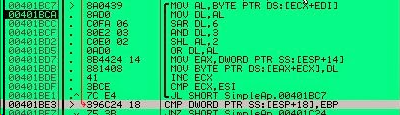
This loop will decrypt our archive byte for byte. Let's toggle a breakpoint on the instruction after the loop. In this example, the instruction is 00401BE3 > CMP DWOR PTR SS:[ESP+18],EBP. Run the program now and let the decryption complete. Once we break here, the register EAX will contain the location where our decrypted jar file is located and ECX contains its size. Using this information, we are ready to dump the file from memory. To do this, I found a very simple plugin called Memory Dump. It allows you to simply specify a memory address and size to dump those bytes to disk. Let's open the plugin:
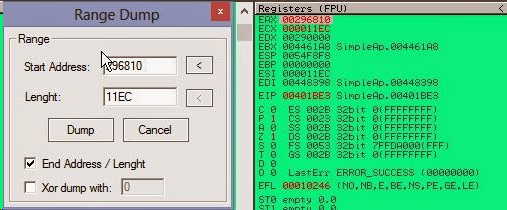
To begin, check the field which says End Address / Lenght. This will allow us to enter the length value. Set the Start Address to the value in EAX and the lenght(length) equal to the value in ECX. In my case, the address is 296810 and the size is 11EC. Once you have entered these values, we are ready to dump this to disk.
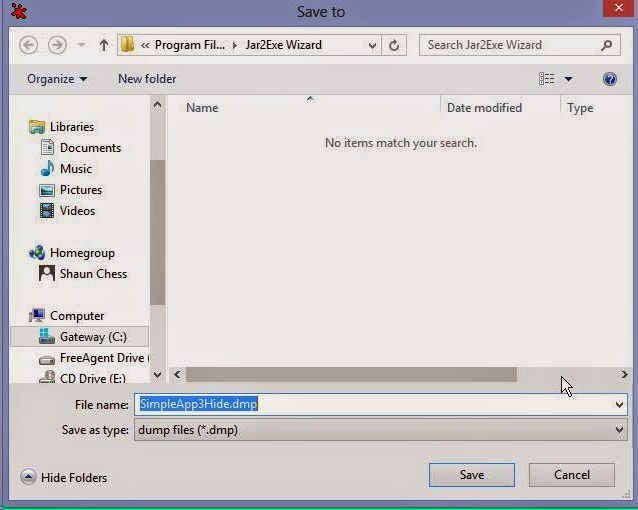
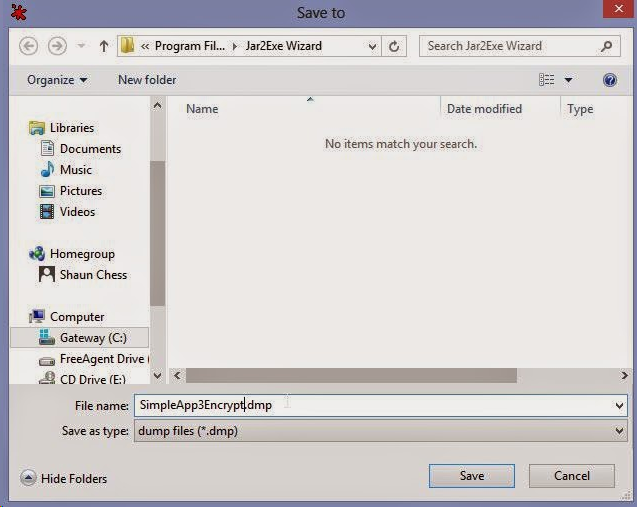
A limitation of this tool is that you can only save the file with a .dmp extension, but we can easily rename it once we are finished. Simply save it with the name you fancy. In this case I named it as SimpleApp3Hide.dmp for easy recognition.

After a quick renaming, the file is ready to run.

Jar2Exe Level 3: Hidden Archive + Encrypted Class Names:
This is the strongest protection offered by Jar2Exe. First, it changes all of the class file names to gibberish. Second, it encrypts and hides the files just like the level 2 protection. While we can recover the archive with a similar method as in Level 2, we need to take an additional step to repair the class names.
To begin, let's open the application "SimpleAppEncrypt.exe" in a resource editor just as before to acquire the offset of the encrypted RCData:
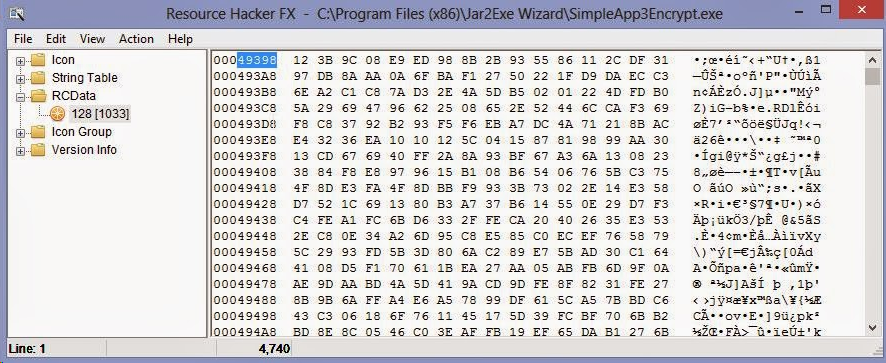
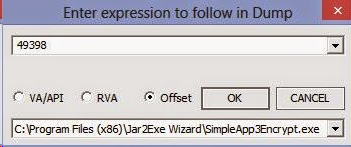
Our offset in this case is 49398h. Let's note that and open the application in Ollydbg and follow the offset
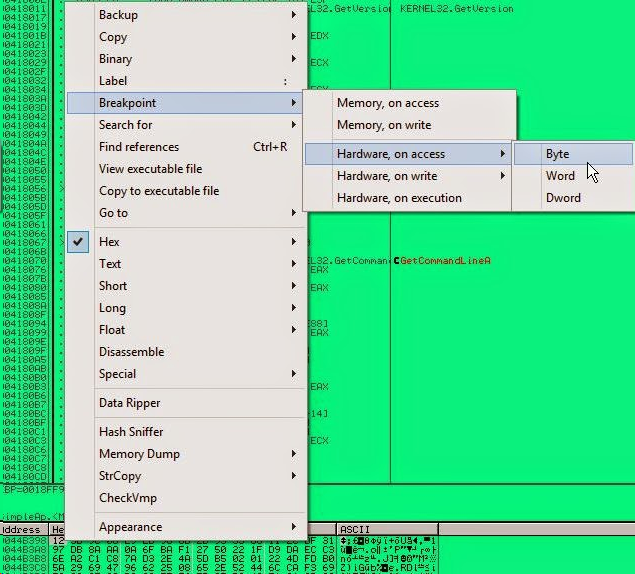
Once we arrive at the offset, place a hardware breakpoint on access-> byte just like before.
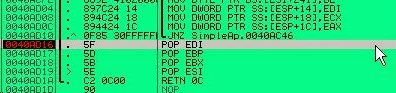
Run the program an wait for the breakpoint. We should arrive at the following code:
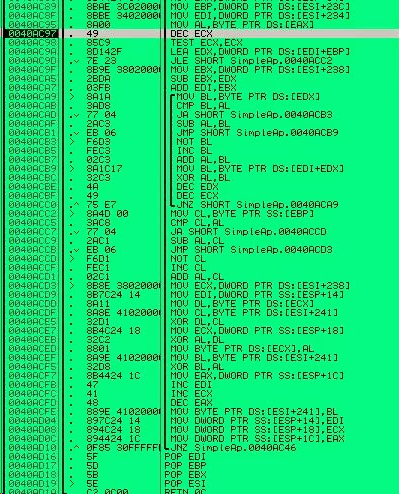
This is the new decryption routine. The instruction 0040ACED-> MOV BYTE PTR DS:[ECX],AL will move each decrypted byte to their new memory location.

According to the code, the address of the memory location where our file is decrypted to can be found at the stack pointer [ESP+18]
The value at ESP+1C contains the size of the memory region. This can be verified by checking the decrement value of the loop.

This code verifies that ESP+1C is the value decremented. ESP+1c is moved to EAX, decremented, and then moved back.
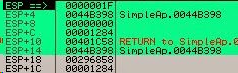
At our current location where the hardware breakpoint landed us, the values at ESP +18 and ESP+1C are the ones we need for our dump. Please note them and target a breakpoint on the instruction outside of the loop.
Once you break here, we are ready to make a dump of the file. But first, I would like to show you the encrypted strings in our archive to give you a glimpse of how jar2exe encrypts them:
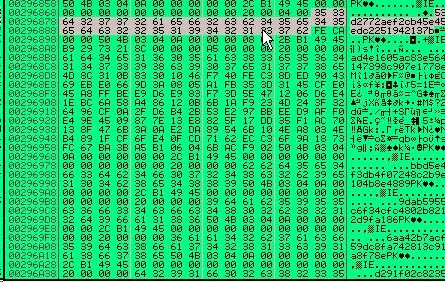
As you can see here, the names of our classes and manifest files have been completely obfuscated. As a result, we need to recover these names manually. The way that jar2exe gets the original names for the class is to read them directly from the class file itself. I will show you a simple approach to doing this once we dump the archive.
Now since I am finished digressing, let's dump the file just like before.
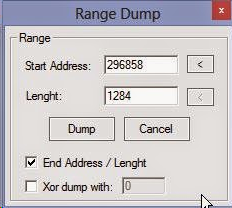
In my case, the location of the decrypted file is at 296858 and its length is 1284. We are ready to dump.
Now that we have saved the file, let's rename change the extension to .jar and prepare to extract the contents.

Please note that due to the encryption employed on the names, the file will not run until we correct the classes. Let's extract the contents to a new folder so we can begin repairing.
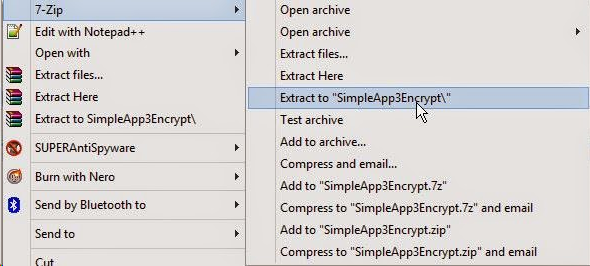
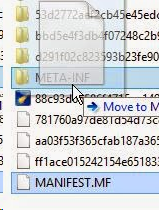
Once we have extracted the files, let's open the new directory and see the files.
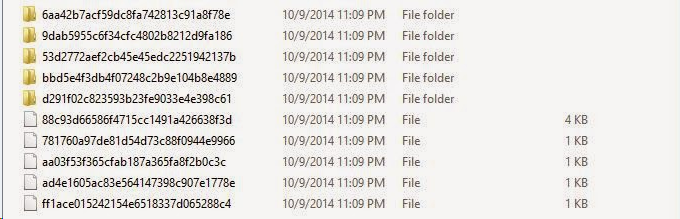
As we can see here, the file names are complete gibberish. The randomly named directories will typically not contain a file and can be deleted. The rest of the files will be the original class and manifest files. To begin the recovery, I like to first identify which file is the manifest. We can usually assume that the manifest will be the smallest file contained in the archive. The manifest.mf file tells the java runtime which file contains the main() class. Without it, the runtime would not know how to execute the code. Let's find the smallest file and open it in a text editor.
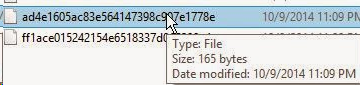
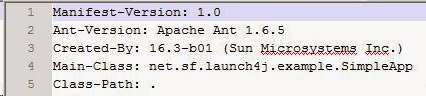
As you can see, we have identified our manifest file. This file should be renamed to 'MANIFEST.MF' and placed in a subdirectory called 'META-INF'. Remember that these names are case sensitive and must be typed in all uppercase.
To continue with the rest of the files, let's add a '.class' extension to each of them and open them in your favorite java decompiler. You can read these names with a hex editor if you fancy, but a decompiler makes it a little cleaner. Let's begin with the largest file which is 4kb. I will open it in DJ Java Decompiler
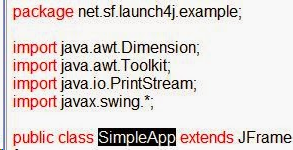
As we can see here, we have identified the name of this class file as SimpleApp which according to the manifest, contains our main() procedure. The name of the package this file resides in is 'net.sf.launch4j.example'. The dots between these words represent a subdirectory. That means that this class belongs in a folder hierarchy of net/sf/launch4j/example. Let's rename this to class file to 'SimpleApp.class', create the directory hierarchy listed above, and place this file in it.

Now that we have completed this, we just need to go back and follow the same steps for the rest of the files. Please remember that every name is case sensitive. Once you have recovered each of them and placed them into the correct directory(there is only one directory), it should look like this:

Now that we are done, it is time to recreate the jar file. A jar file is simply a zip archive under a different extension. All we need to do is go back to the directory that contains our two folders named 'net' and 'META-INF' and add them to a zip archive.
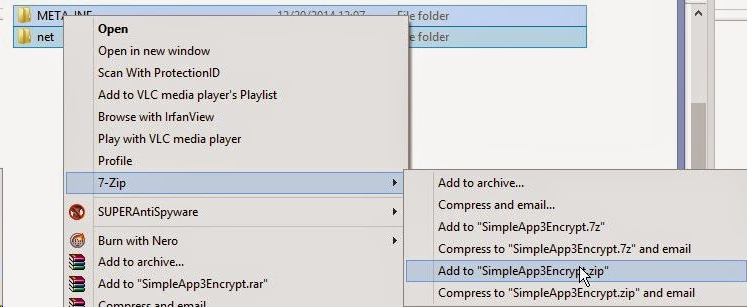
Now, we simply change the extension of the zip archive to jar and it is ready to run.

Now let's see the finished result

I hope that you have learned a few things from this tutorial and have walked away with some new knowledge. If something in this tutorial is not clear, please feel free to post a comment and I will try to explain it further. Until next time, happy reversing.
============================================================================================
我也用OD试了一下,可能是因为不会用的问题吧,拖入进去木有反应,SO放弃了老外这种方法了。
提取Jar2Exe源代码,JavaAgent监控法的更多相关文章
- Jacoco 代码覆盖率,监控WEB项目
转载:https://blog.csdn.net/u010469432/article/details/73283824 jacococ代码覆盖率,以客户端形式直接监控远程代码 使用理解 jacoco ...
- 【No.2】监控Linux性能25个命令行工具
接着上一篇博文继续 [No.1]监控Linux性能25个命令行工具 10:mpstat -- 显示每个CPU的占用情况 该命令可以显示每个CPU的占用情况,如果有一个CPU占用率特别高,那么有可能是一 ...
- 监控Linux性能的18个命令行工具
监控 Linux 性能的 18 个命令行工具 对于系统和网络管理员来说每天监控和调试Linux系统的性能问题是一项繁重的工作.在IT领域作为一名Linux系统的管理员工作5年后,我逐渐 认识到监控和保 ...
- Linux 性能监控的18个命令行工具
对于系统和网络管理员来说每天监控和调试Linux系统的性能问题是一项繁重的工作.在IT领域作为一名Linux系统的管理员工作5年后,我逐渐 认识到监控和保持系统启动并运行是多么的不容易.基于此原因,我 ...
- 监控 Linux 性能的 18 个命令行工具
http://www.oschina.net/translate/command-line-tools-to-monitor-linux-performance 1.Top-Linux进程监控 Lin ...
- [转载]监控 Linux 性能的 18 个命令行工具
转自:http://www.kuqin.com/shuoit/20140219/338066.html 对于系统和网络管理员来说每天监控和调试Linux系统的性能问题是一项繁重的工作.在IT领域作为一 ...
- MPSOC之4——petalinux提取源码
petalinux使用太不方便,捆绑的太死板,也不通用,还不如直接用编译器来的简单高效. 本文说明从petalinux中提取出源代码的过程,前提是已经petalinux-build完成. 1. ubo ...
- 监控 Linux 性能的 18 个命令行工具[转]
对于系统和网络管理员来说每天监控和调试Linux系统的性能问题是一项繁重的工作.在IT领域作为一名Linux系统的管理员工作5年后,我逐渐认识到监控和保持系统启动并运行是多么的不容易.基于此原因,我们 ...
- 【linux之进程管理,系统监控】
一.进程管理 前台进程:一般是指占据着标准输入和/或标准输出的进程后台进程:不占据默认开启的进程都是前台进程ctrl+C 中断ctrl+z 从前台转入后台bg 后台进程编号 让其在后台运行ls -R ...
随机推荐
- web自动化框架如何设计
web自动化框架如何设计po模式总结: 1. 页面对象模型:当页面特别多的时候,代码更好的维护 2. Po是pageObject设计模式,用来管理和维护一组web元素的对象库 3. 每一个page c ...
- IntelliJ IDEA 创建 Maven简单项目
创建简单Maven项目 使用IDEA提供的Maven工具,根据artifact创建简单Maven项目.根据下图操作,创建Maven项目. 使用IDEA提供的Maven工具创建的Maven简单项目目录结 ...
- luoguP3598 Koishi Loves Number Theory
题目 题解 等比数列,最后统一除以(x-1)(这里数据都存在逆元....) (不存在逆元可以考虑表示成:x*p^y的pair形式,最后上下把p的次数相减(类似扩展Lucas)) 求:lcm(x^(ai ...
- FTP文件上传 支持断点续传 并 打印下载进度(二) —— 单线程实现
这个就看代码,哈哈哈哈哈 需要用到的jar包是: <dependency> <groupId>commons-net</groupId> <artifact ...
- Apache Hadoop 2.9.2 的集群管理之服役和退役
Apache Hadoop 2.9.2 的集群管理之服役和退役 作者:尹正杰 版权声明:原创作品,谢绝转载!否则将追究法律责任. 随着公司业务的发展,客户量越来越多,产生的日志自然也就越来越大来,可能 ...
- NameNode和SecondaryNameNode工作原理剖析
NameNode和SecondaryNameNode工作原理剖析 作者:尹正杰 版权声明:原创作品,谢绝转载!否则将追究法律责任. 一.NameNode中的元数据是存储在那里的? 1>.首先,我 ...
- NameNode与DataNode的工作原理剖析
NameNode与DataNode的工作原理剖析 作者:尹正杰 版权声明:原创作品,谢绝转载!否则将追究法律责任. 一.HDFS写数据流程 >.客户端通过Distributed FileSyst ...
- Linux记录-GC值
jmap -heap pid 查看gc情况: jstat -gc PID 刷新频率 jstat -gc 12538 5000 导出堆内存dump 文件: jmap -dump:file=文件名.bin ...
- Linux进程管理工具Supervisor
简述 Supervisor是用Python开发的一套通用的进程管理程序,能将一个普通的命令行进程变为后台daemon,并监控进程状态,异常退出时能自动重启. 它是通过fork/exec的方式把这些被管 ...
- HttpServletRequest基础
一.请求行 二.请求消息头 三.请求正文(重要) 1.获取表单(request)提交的数据 (1)getParameter(name):根据表单name属性的名字,获取name的值 (2)getPar ...