ffmpeg学习(二) 通过rtsp获取H264裸流并保存到mp4文件
本篇将使用上节http://www.cnblogs.com/wenjingu/p/3977015.html中编译好的库文件通过rtsp获取网络上的h264裸流并保存到mp4文件中。
1、VS2010建立VC++ win32控制台项目
2、在工程目录下建立lib目录和include目录,将已编译好的lib拷打lib下,include拷到include下,dll拷到Debug目录下
3、工程属性--配置属性--VC++目录--包含目录,添加ffmpeg头文件目录及其他第三方头文件目录
链接器--常规--附加库目录,添加lib目录
链接器--输入--附加依赖项,添加各个lib名
4、设计和实现:
4.1 设计思路:
组件和网络初始化——>打开网络流——>获取网络流信息——>根据网络流信息初始化输出流信息——>创建并打开mp4文件——>写mp4文件头
——>循环读取输入流并写入mp4文件——>写文件尾——>关闭流,关闭文件
4.2 关键数据结构:
AVFormatContext,AVStream,AVCodecContext,AVPacket,AVFrame等,它们的关系解释如下:
一个AVFormatContext包含多个AVStream,每个码流包含了AVCodec和AVCodecContext,AVPicture是AVFrame的一个子集,
他们都是数据流在编解过程中用来保存数据缓存的对像,从数据流读出的数据首先是保存在AVPacket里,也可以理解为一个AVPacket最多只包含一个AVFrame,
而一个AVFrame可能包含好几个AVPacket,AVPacket是种数据流分包的概念。
4.3 关键函数:
int avformat_open_input(AVFormatContext **ps, const char *filename, AVInputFormat *fmt, AVDictionary **options); //打开网络流或文件流
int avformat_write_header(AVFormatContext *s, AVDictionary **options);//根据文件名的后缀写相应格式的文件头
int av_read_frame(AVFormatContext *s, AVPacket *pkt);//从输入流中读取一个分包
int av_interleaved_write_frame(AVFormatContext *s, AVPacket *pkt);//往输出流中写一个分包
int av_write_trailer(AVFormatContext *s);//写输出流(文件)的文件尾
4.4 代码:
#include "stdafx.h"

#ifdef __cplusplus

extern "C" {

#endif

#include <libavcodec/avcodec.h>

#include <libavdevice/avdevice.h>

#include <libavformat/avformat.h>

#include <libavfilter/avfilter.h>

#include <libavutil/avutil.h>

#include <libswscale/swscale.h>

#include <stdlib.h>

#include <stdio.h>

#include <string.h>

#include <math.h>

#ifdef __cplusplus

}

#endif
以上为引用C库和ffmpeg库的头文件。
static AVFormatContext *i_fmt_ctx;

static AVStream *i_video_stream;

static AVFormatContext *o_fmt_ctx;

static AVStream *o_video_stream;

static bool bStop = false;

static unsigned __stdcall rtsp2mp4(void * pThis)

{

    avcodec_register_all();

    av_register_all();

    avformat_network_init();

    /* should set to NULL so that avformat_open_input() allocate a new one */

    i_fmt_ctx = NULL;

    char rtspUrl[] = "rtsp://admin:12345@192.168.10.76:554";

    const char *filename = "1.mp4";

    if (avformat_open_input(&i_fmt_ctx, rtspUrl, NULL, NULL)!=)

    {

        fprintf(stderr, "could not open input file\n");

        return -;

    }

    if (avformat_find_stream_info(i_fmt_ctx, NULL)<)

    {

        fprintf(stderr, "could not find stream info\n");

        return -;

    }

    //av_dump_format(i_fmt_ctx, 0, argv[1], 0);

    /* find first video stream */

    for (unsigned i=; i<i_fmt_ctx->nb_streams; i++)

    {

        if (i_fmt_ctx->streams[i]->codec->codec_type == AVMEDIA_TYPE_VIDEO)

        {

            i_video_stream = i_fmt_ctx->streams[i];

            break;

        }

    }

    if (i_video_stream == NULL)

    {

        fprintf(stderr, "didn't find any video stream\n");

        return -;

    }

    avformat_alloc_output_context2(&o_fmt_ctx, NULL, NULL, filename);

    /*

    * since all input files are supposed to be identical (framerate, dimension, color format, ...)

    * we can safely set output codec values from first input file

    */

    o_video_stream = avformat_new_stream(o_fmt_ctx, NULL);

    {

        AVCodecContext *c;

        c = o_video_stream->codec;

        c->bit_rate = ;

        c->codec_id = i_video_stream->codec->codec_id;

        c->codec_type = i_video_stream->codec->codec_type;

        c->time_base.num = i_video_stream->time_base.num;

        c->time_base.den = i_video_stream->time_base.den;

        fprintf(stderr, "time_base.num = %d time_base.den = %d\n", c->time_base.num, c->time_base.den);

        c->width = i_video_stream->codec->width;

        c->height = i_video_stream->codec->height;

        c->pix_fmt = i_video_stream->codec->pix_fmt;

        printf("%d %d %d", c->width, c->height, c->pix_fmt);

        c->flags = i_video_stream->codec->flags;

        c->flags |= CODEC_FLAG_GLOBAL_HEADER;

        c->me_range = i_video_stream->codec->me_range;

        c->max_qdiff = i_video_stream->codec->max_qdiff;

        c->qmin = i_video_stream->codec->qmin;

        c->qmax = i_video_stream->codec->qmax;

        c->qcompress = i_video_stream->codec->qcompress;

    }

    avio_open(&o_fmt_ctx->pb, filename, AVIO_FLAG_WRITE);

    avformat_write_header(o_fmt_ctx, NULL);

    int last_pts = ;

    int last_dts = ;

    int64_t pts, dts;

    while (!bStop)

    {

        AVPacket i_pkt;

        av_init_packet(&i_pkt);

        i_pkt.size = ;

        i_pkt.data = NULL;

        if (av_read_frame(i_fmt_ctx, &i_pkt) < )

            break;

        /*

        * pts and dts should increase monotonically

        * pts should be >= dts

        */

        i_pkt.flags |= AV_PKT_FLAG_KEY;

        pts = i_pkt.pts;

        i_pkt.pts += last_pts;

        dts = i_pkt.dts;

        i_pkt.dts += last_dts;

        i_pkt.stream_index = ;

        //printf("%lld %lld\n", i_pkt.pts, i_pkt.dts);

        static int num = ;

        printf("frame %d\n", num++);

        av_interleaved_write_frame(o_fmt_ctx, &i_pkt);

        //av_free_packet(&i_pkt);

        //av_init_packet(&i_pkt);

         Sleep();

    }

    last_dts += dts;

    last_pts += pts;

    avformat_close_input(&i_fmt_ctx);

    av_write_trailer(o_fmt_ctx);

    avcodec_close(o_fmt_ctx->streams[]->codec);

    av_freep(&o_fmt_ctx->streams[]->codec);

    av_freep(&o_fmt_ctx->streams[]);

    avio_close(o_fmt_ctx->pb);

    av_free(o_fmt_ctx);

    return ;

}

int _tmain(int argc, char **argv)

{

    //ffplayer();

    bStop = false;

    HANDLE   hth;

    unsigned  uiThreadID;

    hth = (HANDLE)_beginthreadex( NULL,         // security

                                   ,            // stack size

                                   rtsp2mp4,

                                   NULL,           // arg list

                                   ,  //CREATE_SUSPENDED so we can later call ResumeThread()

                                   &uiThreadID );

    if ( hth ==  )

    {

        printf("Failed to create thread\n");

        return -;

    }

    printf("按任意键停止录像\n");

    getchar();

    bStop = true;

    printf("按任意键退出\n");

    getchar();

    return ;

}
原来的代码没有为存储流功能单独开线程,会导致写文件尾的语句执行不到,现在改为用一个单独的线程来执行。
5、测试

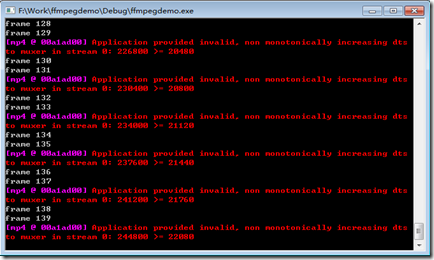
如上图为存储视频流过程中程序的打印结果。生成的mp4文件可以用任意支持该格式的播放器播放。现在还无法做到一边存储一边回放录像,下篇再完善吧。
ffmpeg学习(二) 通过rtsp获取H264裸流并保存到mp4文件的更多相关文章
- 利用FFmpeg 将 rtsp 获取H264裸流并保存到文件中
既然已经可以通过 RTSP 获取h264 裸流了.那么通过 FFmpeg 将其保存到文件中怎么做呢? 一.首先RTSP获取 h264 裸流 我们上面两篇文章主要讲的是通过 rtsp://Your ip ...
- 【嵌入式开发】用 VLC 显示 树莓派摄像头 H264 裸流
首先树莓派连上网络,并和电脑在同一网段. 树莓派的IP是: 192.168.3.13 电脑的IP是: 192.168.3.6 1.在树莓派上采集 H264裸流,并用UDP发送到电脑. pi@Neil- ...
- H264裸流分析中,能获取哪些信息?
从H264的裸流中,PPS,SPS中,一定可以获取到的,有图像的宽,高信息. 这部分信息的提取,用Stream eye 分析: 这里需要特别提一下这两个参数: pic_width_in_mbs_mi ...
- 使用ffmpeg获取视频流后如何封装存储成mp4文件
int main(int argc,char *argv[]) 02 { 03 AVFormatContext *pFormatCtx; 04 int i,videoStream; 05 AVC ...
- Servlet学习(二):ServletConfig获取参数;ServletContext应用:请求转发,参数获取,资源读取;类装载器读取文件
转载:http://www.cnblogs.com/xdp-gacl/p/3763559.html 一.ServletConfig讲解 1.1.配置Servlet初始化参数 在Servlet的配置文件 ...
- FFmpeg 学习(二):Mac下安装FFmpeg
一.安装ffmpeg 分为两种安装方式: 1. 命令行安装 brew install ffmpeg 2. 下载压缩包安装 去 http://evermeet.cx/ffmpeg/ 下载7z压缩包,解压 ...
- 【FFMPEG】从内存中获取H264数据并进行decode
版权声明:本文为博主原创文章,未经博主允许不得转载. 使用ffmpeg解码h264数据其实相对使用x264进行视频编码是简单了许多的,因为ffmpeg提供了一个decoding_encoding.c的 ...
- FFmpeg(6)-通过av_find_best_stream()来获取音视流的索引
也可以通过av_find_best_stream()函数来获取流的索引: 例: audioStream = av_find_best_stream(ic, AVMEDIA_TYPE_AUDIO, -, ...
- Windwos平台上ffmpeg解码音频并且保存到wav文件中
先附上代码,测试通过 #include <stdio.h> #include <math.h> #include "libavutil/avstring.h" ...
随机推荐
- PHP图片加水印文字及图片合成缩放
<?php //图片添加文字水印 /*$bigImgPath = 'background.png'; $img = imagecreatefromstring(file_get_contents ...
- (转)Chrome开发者工具不完全指南(一、基础功能篇)
本篇转载自卖烧烤夫斯基,并做了小部分的修改. 原文地址:Chrome开发者工具不完全指南(一.基础功能篇) 原作者:卖烧烤夫斯基 就算你不是一名前端开发工程师,相信你也不会对Chrome浏览器感到陌生 ...
- Linux下安装MATLAB
Why do I see "Preparing installation files ... Installing ... Finished..." in the terminal ...
- TBitConverter
TBitConverter FromBcd FromByte FromCurrency FromDouble FromExtended FromInteger FromLargeInt ...
- autocomplete.js的使用(2):自动输入时,出现下拉选择框
<!--自动输入文本值所需的jquery文件--><script src="/js/jquery-1.8.3.min.js" type="text/Ja ...
- 光圈、曝光、ISO
光圈大小对景深的影响: 光圈大小示意图(值越小光圈越大) 光圈.曝光.ISO对图像效果影响
- 小学生轻松做题App
作业链接:https://edu.cnblogs.com/campus/fzzcxy/2016SE/homework/2180 原型模型设计工具:墨刀 原型模型链接:https://modao.cc/ ...
- 【HTTP请求】、详解
一.协议介绍 HTTP(HyperText Transfer Protocol,超文本传输协议)是一套计算机通过网络进行通信的规则,使HTTP客户端能够从HTTP服务器端请求到信息和服务,目前的版本号 ...
- cp & scp
[cp & scp] Linux为我们提供了两个用于文件copy的命令,一个是cp,一个是scp,但是他们略有不同. cp --- 主要是用于在同一台电脑上,在不同的目录之间来回copy文 ...
- pymysql.err.IntegrityError: (1062, "Duplicate entry 'roxml-ROXML' for key 'PRIMARY'")
在<Python数据挖掘-概念.方法与实践>一书的第3章实体匹配中,如果一路按照作者的代码及SQL语句进行配置运行的话,会出现如题目所示的错误.根据python脚本的执行错误提示显示,错误 ...
