1、微信小程序----弹幕的实现(无后台)
小程序刚刚出来,现在网上的demo是多,但是要找到一个自己需要的却不容易。今天跟大家分享自己写的一个弹幕功能。
先来一张效果图:
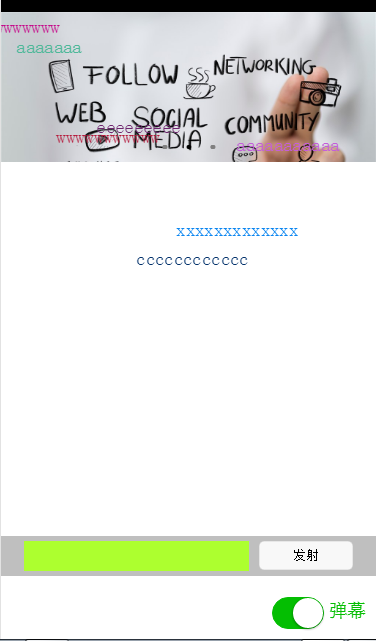
我的思路是这样的,先用<switch>标签确定是否打开弹幕,若打开弹幕则出现弹幕文本框和发射按钮,还有弹幕遮罩层。
先贴wxml和wxss代码。
wxml代码如下:
<!-- pages/index/index.wxml -->

<swiper indicator-dots="{{indicatorDots}}"

  autoplay="{{autoplay}}" interval="{{interval}}" duration="{{duration}}">

  <block wx:for="{{imgUrls}}" wx:key="unique">

    <swiper-item>

      <image src="{{item}}" class="slide-image"/>

    </swiper-item>

  </block>

</swiper>

<!--弹幕开关-->

<view class="barrage-Switch" style="color:{{barrageTextColor}};">

    <switch id="switch_" bindchange="barrageSwitch"/>

    <text>弹幕</text>

</view>

<!--弹幕输入框-->

  <view class="barrage-inputText" style="display:{{barrage_inputText}}">

      <view class="barrage-input">

        <input bindblur="bind_shoot" value="{{bind_shootValue}}"/>

      </view>

      <view class="barrage-shoot">

          <button class="shoot" size="mini" bindtap="shoot">发射</button>

      </view>

  </view>

<!--弹幕上单文字-->

<view class="barrage-fly" style="display:{{barragefly_display}}">

  <block wx:for="{{barrage_style}}" wx:key="unique">

   <text class="barrage-textFly" style="color:{{item.barrage_shoottextColor}};left:{{item.barrage_phoneWidth}}px;top:{{item.barrageText_height}}px;">{{item.barrage_shootText}}</text>

  </block>

</view>
wxss代码如下:
/* pages/index/index.wxss */

.slide-image{

    width: 100%;

}

/* 弹幕选择按钮的操作*/

.barrage-Switch{

    position: absolute;

    bottom: 10px;

    right: 10px;

    z-index:;

}

/* 弹幕输入框的操作*/

.barrage-inputText{

    position: absolute;

    display: flex;

    background-color: #BFBFBF;

    width: 100%;

    height: 40px;

    flex-direction: row;

    nav-index:;

    justify-content: center;

    align-items: center;

    bottom: 10%;

}

.barrage-input{

    background-color: greenyellow;

    width: 60%;

    height: 30px;

}

.barrage-shoot{

    margin-left: 10px;

    width: 25%;

    height: 30px;

}

.shoot{

    width: 100%;

    color: black;

}

/*弹幕飞飞飞*/

.barrage-fly{

    z-index:;

    height: 80%;

    width: 100%;

    position: absolute;

    top:;

}

.barrage-textFly{

    position: absolute;

}
这样基本的样式就都实现了。接下来要对弹幕上的字进行处理。
文字是从右往左移动,文字出现的位置top是随机,left则是取屏幕的宽度。移动的时候是用定时器进行处理。
还有就是字体的颜色是随机出现的。这些功能都是利用js处理的。
js的代码如下:
var barrage_style_arr = [];

var barrage_style_obj ={};

var phoneWidth = 0;

var timers = [];

var timer ;

Page({

  data: {

    imgUrls: [

      'http://img02.tooopen.com/images/20150928/tooopen_sy_143912755726.jpg',

      'http://img06.tooopen.com/images/20160818/tooopen_sy_175866434296.jpg',

      'http://img06.tooopen.com/images/20160818/tooopen_sy_175833047715.jpg'

    ],

    indicatorDots: true,

    autoplay: true,

    interval: 3000,

    duration: 500,

    barrageTextColor:"#D3D3D3",

    barrage_inputText:"none",

    barrage_shoottextColor:"black",

    bind_shootValue:"",

    barrage_style:[],

    barragefly_display:"none",

  },

    // 生命周期函数--监听页面加载

  onLoad:function(options){

    var that = this;

    //获取屏幕的宽度

      wx.getSystemInfo({

        success: function(res) {

           that.setData({

                barrage_phoneWidth:res.windowWidth-100,

           })

        }

      })

      phoneWidth = that.data.barrage_phoneWidth;

      console.log(phoneWidth);

  },

  //是否打开弹幕...

  barrageSwitch: function(e){

    console.log(e);

    //先判断没有打开

    if(!e.detail.value){

    //清空弹幕

      barrage_style_arr = [];

      //设置data的值

      this.setData({

        barrageTextColor:"#D3D3D3",

        barrage_inputText:"none",

        barragefly_display:"none",

        barrage_style:barrage_style_arr,

      });

      //清除定时器

      clearInterval(timer);

    }else{

      this.setData({

        barrageTextColor:"#04BE02",

        barrage_inputText:"flex",

        barragefly_display:"block",

      });

      //打开定时器

        timer= setInterval(this.barrageText_move,800)

    }

  },

  //发射按钮

  shoot: function(e){

    //字体颜色随机

    var textColor = "rgb("+parseInt(Math.random()*256)+","+parseInt(Math.random()*256)+","+parseInt(Math.random()*256)+")";

    // //设置弹幕字体的水平位置样式

    // var textWidth = -(this.data.bind_shootValue.length*0);

    //设置弹幕字体的垂直位置样式

    var barrageText_height = (Math.random())*266;

     barrage_style_obj = {

      // textWidth:textWidth,

      barrageText_height:barrageText_height,

      barrage_shootText:this.data.bind_shootValue,

      barrage_shoottextColor : textColor,

      barrage_phoneWidth:phoneWidth

    };

    barrage_style_arr.push(barrage_style_obj);

    this.setData({

      barrage_style:barrage_style_arr,        //发送弹幕

      bind_shootValue:""                    //清空输入框

    })

      //定时器  让弹幕动起来

      //  this.timer= setInterval(this.barrageText_move,800);

  },

//定时器  让弹幕动起来

  barrageText_move: function(){

    var timerNum = barrage_style_arr.length;

    var textMove ;

    for(var i=0;i<timerNum;i++){

       textMove = barrage_style_arr[i].barrage_phoneWidth;

       console.log("barrage_style_arr["+i+"].barrage_phoneWidth----------:"+barrage_style_arr[i].barrage_phoneWidth);

       textMove = textMove -20;

      barrage_style_arr[i].barrage_phoneWidth = textMove;

      //走完的移除掉

      if(textMove<=-100){

 //         clearTimeout(this.timer);

          barrage_style_arr.splice(0,1);

          i--;

          //全部弹幕运行完

          if(barrage_style_arr.length==0){

            this.setData({

              barrage_style:barrage_style_arr,

            })

            // clearInterval(this.timer);

            return;

          }

      }

      console.log("第"+i+"个定时器:",textMove);

      this.setData({

        barrage_style:barrage_style_arr,

      })

    }

  },

  //绑定发射输入框,将值传递给data里的bind_shootValue,发射的时候调用

  bind_shoot:function(e){

    this.setData({

      bind_shootValue:e.detail.value

    })

  },

})
因为刚刚接触小程序,所以对一些语句的使用都不是很了解。所以遇到了一些问题:
1、在js中获取wxml的控件的信息。
js:
  barrageSwitch: function(e){

    console.log(e);

  }
wxml:
<switch id="switch_" bindchange="barrageSwitch"/>
结果:返回了一个objec.在控制台返回的类型好像都是json格式的数据。
Object {type: "change", timeStamp: 2766, target: Object, currentTarget: Object, detail: Object}
2、在实现弹幕的时候,点击发射按钮,如何获取到输入框的信息。
在这,我是输入框失去焦点的时候,将数据复制给js中的data类,再点击发射的时候取data类中的值。
3、其中最大的问题是如何让文字跑起来,因为小程序不支持jQuery,让我这个js白痴有点无能为力。
在这说说自己让文字移动的思路:
首先,在打开弹幕的时候定义一个定时器,关闭的弹幕的时候把定时器给关掉。因为我是用数组来存储文字移动的样式,其他确定下来。我只要改变left的大小就可以让文字移动。所以我用for循环,当定时器运行的时候改变弹幕文字样式 left:xxx px;的大小。
接下来我会坚持写博客,每次学习一个新的技术都是参观别人的博客。在这里可以分享自己的一些成果,如果自己的内容可以在网上找到,就不会去花时间写了。
1、微信小程序----弹幕的实现(无后台)的更多相关文章
- 微信小程序腾讯云php后台解决方案
微信小程序腾讯云php后台解决方案 微信小程序前段需要添加必要的文件以配合后端 (1)wafer2-client-sdk sdk提供了几种接口包括登陆,获取用户openid,图片上传等 (2)conf ...
- 微信小程序支付源码,后台服务端代码
作者:尹华南,来自原文地址 微信小程序支付绕坑指南 步骤 A:小程序向服务端发送商品详情.金额.openid B:服务端向微信统一下单 C:服务器收到返回信息二次签名发回给小程序 D:小程序发起支付 ...
- 微信小程序开发(request请求后台获取不到data)
1微信的request的post请求后台获取不到data(当初这个问题纠结了好久好久),原因是post传递的data是json格式而不是key,value的格式,所以获取不到相应的data就是post ...
- 微信小程序支付接口之Django后台
本文链接:https://blog.csdn.net/qq_41860162/article/details/89098694Python3-django-微信小程序支付接口调用工具类生成一系列微信官 ...
- 微信小程序图片上传java后台(前后端代码)
小程序代码 upload:function(e){ var that = this; wx.showActionSheet({ itemList: ['从相册选择','拍照'], itemColor: ...
- 微信小程序传code 拿token 后台报40029 状态吗,是为什么?
看看是不是code用了两次,还有种可能,检查一下后台的appid
- 微信小程序踩坑集合
1:官方工具:https://mp.weixin.qq.com/debug/w ... tml?t=1476434678461 2:简易教程:https://mp.weixin.qq.com/debu ...
- 微信小程序计算器Bug版=-=(笔记)
微信小程序计算器BUG版本 无APPID的测试号登录,先在app.json中更改路径,以及修改头部信息. 首先一个输入框字段用{{screenData}} 功能可以退格,清屏,正负号,正常操作加减乘除 ...
- 新手指南:顶象验证码如何接入微信小程序?
自2017年小程序发布以来,经过4年的快速发展,小程序已然成为企业互联网布局不可或缺的一环.无论是互联网企业还是拥抱互联网的传统企业,无论是服务导向型企业还是产品导向型企业,小程序都为用户提供了一种轻 ...
随机推荐
- Coursera 机器学习笔记(一)
主要是第一二周内容 机器学习概要 机器学习是什么? 生活在信息时代的我们,其实时时刻刻都离不开机器学习算法.比如日常使用的搜索引擎就涉及到很多学习算法. Arthur Samuel 给出第一个定义.他 ...
- */美女镇楼/*>>>---PHP中的OOP-->面对过程与面对对象基础概念与内容--(封装、继承、多态)
前 言 OOP 学习了好久的PHP,今天来总结一下PHP中的重要成员OOP 1 面向过程&面向对象 1.专注于解决一个问题的过程.面向过程的最大特点,是由一个一个的函数去解决处理这 ...
- Spring+SpringMVC+MyBatis深入学习及搭建(十)——MyBatis逆向工程
转载请注明出处:http://www.cnblogs.com/Joanna-Yan/p/6973266.html 前面讲到:Spring+SpringMVC+MyBatis深入学习及搭建(九)--My ...
- pod trunk push --verbose 失败的原因总结
用 pod trunk push --verbose 添加一个 pod 的时候,经常出现如下的错误 [!] The podspec does not validate. /Library/Ruby/ ...
- 高性能队列Disruptor系列3--Disruptor的简单使用(译)
简单用法 下面以一个简单的例子来看看Disruptor的用法:生产者发送一个long型的消息,消费者接收消息并打印出来. 首先,我们定义一个Event: public class LongEvent ...
- css3自适应圆
.class{ width:auto; height:auto; border-radius:11px; min-width:14px; padding:0 4px; font-size:12px; ...
- Swift初始化空字符串
为了构造一个很长的字符串,可以创建一个空字符串作为初始值.可以将空的字符串字面量赋值给变量,也可以初始化一个新的String 实例: var emptyString = "" // ...
- 关于Client_Abort_Exception异常的分析和解决
1.什么情况下会出现“ClientAbortException: java.net.socketException: Broken pipe”? 答:客户端非正常(标准握手协议)退出连接,体现在h ...
- 详细介绍Java虚拟机(JVM)
1. JVM生命周期 启动.启动一个Java程序时,一个JVM实例就产生了,任何一个拥有public static void main(String[] args)函数的class都可以作为JVM实例 ...
- 简约的HTML5音乐播放器插件
从我刚开始接触前端的时候就想写一个能播放音乐的小程序,刚开始写的时候虽然可以放,但是确实很慢,很卡,有很多可以优化的地方.最近在前一个版本的基础上重写了一个音乐播放器的插件,速度还可以吧 因为追求简约 ...