SpringCloud微服务之Ribbon负载均衡(一)
什么是微服务?什么是SpringCloud?
微服务是一种架构的模式,它提倡将一个应用程序划分成很多个微小的服务,服务与服务之间相互协调、相互配合。每个服务运行都是一个独立的进程,服务与服务之间采用轻量级的通讯机制相互沟通。简单的来说就是将一个庞大的复杂的单体应用进行划分成n多个微小的服务(一个服务负责一个业务),各个微服务都被独立的部署。
微服务与集群的区别是,微服务的每一个部署的服务都是不相同的,而集群部署的每一个服务都是相同的。
Spring Cloud是一个微服务框架,相比Dubbo等RPC框架,Spring Cloud提供的全套的分布式系统解决方案。它是在SpringBoot的基础上构建的。SpringCloud的五大神兽分别是Eureka、Ribbon、Feign、Hystrix、Zuul。
环境搭建
版本说明
springboot:2.0.3
springcloud:Finchley
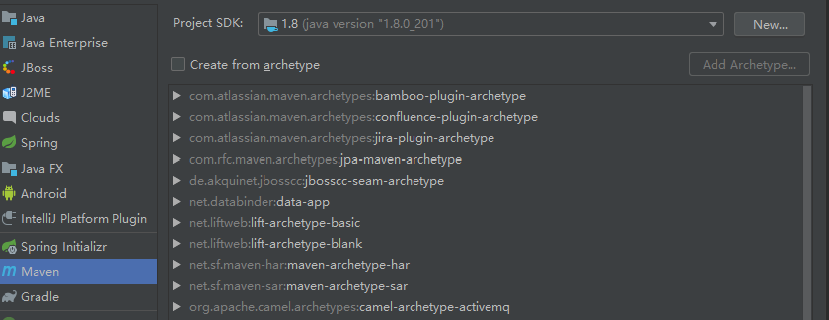
创建一个父工程(maven项目)

选择maven,点击next

然后点击完成
修改父工程pom.xml
<?xml version="1.0" encoding="UTF-8"?>

<project xmlns="http://maven.apache.org/POM/4.0.0"

         xmlns:xsi="http://www.w3.org/2001/XMLSchema-instance"

         xsi:schemaLocation="http://maven.apache.org/POM/4.0.0 http://maven.apache.org/xsd/maven-4.0.0.xsd">

    <modelVersion>4.0.0</modelVersion>

    <groupId>com.lzh</groupId>

    <artifactId>my-springcloud-01</artifactId>

    <packaging>pom</packaging>

    <version>1.0-SNAPSHOT</version>

    <properties>

        <project.build.sourceEncoding>UTF-8</project.build.sourceEncoding>

        <maven.compiler.source>1.8</maven.compiler.source>

        <maven.compiler.target>1.8</maven.compiler.target>

        <junit.version>4.12</junit.version>

        <log4j.version>1.2.17</log4j.version>

        <lombok.version>1.16.18</lombok.version>

    </properties>

    <dependencyManagement>

        <dependencies>

            <dependency>

                <groupId>org.springframework.cloud</groupId>

                <artifactId>spring-cloud-dependencies</artifactId>

                <version>Finchley.RELEASE</version>

                <!--<version>Dalston.SR1</version>-->

                <type>pom</type>

                <scope>import</scope>

            </dependency>

            <dependency>

                <groupId>org.springframework.boot</groupId>

                <artifactId>spring-boot-dependencies</artifactId>

                <version>2.0.3.RELEASE</version>

                <type>pom</type>

                <scope>import</scope>

            </dependency>

            <dependency>

                <groupId>mysql</groupId>

                <artifactId>mysql-connector-java</artifactId>

                <version>5.0.4</version>

            </dependency>

            <dependency>

                <groupId>com.alibaba</groupId>

                <artifactId>druid</artifactId>

                <version>1.0.31</version>

            </dependency>

            <dependency>

                <groupId>org.mybatis.spring.boot</groupId>

                <artifactId>mybatis-spring-boot-starter</artifactId>

                <version>1.3.0</version>

            </dependency>

            <dependency>

                <groupId>ch.qos.logback</groupId>

                <artifactId>logback-core</artifactId>

                <version>1.2.3</version>

            </dependency>

            <dependency>

                <groupId>junit</groupId>

                <artifactId>junit</artifactId>

                <version>${junit.version}</version>

                <scope>test</scope>

            </dependency>

            <dependency>

                <groupId>log4j</groupId>

                <artifactId>log4j</artifactId>

                <version>${log4j.version}</version>

            </dependency>

        </dependencies>

    </dependencyManagement>

    <build>

        <finalName>microservicecloud</finalName>

        <resources>

            <resource>

                <directory>src/main/resources</directory>

                <filtering>true</filtering>

            </resource>

        </resources>

        <plugins>

            <plugin>

                <groupId>org.apache.maven.plugins</groupId>

                <artifactId>maven-resources-plugin</artifactId>

                <configuration>

                    <delimiters>

                        <delimit>$</delimit>

                    </delimiters>

                </configuration>

            </plugin>

        </plugins>

    </build>

</project>
创建子工程(maven项目)
工程名称:microservice-consumer-80
pom.xml文件
<?xml version="1.0" encoding="UTF-8"?>

<project xmlns="http://maven.apache.org/POM/4.0.0"

         xmlns:xsi="http://www.w3.org/2001/XMLSchema-instance"

         xsi:schemaLocation="http://maven.apache.org/POM/4.0.0 http://maven.apache.org/xsd/maven-4.0.0.xsd">

    <parent>

        <artifactId>my-springcloud-01</artifactId>

        <groupId>com.lzh</groupId>

        <version>1.0-SNAPSHOT</version>

    </parent>

    <modelVersion>4.0.0</modelVersion>

    <artifactId>microservice-consumer-80</artifactId>

    <dependencies>

        <dependency>

            <groupId>com.lzh</groupId>

            <artifactId>microservice-api</artifactId>

            <version>1.0-SNAPSHOT</version>

        </dependency>

        <dependency>

            <groupId>org.springframework.cloud</groupId>

            <artifactId>spring-cloud-starter-netflix-eureka-client</artifactId>

        </dependency>

        <!-- 整合ribbon -->

        <dependency>

            <groupId>org.springframework.cloud</groupId>

            <artifactId>spring-cloud-starter-netflix-ribbon</artifactId>

        </dependency>

        <dependency>

            <groupId>org.springframework.boot</groupId>

            <artifactId>spring-boot-starter-web</artifactId>

        </dependency>

        <dependency>

            <groupId>org.springframework.boot</groupId>

            <artifactId>spring-boot-starter-actuator</artifactId>

        </dependency>

    </dependencies>

</project>
编码实现
在主启动类上加上@EnableDiscoveryClient注解
创建一个配置文件ConfigBean.java,new一个RestTemplate远程调用模板,加入@LoadBalanced注解,开启负载均衡
import org.springframework.cloud.client.loadbalancer.LoadBalanced;

import org.springframework.context.annotation.Bean;

import org.springframework.context.annotation.Configuration;

import org.springframework.web.client.RestTemplate;

/**

 * @author lzh

 * create 2019-11-05-9:58

 */

@Configuration

public class ConfigBean {

    @Bean

    //加入负载均衡

    //Spring Cloud Ribbon是基于Netflix Ribbon实现的一套客户端    负载均衡的工具

    @LoadBalanced

    public RestTemplate getRestTemplate(){

        return new RestTemplate();

    }

}
在服务层DeptServiceImpl.java类中用RestTemplate模板工具调用,这里使用服务名称调用,如果服务名称相同,则会进行顺序轮询调用
import com.lzh.cloud.model.Dept;

import com.lzh.cloud.service.DeptService;

import org.springframework.beans.factory.annotation.Autowired;

import org.springframework.stereotype.Service;

import org.springframework.web.client.RestTemplate;

import java.util.List;

/**

 * @author lzh

 * create 2019-11-05-10:27

 */

@Service

public class DeptServiceImpl implements DeptService {

    /**

     * 使用restTemplate访问restful接口非常的简单粗暴无脑。

     * (url, requestMap, ResponseBean.class)这三个参数分别代表

     * REST请求地址、请求参数、HTTP响应转换被转换成的对象类型。

     */

    @Autowired

    private RestTemplate restTemplate;

    //private static final String REST_URL_PREFIX = "http://localhost:8001";

    private static final String REST_URL_PREFIX = "http://MICROSERVICECLOUD-DEPT";

    @Override

    public boolean add(Dept dept) {

        return restTemplate.postForObject(REST_URL_PREFIX + "/dept/add", dept, Boolean.class);

    }

    @Override

    public Dept get(Long id) {

        return restTemplate.getForObject(REST_URL_PREFIX + "/dept/get/" + id, Dept.class);

    }

    @Override

    public List<Dept> list() {

        return restTemplate.getForObject(REST_URL_PREFIX + "/dept/list/", List.class);

    }

    @Override

    public Object discovery() {

        return restTemplate.getForObject(REST_URL_PREFIX + "/dept/discovery", Object.class);

    }

}
自定义轮询规则
在主启动类的前一个包创建一个配置MySelRule类,注意不要跟主启动类同包或者在主启动类的子包中创建
import com.netflix.loadbalancer.IRule;

import org.springframework.context.annotation.Bean;

import org.springframework.context.annotation.Configuration;

/**

 * @author lzh

 * create 2019-05-19-17:10

 */

@Configuration

public class MySelfRule {

    @Bean

    public IRule myRule(){

        //return new RandomRule(); //Ribbon默认是轮询,我自定义为随机

        //return new RoundRobinRule(); //Ribbon默认是轮询,我自定义为随机

        return new RandomRule_LZH(); // 我自定义为每台机器5次

    }

}
参照源码,自定义轮询算法RandomRule_LZH.java
import com.netflix.client.config.IClientConfig;

import com.netflix.loadbalancer.AbstractLoadBalancerRule;

import com.netflix.loadbalancer.ILoadBalancer;

import com.netflix.loadbalancer.Server;

import java.util.List;

public class RandomRule_LZH extends AbstractLoadBalancerRule {

    // total = 0 // 当total==5以后,我们指针才能往下走,

    // index = 0 // 当前对外提供服务的服务器地址,

    // total需要重新置为零,但是已经达到过一个5次,我们的index = 1

    // 分析:我们5次,但是微服务只有8001 8002 8003 三台,OK?

    //

    private int total = 0;            // 总共被调用的次数,目前要求每台被调用5次

    private int currentIndex = 0;    // 当前提供服务的机器号

    public Server choose(ILoadBalancer lb, Object key) {

        if (lb == null) {

            return null;

        }

        Server server = null;

        while (server == null) {

            if (Thread.interrupted()) {

                return null;

            }

            List<Server> upList = lb.getReachableServers();

            List<Server> allList = lb.getAllServers();

            int serverCount = allList.size();

            if (serverCount == 0) {

                /*

                 * No servers. End regardless of pass, because subsequent passes only get more

                 * restrictive.

                 */

                return null;

            }

//            int index = rand.nextInt(serverCount);// java.util.Random().nextInt(3);

//            server = upList.get(index);

//            private int total = 0;             // 总共被调用的次数,目前要求每台被调用5次

//            private int currentIndex = 0;    // 当前提供服务的机器号

            if (total < 5) {

                server = upList.get(currentIndex);

                total++;

            } else {

                total = 0;

                currentIndex++;

                if (currentIndex >= upList.size()) {

                    currentIndex = 0;

                }

            }

            if (server == null) {

                /*

                 * The only time this should happen is if the server list were somehow trimmed.

                 * This is a transient condition. Retry after yielding.

                 */

                Thread.yield();

                continue;

            }

            if (server.isAlive()) {

                return (server);

            }

            // Shouldn't actually happen.. but must be transient or a bug.

            server = null;

            Thread.yield();

        }

        return server;

    }

    @Override

    public Server choose(Object key) {

        return choose(getLoadBalancer(), key);

    }

    @Override

    public void initWithNiwsConfig(IClientConfig clientConfig) {

        // TODO Auto-generated method stub

    }

}
最后不要忘了在主启动类加上注解,使用自定义轮询算法configuration = MySelfRule.class
import org.springframework.boot.SpringApplication;

import org.springframework.boot.autoconfigure.SpringBootApplication;

import org.springframework.cloud.client.discovery.EnableDiscoveryClient;

import org.springframework.cloud.netflix.eureka.EnableEurekaClient;

/**

 * @author lzh

 * create 2019-11-04-22:26

 */

@SpringBootApplication

@EnableEurekaClient

//自定义负载均衡规则

//在启动该为服务的时候就能去加载我们的自定义Ribbon配置类,从而使配置生效

//configuration = MySelfRule.class  把MySelfRule配置类加载进容器

@RibbonClient(name = "MICROSERVICECLOUD-DEPT",configuration = MySelfRule.class)

@EnableDiscoveryClient

public class MyConsumerApplication_80 {

    public static void main(String[] args) {

        SpringApplication.run(MyConsumerApplication_80.class);

    }

}
代码
github:https://github.com/LZHDonald/my-springcloud-01/tree/master/microservice-consumer-80
SpringCloud微服务之Ribbon负载均衡(一)的更多相关文章
- spring-cloud: eureka之:ribbon负载均衡自定义配置(二)
spring-cloud: eureka之:ribbon负载均衡自定义配置(二) 有默认配置的话基本上就是轮询接口,现在我们改用自定义配置,同时支持:轮询,随机接口读取 准备工作: 1.eureka服 ...
- spring-cloud: eureka之:ribbon负载均衡配置(一)
spring-cloud: eureka之:ribbon负载均衡配置(一) 比如我有: 一个eureka服务:8761 两个user用户服务: 7900/7901端口 一个movie服务:8010 1 ...
- SpringCloud系列五:Ribbon 负载均衡(Ribbon 基本使用、Ribbon 负载均衡、自定义 Ribbon 配置、禁用 Eureka 实现 Ribbon 调用)
1.概念:Ribbon 负载均衡 2.具体内容 现在所有的服务已经通过了 Eureka 进行了注册,那么使用 Eureka 注册的目的是希望所有的服务都统一归属到 Eureka 之中进 行处理,但是现 ...
- 微服务SpringCloud之服务调用与负载均衡
上一篇我们学习了服务的注册与发现,本篇博客是在上一篇的基础上学习服务的调用.上一博客主要创建了Eureka的服务端和一个Client,该Client包含了一个Controller用来提供对外服务供外部 ...
- 学习一下 SpringCloud (三)-- 服务调用、负载均衡 Ribbon、OpenFeign
(1) 相关博文地址: 学习一下 SpringCloud (一)-- 从单体架构到微服务架构.代码拆分(maven 聚合): https://www.cnblogs.com/l-y-h/p/14105 ...
- 【微服务】之四:轻松搞定SpringCloud微服务-负载均衡Ribbon
对于任何一个高可用高负载的系统来说,负载均衡是一个必不可少的名称.在大型分布式计算体系中,某个服务在单例的情况下,很难应对各种突发情况.因此,负载均衡是为了让系统在性能出现瓶颈或者其中一些出现状态下可 ...
- SpringCloud微服务(02):Ribbon和Feign组件,实现服务调用的负载均衡
本文源码:GitHub·点这里 || GitEE·点这里 一.Ribbon简介 1.基本概念 Ribbon是一个客户端的负载均衡(Load Balancer,简称LB)器,它提供对大量的HTTP和TC ...
- 小D课堂 - 新版本微服务springcloud+Docker教程_4-03 高级篇幅之Ribbon负载均衡源码分析实战
笔记 3.高级篇幅之Ribbon负载均衡源码分析实战 简介: 讲解ribbon服务间调用负载均衡源码分析 1.完善下单接口 2.分析@LoadBalanced ...
- SpringCloud微服务负载均衡与网关
1.使用ribbon实现负载均衡ribbon是一个负载均衡客户端 类似nginx反向代理,可以很好的控制htt和tcp的一些行为.Feign默认集成了ribbon. 启动两个会员服务工程,端口号分别为 ...
随机推荐
- JMeter压力测试简单使用
原创:转载需注明原创地址 https://www.cnblogs.com/fanerwei222/p/11915535.html JMeter压力测试简单使用: 我们可以使用JMeter来测试一下自己 ...
- git本地仓库关联多个远程仓库及取消关联
关联 本地和远程仓库关联步骤: 在网站上(如gitee.github等,这里以gitee为例)首先添加好自己的ssh公钥 本地创建一个空的项目,即文件夹. 在文件夹下git init初始化仓库 在gi ...
- 05.python语法入门--垃圾回收机制
# (1)垃圾回收机制GC# 引用计数# x = 10 # 值10引用计数为1# y = x # 值10引用计数为2## y = 1000 # 值10引用计数减少为1# del x # 值 ...
- Solution -「LOJ #150」挑战多项式 ||「模板」多项式全家桶
\(\mathcal{Description}\) Link. 给定 \(n\) 次多项式 \(F(x)\),在模 \(998244353\) 意义下求 \[G(x)\equiv\left\{ ...
- Centos下Ambari2.7.5的编译和安装
前言 终于,要开始写点大数据相关的文章了.当真的要开始写老本行的时候,还是考虑了挺久的.一是不知道从何处写起,二是如何能写点有意思的. 我们常说,过程比结果重要.也是有很多人喜欢准备完全之后,才会开始 ...
- 【k8s中无法使用jstack和arthas的解决方案】1: Unable to get pid of LinuxThreads manager thread
使用alpine镜像,jstack和arthas等无法连接到pid为1的java进程 k8s容器中执行结果 / # jstack 1 1: Unable to get pid of LinuxThre ...
- 录毛线脚本,直接手写接口最简洁的LoadRunner性能测试脚本(含jmeter脚本)
近日翻看了下招聘信息,很多都要求loadrunner和jmeter这两款工具,毕竟是性能测试的主流客户端并发工具. 录制的问题 做性能脚本是性能测试的基本功,loadrunner和jmeter这两款工 ...
- Kafka经典三大问:数据有序丢失重复
Kafka经典三大问:数据有序丢失重复 在kafka中有三个经典的问题: 如何保证数据有序性 如何解决数据丢失问题 如何处理数据重复消费 这些不光是面试常客,更是日常使用过程中会遇到的几个问题,下面分 ...
- 传统式与自助式BI分析平台有什么区别
如今自助式BI分析平台已经成为众多企业进行数据分析工作时的首选,究竟自助式BI分析平台在数据分析中有哪些优势,可以受到企业如此的青睐与追捧呢?小编将在本文中,跟大家一起来了解自助式BI分析平台的概念. ...
- 『无为则无心』Python日志 — 65、日志模块logging的使用
目录 1.logger类用法 2.handler类用法 3.formatter类用法 4.filter类用法 1.logger类用法 logger类:logger用于提供日志接口,常用于配置和发送日志 ...
