vue移动端购物商场首页制作
1.搭建项目框架


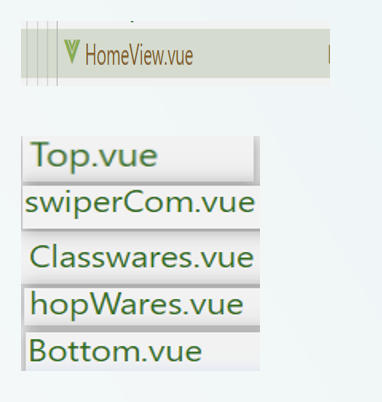
新建首页主组件及其子组件并将子组件展示出来
2.封装所需接口

3.编写轮播图组件
<template>

<div id="swipercom">

      <div class="swiper-container" id="swiperIndex">

          <div class="swiper-wrapper">

              <div class="swiper-slide" v-for="(item,i) in imgs" :key="i">

                  <img :src="item.pic" alt="">

              </div>

          </div>

          <!-- 如果需要分页器 -->

          <div class="swiper-pagination"></div>

      </div>

  </div>

</template>

<script>

import 'swiper/css/swiper.css'

import Swiper from 'swiper'

export default {

  name: 'swiperCom',

  data(){

    return{

 imgs:[

        { pic: require("../assets/img/banner2.jpg") },

        { pic: require("../assets/img/banner3.jpg") },

        { pic: require("../assets/img/banner1.gif") },

      ],

    }

    },

    mounted(){//view与model绑定成功之后

        var mySwiper = new Swiper('#swiperIndex',{

            loop: true,

              autoplay: {

                delay: 3000,

                disableOnInteraction: false,

                waitForTransition: false,

            },

            //配置分页器内容

            pagination:{

                el:".swiper-pagination",//分页器与哪个标签关联

                clickable:true//分页器是否可以点击

            }

        })

    }

}

</script>

<style lang="less" scoped>

    #swipercom{

        width: 3rem;

        height: 3.2rem;

    #swiperIndex.swiper-container{

        width: 7.5rem;

        height: 3.2rem;

        // border-radius: 0.1rem;

        .swiper-slide img{

            width: 100%;

        }

        .swiper-pagination-bullet-active{

            background-color: #8d78cd;

        }

    }

    }

    </style>
并通过v-for循环 将轮播图片循环展示
4.编写商品分类组件
<template>

  <div class="packge">

    <div class="label">

      <div class="zikuai"></div>

      <span>商品分类</span>

    </div>

    <div class="iconList">

      <div class="iconItem" v-for="(item, i) in hotClass" :key="i" @click="getClass(item.id)">

        <img :src="'http://47.95.13.193/myToiletries' + item.icon" alt="" />

        <span class="count">{{ item.name }}</span>

      </div>

    </div>

  </div>

</template>

<script>

import "swiper/css/swiper.css";

import { getHotClass } from "@/api/index.js";

export default {

  name: "musicList",

  data() {

    return {

      hotClass: [],

      hotCommodity: [],

      imgs: [

      ],

    };

  },

  methods:{

    getClass(id){

          this.$router.push(`/ClassifyView/${id}`)

    }

  },

  async mounted() {

    let res1 = await getHotClass();

    console.log(res1);

    this.hotClass = res1.data.data;

  },

};

</script>

<style lang="less" scoped>

.packge {

  width: 7.5rem;

  padding: 0 0.25rem;

}

.label {

  display: flex;

  margin-top: 0.3rem;

  margin-left: 0.05rem;

}

.zikuai {

  background: #6652ff;

  width: 0.1rem;

  height: 0.4rem;

  margin-right: 0.1rem;

}

.iconList {

  width: 7rem;

  display: flex;

  justify-content: space-between;

  // padding: 0.4rem;

  margin-top: 0.2rem;

  .iconItem {

    display: flex;

    flex-direction: column;

    align-items: center;

    position: relative;

    img {

      width: 1.65rem;

      height: 1.65rem;

      border-radius: 0.1rem;

    }

    span {

      position: absolute;

      right: 0.3rem;

      top: 1.2rem;

      font-size: 0.26rem;

      background: rgba(114, 71, 244, 0.7);

      width: 1rem;

      text-align: center;

      border-radius: 0.1rem;

      color: #fff;

      overflow: hidden;

      height: 0.4rem;

    }

  }

}

</style>
5.编写热门商品页面
<template>

  <div class="packge">

    <div class="label">

      <div class="zikuai"></div>

      <span>热门商品</span>

    </div>

    <div class="iconList">

      <div class="iconItem" v-for="(item, i) in hotCommodity" :key="i">

        <div class="hot"><img src="../assets/img/hot.jpg" alt="" /></div>

        <img :src="'http://47.95.13.193/myToiletries/' + item.photo" alt="" />

        <div class="present">

          <div class="pname">

            <p style="font-size: 0.28rem; width: 4.9rem">

              <strong>{{ item.name }}</strong>

            </p>

          </div>

          <div class="detail">

            <p style="font-size: 0.1rem">{{ item.info }}</p>

          </div>

          <router-link

            class="count"

            :to="{ path: '/shoplist' }"

            @click="change(item.id)"

            style="text-decoration: none"

            >购买</router-link

          >

        </div>

      </div>

    </div>

  </div>

</template>

<script>

import "swiper/css/swiper.css";

import Swiper from "swiper";

import { getHotCommodity } from "@/api/index.js";

import store from "@/store/index.js";

export default {

  name: "hopwares",

  data() {

    return {

      hotCommodity: [],

      imgs: [],

    };

  },

  async mounted() {

    let res2 = await getHotCommodity();

    this.hotCommodity = res2.data.data;

    console.log(res2);

  },

  methods: {

    change(id) {

      store.commit("setplayIndex", id);

    },

  },

};

</script>

<style lang="less" scoped>

.packge {

  width: 7.5rem;

  padding: 0 0.25rem;

}

.label {

  display: flex;

  margin-top: 0.3rem;

  margin-left: 0.05rem;

}

.zikuai {

  background: #6652ff;

  width: 0.1rem;

  height: 0.4rem;

  margin-right: 0.1rem;

}

.iconList {

  width: 7rem;

  display: flex;

  justify-content: space-between;

  // padding: 0.4rem;

  margin-top: 0.2rem;

  display: flex;

  flex-direction: column;

  .iconItem {

    width: 7rem;

    display: flex;

    // flex-direction: column;

    align-items: center;

    position: relative;

    position: relative;

    background: #fff;

    border-bottom: 0.15rem solid #f5f5f5;

    // background: aquamarine;

    .hot {

      position: absolute;

      top: 0rem;

      right: 0.1rem;

      width: 0.5rem;

      height: 0.5rem;

      float: right;

      img {

        width: 0.6rem;

        height: 0.6rem;

      }

    }

    img {

      width: 1.65rem;

      height: 1.65rem;

      //   border-radius:0.1rem ;

      float: left;

    }

    .present {

      width: 5rem;

      .pname {

        width: 5rem;

        // height: 0.6rem;

        // background: yellow;

      }

      .detail {

        width: 5.4rem;

        font-size: 0.02rem;

      }

    }

    .count {

      width: 0.3rem;

      font-size: 0.2rem;

      background: rgba(142, 120, 206);

      width: 1rem;

      text-align: center;

      border-radius: 0.08rem;

      color: #fff;

      margin-left: 0.01rem;

      display: inline-block;

    }

  }

}

</style>
<template>

<div class="iconList">

    <div class="iconItem" @click="$router.push('/')">

      <svg class="icon" aria-hidden="trun">

        <use xlink:href="#icon-zhuye"  class='active1'></use>

      </svg>

      <span class="active1">主页</span>

    </div>

    <div class="iconItem active2" @click="$router.push('/classifyview/1')">

      <svg class="icon" aria-hidden="trun">

        <use xlink:href="#icon-yingyong"></use>

      </svg>

      <span class="active2">分类</span>

    </div>

    <div class="iconItem" @click="$router.push('/search')">

      <svg class="icon" aria-hidden="trun">

        <use xlink:href="#icon-faxian"></use>

      </svg>

      <span>发现</span>

    </div>

    <div class="iconItem" @click="$router.push('/dingdan')">

      <svg class="icon" aria-hidden="trun">

        <use xlink:href="#icon-gouwuche"></use>

      </svg>

      <span>购物车</span>

    </div>

    <div class="iconItem"  @click="$router.push('/me')">

      <svg class="icon" aria-hidden="trun">

        <use xlink:href="#icon-geren"></use>

      </svg>

      <span>个人中心</span>

    </div>

  </div>

</template>

<script>

import "swiper/css/swiper.css";

import Swiper from "swiper";

export default {

  name: "bottom",

       data(){

        return{ }

        },

         methods:{

      leftChange(index) {

              //当前的背景颜色赋给当前点击的索引

             this.changeLeftBackground = index;

       },

         }

}

</script>

<style lang="less" scoped>

.iconList {

    background: #fff;

    position: fixed;

    left: 0;

    bottom: -0.1rem;

  width: 7.5rem;

  height: 1rem;

  display: flex;

  justify-content: space-between;

  padding: 0.2rem;

  .iconItem {

    display: flex;

    flex-direction: column;

    align-items: center;

    .icon {

      width: 0.5rem;

      height: 0.5rem;

      fill: #6f6f6f;

    }

    span {

      font-size: 0.01rem;

    }

  }

}

.active1{

  color:#9285f9;

  fill:#9285f9

}

</style>
vue移动端购物商场首页制作的更多相关文章
- Vue项目——Supermall移动端购物商城
一.项目描述 基于Vue全家桶构建的移动端购物商城APP.页面一共分为:首页.详情页.分类页.购物车页面.登录页面和个人信息页面. 二.使用技术 使用Vue CLI3快速搭建Vue开发环境以及对应的w ...
- [vue] vue服务端渲染nuxt.js
初始化 使用脚手架工具 create-nuxt-app 快速创建 npx create-nuxt-app <项目名> npx create-nuxt-app 执行一些选择 在集成的服务器端 ...
- 了解css中px、em、rem的区别并使用Flexible实现vue移动端的适配
本人java菜鸟一名,若有错误,还请见谅. 1.px和em和rem的定义和区别 px:px像素,是相对单位,相对于屏幕的分辨率而言,也就是说,当屏幕的分辨率不同那么px相同,实际看到的大小也会不同. ...
- vue服务端渲染之nuxtjs
前言 本篇主要针对nuxtjs中的一些重要概念整理和代码实现! 在学习vue服务端渲染之前,先搞清楚几个概念: 什么是客户端渲染(CSR) 什么是服务端渲染(SSR) CSR和SSR有什么异同 客户端 ...
- Egg + Vue 服务端渲染工程化实现
在实现 egg + vue 服务端渲染工程化实现之前,我们先来看看前面两篇关于Webpack构建和Egg的文章: 在 Webpack工程化解决方案easywebpack 文章中我们提到了基于 Vue ...
- Vue移动端项目模板
一个集成移动端开发插件的Vue移动端模板包含1.css: 使用stylus开发css 集成reset样式文件 修改UI组件文件 统一样式处理(如主题色等)2.UI组件 使用热门的vant与mint-u ...
- discuz 修改亮剑积分商城2.91模板(在常用设置中添加商场首页排序方式的背景颜色)
在应用 -> 积分商城 -> 常用设置 中添加 商场首页排序方式 的背景颜色修改功能 步骤: 1.找到并打开此页面对应的模板source\plugin\aljsc\template\set ...
- vue移动端金融UI组件库滴滴MandMobile面向金融场景设计附功能思维导图
vue移动端金融UI组件库滴滴MandMobile面向金融场景设计附功能思维导图 Mand Mobile是面向金融场景设计的移动端组件库,基于Vue.js实现.目前已实际应用于滴滴四大金融业务板块的1 ...
- vue移动端h5页面根据屏幕适配的四种方案
最近做了两个关于h5页面对接公众号的项目,不得不提打开微信浏览器内置地图导航的功能确实有点恶心.下次想起来了的话,进行总结分享一下如何处理.在vue移动端h5页面当中,其中适配是经常会遇到的问题,这块 ...
- vue服务端渲染axios预取数据
首先是要参考vue服务端渲染教程:https://ssr.vuejs.org/zh/data.html. 本文主要代码均参考教程得来.基本原理如下,拷贝的原文教程. 为了解决这个问题,获取的数据需要位 ...
随机推荐
- redis分布锁
1.redis分布式锁应用的场景? 1)防止缓存穿透:热点数据过期,大量线程访问mysql 2) 防止秒杀超卖:库存数量同步给redis后,对redis数据进行扣减 3)双写一致性:缓存的数据,被修 ...
- maven静态资源过滤
<resources> <resource> <directory>src/main/java</directory> <includes> ...
- top usage
https://www.cnblogs.com/dragonsuc/p/5512797.html
- linux并行执行线程
资料来源: (1) https://www.jianshu.com/p/d8d58846c53f(作者:黄甫一) 1.并行任务较少时: (1) 给需要并行运行的命令行在结尾加上"&& ...
- OpenMP fortran 学习
参考自TAMU的PPThttps://people.math.umass.edu/~johnston/PHI_WG_2014/OpenMPSlides_tamu_sc.pdf 什么是OpenMP 在C ...
- 真实世界的算法_pdf
链接:https://pan.baidu.com/s/1OZiDnd2My3FvGIuwO91E7Q 提取码:t88i
- 关于pytorch一些基础知识的备份
压缩conda环境用于备份目的实际上没有意义,因为还有其他方法可以做到这一点,这可能更合适,并使用专为此而设计的内置功能. 您可以创建一个环境.txt版本conda,详细说明其中的每个模块和版本,然后 ...
- surfaceview+mediaplayer
public class VideosurfaceView extends SurfaceView implements SurfaceHolder.Callback, MediaPlayer.OnP ...
- Java基础之标识符和关键字
关键字 标识符 Java所有的组成部分都需要名字.类名.变量名以及方法名都被称为标识符. Java 中标识符是为方法.变量或其他用户定义项所定义的名称.标识符可以有一个或多个字符. 标识符注意点: 在 ...
- vue子组件为父组件属性写值
父组件调用子组件代码(关键字sync): <importModel :visible.sync="dialogModelVisible"></importMode ...
