mybatis源码探索笔记-5(拦截器)
前言
mybatis中拦截器主要用来拦截我们在发起数据库请求中的关键步骤。其原理也是基于代理模式,自定义拦截器时要实现Interceptor接口,并且要对实现类进行标注,声明是对哪种组件的指定方法进行拦截。mybatis的四大组件Executor,ParameterHandler,ResultSetHandler,StatementHandler都可以创建拦截器,分别有其自己的用途。由于拦截器是偏应用型的工具,所以文末会使用拦截Executor的query方法自定义一个模拟一个针对mysql数据库的简易分页插件来说明如何使用拦截器
正文
1.拦截器的声明
mybatis拦截器需要实现一个org.apache.ibatis.plugin.Interceptor接口,我们可以看下
public interface Interceptor {

  Object intercept(Invocation invocation) throws Throwable;

  default Object plugin(Object target) {

    return Plugin.wrap(target, this);

  }

  default void setProperties(Properties properties) {

    // NOP

  }

}
可以看到有三个方法,第一个则是拦截操作的核心方法,第二个plugin则是拦截策略,参数则是要包装的原本组件,这儿默认使用Plugin.wrap 即层层代理的方式,在低版本的mybatis没有此默认方法,需要自己写明。第三个方法则是写入一些自己需要用的属性值。
第一个intercept方法的Invocation我们可以看下这个类
public class Invocation {

  private final Object target;

  private final Method method;

  private final Object[] args;

  public Invocation(Object target, Method method, Object[] args) {

    this.target = target;

    this.method = method;

    this.args = args;

  }

  public Object getTarget() {

    return target;

  }

  public Method getMethod() {

    return method;

  }

  public Object[] getArgs() {

    return args;

  }

  public Object proceed() throws InvocationTargetException, IllegalAccessException {

    return method.invoke(target, args);

  }

}
这个类其实很简洁明了,就是一个反射工具类,属性值是 目标对象,要执行的方法,要执行的方法的参数值,而调用proceed方法则是调用的反射执行。我们可以猜测后面拦截的原理肯定也是将要代理的方法包装为这个对象。究竟是不是这样我们先接着分析
现在我们就用用途较为广泛,功能最强大的Executor来开始构造一个拦截器,其他拦截器功能类似,功能可以自行探索,本篇主要以Executor来讲解
@Intercepts({@Signature(type = Executor.class,method = "query",args = {MappedStatement.class, Object.class, RowBounds.class, ResultHandler.class}),

            @Signature(type = Executor.class,method = "query",args = {MappedStatement.class, Object.class, RowBounds.class, ResultHandler.class,CacheKey.class,BoundSql.class})})

public class ExecutorInterceptor implements Interceptor {

    @Override

    public Object intercept(Invocation invocation) throws Throwable {

        System.out.println("方法执行前);

        Object obj = invocation.proceed();

        System.out.println("方法执行后);

        return obj;

    }

}
@Documented

@Retention(RetentionPolicy.RUNTIME)

@Target(ElementType.TYPE)

public @interface Intercepts {

  Signature[] value();

}
发现其实构造一个拦截器很简单,只需要实现以下步骤即可
1.实现Interceptor 接口
2.类上声明一个@Intercepts注解,表明这是一个拦截器
3.Intercepts接收Signature数组,说明声明至少一个Signature即可生效,也可以声明多个,但要注意方法标志不要一致,即type(拦截器类型),method(拦截方法),args(拦截的方法参数)不能完全一致,要能识别出唯一方法
4.type可选类型有Executor,ParameterHandler,ResultSetHandler,StatementHandler,而后面的方法必须为我们声明的type中的方法,参数则也必须符合我们选择的方法的参数
至此,一个拦截器就声明完成了,而我们在执行invocation.procceed方法即是执行拦截的方法。那么如何让mybatis加载我们的拦截器呢。由于mybatis是在初始化的时候加载拦截器,所以我们需要在构造SqlSessionFactorBean的时候将其加载进去,通过下面代码可以看到有两种方法可以加载,在configuration中单个添加,或者SqlSessionFactoryBean中已数组的形式添加,后者添加的方式最终也是会存到configuration的拦截器集合中
    @Bean

    @Autowired

    public SqlSessionFactoryBean initMybatis(DataSource dataSource) throws IOException {

        org.apache.ibatis.session.Configuration configuration = new org.apache.ibatis.session.Configuration();

        //configuration中添加

        configuration.addInterceptor(new ExecutorInterceptor());

        configuration.setLogImpl(StdOutImpl.class);

        SqlSessionFactoryBean sqlSessionFactoryBean = new SqlSessionFactoryBean();

        sqlSessionFactoryBean.setConfiguration(configuration);

        sqlSessionFactoryBean.setDataSource(dataSource);

        //sqlSessionFactoryBean中添加

        sqlSessionFactoryBean.setPlugins(new Interceptor[]{new ExecutorInterceptor()});

        //扫描xml路径

        sqlSessionFactoryBean.setMapperLocations(new PathMatchingResourcePatternResolver().getResources("classpath*:/mapper/**.xml"));

        return sqlSessionFactoryBean;

    }
在configuration的属性值中我们可以看到有如下属性
protected final InterceptorChain interceptorChain = new InterceptorChain();
public class InterceptorChain {

  private final List<Interceptor> interceptors = new ArrayList<>();

  public Object pluginAll(Object target) {

    for (Interceptor interceptor : interceptors) {

      target = interceptor.plugin(target);

    }

    return target;

  }

  ..................

}
可以发现最终也是存入到了InterceptorChain 的interceptors 集合中,而这里面有个pluginAll的方法,这个方法就是拦截包装方法,我们下面则会讲到
到此拦截器已经声明完毕,并且最终加载到了mybatis配置中,那么拦截器是如何生效,又是如何进行判断拦截的呢。我们接着看
2.代理包装组件
拦截器的包装地方其实非常的好找,就在configuration中就有四个对应的拦截方法。在翻看configuration类的源码中可以看到如下四个方法(声明在一起的,非常好找)
  public ParameterHandler newParameterHandler(MappedStatement mappedStatement, Object parameterObject, BoundSql boundSql) {

    ParameterHandler parameterHandler = mappedStatement.getLang().createParameterHandler(mappedStatement, parameterObject, boundSql);

    parameterHandler = (ParameterHandler) interceptorChain.pluginAll(parameterHandler);

    return parameterHandler;

  }

  public ResultSetHandler newResultSetHandler(Executor executor, MappedStatement mappedStatement, RowBounds rowBounds, ParameterHandler parameterHandler,

      ResultHandler resultHandler, BoundSql boundSql) {

    ResultSetHandler resultSetHandler = new DefaultResultSetHandler(executor, mappedStatement, parameterHandler, resultHandler, boundSql, rowBounds);

    resultSetHandler = (ResultSetHandler) interceptorChain.pluginAll(resultSetHandler);

    return resultSetHandler;

  }

  public StatementHandler newStatementHandler(Executor executor, MappedStatement mappedStatement, Object parameterObject, RowBounds rowBounds, ResultHandler resultHandler, BoundSql boundSql) {

    StatementHandler statementHandler = new RoutingStatementHandler(executor, mappedStatement, parameterObject, rowBounds, resultHandler, boundSql);

    statementHandler = (StatementHandler) interceptorChain.pluginAll(statementHandler);

    return statementHandler;

  }

  public Executor newExecutor(Transaction transaction) {

    return newExecutor(transaction, defaultExecutorType);

  }

  public Executor newExecutor(Transaction transaction, ExecutorType executorType) {

    executorType = executorType == null ? defaultExecutorType : executorType;

    executorType = executorType == null ? ExecutorType.SIMPLE : executorType;

    Executor executor;

    if (ExecutorType.BATCH == executorType) {

      executor = new BatchExecutor(this, transaction);

    } else if (ExecutorType.REUSE == executorType) {

      executor = new ReuseExecutor(this, transaction);

    } else {

      executor = new SimpleExecutor(this, transaction);

    }

    if (cacheEnabled) {

      executor = new CachingExecutor(executor);

    }

    executor = (Executor) interceptorChain.pluginAll(executor);

    return executor;

  }
这四个方法则是在创建对应的组件的时候就会用到,至于具体在查询中哪个环节会用到本系列第二章和第三章到对应的地方已有红色标注说明,例如Executor就是再我们构建SqlSession即使用SqlSessionFactory.openSession()时用到的,这儿就不再多讲解。我们主要看下plugin方法
  private final List<Interceptor> interceptors = new ArrayList<>();

  public Object pluginAll(Object target) {

    for (Interceptor interceptor : interceptors) {

      target = interceptor.plugin(target);

    }

    return target;

  }
可以发现会将我们声明的所有拦截器进行遍历,第一次的参数为我们要包装的组件例如Executor,然后将每次的结果作为plugin参数继续传递,直到遍历完成,这儿一定注意将每次的结果作为了参数继续传递。接下来我们看下plugin的具体逻辑。
我发现执行了我们上面所说的接口的默认方法
  default Object plugin(Object target) {

    return Plugin.wrap(target, this);

  }
我们接着看,注意这个this参数即是我们声明的拦截器
2.1 Plugin

在讲pugin.wrap方法前,我们先看下这个类的结构,先看继承关系。我们发现其实现了InvocationHandler接口,了解jdk代理的都知道这个接口是用来实现代理的接口,我们需要实现其invoke接口。那么很明显我们的拦截器核心肯定是和代理有关了。
我们再接着看下属性
  private final Object target;

  private final Interceptor interceptor;

  private final Map<Class<?>, Set<Method>> signatureMap;

  private Plugin(Object target, Interceptor interceptor, Map<Class<?>, Set<Method>> signatureMap) {

    this.target = target;

    this.interceptor = interceptor;

    this.signatureMap = signatureMap;

  }
属性不多,一共只有三个,tartget,interceptor即拦截器,还有一个Map类型的signatureMap。这三个属性值下面会一一讲到。 这个时候我们可以开始看wrap方法了
2.2 wrap
  /*target 要拦截的组件

    *interceptor 我们定义的拦截器

    *

    */

  public static Object wrap(Object target, Interceptor interceptor) {

    //获取拦截器上对应的type所包含的所有方法

    Map<Class<?>, Set<Method>> signatureMap = getSignatureMap(interceptor);

    //获取到要拦截的组件类型

    Class<?> type = target.getClass();

    //过滤掉组件所有接口中拦截器不包含的type接口

    Class<?>[] interfaces = getAllInterfaces(type, signatureMap);

    //如果为过滤后接口数量为0  例如我们传入的组件是Executor,

    //但是传入拦截器中只拦截ParameterHandler  那这儿过滤后熟练则会为0

    if (interfaces.length > 0) {

      //如果大于0 则为满足的接口 创建一个代理,

      //这儿注意新建了一个Plugin 也就是实现Invocation接口的类

      //参数分别为要代理的组件  我们复合type的拦截器  还有拦截器中的拦截方法集合

      return Proxy.newProxyInstance(

          type.getClassLoader(),

          interfaces,

          new Plugin(target, interceptor, signatureMap));

    }

    return target;

  }

  private static Map<Class<?>, Set<Method>> getSignatureMap(Interceptor interceptor) {

    //获取类上的 Intercepts 注解

    Intercepts interceptsAnnotation = interceptor.getClass().getAnnotation(Intercepts.class);

    //没有该注解直接报错

    if (interceptsAnnotation == null) {

      throw new PluginException("No @Intercepts annotation was found in interceptor " + interceptor.getClass().getName());

    }

    //获得我们定义的所有Signature

    Signature[] sigs = interceptsAnnotation.value();

    //创建一个存储map

    Map<Class<?>, Set<Method>> signatureMap = new HashMap<>();

    //遍历我们定义的Signature数组  本例中即定义的两个Executor的query方法

    for (Signature sig : sigs) {

      //如果该方法的type没有则为其创建一个k,v存储   k为type类型,value为    Set<Method>

      Set<Method> methods = signatureMap.computeIfAbsent(sig.type(), k -> new HashSet<>());

      try {

        //根据方法名字和参数类获取指定方法即method

        Method method = sig.type().getMethod(sig.method(), sig.args());

        //添加进对应class的方法集合   例如本例因为两个Signature都是Executor 所以会k都为Executor  对应的值set中有两个方法

        methods.add(method);

      } catch (NoSuchMethodException e) {

          //方法没找到会抛异常 所以代理组件类型  方法名  参数都要定义准确

        throw new PluginException("Could not find method on " + sig.type() + " named " + sig.method() + ". Cause: " + e, e);

      }

    }

    //返回

    return signatureMap;

  }

  /*

    *拦截器中的方法声明 和我们要拦截组件的方法进行对比

    * 找到我们拦截组件的所有接口以及父接口且过滤掉拦截器中不存在的type类型的接口 然后以数组的形式返回

    */

    private static Class<?>[] getAllInterfaces(Class<?> type, Map<Class<?>, Set<Method>> signatureMap) {

    Set<Class<?>> interfaces = new HashSet<>();

    while (type != null) {

      for (Class<?> c : type.getInterfaces()) {

        if (signatureMap.containsKey(c)) {

          interfaces.add(c);

        }

      }

      type = type.getSuperclass();

    }

    return interfaces.toArray(new Class<?>[interfaces.size()]);

  }
上面的方法核心逻辑主要有以下步骤
1.找打拦截器的所有拦截类型和方法
2.找到被代理组件的所有接口,且过滤掉我们拦截器中未声明的拦截类型
3.为符合条件的所有接口创建代理,且new Plugin 即实现InvocationHandler中传入了我们的要拦截的组件,定义的拦截器,拦截器上的方法集合
4.返回被代理类
这儿我们注意了,我们返回的是代理类,而在迭代下一个拦截器的时候,该代理类又会当做被代理组件传进来,这样我们定义了多少个符合条件的拦截器,就会嵌套多少层代理。mybatis实现拦截的方式实际上是通过层层代理,所以我们在编写拦截器的时候尽量在一个拦截器中搞定我们的业务,毕竟这样层层代理会生成很多的代理类,对性能和内存也是种负担
好了 至此我们明白了pluginAll的逻辑,即实现了层层代理包装类。我们系统也就拿到了层层代理后的组件,那么拦截器最终又是如何执行的呢。我们接着往下看
2.3 拦截器的执行
通过2.2我们得知了我们最终得到的组件是代理后的组件,那我们执行方法时执行的也肯定是实现了InvocationHandler接口的类的invoke方法。所以我们还是要接着看Plugin方法中的Invoke方法
本例中我们已Executor.query(MappedStatement ms, Object parameter, RowBounds rowBounds, ResultHandler resultHandler) 方法为例
  //我们传入的被代理的组件

  private final Object target;

  //我们定义的拦截器

  private final Interceptor interceptor;

  //拦截器上的方法结婚  key是我们制定的type   value是该type的所有方法

  private final Map<Class<?>, Set<Method>> signatureMap;

  @Override

  public Object invoke(Object proxy, Method method, Object[] args) throws Throwable {

    try {

      //查找method的声明class即我们本例中的Executor  能够查找到两个查询方法

      Set<Method> methods = signatureMap.get(method.getDeclaringClass());

      //如果声明的方法包含了本次调用的方法

      if (methods != null && methods.contains(method)) {

          //执行拦截器的intercept方法  此时构造了一个Invocation

        return interceptor.intercept(new Invocation(target, method, args));

      }

      //如果没有就执行普通的原始调用

      return method.invoke(target, args);

    } catch (Exception e) {

      throw ExceptionUtil.unwrapThrowable(e);

    }

  }
通过上述方法可以得知,如果我们的拦截方法中有匹配的对应方法,那就将被代理组件,本次方法,和参数包装一个最开始提到的反射工具类Invocation,然后我们在intercept方法中执行invocation.procceed即相当于执行了其原本的方法。
至此,mybatis的拦截器工作原理就是这样的,其实想来还是很简单的。就是在代理的层面上再进行一次包装就可以了。接下来我们用一个例子说明mybatis拦截器在实际开发中的作用
3.模拟简易分页插件
我们就使用拦截Executor来模拟一个简易的分页插件
3.1 创建一个分页结果bean
import java.util.List;

public class MyPage<E> {

    private Integer total;

    private Integer page;

    private Integer size;

    private Integer totalPage;

    private List<E> recoreds;

    public MyPage(Integer page, Integer size) {

        if (page == null || page < 0){

            page = 0;

        }

        if (size == null || size <= 0){

            size = Integer.MAX_VALUE;

        }

        this.page = page;

        this.size = size;

    }

    public Integer getTotal() {

        return total;

    }

    public void setTotal(Integer total) {

        this.total = total;

    }

    public Integer getPage() {

        return page;

    }

    public void setPage(Integer page) {

        this.page = page;

    }

    public Integer getSize() {

        return size;

    }

    public void setSize(Integer size) {

        this.size = size;

    }

    public Integer getTotalPage() {

        return totalPage;

    }

    public void setTotalPage(Integer totalPage) {

        this.totalPage = totalPage;

    }

    public List<E> getRecoreds() {

        return recoreds;

    }

    public void setRecoreds(List<E> recoreds) {

        this.recoreds = recoreds;

    }

}
3.2 创建一个分页信息存储类
import java.util.List;

public class MyPageHelper {

    private static final ThreadLocal<MyPage> pages = new ThreadLocal<>();

  //创建分页信息

    public static void startPage(Integer page,Integer size){

        MyPage myPage = new MyPage(page,size);

        pages.set(myPage);

    }

  //获取当前分页信息

    public static MyPage getLocal(){

        return pages.get();

    }

  //包装结果返回

    public static<E> MyPage<E> getPageData(List<E> list){

        try {

            MyPage<E> myPage = pages.get();

            myPage.setRecoreds(list);

            return myPage;

        }finally {
            //记得清除

            pages.remove();

        }

    }

  //设置分页信息总数

    public static void setTotalPage(Integer count) {

        Integer size = getLocal().getSize();

        getLocal().setTotalPage(count%size==0?count/size:(count/size)+1);

    }

}
用一个ThreadLocal存储分页信息,然后给予四个方法,后面会用到
3.3 创建我们的拦截器
@Intercepts({@Signature(type = Executor.class,method = "query",args = {MappedStatement.class, Object.class, RowBounds.class, ResultHandler.class}),

            @Signature(type = Executor.class,method = "query",args = {MappedStatement.class, Object.class, RowBounds.class, ResultHandler.class,CacheKey.class,BoundSql.class})})

public class ExecutorInterceptor implements Interceptor {

    public static final String START="MY_START";

    public static final String END="MY_END";

    @Override

    public Object intercept(Invocation invocation) throws Throwable {

        //获取到该拦截方法的所有参数

        Object[] args = invocation.getArgs();

        MappedStatement mappedStatement = (MappedStatement)args[0];

        Object object =args[1];

        RowBounds rowBounds = (RowBounds)args[2];

        ResultHandler resultHandler = (ResultHandler)args[3];

        Executor executor = (Executor)invocation.getTarget();

        BoundSql boundSqls = mappedStatement.getBoundSql(object);

       //查询总数量数量

        Integer count = getCount(mappedStatement,object,rowBounds,resultHandler,executor,boundSqls);

        //设置总数量到ThreadLocal中的page

        MyPageHelper.setTotalPage(count);

        //查询分页的值

        List pageRecords = getPageRecords(mappedStatement,object,resultHandler,executor,boundSqls);

        //返回

        return pageRecords;

    }

}
在拦截器中获取被代理的组件,以及所有的参数。
分页一般来说有两个需要我们自己获取的东西,总数量和分页数据,根据这两个数据我们构造分页信息返回,所以这我们来看这两个方法
先看获取总数量
3.4 获取总数量
思路其实很简单,我们通过拦截器获取到其查询的sql ,然后我们将其包装一下,即select count(*) from (查询sql) as temp_table_name 即可获取到返回值了。
这儿我们可以理一下思路,我们要做的事情有如下
1.获取到我们的执行sql,并包装一下sql内容,但不能直接更改原本MappedStatment的sql内容
2.我们不需要添加任何参数,所以参数部分完全不用动
3.原版的MappedStatment返回值不能用来接收我们的count(*)了,所以我们需要修改其MappedStatment的值,但由于直接修改会影响原本的值,所以我们需要新建一个,并且除了返回值和id,其他的和原本MappedStatment一致即可
4.原本用来构造缓存的Cachkey不能使用了,所以我们需要构造新的CacheKey
5.然后我们自己使用Executor调用传入参数即可调用获取返回值了
我们就根据思路一步步来
    private Integer getCount(MappedStatement ms,Object params,RowBounds rowBounds,ResultHandler resultHandler,Executor executor,BoundSql boundSqls) throws SQLException {

        //获取到原本的sql内容 并对其进行包装

        String countSql = "select count(*) from ( "+boundSqls.getSql()+" ) as PAGE_LOCAL_HELP";

        //然后构造一个新的BoundSql 这个只有sql被更改了其他内容一致

        BoundSql boundSql = new BoundSql(ms.getConfiguration(),countSql,boundSqls.getParameterMappings(),params);

        //构造一个新的MappedStatement  只修改其id和返回值

        MappedStatement mappedStatements = newCountMappedStatement2(ms, ms.getId() + "_PAGE");

        //根据新的MappedStatement BoundSql构造缓存Cachekey

        CacheKey cacheKey = executor.createCacheKey(mappedStatements,params,RowBounds.DEFAULT,boundSql);

        //调用Executor的查询方法

        List<Object> query = executor.query(mappedStatements, params, rowBounds, resultHandler, cacheKey, boundSql);

        //将获取到的值返回

        return (Integer)query.get(0);

    }
这里的代码则是根据我们的想法实现,其中构造新的MappedStatement 我们可以直接参考mybatis构建的源码进行构建
    public static MappedStatement newCountMappedStatement2(MappedStatement ms, String newMsId) {

        //使用新id

        MappedStatement.Builder statementBuilder = new MappedStatement.Builder(ms.getConfiguration(), newMsId, ms.getSqlSource(), ms.getSqlCommandType())

                .resource(ms.getResource())

                .fetchSize(ms.getFetchSize())

                .timeout(ms.getTimeout())

                .statementType(ms.getStatementType())

                .keyGenerator(ms.getKeyGenerator())

                .databaseId(ms.getDatabaseId())

                .lang(ms.getLang())

                .resultOrdered(false)

                .resultMaps(ms.getResultMaps())

                .resultSetType(ms.getResultSetType())

                .flushCacheRequired(ms.isFlushCacheRequired())

                .useCache(ms.isUseCache())

                .cache(ms.getCache())

                .parameterMap(ms.getParameterMap());

        //设置返回类型  这儿设置为Integer类型接收

        ResultMap build = new ResultMap.Builder(ms.getConfiguration(), ms.getId(), Integer.class, new ArrayList<>()).build();

        statementBuilder.resultMaps(Arrays.asList(build));

        //构建完成后返回

        MappedStatement statement = statementBuilder.build();

        return statement;

    }
完成之后我们就将总数以及分页信息设置到了ThreadLocal中的MyPage中了,此时里面只差分页数据了。所以我们再看分页数据
3.5 获取分页数据
我们依旧可以来理一下思路
1.先从我们的MyPageHelper中获取到存储的分页信息 page & size
2.包装我们原本的sql 将其改为 原本的sql +"limit ?,?",本案例使用mysql的方式
3.由于增加了两个参数,所以我们的参数及param要增加两个,而BoundSql中的parameterMappings即参数映射也要增加两个。但不能修改其原本的引用,否则会影响原本的MappedStatment
4.参数和sql也修改了,所以也要构造新的缓存CacheKey
5.然后调用被代理组件Executor.query方法获取返回值,由于原本的mappedStatment可以接收,所以不用修改
我们根据思路来一步一步实现
    private List getPageRecords(MappedStatement ms,Object params,ResultHandler resultHandler,Executor executor,BoundSql boundSqls ) throws SQLException, NoSuchFieldException, IllegalAccessException {

        //构造新sql

        String pageSql = boundSqls.getSql()+" limit ?,?";

        //得到新的参数map 以及parameterMappings

        Map map = handleParam(params,ms,boundSqls);

        //参数值赋为新的map

        params = map;

        //根据新的param,paramsMappings,sql构建新的BoundSql

        BoundSql boundSql = new BoundSql(ms.getConfiguration(),pageSql,boundSqls.getParameterMappings(),params);

        //构建新的CacheKey

        CacheKey cacheKey = executor.createCacheKey(ms,params,RowBounds.DEFAULT,boundSql);

        //由于新加了两个参数 所以要执行两次参数构建方法

        cacheKey.update(map.get(START));

        cacheKey.update(map.get(END));

        //执行返回结果

        return executor.query(ms, params, RowBounds.DEFAULT, resultHandler, cacheKey, boundSql);

    }
上面即是根据我们的实现思路来的,我们看下其中的handlePram即生成新参数以及参数映射
    private Map handleParam(Object param, MappedStatement mappedStatement,BoundSql boundSql) throws NoSuchFieldException, IllegalAccessException {

        //构建一个新的参数map

        Map<String,Object> map = new HashMap<>();

        //拿到MyPageHelper我们存的分页信息

        Integer page = MyPageHelper.getLocal().getPage();

        Integer size = MyPageHelper.getLocal().getSize();

        //设置两个新参数

        map.put(START,page*size);

        map.put(END,(page+1)*size);

        //将原本的Map参数设置进去

        if (param instanceof Map){

            map.putAll((Map) param);

        }

        //设置新的ParameterMappings  由于其属性的值关联到configuration的引用,所以这儿不能直接添加 我们进行反射修改 在原本的基础上加入了我们的分页参数

        if (boundSql.getParameterMappings() != null) {

            List<ParameterMapping> newParameterMappings = new ArrayList<ParameterMapping>(boundSql.getParameterMappings());

            newParameterMappings.add(new ParameterMapping.Builder(mappedStatement.getConfiguration(), START, Integer.class).build());

            newParameterMappings.add(new ParameterMapping.Builder(mappedStatement.getConfiguration(), END, Integer.class).build());

            Class<? extends BoundSql> c = boundSql.getClass();

            Field filed = c.getDeclaredField("parameterMappings");

            filed.setAccessible(true);

            filed.set(boundSql,newParameterMappings);

        }

        return map;

    }
这儿注意我只考虑了原本mapper查询参数值为普通设置或者Map类型的值,如果参数为bean类型的话则需要另外特殊处理,这儿就不说明了。
到此拦截器已经设置成功,我们将其添加到mybatis的配置中
configuration.addInterceptor(new ExecutorInterceptor());
3.6 使用分页简易分页插件
我们使用springmvc的方式来调用
@RestController
@RequestMapping
public class UserController { @Autowired
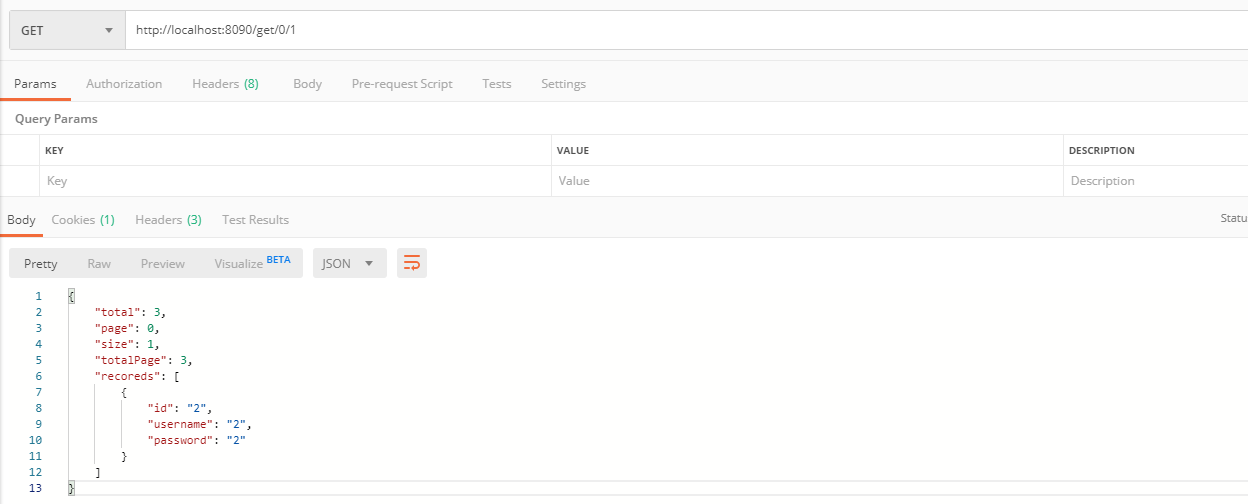
private SqlSessionFactory sqlSessionFactory; @GetMapping("/get/{page}/{size}")
public MyPage getUser(@PathVariable("page")Integer page,
@PathVariable("size")Integer size) {
SqlSession sqlSession = sqlSessionFactory.openSession();
UserInfoMapper mapper = sqlSession.getMapper(UserInfoMapper.class);
MyPageHelper.startPage(page,size);
System.out.println("第一次查询开始");
List<UserInfo> userInfo = mapper.selectInfo("1");
System.out.println("第一次查询结束");
MyPage local = MyPageHelper.getPageData(userInfo); MyPageHelper.startPage(page,size);
System.out.println("第二次查询开始");
List<UserInfo> userInfo1 = mapper.selectInfo("1");
System.out.println("第二次查询结束");
MyPage local1 = MyPageHelper.getPageData(userInfo); sqlSession.close();
return local;
}
}
可以看到控制台会打印
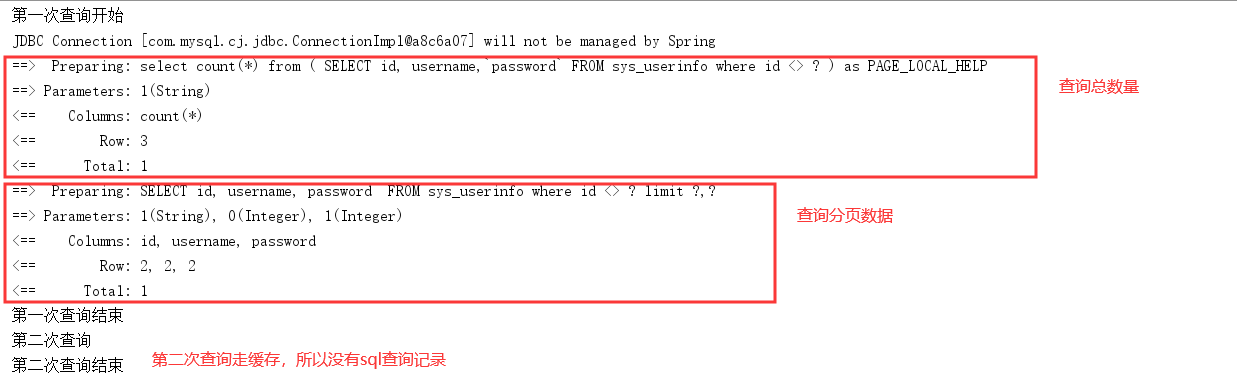
而我们获取到的结果也满足分页信息
完结
至此我们已经明白了拦截器的原理,还是较为简单,即使用层层嵌套的代理来实现拦截,并通过方法我们注解表明的方法签名来拦截指定的方法。拦截器的实用性较强,本文也构造了一个简易的分页插件来说明拦截器的使用方式。
mybatis源码探索笔记-5(拦截器)的更多相关文章
- mybatis源码探索笔记-1(构建SqlSessionFactory)
前言 mybatis是目前进行java开发 dao层较为流行的框架,其较为轻量级的特性,避免了类似hibernate的重量级封装.同时将sql的查询与与实现分离,实现了sql的解耦.学习成本较hibe ...
- mybatis源码探索笔记-2(构建SqlSession并获取代理mapper)
前言 上篇笔记我们成功的装载了Configuration,并写入了我们全部需要的信息.根据这个Configuration创建了DefaultSqlSessionFactory.本篇我们实现构建SqlS ...
- mybatis源码探索笔记-3(使用代理mapper执行方法)
前言 前面两章我们构建了SqlSessionFactory,并通过SqlSessionFactory创建了我们需要的SqlSession,并通过这个SqlSession获取了我们需要的代理mapper ...
- mybatis源码探索笔记-4(缓存原理)
前言 mybatis的缓存大家都知道分为一级和二级缓存,一级缓存系统默认使用,二级缓存默认开启,但具体用的时候需要我们自己手动配置.我们依旧还是先看一个demo.这儿只贴出关键代码 public in ...
- 33、[源码]-AOP原理-获取拦截器链-MethodInterceptor
33.[源码]-AOP原理-获取拦截器链-MethodInterceptor
- SpringMVC源码情操陶冶-InterceptorsBeanDefinitionParser拦截器解析器
解析mvc:interceptors节点 观察下InterceptorsBeanDefinitionParser的源码备注 /** * {@link org.springframework.beans ...
- 0002 - Spring MVC 拦截器源码简析:拦截器加载与执行
1.概述 Spring MVC中的拦截器(Interceptor)类似于Servlet中的过滤器(Filter),它主要用于拦截用户请求并作相应的处理.例如通过拦截器可以进行权限验证.记录请求信息的日 ...
- OkHttp3源码详解(三) 拦截器-RetryAndFollowUpInterceptor
最大恢复追逐次数: ; 处理的业务: 实例化StreamAllocation,初始化一个Socket连接对象,获取到输入/输出流()基于Okio 开启循环,执行下一个调用链(拦截器),等待返回结果(R ...
- OkHttp3源码详解(三) 拦截器
1.构造Demo 首先构造一个简单的异步网络访问Demo: OkHttpClient client = new OkHttpClient(); Request request = new Reques ...
随机推荐
- hdu 1532 Drainage Ditches(网络流)
题目链接:http://acm.hdu.edu.cn/showproblem.php?pid=1532 题目大意是:农夫约翰要把多个小池塘的水通过池塘间连接的水渠排出去,从池塘1到池塘M最多可以排多少 ...
- zlt项目实践
nacos gateWay fronted oath2 codeGenerate log-app monitor-app search-app
- Python小白的零碎记录
1 3.7往后iterable .iterator包都包含在collections.abc中了,记录一下 from collections.abc import Iterable,Iterator p ...
- 版本控制gitlab
目录 1. 版本控制介绍 2. gitlab部署 3. gitlab管理 1. 版本控制介绍 版本控制是指对软件开发过程中各种程序代码.配置文件及说明文档等文件变更的管理,是软件配置管理的核心思想之一 ...
- Java 动态代理实现
1.依赖 java.lang.reflect.Proxy - 提供了静态方法去创建动态代理类的实例: Interface InvocationHandler - 一个代理实例调用处理程序实现的接口 2 ...
- go key-value缓存go-cache实现
Cache类型 Cache封装了一个cache类型,cache类型的参数解析: 1.defaultExpiration time.Duration 每个键值的默认过期时间. 2.items map[s ...
- 数据库程序接口——JDBC——功能第一篇——第一个程序
流程图 综述 从零开始搭建JDBC环境.通过创建Java项目,在项目中,通过java程序执行SQL,并处理返回的结果.本文通过执行 select 1 from dual 语句来测试,并输出相结果集.首 ...
- IDE - IDEA - 快捷键整理 - 01. Navigation
1. 概述 工具的熟练程度, 会决定工作效率 总共也就 140 条左右吧 需要讲解吗? 2. ref 1. idea 自带的 ReferenceCard.pdf 3. keymap 1. 文件移动 C ...
- jmeter实现一次登录,多次业务请求(不同线程组间共享cookie和变量)
实现目的 很多时候,在进行性能测试时,需要先登录,然后再对需求的事务进行相关性能测试,此时的登录操作,并不在本次性能测试的范围内,所以我们只需要登录一次,然后获取登录成功后的cookie等,并将coo ...
- Vue-路由跳转的几种方式和路由重定向
一.标签路由 router-link 注意:router-link中链接如果是'/'开始就是从根路由开始,如果开始不带'/',则从当前路由开始. 1.不传参 <router-link :to=& ...