springboot核心技术(三)-----web开发
web开发
1、简介
使用SpringBoot;
1)、创建SpringBoot应用,选中我们需要的模块;
2)、SpringBoot已经默认将这些场景配置好了,只需要在配置文件中指定少量配置就可以运行起来
3)、自己编写业务代码;
自动配置原理?
这个场景SpringBoot帮我们配置了什么?能不能修改?能修改哪些配置?能不能扩展?xxx
xxxxAutoConfiguration:帮我们给容器中自动配置组件;

xxxxProperties:配置类来封装配置文件的内容;
2、SpringBoot对静态资源的映射规则;
@ConfigurationProperties(prefix = "spring.resources", ignoreUnknownFields = false)

public class ResourceProperties implements ResourceLoaderAware {

//可以设置和静态资源有关的参数,缓存时间等

WebMvcAuotConfiguration:

    @Override

    public void addResourceHandlers(ResourceHandlerRegistry registry) {

        if (!this.resourceProperties.isAddMappings()) {

            logger.debug("Default resource handling disabled");

            return;

        }

        Integer cachePeriod = this.resourceProperties.getCachePeriod();

        if (!registry.hasMappingForPattern("/webjars/**")) {

            customizeResourceHandlerRegistration(

            registry.addResourceHandler("/webjars/**").addResourceLocations("classpath:/META‐INF/resources/webjars/").setCachePeriod(cachePeriod));

        }

        String staticPathPattern = this.mvcProperties.getStaticPathPattern();

        //静态资源文件夹映射

        if (!registry.hasMappingForPattern(staticPathPattern)) {

            customizeResourceHandlerRegistration(

            registry.addResourceHandler(staticPathPattern).addResourceLocations(this.resourceProperties.getStaticLocations()).setCachePeriod(cachePeriod));

        }

    }

    //配置欢迎页映射

    @Bean

    public WelcomePageHandlerMapping welcomePageHandlerMapping(ResourceProperties resourceProperties) {

        return new WelcomePageHandlerMapping(resourceProperties.getWelcomePage(), this.mvcProperties.getStaticPathPattern());

    }

    //配置喜欢的图标

    @Configuration

    @ConditionalOnProperty(value = "spring.mvc.favicon.enabled", matchIfMissing = true)

    public static class FaviconConfiguration {

        private final ResourceProperties resourceProperties;

        public FaviconConfiguration(ResourceProperties resourceProperties) {

            this.resourceProperties = resourceProperties;

        }

        @Bean

        public SimpleUrlHandlerMapping faviconHandlerMapping() {

            SimpleUrlHandlerMapping mapping = new SimpleUrlHandlerMapping();

            mapping.setOrder(Ordered.HIGHEST_PRECEDENCE + 1);

            //所有 **/favicon.ico

            mapping.setUrlMap(Collections.singletonMap("**/favicon.ico", faviconRequestHandler()));

            return mapping;

        }

        @Bean

        public ResourceHttpRequestHandler faviconRequestHandler() {

            ResourceHttpRequestHandler requestHandler = new ResourceHttpRequestHandler();

            requestHandler.setLocations(this.resourceProperties.getFaviconLocations());

            return requestHandler;

        }

}
1)、所有 /webjars/** ,都去 classpath:/META-INF/resources/webjars/ 找资源;
webjars:以jar包的方式引入静态资源;-----http://www.webjars.org/
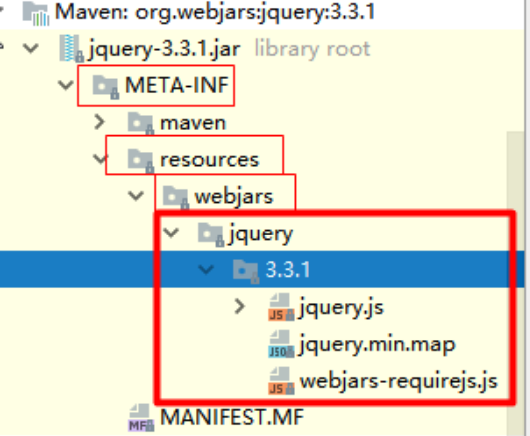
localhost:8080/webjars/jquery/3.3.1/jquery.js
<!‐‐引入jquery‐webjar‐‐>在访问的时候只需要写webjars下面资源的名称即可

<dependency>

    <groupId>org.webjars</groupId>

    <artifactId>jquery</artifactId>

    <version>3.3.1</version>

</dependency>
2)、"/**" 访问当前项目的任何资源,都去(静态资源的文件夹)找映射
"classpath:/META‐INF/resources/",

"classpath:/resources/",

"classpath:/static/",

"classpath:/public/"

"/":当前项目的根路径
localhost:8080/abc === 去静态资源文件夹里面找abc
3)、欢迎页; 静态资源文件夹下的所有index.html页面;被"/**"映射;
localhost:8080/ 找index页面
4)、所有的 **/favicon.ico 都是在静态资源文件下找;
3、模板引擎
JSP、Velocity、Freemarker、Thymeleaf
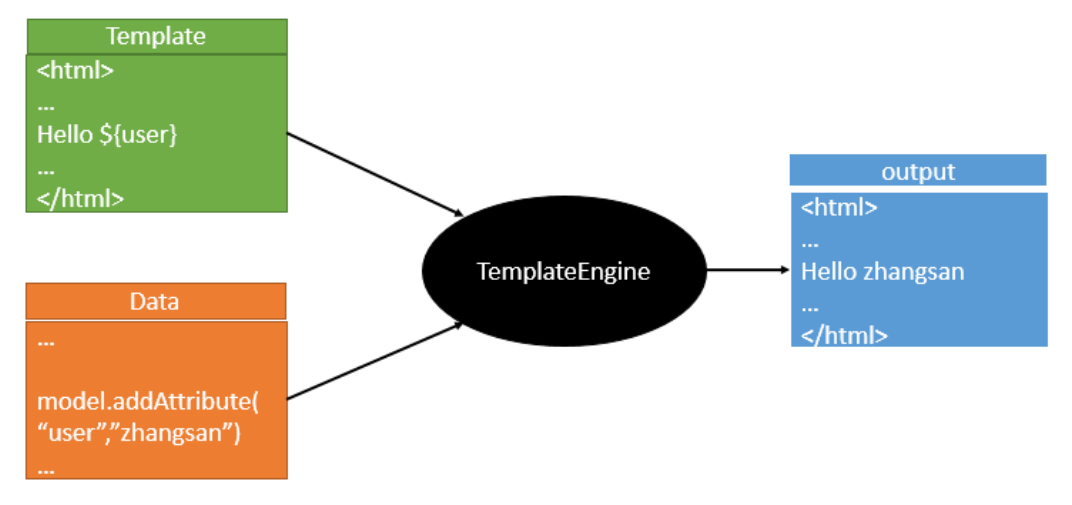
SpringBoot推荐的Thymeleaf; 语法更简单,功能更强大;
1、引入thymeleaf;
<dependency>

    <groupId>org.springframework.boot</groupId>

    <artifactId>spring‐boot‐starter‐thymeleaf</artifactId>

</dependency>

<properties>

    <thymeleaf.version>3.0.9.RELEASE</thymeleaf.version>

    <!‐‐ 布局功能的支持程序 thymeleaf3主程序 layout2以上版本 ‐‐>

    <!‐‐ thymeleaf2 layout1‐‐>

    <thymeleaf‐layout‐dialect.version>2.2.2</thymeleaf‐layout‐dialect.version>

</properties>
2、Thymeleaf使用
@ConfigurationProperties(prefix = "spring.thymeleaf")

public class ThymeleafProperties {

    private static final Charset DEFAULT_ENCODING = Charset.forName("UTF‐8");

    private static final MimeType DEFAULT_CONTENT_TYPE = MimeType.valueOf("text/html");

    public static final String DEFAULT_PREFIX = "classpath:/templates/";

    public static final String DEFAULT_SUFFIX = ".html";
只要我们把HTML页面放在classpath:/templates/,thymeleaf就能自动渲染;
使用:
1、导入thymeleaf的名称空间-----这样就会有语法提示了
<html lang="en" xmlns:th="http://www.thymeleaf.org">
2、使用thymeleaf语法;
<!DOCTYPE html>

<html lang="en" xmlns:th="http://www.thymeleaf.org">

    <head>

        <meta charset="UTF‐8">

        <title>Title</title>

    </head>

    <body>

        <h1>成功!</h1>

        <!‐‐th:text 将div里面的文本内容设置为 ‐‐>

        <div th:text="${hello}">这是显示欢迎信息</div>

    </body>

</html>
3、语法规则
1)、th:text;改变当前元素里面的文本内容;
th:任意html属性;来替换原生属性的值
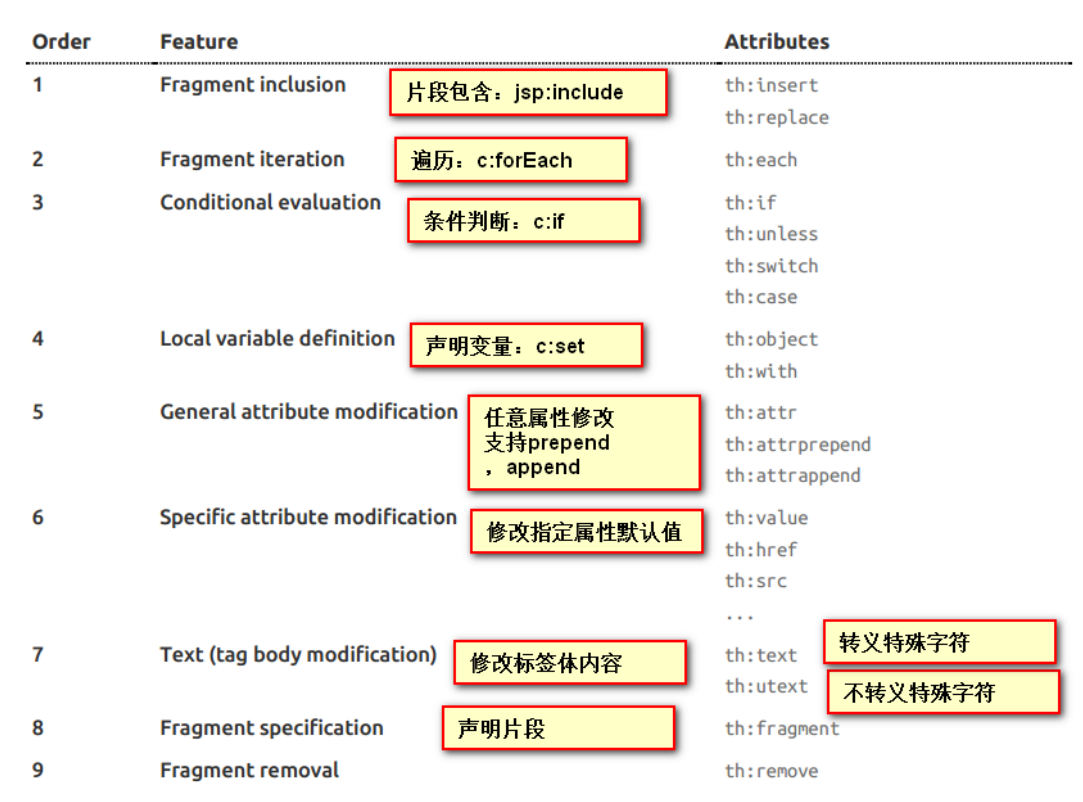
2)、表达式

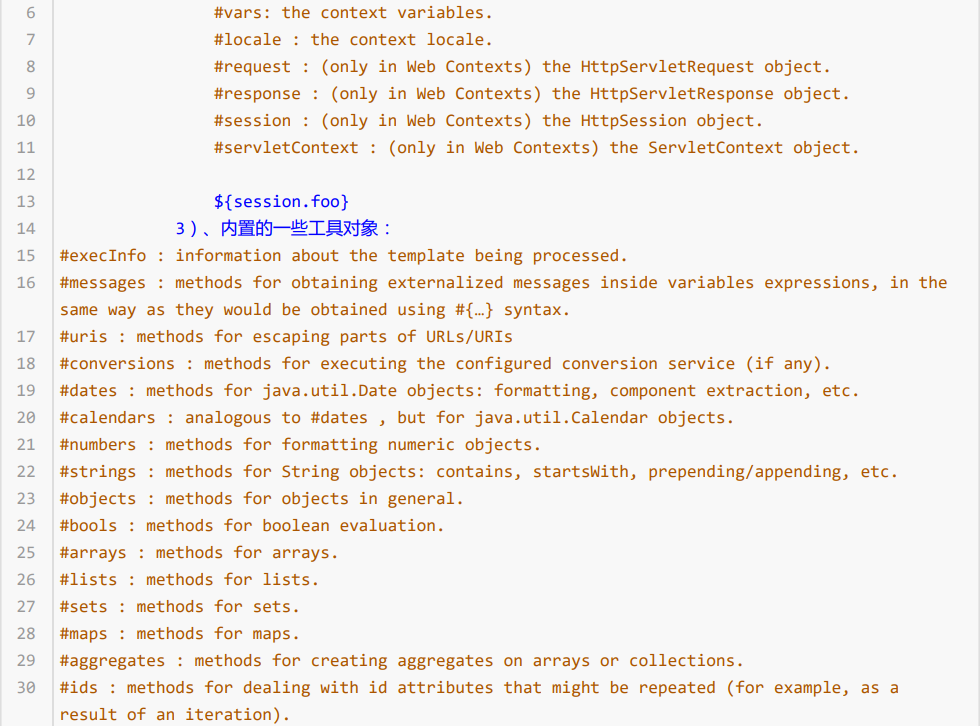
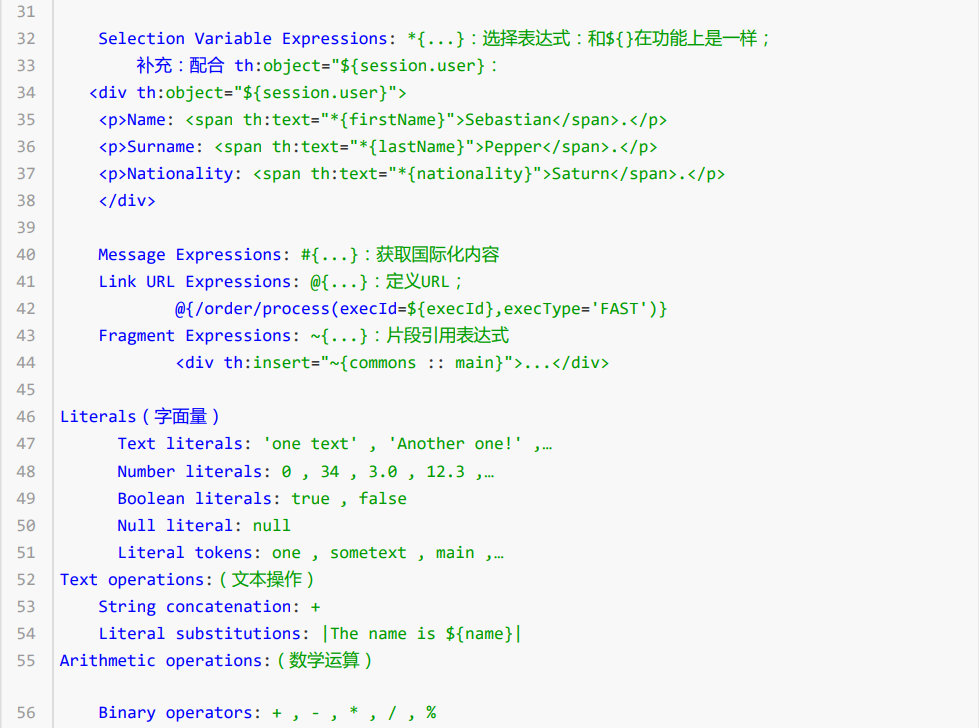
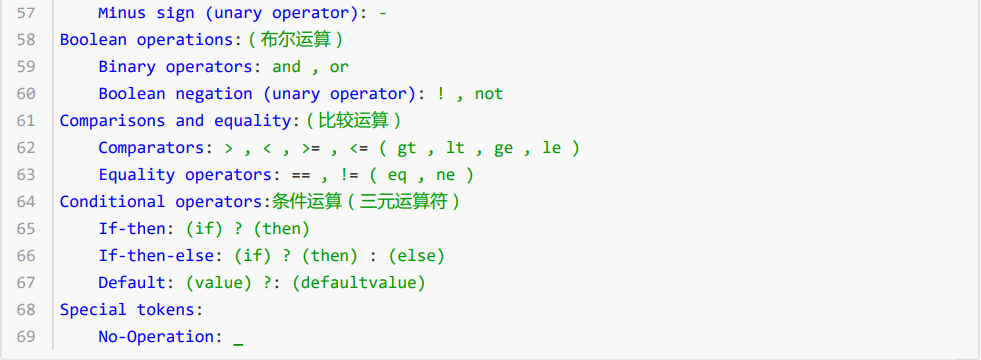
4、SpringMVC自动配置
1. Spring MVC auto-configuration
Spring Boot 自动配置好了SpringMVC
以下是SpringBoot对SpringMVC的默认配置:(WebMvcAutoConfiguration)

@Bean

@ConditionalOnProperty(prefix = "spring.mvc", name = "date‐format")//在文件中配置日期格式化的规则

public Formatter<Date> dateFormatter() {

    return new DateFormatter(this.mvcProperties.getDateFormat());//日期格式化组件

}
自己添加的格式化器转换器,我们只需要放在容器中即可


自己给容器中添加HttpMessageConverter,只需要将自己的组件注册容器中 (@Bean,@Component)

我们可以配置一个ConfigurableWebBindingInitializer来替换默认的;(添加到容器)
初始化WebDataBinder;

请求数据=====JavaBean;

2、扩展SpringMVC
<mvc:view‐controller path="/hello" view‐name="success"/>

<mvc:interceptors>

    <mvc:interceptor>

        <mvc:mapping path="/hello"/>

        <bean></bean>

    </mvc:interceptor>

</mvc:interceptors>
编写一个配置类(@Configuration),是WebMvcConfigurerAdapter类型;不能标注@EnableWebMvc;
既保留了所有的自动配置,也能用我们扩展的配置;
//使用WebMvcConfigurerAdapter可以来扩展SpringMVC的功能

@Configuration

public class MyMvcConfig extends WebMvcConfigurerAdapter {

    @Override

    public void addViewControllers(ViewControllerRegistry registry) {

    // super.addViewControllers(registry);

    //浏览器发送 /atguigu 请求来到 success

    registry.addViewController("/atguigu").setViewName("success");

    }

}
原理:
1)、WebMvcAutoConfiguration是SpringMVC的自动配置类
2)、在做其他自动配置时会导入;@Import(EnableWebMvcConfiguration.class)
@Configuration

public static class EnableWebMvcConfiguration extends DelegatingWebMvcConfiguration {

    private final WebMvcConfigurerComposite configurers = new WebMvcConfigurerComposite();

    //从容器中获取所有的WebMvcConfigurer

    @Autowired(required = false)

    public void setConfigurers(List<WebMvcConfigurer> configurers) {

    if (!CollectionUtils.isEmpty(configurers)) {

    this.configurers.addWebMvcConfigurers(configurers);

    //一个参考实现;将所有的WebMvcConfigurer相关配置都来一起调用;

    @Override

    // public void addViewControllers(ViewControllerRegistry registry) {

    // for (WebMvcConfigurer delegate : this.delegates) {

    // delegate.addViewControllers(registry);

  // }

  }

}

}
3)、容器中所有的WebMvcConfigurer都会一起起作用;
4)、我们的配置类也会被调用;
效果:SpringMVC的自动配置和我们的扩展配置都会起作用;
3、全面接管SpringMVC;
SpringBoot对SpringMVC的自动配置不需要了,所有都是我们自己配置;所有的SpringMVC的自动配置都失效了
我们需要在配置类中添加@EnableWebMvc即可;
//使用WebMvcConfigurerAdapter可以来扩展SpringMVC的功能

@EnableWebMvc

@Configuration

public class MyMvcConfig extends WebMvcConfigurerAdapter {

    @Override

    public void addViewControllers(ViewControllerRegistry registry) {

    // super.addViewControllers(registry);

    //浏览器发送 /atguigu 请求来到 success

    registry.addViewController("/atguigu").setViewName("success");

    }

}
原理:
为什么@EnableWebMvc自动配置就失效了;
1)@EnableWebMvc的核心
@Import(DelegatingWebMvcConfiguration.class)

public @interface EnableWebMvc {
2)、
@Configuration

public class DelegatingWebMvcConfiguration extends WebMvcConfigurationSupport {
3)、
@Configuration

@ConditionalOnWebApplication

@ConditionalOnClass({ Servlet.class, DispatcherServlet.class,

WebMvcConfigurerAdapter.class })

//容器中没有这个组件的时候,这个自动配置类才生效

@ConditionalOnMissingBean(WebMvcConfigurationSupport.class)

@AutoConfigureOrder(Ordered.HIGHEST_PRECEDENCE + 10)

@AutoConfigureAfter({ DispatcherServletAutoConfiguration.class,

ValidationAutoConfiguration.class })

public class WebMvcAutoConfiguration {
4)、@EnableWebMvc将WebMvcConfigurationSupport组件导入进来;
5)、导入的WebMvcConfigurationSupport只是SpringMVC最基本的功能;
5、如何修改SpringBoot的默认配置
模式:
1)、SpringBoot在自动配置很多组件的时候,先看容器中有没有用户自己配置的(@Bean、@Component)如 果有就用用户配置的,如果没有,才自动配置;如果有些组件可以有多个(ViewResolver)将用户配置的和自己默 认的组合起来;
2)、在SpringBoot中会有非常多的xxxConfigurer帮助我们进行扩展配置
3)、在SpringBoot中会有很多的xxxCustomizer帮助我们进行定制配置
6、RestfulCRUD
1)、默认访问首页
//使用WebMvcConfigurerAdapter可以来扩展SpringMVC的功能

//@EnableWebMvc 不要接管SpringMVC

@Configuration

public class MyMvcConfig extends WebMvcConfigurerAdapter {

    @Override

    public void addViewControllers(ViewControllerRegistry registry) {

    // super.addViewControllers(registry);

    //浏览器发送 /atguigu 请求来到 success

    registry.addViewController("/atguigu").setViewName("success");

    }

    //所有的WebMvcConfigurerAdapter组件都会一起起作用

    @Bean //将组件注册在容器

    public WebMvcConfigurerAdapter webMvcConfigurerAdapter(){

        WebMvcConfigurerAdapter adapter = new WebMvcConfigurerAdapter() {

            @Override

            public void addViewControllers(ViewControllerRegistry registry) {

                registry.addViewController("/").setViewName("login");

                registry.addViewController("/index.html").setViewName("login");

            }

        };

    return adapter;

    }

}
2)、国际化
1)、编写国际化配置文件;
2)、使用ResourceBundleMessageSource管理国际化资源文件
3)、在页面使用fmt:message取出国际化内容
步骤:
1)、编写国际化配置文件,抽取页面需要显示的国际化消息
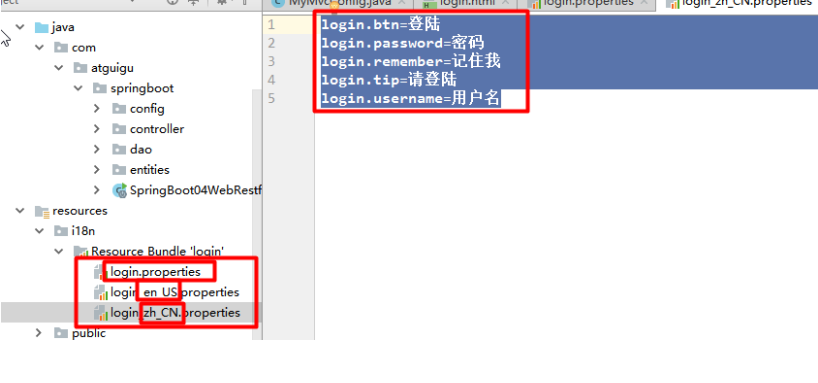
2)、SpringBoot自动配置好了管理国际化资源文件的组件;
@ConfigurationProperties(prefix = "spring.messages")

public class MessageSourceAutoConfiguration {

    /**

    * Comma‐separated list of basenames (essentially a fully‐qualified classpath

    * location), each following the ResourceBundle convention with relaxed support for

    * slash based locations. If it doesn't contain a package qualifier (such as

    * "org.mypackage"), it will be resolved from the classpath root.

    */

    private String basename = "messages";

    //我们的配置文件可以直接放在类路径下叫messages.properties;

    @Bean

    public MessageSource messageSource() {

        ResourceBundleMessageSource messageSource = new ResourceBundleMessageSource();

        if (StringUtils.hasText(this.basename)) {

        //设置国际化资源文件的基础名(去掉语言国家代码的)

            messageSource.setBasenames(StringUtils.commaDelimitedListToStringArray(

            StringUtils.trimAllWhitespace(this.basename)));

        }

        if (this.encoding != null) {

            messageSource.setDefaultEncoding(this.encoding.name());

        }

        messageSource.setFallbackToSystemLocale(this.fallbackToSystemLocale);

        messageSource.setCacheSeconds(this.cacheSeconds);

        messageSource.setAlwaysUseMessageFormat(this.alwaysUseMessageFormat);

        return messageSource;

    }

}
3)、去页面获取国际化的值;
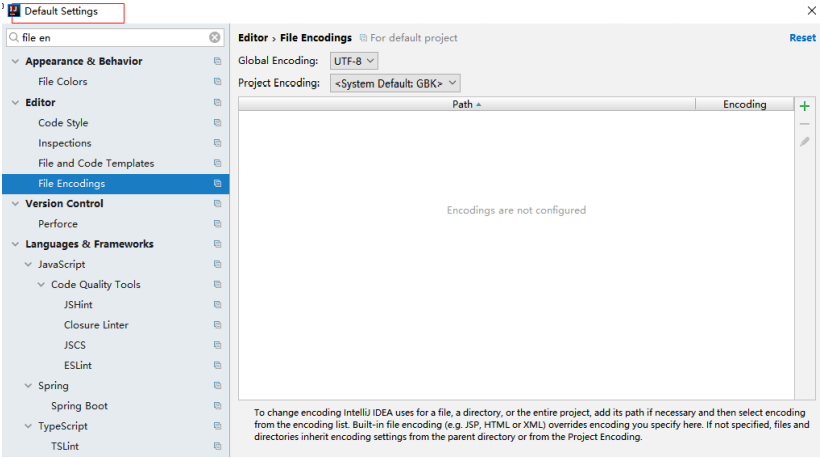
<!DOCTYPE html>

<html lang="en" xmlns:th="http://www.thymeleaf.org">

    <head>

        <meta http‐equiv="Content‐Type" content="text/html; charset=UTF‐8">

        <meta name="viewport" content="width=device‐width, initial‐scale=1, shrink‐to‐

fit=no">

        <meta name="description" content="">

        <meta name="author" content="">

        <title>Signin Template for Bootstrap</title>

        <!‐‐ Bootstrap core CSS ‐‐>

        <link href="asserts/css/bootstrap.min.css"

th:href="@{/webjars/bootstrap/4.0.0/css/bootstrap.css}" rel="stylesheet">

        <!‐‐ Custom styles for this template ‐‐>

        <link href="asserts/css/signin.css" th:href="@{/asserts/css/signin.css}"

        rel="stylesheet">

    </head>

    <body class="text‐center">

        <form class="form‐signin" action="dashboard.html">

            <img class="mb‐4" th:src="@{/asserts/img/bootstrap‐solid.svg}"

src="asserts/img/bootstrap‐solid.svg" alt="" width="72" height="72">

            <h1 class="h3 mb‐3 font‐weight‐normal" th:text="#{login.tip}">Please sign

in</h1>

            <label class="sr‐only" th:text="#{login.username}">Username</label>

            <input type="text" class="form‐control" placeholder="Username" th:placeholder="#

{login.username}" required="" autofocus="">

            <label class="sr‐only" th:text="#{login.password}">Password</label>

            <input type="password" class="form‐control" placeholder="Password"

th:placeholder="#{login.password}" required="">

            <div class="checkbox mb‐3">

                <label>

                    <input type="checkbox" value="remember‐me"/> [[#{login.remember}]]

                </label>

            </div>

            <button class="btn btn‐lg btn‐primary btn‐block" type="submit" th:text="#

{login.btn}">Sign in</button>

            <p class="mt‐5 mb‐3 text‐muted">© 2017‐2018</p>

            <a class="btn btn‐sm">中文</a>

            <a class="btn btn‐sm">English</a>

        </form>

    </body>

</html>
效果:根据浏览器语言设置的信息切换了国际化;
原理:
国际化Locale(区域信息对象);LocaleResolver(获取区域信息对象);
@Bean

@ConditionalOnMissingBean

@ConditionalOnProperty(prefix = "spring.mvc", name = "locale")

public LocaleResolver localeResolver() {

    if(this.mvcProperties.getLocaleResolver() == WebMvcProperties.LocaleResolver.FIXED) {

        return new FixedLocaleResolver(this.mvcProperties.getLocale());

    }

    AcceptHeaderLocaleResolver localeResolver = new AcceptHeaderLocaleResolver();

    localeResolver.setDefaultLocale(this.mvcProperties.getLocale());

    return localeResolver;

}

默认的就是根据请求头带来的区域信息获取Locale进行国际化
4)、点击链接切换国际化
/**

* 可以在连接上携带区域信息

*/

public class MyLocaleResolver implements LocaleResolver {

    @Override

    public Locale resolveLocale(HttpServletRequest request) {

        String l = request.getParameter("l");

        Locale locale = Locale.getDefault();

        if(!StringUtils.isEmpty(l)){

            String[] split = l.split("_");

            locale = new Locale(split[0],split[1]);

        }

        return locale;

    }

    @Override

    public void setLocale(HttpServletRequest request, HttpServletResponse response, Locale

locale) {

    }

}

    @Bean

    public LocaleResolver localeResolver(){

        return new MyLocaleResolver();

    }

}
3)、登陆
开发期间模板引擎页面修改以后,要实时生效
1)、禁用模板引擎的缓存
# 禁用缓存

spring.thymeleaf.cache=false
2)、页面修改完成以后ctrl+f9:重新编译;
登陆错误消息的显示
<p style="color: red" th:text="${msg}" th:if="${not #strings.isEmpty(msg)}"></p>
4)、拦截器进行登陆检查
拦截器
/**

* 登陆检查,

*/

public class LoginHandlerInterceptor implements HandlerInterceptor {

    //目标方法执行之前

    @Override

    public boolean preHandle(HttpServletRequest request, HttpServletResponse response,

Object handler) throws Exception {

        Object user = request.getSession().getAttribute("loginUser");

        if(user == null){

            //未登陆,返回登陆页面

            request.setAttribute("msg","没有权限请先登陆");

            request.getRequestDispatcher("/index.html").forward(request,response);

            return false;

        }else{

            //已登陆,放行请求

            return true;

        }

    }

    @Override

    public void postHandle(HttpServletRequest request, HttpServletResponse response, Object

handler, ModelAndView modelAndView) throws Exception {

    }

    @Override

    public void afterCompletion(HttpServletRequest request, HttpServletResponse response,

Object handler, Exception ex) throws Exception {

    }

}
注册拦截器
//所有的WebMvcConfigurerAdapter组件都会一起起作用

@Bean //将组件注册在容器

public WebMvcConfigurerAdapter webMvcConfigurerAdapter(){

    WebMvcConfigurerAdapter adapter = new WebMvcConfigurerAdapter() {

        @Override

        public void addViewControllers(ViewControllerRegistry registry) {

            registry.addViewController("/").setViewName("login");

            registry.addViewController("/index.html").setViewName("login");

            registry.addViewController("/main.html").setViewName("dashboard");

        }

    //注册拦截器

    @Override

    public void addInterceptors(InterceptorRegistry registry) {

        //super.addInterceptors(registry);

        //静态资源; *.css , *.js

        //SpringBoot已经做好了静态资源映射

        registry.addInterceptor(new LoginHandlerInterceptor()).addPathPatterns("/**").excludePathPatterns("/index.html","/","/user/login");

    }

    };

    return adapter;

}
7、错误处理机制
1)、SpringBoot默认的错误处理机制
默认效果:
1)、浏览器,返回一个默认的错误页面

浏览器发送请求的请求头:

2)、如果是其他客户端,默认响应一个json数据


原理:
可以参照ErrorMvcAutoConfiguration;错误处理的自动配置;
给容器中添加了以下组件
1、DefaultErrorAttributes:

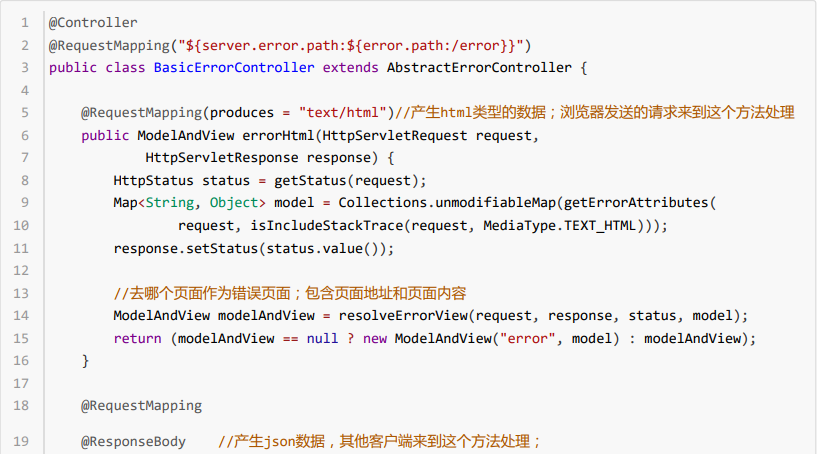
2、BasicErrorController:处理默认/error请求

3、ErrorPageCustomizer:

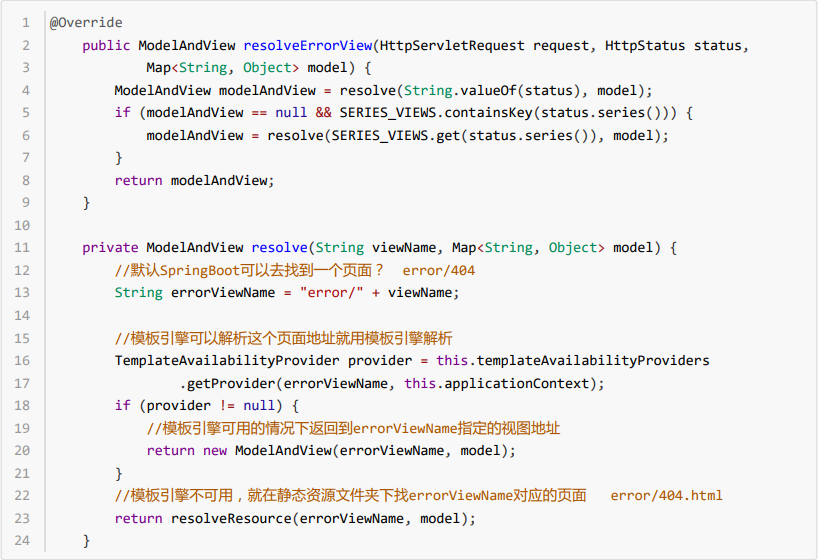
4、DefaultErrorViewResolver:
步骤:
一但系统出现4xx或者5xx之类的错误;ErrorPageCustomizer就会生效(定制错误的响应规则);就会来到/error 请求;就会被BasicErrorController处理;
1)响应页面;去哪个页面是由DefaultErrorViewResolver解析得到的;

2)、如果定制错误响应:
1)、如何定制错误的页面;
1)、有模板引擎的情况下;error/状态码; 【将错误页面命名为 错误状态码.html 放在模板引擎文件夹里面的 error文件夹下】,发生此状态码的错误就会来到 对应的页面;
我们可以使用4xx和5xx作为错误页面的文件名来匹配这种类型的所有错误,精确优先(优先寻找精确的状态 码.html);
页面能获取的信息;
timestamp:时间戳
status:状态码
error:错误提示
exception:异常对象
message:异常消息
errors:JSR303数据校验的错误都在这里
2)、没有模板引擎(模板引擎找不到这个错误页面),静态资源文件夹下找;
3)、以上都没有错误页面,就是默认来到SpringBoot默认的错误提示页面;
2)、如何定制错误的json数据;
1)、自定义异常处理&返回定制json数据;

2)、转发到/error进行自适应响应效果处理

3)、将我们的定制数据携带出去;
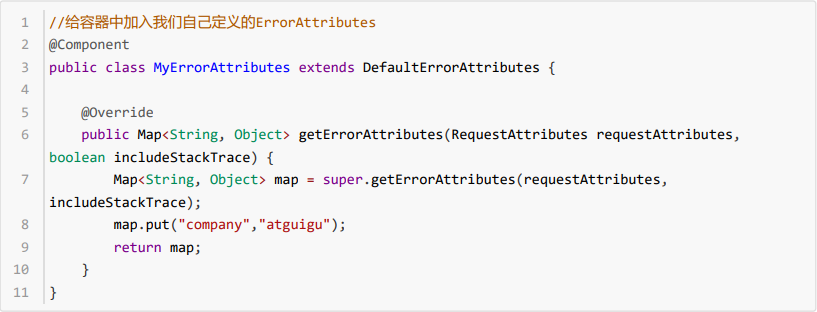
出现错误以后,会来到/error请求,会被BasicErrorController处理,响应出去可以获取的数据是由 getErrorAttributes得到的(是AbstractErrorController(ErrorController)规定的方法);
1、完全来编写一个ErrorController的实现类【或者是编写AbstractErrorController的子类】,放在容器中;
2、页面上能用的数据,或者是json返回能用的数据都是通过errorAttributes.getErrorAttributes得到;
容器中DefaultErrorAttributes.getErrorAttributes();默认进行数据处理的;
自定义ErrorAttributes
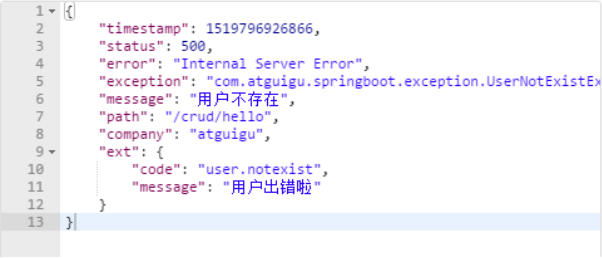
最终的效果:响应是自适应的,可以通过定制ErrorAttributes改变需要返回的内容,
8、配置嵌入式Servlet容器
SpringBoot默认使用Tomcat作为嵌入式的Servlet容器;

1)、如何定制和修改Servlet容器的相关配置;
1、修改和server有关的配置(ServerProperties【也是EmbeddedServletContainerCustomizer】);
server.port=8081

server.context‐path=/crud

server.tomcat.uri‐encoding=UTF‐8

//通用的Servlet容器设置

server.xxx

//Tomcat的设置

server.tomcat.xxx
2、编写一个EmbeddedServletContainerCustomizer:嵌入式的Servlet容器的定制器;来修改Servlet容器的 配置
@Bean //一定要将这个定制器加入到容器中

public EmbeddedServletContainerCustomizer embeddedServletContainerCustomizer(){

    return new EmbeddedServletContainerCustomizer() {

        //定制嵌入式的Servlet容器相关的规则

        @Override

        public void customize(ConfigurableEmbeddedServletContainer container) {

            container.setPort(8083);

        }

    };

}
2)、注册Servlet三大组件【Servlet、Filter、Listener】
由于SpringBoot默认是以jar包的方式启动嵌入式的Servlet容器来启动SpringBoot的web应用,没有web.xml文 件。
注册三大组件用以下方式
ServletRegistrationBean
//注册三大组件

@Bean

public ServletRegistrationBean myServlet(){

    ServletRegistrationBean registrationBean = new ServletRegistrationBean(new MyServlet(),"/myServlet");

    return registrationBean;

}
FilterRegistrationBean
@Bean

public FilterRegistrationBean myFilter(){

    FilterRegistrationBean registrationBean = new FilterRegistrationBean();

    registrationBean.setFilter(new MyFilter());

   registrationBean.setUrlPatterns(Arrays.asList("/hello","/myServlet"));

    return registrationBean;

}
ServletListenerRegistrationBean
@Bean

public ServletListenerRegistrationBean myListener(){

    ServletListenerRegistrationBean<MyListener> registrationBean = new ServletListenerRegistrationBean<>(new MyListener());

    return registrationBean;

}
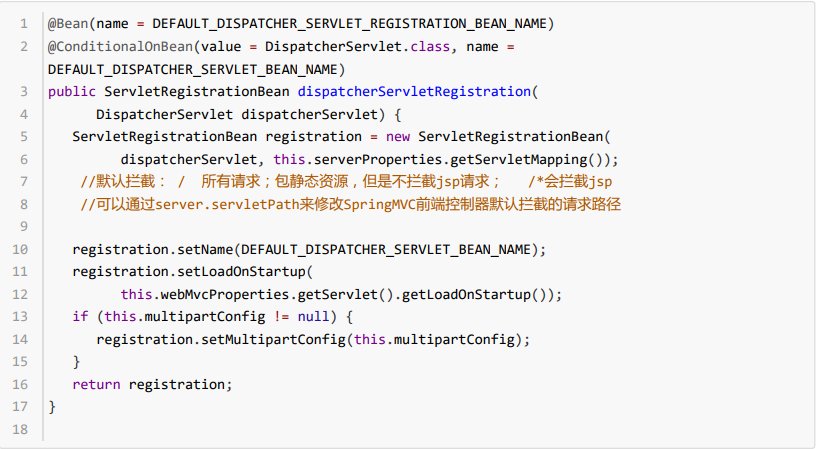
SpringBoot帮我们自动SpringMVC的时候,自动的注册SpringMVC的前端控制器;DIspatcherServlet;
DispatcherServletAutoConfiguration中:
2)、SpringBoot能不能支持其他的Servlet容器;
3)、替换为其他嵌入式Servlet容器

默认支持:
Tomcat(默认使用)
<dependency>

    <groupId>org.springframework.boot</groupId>

    <artifactId>spring‐boot‐starter‐web</artifactId>

    引入web模块默认就是使用嵌入式的Tomcat作为Servlet容器;

</dependency>
Jetty
<!‐‐ 引入web模块 ‐‐>

<dependency>

    <groupId>org.springframework.boot</groupId>

    <artifactId>spring‐boot‐starter‐web</artifactId>

    <exclusions>

        <exclusion>

            <artifactId>spring‐boot‐starter‐tomcat</artifactId>

            <groupId>org.springframework.boot</groupId>

        </exclusion>

    </exclusions>

</dependency>

<!‐‐引入其他的Servlet容器‐‐>

<dependency>

    <artifactId>spring‐boot‐starter‐jetty</artifactId>

    <groupId>org.springframework.boot</groupId>

</dependency>
Undertow
<!‐‐ 引入web模块 ‐‐>

<dependency>

    <groupId>org.springframework.boot</groupId>

    <artifactId>spring‐boot‐starter‐web</artifactId>

    <exclusions>

        <exclusion>

            <artifactId>spring‐boot‐starter‐tomcat</artifactId>

            <groupId>org.springframework.boot</groupId>

        </exclusion>

    </exclusions>

</dependency>

<!‐‐引入其他的Servlet容器‐‐>

<dependency>

    <artifactId>spring‐boot‐starter‐undertow</artifactId>

    <groupId>org.springframework.boot</groupId>

</dependency>
4)、嵌入式Servlet容器自动配置原理
EmbeddedServletContainerAutoConfiguration:嵌入式的Servlet容器自动配置?

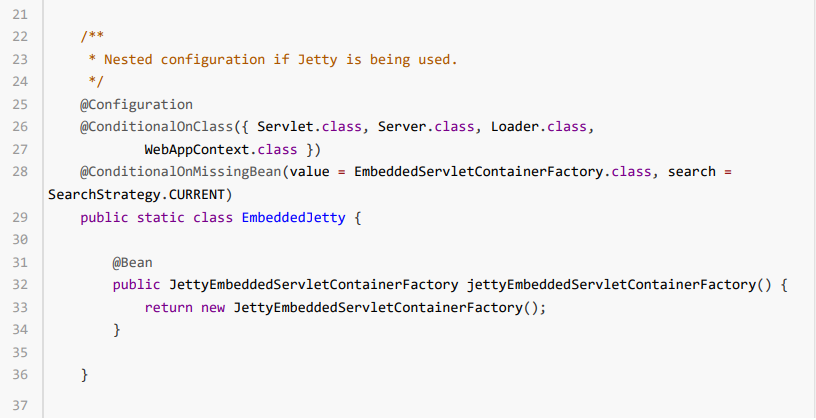

1)、EmbeddedServletContainerFactory(嵌入式Servlet容器工厂)


2)、EmbeddedServletContainer:(嵌入式的Servlet容器)

3)、以TomcatEmbeddedServletContainerFactory为例


4)、我们对嵌入式容器的配置修改是怎么生效?
ServerProperties、EmbeddedServletContainerCustomizer
EmbeddedServletContainerCustomizer:定制器帮我们修改了Servlet容器的配置?
怎么修改的原理?
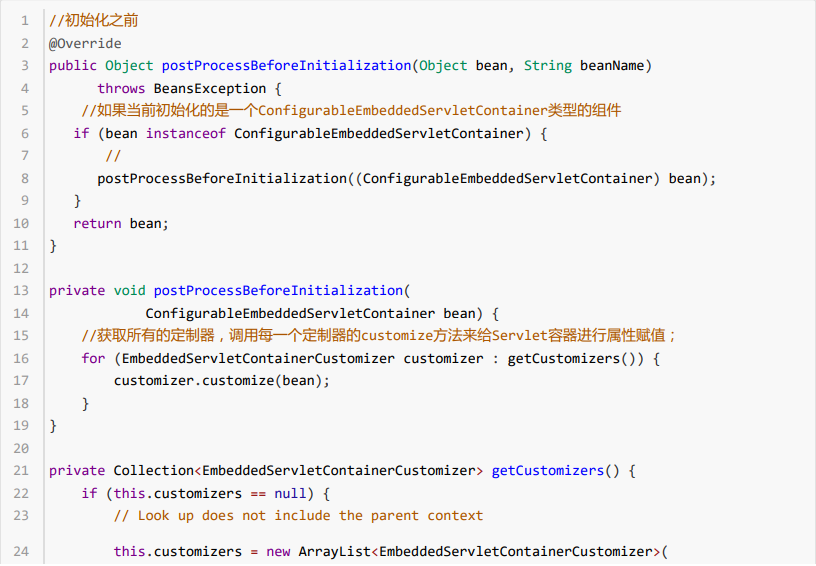
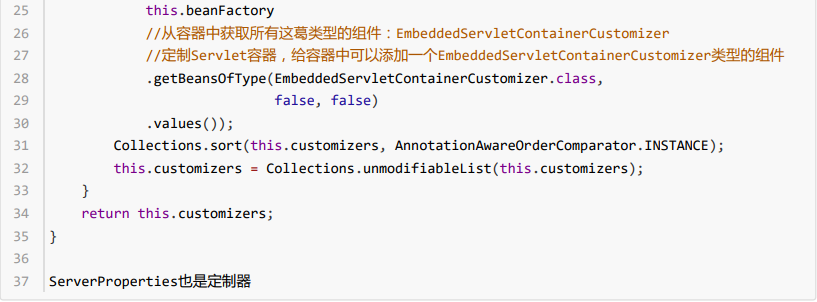
5)、容器中导入了EmbeddedServletContainerCustomizerBeanPostProcessor
步骤:
1)、SpringBoot根据导入的依赖情况,给容器中添加相应的EmbeddedServletContainerFactory【TomcatEmbeddedServletContainerFactory】
2)、容器中某个组件要创建对象就会惊动后置处理器;
EmbeddedServletContainerCustomizerBeanPostProcessor;
只要是嵌入式的Servlet容器工厂,后置处理器就工作;
3)、后置处理器,从容器中获取所有的EmbeddedServletContainerCustomizer,调用定制器的定制方法
5)、嵌入式Servlet容器启动原理;
什么时候创建嵌入式的Servlet容器工厂?什么时候获取嵌入式的Servlet容器并启动Tomcat;
获取嵌入式的Servlet容器工厂:
1)、SpringBoot应用启动运行run方法
2)、refreshContext(context);SpringBoot刷新IOC容器【创建IOC容器对象,并初始化容器,创建容器中的每一个组件】;如果是web应用创建AnnotationConfigEmbeddedWebApplicationContext,否则:AnnotationConfigApplicationContext
3)、refresh(context);刷新刚才创建好的ioc容器;
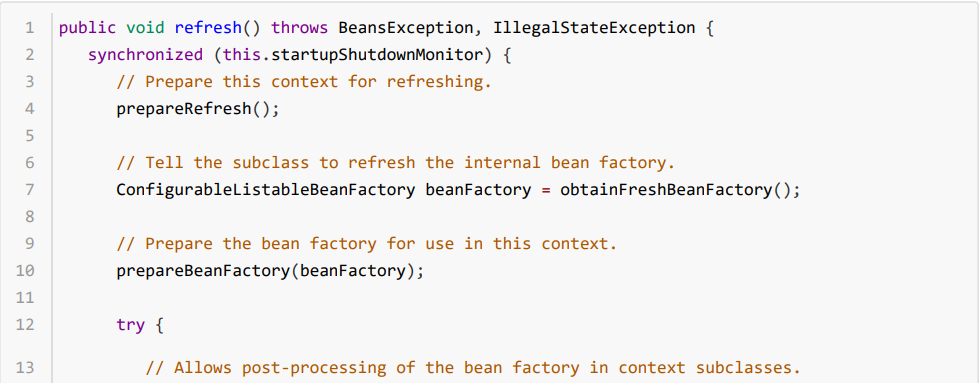

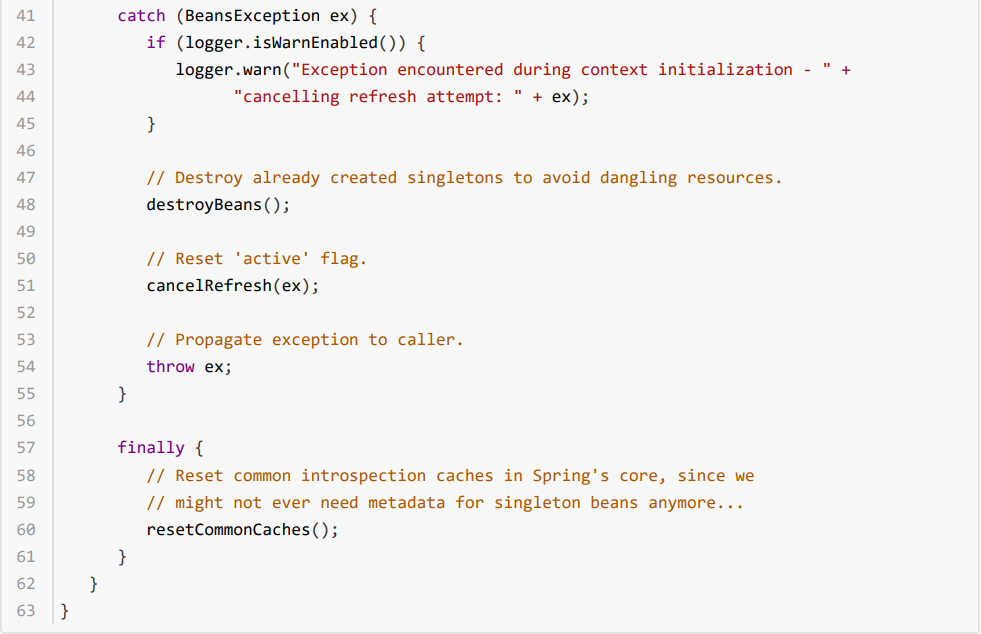
4)、 onRefresh(); web的ioc容器重写了onRefresh方法
5)、webioc容器会创建嵌入式的Servlet容器;createEmbeddedServletContainer();
6)、获取嵌入式的Servlet容器工厂:
EmbeddedServletContainerFactory containerFactory = getEmbeddedServletContainerFactory();
从ioc容器中获取EmbeddedServletContainerFactory 组件;TomcatEmbeddedServletContainerFactory创建对象,后置处理器一看是这个对象,就获取所有的定制器来先定制Servlet容器的相关配置;
7)、使用容器工厂获取嵌入式的Servlet容器:this.embeddedServletContainer = containerFactory.getEmbeddedServletContainer(getSelfInitializer());
8)、嵌入式的Servlet容器创建对象并启动Servlet容器;
先启动嵌入式的Servlet容器,再将ioc容器中剩下没有创建出的对象获取出来;
IOC容器启动创建嵌入式的Servlet容器
9、使用外置的Servlet容器
嵌入式Servlet容器:应用打成可执行的jar
优点:简单、便携;
缺点:默认不支持JSP、优化定制比较复杂(使用定制器【ServerProperties、自定义EmbeddedServletContainerCustomizer】,自己编写嵌入式Servlet容器的创建工厂【EmbeddedServletContainerFactory】);
外置的Servlet容器:外面安装Tomcat- 应用war包的方式打包;
步骤
1)、必须创建一个war项目;(利用idea创建好目录结构)
2)、将嵌入式的Tomcat指定为provided;

3)、必须编写一个SpringBootServletInitializer的子类,并调用configure方法

4)、启动服务器就可以使用;
原理
jar包:执行SpringBoot主类的main方法,启动ioc容器,创建嵌入式的Servlet容器;
war包:启动服务器,服务器启动SpringBoot应用【SpringBootServletInitializer】,启动ioc容器;
servlet3.0(Spring注解版):
8.2.4 Shared libraries / runtimes pluggability:
规则:
1)、服务器启动(web应用启动)会创建当前web应用里面每一个jar包里面ServletContainerInitializer实例:
2)、ServletContainerInitializer的实现放在jar包的META-INF/services文件夹下,有一个名为javax.servlet.ServletContainerInitializer的文件,内容就是ServletContainerInitializer的实现类的全类名
3)、还可以使用@HandlesTypes,在应用启动的时候加载我们感兴趣的类;
流程:
1)、启动Tomcat
2)、org\springframework\spring-web\4.3.14.RELEASE\spring-web-4.3.14.RELEASE.jar!\METAINF\services\javax.servlet.ServletContainerInitializer:
Spring的web模块里面有这个文件:org.springframework.web.SpringServletContainerInitializer
3)、SpringServletContainerInitializer将@HandlesTypes(WebApplicationInitializer.class)标注的所有这个类型的类都传入到onStartup方法的Set>;为这些WebApplicationInitializer类型的类创建实例;
4)、每一个WebApplicationInitializer都调用自己的onStartup;

5)、相当于我们的SpringBootServletInitializer的类会被创建对象,并执行onStartup方法
6)、SpringBootServletInitializer实例执行onStartup的时候会createRootApplicationContext;创建容器
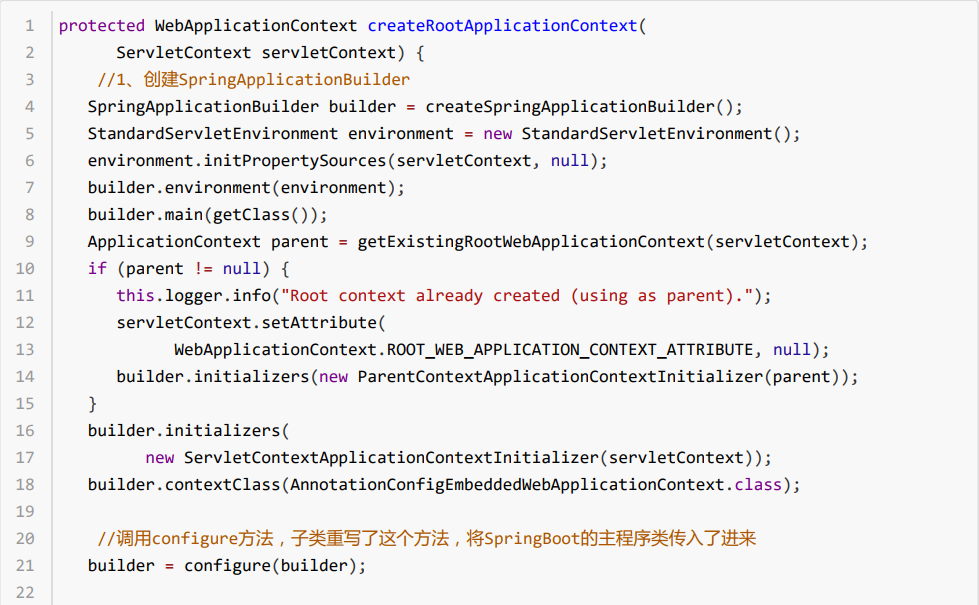
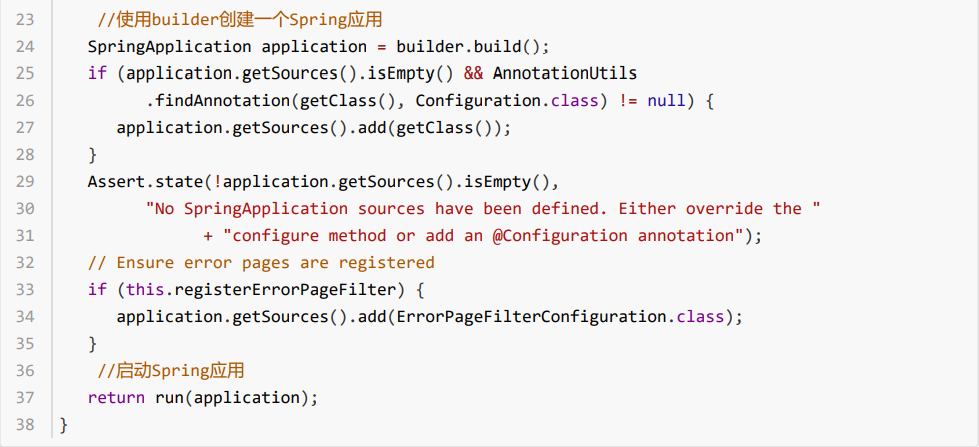
7)、Spring的应用就启动并且创建IOC容器


启动Servlet容器,再启动SpringBoot应用
springboot核心技术(三)-----web开发的更多相关文章
- Spring入门(二):SpringBoot之基础Web开发
接上回 现在,我们已经能自行完成SpringBoot的初级项目搭建了,接下来看如何实现一些Web开发中的基础功能. 先看项目完整的目录结构: 1. 返回Json数据 创建model文件夹,并新建Per ...
- SpringBoot起飞系列-Web开发(四)
一.前言 从今天你开始我们就开始进行我们的web开发,之前的一篇用SpringBoot起飞系列-使用idea搭建环境(二)已经说明了我们如何进行开发,当然这是搭建起步,接下来我们就开始进行详细的开发, ...
- Springboot学习:Web开发介绍
简介 使用SpringBoot: 1).创建SpringBoot应用,选中我们需要的模块: 2).SpringBoot已经默认将这些场景配置好了,只需要在配置文件中指定少量配置就可以运行起来 3).自 ...
- Spring基础系列-Web开发
原创作品,可以转载,但是请标注出处地址:https://www.cnblogs.com/V1haoge/p/9996902.html SpringBoot基础系列-web开发 概述 web开发就是集成 ...
- Springboot mini - Solon详解(三)- Solon的web开发
Springboot min -Solon 详解系列文章: Springboot mini - Solon详解(一)- 快速入门 Springboot mini - Solon详解(二)- Solon ...
- SpringBoot之旅第四篇-web开发
一.引言 有了自动配置,springboot使web开发变得简单,这个在springboot之旅中的第一篇中就有体现,实际的开发中当然不会这么简单,很多时候我们都需要自己去定制一些东西.web开发的东 ...
- Springboot 系列(六)Spring Boot web 开发之拦截器和三大组件
1. 拦截器 Springboot 中的 Interceptor 拦截器也就是 mvc 中的拦截器,只是省去了 xml 配置部分.并没有本质的不同,都是通过实现 HandlerInterceptor ...
- Springboot 系列(五)Spring Boot web 开发之静态资源和模版引擎
前言 Spring Boot 天生的适合 web 应用开发,它可以快速的嵌入 Tomcat, Jetty 或 Netty 用于包含一个 HTTP 服务器.且开发十分简单,只需要引入 web 开发所需的 ...
- SpringBoot Web开发(5) 开发页面国际化+登录拦截
SpringBoot Web开发(5) 开发页面国际化+登录拦截 一.页面国际化 页面国际化目的:根据浏览器语言设置的信息对页面信息进行切换,或者用户点击链接自行对页面语言信息进行切换. **效果演示 ...
随机推荐
- python和go对比字符串的链式处理
一.什么是链式处理 对数据的操作进行多步骤的处理称为链式处理,链式处理器是一种常见的编程设计,链式处理的开发思想将数据和操作拆分,解耦,让开发者可以根据自己的技术优势和需求,进行系统开发,同时将自己的 ...
- echarts 默认柱状图每根柱子显示不同颜色(随机显示和定制显示)
series: [{ name: '请求数', type: 'bar', //barGap: 60, barWidth: 140,//柱图宽度 //stack: 'sum',//堆叠效果 itemSt ...
- 372 在O(1)时间复杂度删除链表节点
原题网址:http://www.lintcode.com/zh-cn/problem/delete-node-in-the-middle-of-singly-linked-list/ 给定一个单链表中 ...
- windows api(GDI)实现图片旋转
GDI实现图片旋转,博主在网上找了好多资料,都不太如意. 并且在尝试中发现,如果先用SetViewportOrgEx将HDC上的坐标原点移动到图片中心:再在HDC上的获取每个点,用三角函数进行变换,算 ...
- centos下 安装python相关
centos 安装python相关 python3 https://blog.csdn.net/tanxiaob/article/details/78725301 yum -y install zli ...
- Ubuntu 18.04/18.10快速开启Google BBR的方法
说明:Ubuntu 18.04改变挺大的,内核直接升到了正式版4.15,而BBR内核要求为4.9,也就是说满足了,所以我们不需要换内核就可以很快的开启BBR,这里简单说下方法. 提示:Ubuntu 1 ...
- JS规则 确定你的存在(变量声明) 声明变量语法: var 变量名; 一次声明多个,中间用逗号隔开var num1,mun2 ;
确定你的存在(变量声明) 我们要使用盒子装东西,是不是先要找到盒子,那在编程中,这个过程叫声明变量,找盒子的动作,如何表示: 声明变量语法: var 变量名; var就相当于找盒子的动作,在JavaS ...
- php非法输入数据类型
1.空白输入 2.超长输入(如大于256个字符) 3.特殊字符(如·!@#¥%……&*()—=|.:‘:<>;'"<>?.,) 4.控制字符(如\r\n等) ...
- soj97 旅行
题意:给你一棵n个点的树.m个操作,op 1:在点i上建立银行.op 2:询问从点x开始可以经过至少一个银行走到的点中编号第二大的点. n,m<=1e5. 标程: #include<bit ...
- Java虚拟机性能管理神器 - VisualVM(7) 排查JAVA应用程序线程泄漏【转】
Java虚拟机性能管理神器 - VisualVM(7) 排查JAVA应用程序线程泄漏[转] 标签: javajvm线程泄漏 2015-03-11 19:47 1098人阅读 评论(0) 收藏 举报 ...
