替代 Navigator 组件
前言:最近在研究 react-native 时,突然发现 Navigator 组件被 react-native 包 抛弃了。现总结了几种替代方法。
方法一:引入 react-native-deprecated-custom-components 组件
npm install react-native-deprecated-custom-components --save

import CustomerComponents, { Navigator } from 'react-native-deprecated-custom-components'; // 引入
方法二:引入 react-navigation 组件
npm install react-navigation --save
官网:https://reactnavigation.org/docs/intro/
demo-1
BasicApp.js
import {

  StackNavigator,

} from 'react-navigation';

const BasicApp = StackNavigator({

  Main: {screen: MainScreen},

  Profile: {screen: ProfileScreen},

});
MainScreen.js
class MainScreen extends React.Component {

  static navigationOptions = {

    title: 'Welcome',

  };

  render() {

    const { navigate } = this.props.navigation;

    return (

      <Button

        title="Go to Jane's profile"

        onPress={() =>

          navigate('Profile', { name: 'Jane' })

        }

      />

    );

  }

}
ProfileScreen.js
class ProfileScreen extends React.Component {

  static navigationOptions = ({navigation}) => ({

    title: navigation.state.params.name,

  });

  render() {

    const { goBack } = this.props.navigation;

    return (

      <Button

        title="Go back"

        onPress={() => goBack()}

      />

    );

  }

}
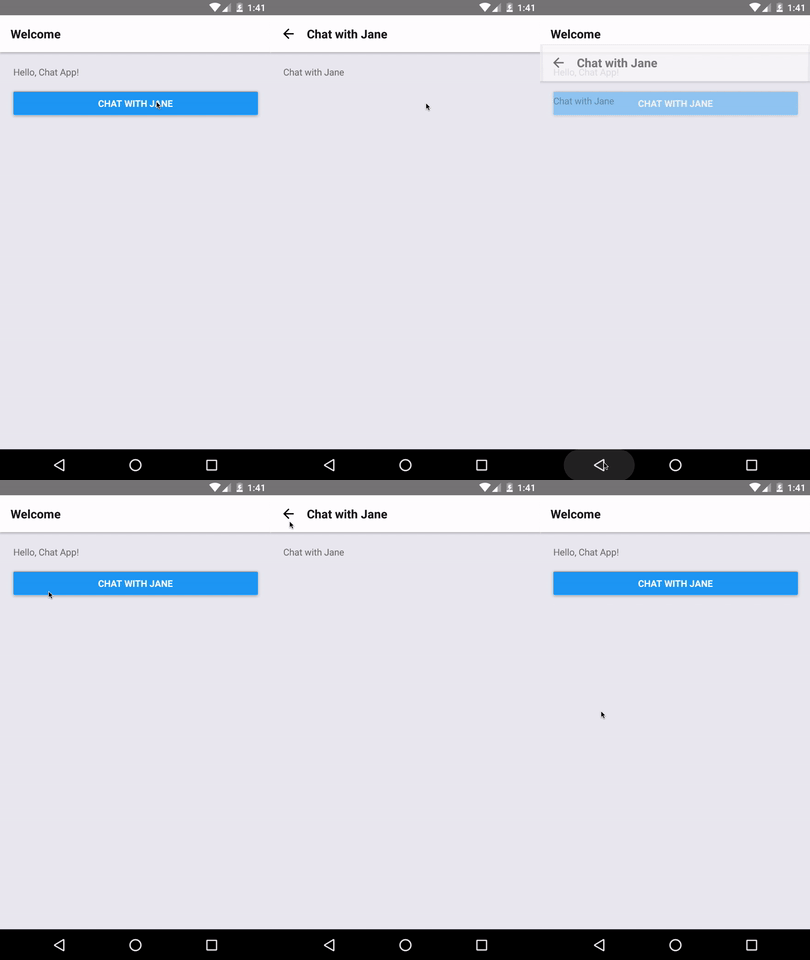
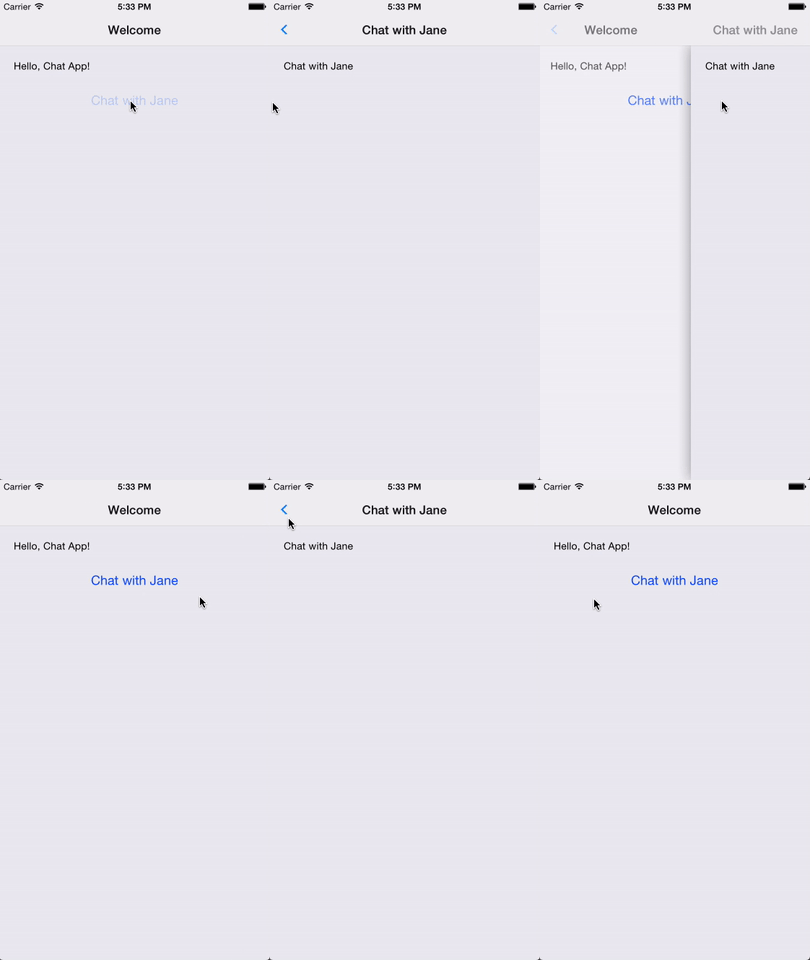
效果图:
android

ios

demo-2:
BasicApp.js
import {

  TabNavigator,

} from 'react-navigation';

const BasicApp = TabNavigator({

  Main: {screen: MainScreen},

  Setup: {screen: SetupScreen},

});
MainScreen.js
class MainScreen extends React.Component {

  static navigationOptions = {

    tabBarLabel: 'Home',

  };

  render() {

    const { navigate } = this.props.navigation;

    return (

      <Button

        title="Go to Setup Tab"

        onPress={() => navigate('Setup')}

      />

    );

  }

}
SetupScreen.js
class SetupScreen extends React.Component {

  static navigationOptions = {

    tabBarLabel: 'Setup',

  };

  render() {

    const { goBack } = this.props.navigation;

    return (

      <Button

        title="Go back to home tab"

        onPress={() => goBack()}

      />

    );

  }

}
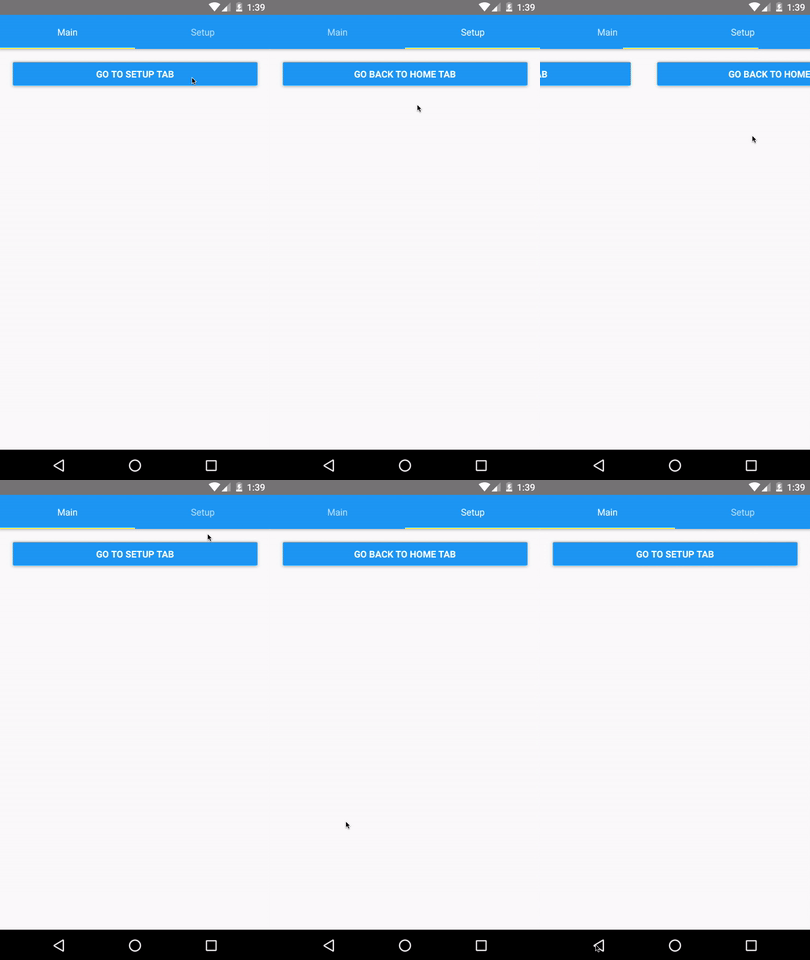
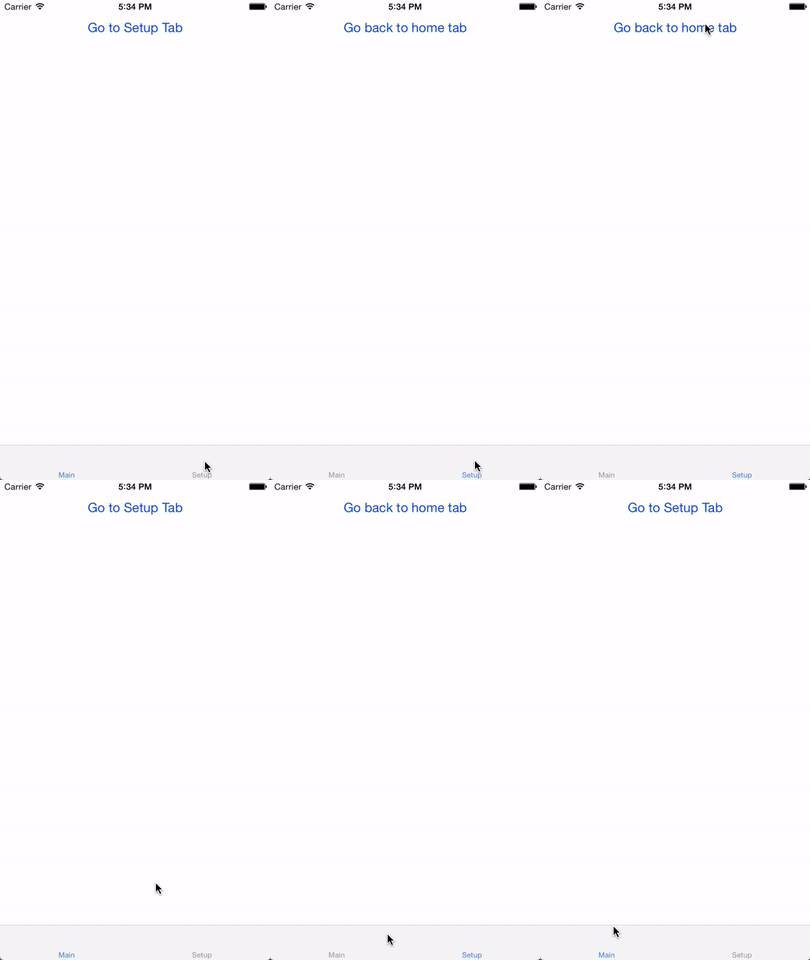
效果:
android

ios

方法三:自定义 Navigator 组件
首先导入组件
var MLNavigator = require('../Lib/MLNavigator');
然后使用
<MLNavigator

        leftIconName = 'nav_btn_back'

        title = '我的导航'

        rightIconName = 'nav_btn_back'

        rightTitle = '右边标题'

        callBackLeftClick = {()=> this.popToHome()}

        callBackRightClick = {()=> this.popToHome()}

    />
定义的一些属性:
 leftIconName: '',    // 左边图片

    leftTitle: '',       // 左边标题

    title: '',           // 标题

    rightIconName: '',   // 右边图片

    rightTitle: '',      // 右边标题

    callBackLeftClick: null,   // 左边回调

    callBackRightClick: null,  // 右边回调

    leftTitleFontSize: 14,     // 左边标题的字体大小

    titleFontSize: 16,         // 标题的字体大小

    rightTitleFontSize: 14,    // 右边标题的字体大小

    leftTitleColor: '#666666',     // 左边标题的字体颜色

    titleColor: 'black',         // 标题的字体颜色

    rightTitleColor: '#666666',    // 右边标题的字体颜色
组件封装:
import React, { Component } from 'react';

import {

    AppRegistry,

    StyleSheet,

    Text,

    View,

    Image,

    Platform,

    TouchableOpacity

} from 'react-native';

var Dimensions = require('Dimensions');

var width = Dimensions.get('window').width;

var Height = Dimensions.get('window').height;

var MLNavigator = React.createClass ({

    getDefaultProps() {

        return{

            leftIconName: '',    // 左边图片

            leftTitle: '',       // 左边标题

            title: '',           // 标题

            rightIconName: '',   // 右边图片

            rightTitle: '',      // 右边标题

            callBackLeftClick: null,   // 左边回调

            callBackRightClick: null,  // 右边回调

            leftTitleFontSize: 14,     // 左边标题的字体大小

            titleFontSize: 16,         // 标题的字体大小

            rightTitleFontSize: 14,    // 右边标题的字体大小

            leftTitleColor: '#666666',     // 左边标题的字体颜色

            titleColor: 'black',         // 标题的字体颜色

            rightTitleColor: '#666666',    // 右边标题的字体颜色

        }

    },

    render() {

        return (

            <View style={styles.NavBarStytle}>

                {/* 左边 */}

                {this.navLeftView()}

                <Text style={{color: this.props.titleColor, fontSize: this.props.titleFontSize, fontWeight: 'bold', bottom:-10}}>{this.props.title}</Text>

                {/* 右边 */}

                {this.navRightView()}

            </View>

        );

    },

    navLeftView() {

        if(this.props.leftIconName){

            return(

                <TouchableOpacity activeOpacity={0.5} style={styles.leftViewStytle} onPress={()=> {this.props.callBackLeftClick()}}>

                    <Image source={{uri: this.props.leftIconName}} style={styles.NavLeftImageStyle} />

                </TouchableOpacity>

            )

        }else {

            return(

                <TouchableOpacity activeOpacity={0.5} style={styles.leftViewStytle} onPress={()=> {this.props.callBackLeftClick()}}>

                    <Text style={{color: this.props.leftTitleColor, fontSize: this.props.leftTitleFontSize, bottom:-2}}>{this.props.rightTitle}</Text>

                </TouchableOpacity>

            )

        }

    },

    navRightView() {

        if(this.props.rightIconName){

            return(

                <TouchableOpacity activeOpacity={0.5} style={styles.rightViewStytle} onPress={()=> {this.props.callBackRightClick()}}>

                    <Image source={{uri: this.props.rightIconName}} style={styles.NavRightImageStyle} />

                </TouchableOpacity>

        )

        }else {

            return(

                <TouchableOpacity activeOpacity={0.5} style={styles.rightViewStytle} onPress={()=> {this.props.callBackRightClick()}}>

                    <Text style={{color: this.props.rightTitleColor, fontSize: this.props.rightTitleFontSize, bottom:-2}}>{this.props.rightTitle}</Text>

                </TouchableOpacity>

             )

        }

    },

})

const styles = StyleSheet.create({

    NavBarStytle: {

        width: width,

        height: Platform.OS == 'ios' ? 64 : 44,

        backgroundColor: '#F2F2F2',

        flexDirection: 'row',

        alignItems: 'center',

        justifyContent: 'center'

    },

    leftViewStytle: {

        position: 'absolute',

        left: 15,

        bottom: 15

    },

    NavLeftImageStyle: {

        width: Platform.OS == 'ios' ? 15 : 15,

        height: Platform.OS == 'ios' ? 15 : 15,

    },

    rightViewStytle: {

        position: 'absolute',

        right: 15,

        bottom: 15

    },

    NavRightImageStyle: {

        width: Platform.OS == 'ios' ? 15 : 15,

        height: Platform.OS == 'ios' ? 15 : 15,

    },

});

module.exports = MLNavigator;
.
替代 Navigator 组件的更多相关文章
- 微信小程序把玩(二十六)navigator组件
原文:微信小程序把玩(二十六)navigator组件 navigator跳转分为两个状态一种是关闭当前页面一种是不关闭当前页面.用redirect属性指定. 主要属性: wxml <naviga ...
- ReactNative: 使用导航栏组件-NavigatorIOS组件和Navigator组件
一.简言 在软件开发中,不论是Web还是App,它们的应用程序都是由很多的功能视图组成的.对于这些组合的视图,如何实现页面间平滑地过渡,应用都有统一的一套跳转机制,这个功能就是路由或者叫导航.应用程序 ...
- Flutter中的普通路由与命名路由(Navigator组件)
Flutter 中的路由通俗的讲就是页面跳转.在 Flutter 中通过 Navigator 组件管理路由导航.并提供了管理堆栈的方法.如:Navigator.push 和 Navigator.pop ...
- navigator组件(相当于a标签)
navigator组件:页面链接: navigator组件属性: target:类型 字符串 在哪个目标上发生跳转,默认当前小程序 属性值:self 当前小程序 miniProgram 其他小程序 u ...
- React Native常用组件之TabBarIOS、TabBarIOS.Item组件、Navigator组件、NavigatorIOS组件、React Navigation第三方
以下内容为老版本React Native,faceBook已经有了新的导航组件,请移步其他博客参考>>[我是传送门] 参考资料:React Navigation react-native ...
- react native的Navigator组件示例
import React, {Component} from 'react';import {ScrollView, StyleSheet, Text, View, PixelRatio} from ...
- Unity TextMeshPro替代Text组件创建简体中文字体纹理集
Unity原生的Text组件有一个毛病,只要文本放大字体放大就会有毛边或锯齿,一个更好的解决方案是用TextMeshPro替代ugui中的Text组件. TMPro采用SDF文字渲染技术,可以使文字放 ...
- React Native使用Navigator组件进行页面导航报this.props....is not a function错误
在push的时候定义回调函数: this.props.navigator.push({ component: nextVC, title: titleName, passProps: { //回调 g ...
- React Native Navigator组件回调
在push的时候定义回调函数: this.props.navigator.push({ component: nextVC, title: titleName, passProps: { //回调 g ...
随机推荐
- linux0.11内核源码剖析:第一篇 内存管理、memory.c【转】
转自:http://www.cnblogs.com/v-July-v/archive/2011/01/06/1983695.html linux0.11内核源码剖析第一篇:memory.c July ...
- IFC and BFC
BFC and IFC 1,IFC -- 针对行内元素 -- 行内格式上下文 BFC --针对块级元素 -- 块级格式上下文 2,IFC特点: 行框的高度由包含元素的高度和有没有float元素决定. ...
- ZOJ 3820:Building Fire Stations(树的直径 Grade C)
题意: n个点的树,边长全为1,求找出两个点,使得树上离这两个点距离最远的那个点,到这两个点(中某个点就行)的距离最小. 思路: 求树直径,找中点,删除中间那条边(如果直径上点数为奇数,则删任何一侧都 ...
- Appium+python自动化5-Appium Inspector【转载】
前言 appium Inspector从入门到放弃!反正你都打开了,那就看下为什么要放弃吧! Appium Inspector是appium自带的一个元素定位工具,上一篇介绍了如何使用uiaut ...
- Mysql数据库乱码总结
今天又独到了Mysql乱码问题,过去总是匆匆的解决了就算了.这次我实在受不了了.每次都是迷迷糊糊的改好的. 这次决定好好探索一把,看了很多资料及博客之后才理解了点.先记录下来.如有不对的请指正. 1. ...
- 在 iSCSI Target 服务器中使用LVM创建和设置LUN(二)
LUN是逻辑单元号,它与iSCSI存储服务器共享.iSCSI 目标器通过TCP/IP网络共享它的物理驱动器给发起程序(initiator).这些来自一个大型存储(SAN:Storage Area Ne ...
- HDU 1203 【01背包/小数/概率DP】
I NEED A OFFER! Time Limit: 2000/1000 MS (Java/Others) Memory Limit: 65536/32768 K (Java/Others) Tot ...
- Good Bye 2016 A. New Year and Hurry【贪心/做题目每道题花费时间按步长为5等差增长,求剩余时间够做几道题】
A. New Year and Hurry time limit per test 1 second memory limit per test 256 megabytes input standar ...
- springmvc适配器的应用
前言 关于SpringMVC初始化ContextLoader中的XMLWebApplicationContext,以及DispatcherServlet初始化等等,这样的原理 已经有 ...
- Python_Tips[0] -> 关于 import
关于 import 1 import import可用于导入一个Python的标准模块,包括.py文件或带有__init__.py的文件目录. 在Python中,import一个模块后,若再次impo ...
