【共享单车】—— React后台管理系统开发手记:Redux集成开发
前言:以下内容基于React全家桶+AntD实战课程的学习实践过程记录。最终成果github地址:https://github.com/66Web/react-antd-manager,欢迎star。
一、Redux基础介绍
- 单向数据流:从父组件留向子组件,兄弟组件无法共享数据
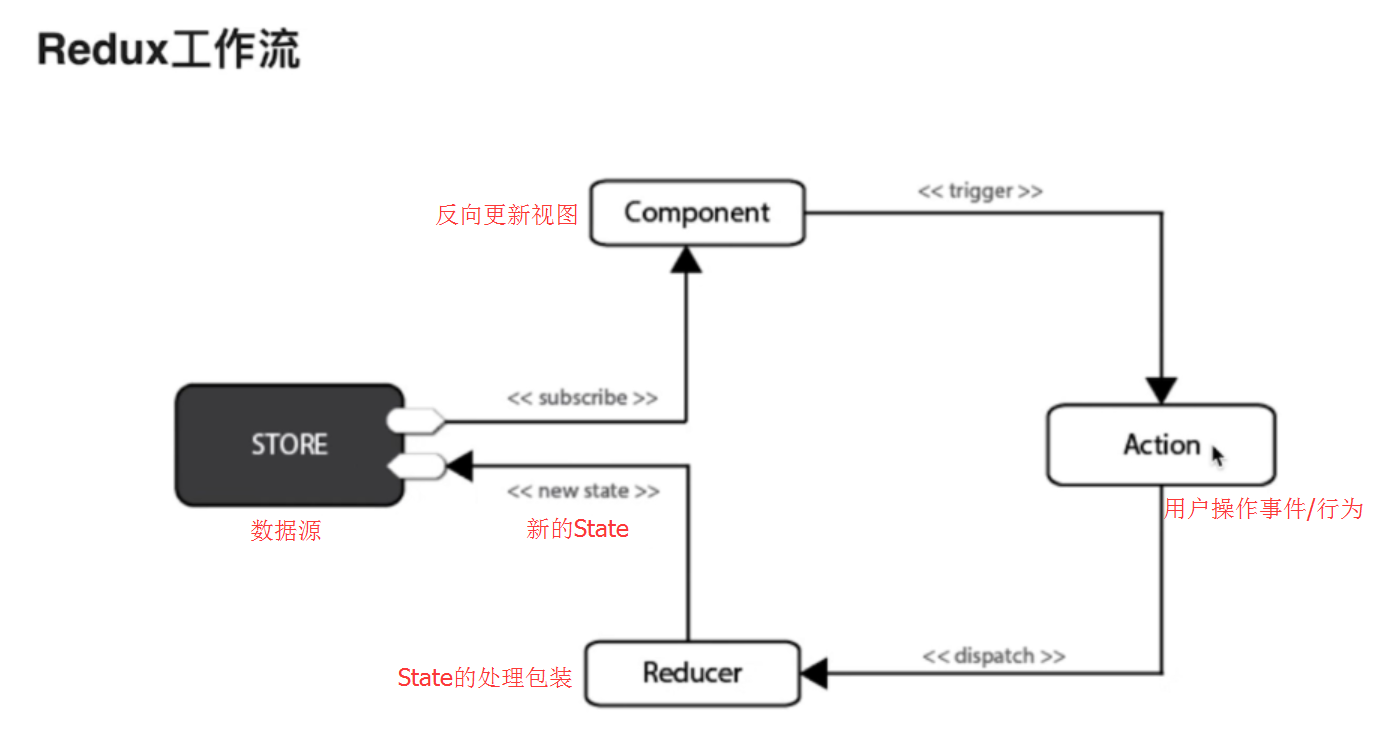
- Redux核心概念
- State:React中的状态,是只读对象,不可直接修改
- Reducer:基本函数,用于对State的业务处理
- Action:普通对象,用于描述事件行为,改变State
- Redux工作流

Redux安装
yarn add redux --save

yarn add react-redux --save
Redux集成
创建Action模块
创建Reducer模块
创建Store模块
通过connect方法将React组件和Redux连接起来
添加<Provider />作为项目的根组件,用于数据的存储
Redux调试工具安装
在火狐中安装Redux Devtools扩展:【安装地址】
项目中安装redux-devtools-extension调试插件
yarn add redux-devtools-extension --save
Redux适用场景
项目需求角度考虑:
- 用户的使用方式复杂
- 不同身份的用户有不同的使用方式(比如普通用户和管理员)
- 多个用户之间可以协作
- 与服务器大量交互,或者使用了WebSocket
- View要从多个来源获取数据
- 组件角度考虑:
- 某个组件的状态,需要共享
- 某个状态需要在任何地方都可以拿到
- 一个组件需要改变全局状态
- 一个组件需要改变另一个组件的状态
- 不适用的场景:
- 用户的使用方式非常简单
- 用户之间没有协作
- 不需要与服务器大量交互,也没有使用 WebSocket
- 视图层(View)只从单一来源获取数据
二、Redux集成
- src->redux目录下:创建action->index.js操作事件模块
/**

 * Action 类型:用户事件操作

 */

export const type = {

    SWITCH_MENU : 'SWITCH_MENU'

}

// 菜单点击切换,修改面包屑名称

export function switchMenu(menuName) {

    return {

        type:type.SWITCH_MENU,

        menuName

    }

} - src->redux目录下:创建reducer->index.js数据处理模块
/**

 * Reducer: 数据处理

 */

import {type} from './../action'

const initialState = {

    menuName: '首页'

}

const ebikeData = (state = initialState, action) => {

    switch (action.type) {

        case type.SWITCH_MENU:

            return {

               ...state, //旧值

               menuName: action.menuName //新值

            }

            break;

        default:

            return {

                ...state

            };

    }

}

export default ebikeData; - src->redux目录下:创建store->configureStore.js数据源模块
/**

 * 引入createStore保存数据源

 */

import {createStore} from 'redux'

import reducer from './../reducer'

//调试工具插件方法 -- redux降级到3.7可使用

// import { composeWithDevTools } from 'redux-devtools-extension'

export default () => createStore(reducer)
src->index.js项目入口文件中:添加<Provider />项目根组件,存储store数据源
import { Provider } from 'react-redux'

import configureStore from './redux/store/configureStore'

const store = configureStore();

ReactDOM.render(

    <Provider store={store}>

        <Router />

    </Provider>,

    document.getElementById('root'));
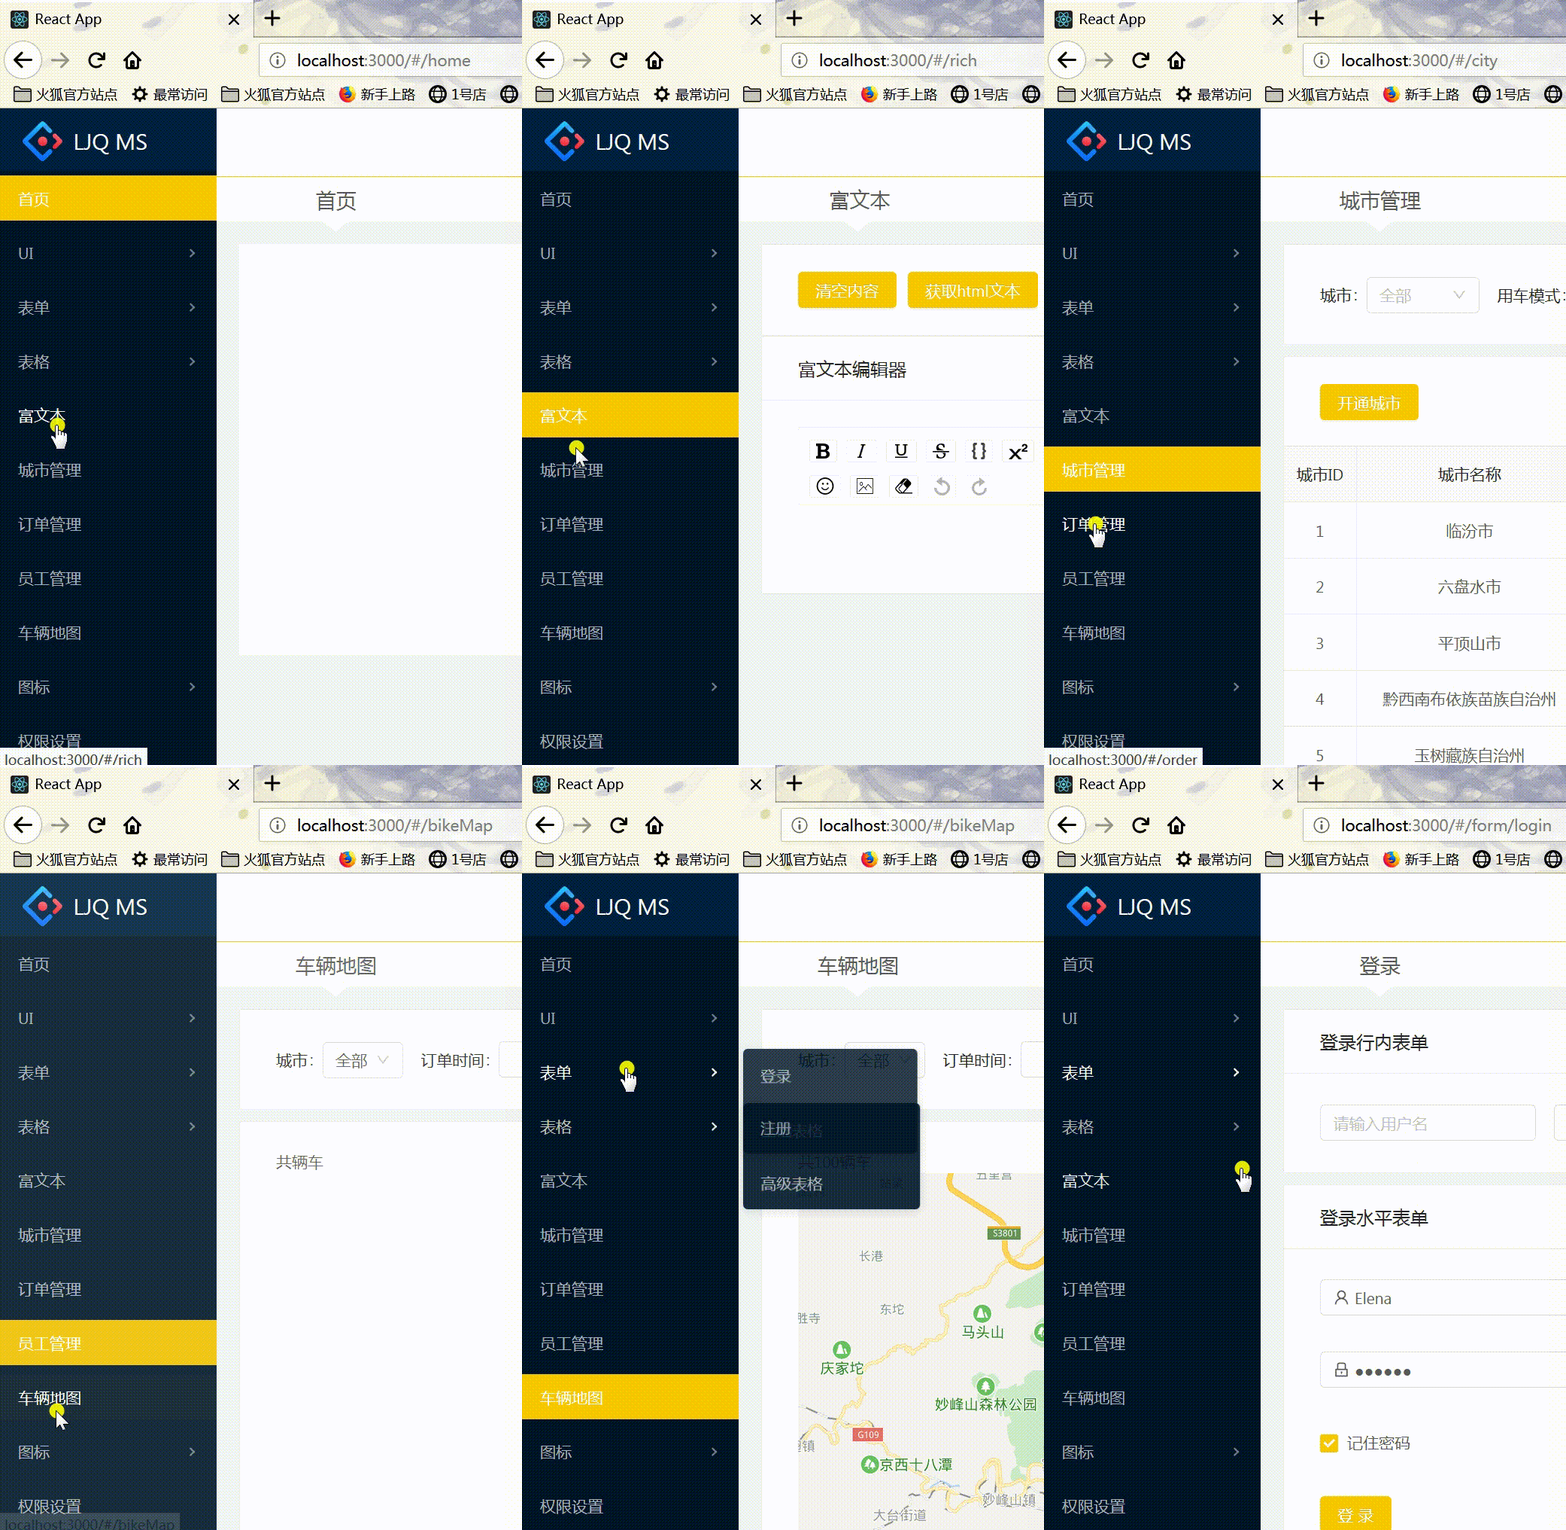
三、面包屑标题切换

- pages->components->NevLeft(index.js)中:菜单(Menu)点击切换改变store中的面包屑名称(MenuName)
- 通过connect方法将react组件与Redux连接
export default connect()(NavLeft)
- 获取this.props.dispatch方法派发事件:通过action事件自动调用reducer存入到store中
import {connect} from 'react-redux'  //连接器

import { switchMenu } from './../../redux/action' //事件行为

class NavLeft extends React.Component {

    state = {

        currentKey: ''

    }

    handleClick = ({item, key}) => {

        if (key === this.state.currentKey) {

            return false;

        }

        // 事件派发,自动调用reducer,通过reducer保存到store对象中

        const { dispatch } = this.props;

        dispatch(switchMenu(item.props.title))

        // console.log(item)

        this.setState({

            currentKey: key

        })

    }

    homeHandleClick = () => {

        const { dispatch } = this.props;

        dispatch(switchMenu('首页'));

        this.setState({

            currentKey: ""

        });

    };

    //其它代码

    <Menu

          onClick={this.handleClick}

          selectedKeys={[this.state.currentKey]}

          theme="dark"

     >

          {this.state.MenuTreeNode}

    </Menu>

}
- pages->components->Header(index.js)中:获取并填入store中的面包屑名称(MenuName)
- 通过connect方法将react组件与Redux连接
- 利用mapStateToProps函数建立state与store的映射关系:将state.menuName 绑定到 props 的menuName
- 面包屑标题处:获取this.props.menuName填入
import {connect} from 'react-redux'  //连接器

……

//将state.menuName 绑定到 props 的menuName

const mapStateToProps = state => {

    return {

        menuName: state.menuName

    }

}

export default connect(mapStateToProps)(Header)
关于mapStateToProps
——参考博客 |
注:项目来自慕课网
【共享单车】—— React后台管理系统开发手记:Redux集成开发的更多相关文章
- 【共享单车】—— React后台管理系统开发手记:主页面架构设计
前言:以下内容基于React全家桶+AntD实战课程的学习实践过程记录.最终成果github地址:https://github.com/66Web/react-antd-manager,欢迎star. ...
- 《React后台管理系统实战 :一》:目录结构、引入antd、引入路由、写login页面、使用antd的form登录组件、form前台验证、高阶函数/组件
实战 上接,笔记:https://blog.csdn.net/u010132177/article/details/104150177 https://gitee.com/pasaulis/react ...
- react后台管理系统路由方案及react-router原理解析
最近做了一个后台管理系统主体框架是基于React进行开发的,因此系统的路由管理,选用了react-router(4.3.1)插件进行路由页面的管理配置. 实现原理剖析 1.hash的方式 ...
- HoloLens开发手记-配置开发环境 Install the tools
随着Build 2016开发者大会的结束,HoloLens开发包也正式开放下载.Hololens没有独立的SDK,开发特性被集成到最新的Visual Studio Update 2中.如果你没有Hol ...
- 【Python开发】python集成开发环境IDE搭建
http://blog.csdn.net/pipisorry/article/details/39854707 使用的系统及软件 Ubuntu / windows Python 2.7 / pytho ...
- 【共享单车】—— React后台管理系统开发手记:城市管理和订单管理
前言:以下内容基于React全家桶+AntD实战课程的学习实践过程记录.最终成果github地址:https://github.com/66Web/react-antd-manager,欢迎star. ...
- 【共享单车】—— React后台管理系统开发手记:AntD Form基础组件
前言:以下内容基于React全家桶+AntD实战课程的学习实践过程记录.最终成果github地址:https://github.com/66Web/react-antd-manager,欢迎star. ...
- 【共享单车】—— React后台管理系统开发手记:Router 4.0路由实战演练
前言:以下内容基于React全家桶+AntD实战课程的学习实践过程记录.最终成果github地址:https://github.com/66Web/react-antd-manager,欢迎star. ...
- 【共享单车】—— React后台管理系统开发手记:权限设置和菜单调整(未完)
前言:以下内容基于React全家桶+AntD实战课程的学习实践过程记录.最终成果github地址:https://github.com/66Web/react-antd-manager,欢迎star. ...
随机推荐
- 【CF Edu 28 A. Curriculum Vitae】
time limit per test 1 second memory limit per test 256 megabytes input standard input output standar ...
- MFC 屏幕截图(libjpeg bmp转jpg)
项目中需要用到的功能. void Screenshot() { CDC *pDC; pDC = CDC::FromHandle(GetDC(GetDesktopWindow())); if(pDC = ...
- 优化web前端性能的几个方法
1 减少http请求, a. 合并脚本跟样式文件,如可以把多个 CSS 文件合成一个,把多个 JS 文件合成一个. b. CSS Sprites 利用 CSS background 相关元素进行背景图 ...
- js得到时间戳(10位数)
//从1970年开始的毫秒数然后截取10位变成 从1970年开始的秒数 function timest() { var tmp = Date.parse( new Date() ).toString( ...
- Redis特性
Redis特性和应用场景 Redis特性 速度快 Redis使用标准C编写实现,而且将所有数据加载到内存中,所以速度非常快.官方提供的数据表明,在一个普通的Linux机器上,Redis读写速度分别达到 ...
- .NET4中多线程并行方法Parallel.ForEach
原文发布时间为:2011-12-10 -- 来源于本人的百度文章 [由搬家工具导入] namespace ForEachDemo{ using System; using System.I ...
- 结构型设计模式之组合模式(Composite)
结构 意图 将对象组合成树形结构以表示“部分-整体”的层次结构.C o m p o s i t e 使得用户对单个对象和组合对象的使用具有一致性. 适用性 你想表示对象的部分-整体层次结构. 你希望用 ...
- UVA 10985 Rings'n'Ropes
最短路 参考了Staingger的博客 感觉DP的状态记录还是有毛病.可以DFS寻找结果也. #include <map> #include <set> #include &l ...
- c/c++中const用法总结
1.修饰常量时: const int temp1; //temp1为常量,不可变 int const temp2; //temp2为常量,不可变 2.修饰指针时: 主要看const在*的前后,在前 ...
- Spring与Struts2的整合
一.复制jar文件. 把struts2-spring-plugin-..*.jar和spring.jar复制到Web工程的WEB-INF/lib目录下,并且还需要复制commons-logging.j ...
