SpringBoot之HelloWorld仔细分析
程序中的pom.xml文件:
一、父级标签
<parent>

   <groupId>org.springframework.boot</groupId>

   <artifactId>spring-boot-starter-parent</artifactId>

   <version>2.0.5.RELEASE</version>

   <relativePath/>

</parent>
这是一个父级标签:让我们点击org.springframework.boot就会查看到他的父级的依赖:
<parent>

    <groupId>org.springframework.boot</groupId>

    <artifactId>spring-boot-dependencies</artifactId>

    <version>2.0.5.RELEASE</version>

    <relativePath>../../spring-boot-dependencies</relativePath>

</parent>
就会发现它才是真正的SpringBoot的版本控制中心,这样一来我们在导入
依赖的时候就不需要写导入的版本号了,但是如果不在dependencies里面
管理的依赖还是需要进行版本号的输入的。
二、依赖标签(启动器)
<dependency>

    <groupId>org.springframework.boot</groupId>

    <artifactId>spring-boot-starter-web</artifactId>

</dependency>
spring-boot-starter-web:spring-boot-starter:spring-boot场景启动器;帮我们导入了web模块
正常运行所依赖的组件;
Spring Boot将所有的功能场景都抽取出来,做成一个个的starters(启动器),
只需要在项目里面引入这些starter相关场景的所有依赖都会导入进来。要用什么
功能就导入什么场景的启动器。
例如:
<dependency>

    <groupId>org.springframework.boot</groupId>

    <artifactId>spring-boot-starter-test</artifactId>

    <scope>test</scope>

</dependency>
这是一个test(测试用的)启动器,我们要用的是测试功能,导入测试场景的启动器就可以了。
程序中的主程序文件:
package com.example.demo;

import org.springframework.boot.SpringApplication;

import org.springframework.boot.autoconfigure.SpringBootApplication;

@SpringBootApplication

public class DemoApplication {

    public static void main(String[] args) {

        SpringApplication.run(DemoApplication.class, args);

    }

}
@SpringBootApplication:Spring Boot应用标注在某个类上说明这个类是SpringBoot的主配置类,
SpringBoot就应该运行这个类的main方法来启动SpringBoot应用;
我们接下来就研究一下这个@SpringBootApplication注解,点进去后看到的内容是:
@Target({ElementType.TYPE})

@Retention(RetentionPolicy.RUNTIME)

@Documented

@Inherited

@SpringBootConfiguration

@EnableAutoConfiguration

@ComponentScan(

    excludeFilters = {@Filter(

    type = FilterType.CUSTOM,

    classes = {TypeExcludeFilter.class}

), @Filter(

    type = FilterType.CUSTOM,

    classes = {AutoConfigurationExcludeFilter.class}

)}

)

public @interface SpringBootApplication {
1)、@SpringBootConfiguration:SpringBoot的配置类,标注在哪个类上面就代表这个类就是一个SpringBoot
的配置类,我们点进这个注解(@SpringBootConfiguration)里面看一下:
@Target({ElementType.TYPE})

@Retention(RetentionPolicy.RUNTIME)

@Documented

@Configuration

public @interface SpringBootConfiguration {

}
我们看到了这个@Configuration注解,这就证明了SpringBootConfiguration 就是一个配置类,再点进到这个注解
(@Configuration)里面看一下:
@Target({ElementType.TYPE})

@Retention(RetentionPolicy.RUNTIME)

@Documented

@Component

public @interface Configuration {

    @AliasFor(

        annotation = Component.class

    )

    String value() default "";

}
我们看到了@Component这个注解,证明了配置类也是容器中的一个组件。
2)、@EnableAutoConfiguration:开启自动配置,这样一来我们需要的所有配置,SpringBoot都将帮我们
配置完成,我们点进去这个注解(@EnableAutoConfiguration)看一看:
@Target({ElementType.TYPE})

@Retention(RetentionPolicy.RUNTIME)

@Documented

@Inherited

@AutoConfigurationPackage

@Import({AutoConfigurationImportSelector.class})

public @interface EnableAutoConfiguration {

    String ENABLED_OVERRIDE_PROPERTY = "spring.boot.enableautoconfiguration";

    Class<?>[] exclude() default {};

    String[] excludeName() default {};

}
这里面有这两个重要的注解(@AutoConfigurationPackage与@Import({AutoConfigurationImportSelector.class}))
先研究一下这个注解(@AutoConfigurationPackage)这是自动配置包的意思我们点进去看一下这个注解:
@Target({ElementType.TYPE})

@Retention(RetentionPolicy.RUNTIME)

@Documented

@Inherited

@Import({Registrar.class})

public @interface AutoConfigurationPackage {

}
里面有一个@Import({Registrar.class})注解,这是Spring底层的注解,是导入一个组件的意思,导入的组件由
Registrar.class将主配置类(也就是SpringBootApplication标注的类)的所在层级以及该层级以下所有层级的
所有组件都扫描到Spring的容器中。
接下来我们研究一下这个注解(@Import({AutoConfigurationImportSelector.class}))这是一个给容器中导入组件的
一个注解,AutoConfigurationImportSelector:导入哪些组件的选择器;将所有需要导入的组件以全类名的方式返回;
这些组件就会被添加到容器中;会给容器中导入非常多的自动配置类(xxxAutoConfiguration);就是给容器中导入
这个场景需要的所有组件,并配置好这些组件;下面是源码(AutoConfigurationImportSelector这个类下面的getAutoConfigurationImportFilters的方法):
protected List<AutoConfigurationImportFilter> getAutoConfigurationImportFilters() {

    return SpringFactoriesLoader.loadFactories(AutoConfigurationImportFilter.class, this.beanClassLoader);

}
我们进入到SpringFactoriesLoader中看一下:这个是加载properties属性文件的方法
public abstract class SpringFactoriesLoader {

    public static final String FACTORIES_RESOURCE_LOCATION = "META-INF/spring.factories";

    private static final Log logger = LogFactory.getLog(SpringFactoriesLoader.class);

    private static final Map<ClassLoader, MultiValueMap<String, String>> cache = new ConcurrentReferenceHashMap();

    public SpringFactoriesLoader() {

    }
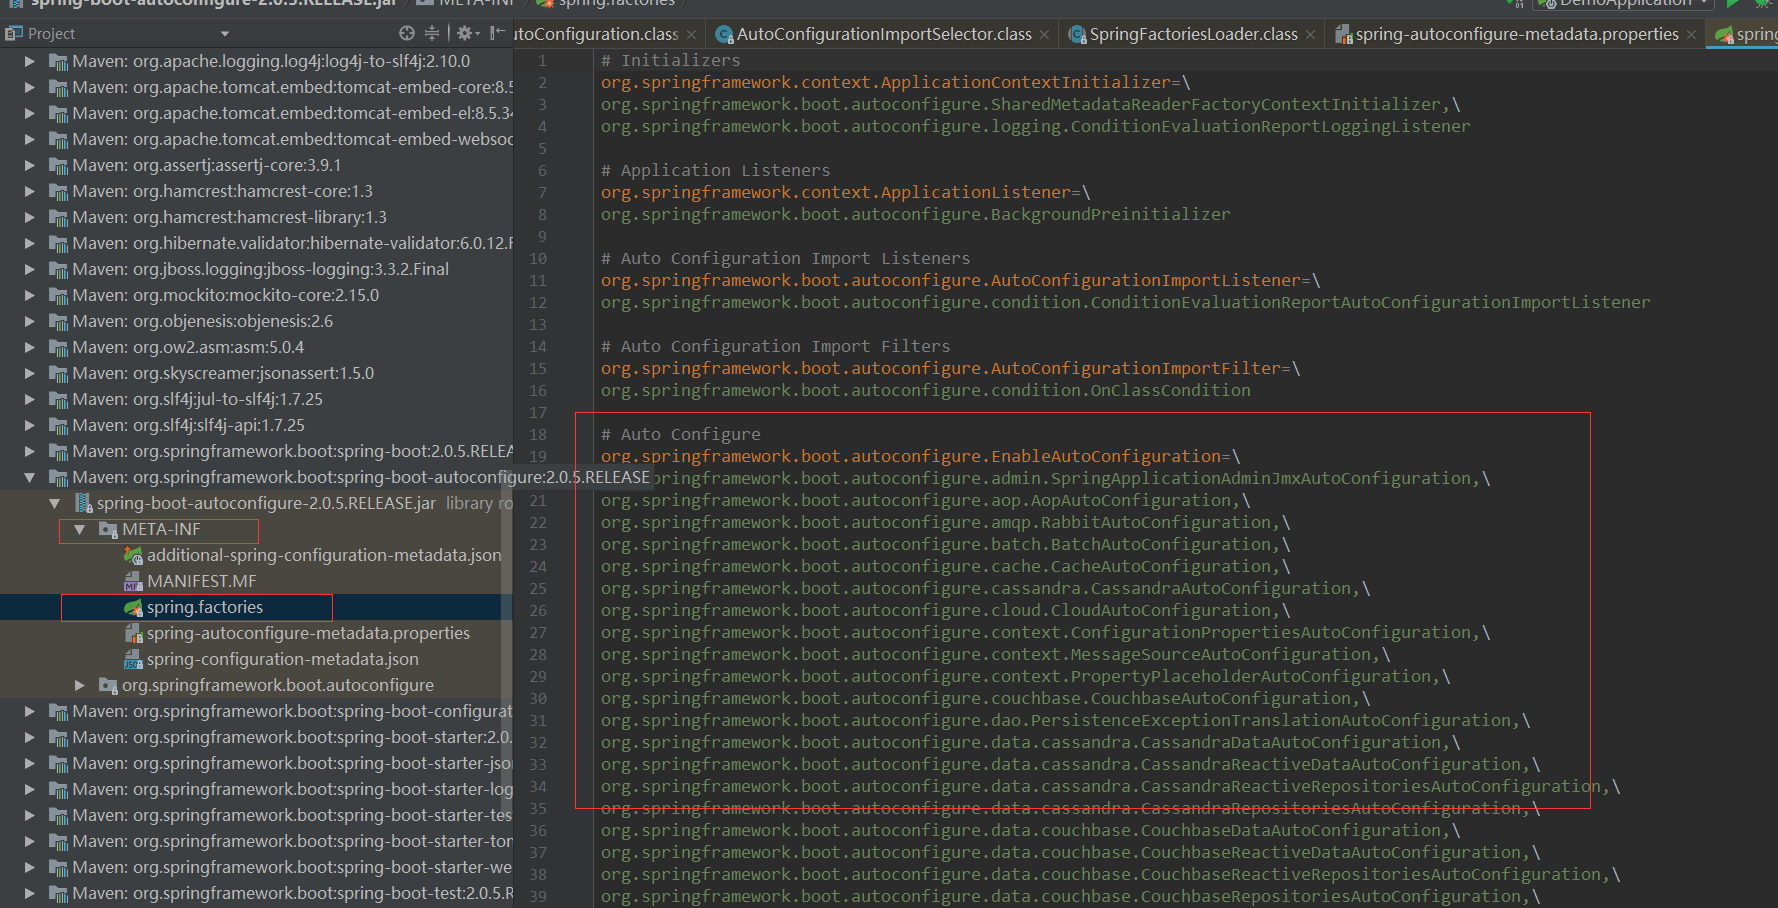
我们看到所加在的properties文件的路径是META-INF/spring.factories,我们找一下这个文件的位置看一下里面都有什么:

Spring Boot在启动的时候从类路径下的META-INF/spring.factories中获取EnableAutoConfiguration指定的值,将这些值作为
自动配置类导入到容器中,自动配置类就生效,帮我们进行自动配置工作;
J2EE的整体整合解决方案和自动配置都在spring-boot-autoconfigure-2.0.5.RELEASE.jar;中
SpringBoot之HelloWorld仔细分析的更多相关文章
- Wix学习整理(4)——关于WiX文件格式和案例HelloWorld的分析
原文:Wix学习整理(4)--关于WiX文件格式和案例HelloWorld的分析 关于WiX文件格式 .wxs是WiX的源文件扩展名..wxs文件以类XML文件的格式来指定了要构造Windows In ...
- 前后端分离框架前端react,后端springboot跨域问题分析
前后端分离框架前端react,后端springboot跨域问题分析 为啥跨域了 前端react的设置 springboot后端设置 为啥跨域了 由于前后端不在一个端口上,也是属于跨域问题的一种,所以必 ...
- Node.js开发入门—HelloWorld再分析
在Node.js开发入门(1)我们用http模块实现了一个简单的HelloWorld站点,这次我们再来细致分析下代码.了解很多其它的细节. 先看看http版本号的HelloWorld代码: 代码就是这 ...
- php实现用短路求值原理求1+2+3+...+n(短路求值是什么)(仔细分析题干)
php实现用短路求值原理求1+2+3+...+n(短路求值是什么)(仔细分析题干) 一.总结 1.仔细分析题干,找出要点:该递归还是得递归啊 2.短路求值原理:&&就是逻辑与,逻辑与有 ...
- 【原创】004 | 搭上SpringBoot事务诡异事件分析专车
前言 如果这是你第二次看到师长,说明你在觊觎我的美色! 点赞+关注再看,养成习惯 没别的意思,就是需要你的窥屏^_^ 本专车系列文章 目前连载到第四篇,本专题是深入讲解Springboot源码,毕竟是 ...
- 【原创】005 | 搭上SpringBoot请求处理源码分析专车
前言 如果这是你第二次看到师长,说明你在觊觎我的美色! 点赞+关注再看,养成习惯 没别的意思,就是需要你的窥屏^_^ 专车介绍 该趟专车是开往Spring Boot请求处理源码分析专车,主要用来分析S ...
- (四)SpringBoot启动过程的分析-预处理ApplicationContext
-- 以下内容均基于2.1.8.RELEASE版本 紧接着上一篇(三)SpringBoot启动过程的分析-创建应用程序上下文,本文将分析上下文创建完毕之后的下一步操作:预处理上下文容器. 预处理上下文 ...
- (三)SpringBoot启动过程的分析-创建应用程序上下文
-- 以下内容均基于2.1.8.RELEASE版本 紧接着上一篇(二)SpringBoot启动过程的分析-环境信息准备,本文将分析环境准备完毕之后的下一步操作:ApplicationContext的创 ...
- (五)SpringBoot启动过程的分析-刷新ApplicationContext
-- 以下内容均基于2.1.8.RELEASE版本 紧接着上一篇[(四)SpringBoot启动过程的分析-预处理ApplicationContext] (https://www.cnblogs.co ...
随机推荐
- lintcode 解码方法
简单的动态规划 class Solution { public: /* * @param s: a string, encoded message * @return: an integer, the ...
- QueueUtil
import com.rabbitmq.client.Connection; import com.rabbitmq.client.ConnectionFactory; import org.slf4 ...
- spark_load csv to hive via hivecontext
//prepare csv year,make,model,comment,blank "2012","Tesla","S","N ...
- svn更改账户信息
原svn账户清除,及使用新用户名密码操作方法 第一步:先清除原svn账户信息,如图示,电脑桌面右击"ToroiseSVN--Settings". 在Settings中,选择Save ...
- vue——运行一个项目
教程:https://segmentfault.com/a/1190000009871504 启动:cnpm run dev
- jquery——尺寸
1. 获取和设置元素的尺寸 2. 获取元素相对页面的绝对位置:offset() 这种方式增加的盒子不会对之前的结构产生影响 demo: <!DOCTYPE html> <html l ...
- shell脚本之前的基础知识
日常的linux系统管理工作中必不可少的就是shell脚本,如果不会写shell脚本,那么你就不算一个合格的管理员.目前很多单位在招聘linux系统管理员时,shell脚本的编写是必考的项目.有的单位 ...
- java中的递归思想及应用
递归就是自己调自己,最需要注意的就是结束条件,否则可能就是死循环,导致内存溢出 public T a(Object x,Object y) { if(条件true) { a(x1,y1); } els ...
- Mavlink协议理解
来源:blog.csdn.net/super_mice/article/details/44836585 之前看了mavlink协议,网上关于mavlink的资料不多.本文大概总结了下对mavlink ...
- How to Install Apache Solr 4.5 on CentOS 6.4
By Shay Anderson on October 2013 Knowledge Base / Linux / How to Install Apache Solr 4.5 on Cent ...
