inotify+rsync实现实时同步并邮件通知
服务器之间文件实时同步,监控文件的变化,发送邮件通知,并实时同步文件。
由于人工同步多台服务器的文件比较吃力,可以借助这样一套软件,自动化的实现这样的工作。
并且可以事实监控变化发送邮件给系统管理人员。
服务器的架构图:
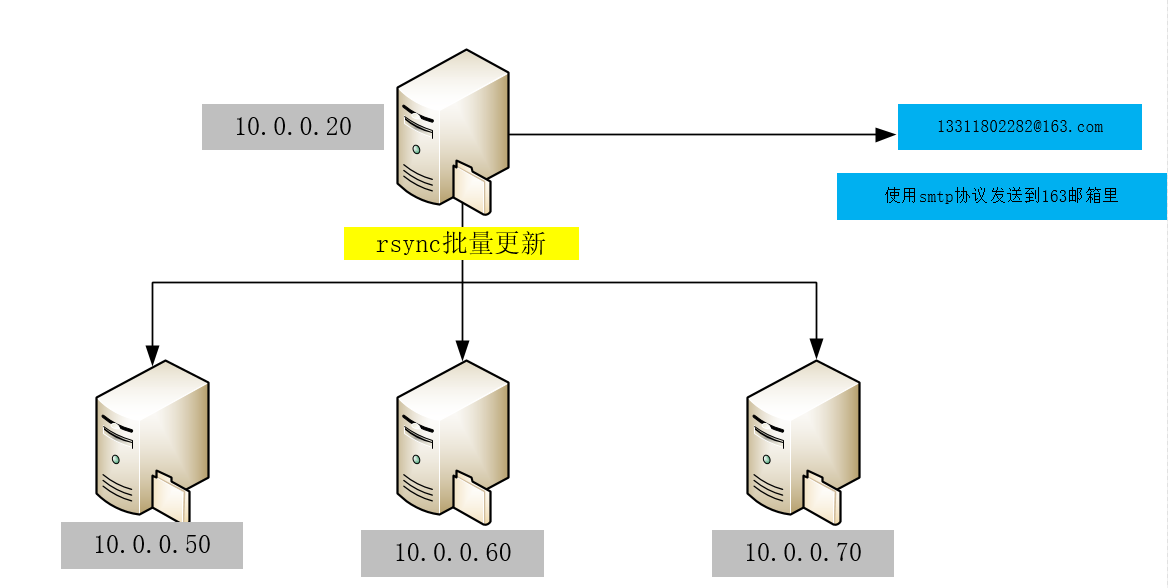
文件源服务器:10.0.0.20
需要同步的目标服务器:10.0.0.50 10.0.0.60 10.0.0.70
一.目标服务器配置
1.关闭selinux
- vi /etc/selinux/config #编辑防火墙配置文件
- #SELINUX=enforcing #注释掉
- #SELINUXTYPE=targeted #注释掉
- SELINUX=disabled #增加
- :wq! #保存,退出
- setenforce #立即生效
2.如果生产环境防火墙不关闭就开放rsync的TCP端口
- vi /etc/sysconfig/iptables #编辑防火墙配置文件
- -A RH-Firewall--INPUT -m state --state NEW -m tcp -p tcp --dport -j ACCEPT
- /etc/init.d/iptables restart #最后重启防火墙使配置生效
3、安装Rsync服务端软件
yum install rsync xinetd #安装
vi /etc/xinetd.d/rsync #编辑配置文件,设置开机启动rsync
disable = no #修改为no
4、创建rsyncd.conf配置文件
[root@master ~]# cat /etc/rsyncd.conf
uid = root
gid = root
use chroot = no
max connections = 100
timeout = 600
pid file=/var/run/rsyucd.pid
lock file = /var/run/rsyncd.lock
log file = /var/log/rsyncd.log
[benjamindata]
path = /home/benjamindata
ignore errors
read only = no
list = no
hosts allow = 10.0.0.20/255.255.255.0
auth users = benjamin
secrets file = /etc/rsync.pass
5.创建用户认证文件
- [root@manager ~]# cat /etc/rsync.pass
- benjamin:
6、设置文件权限
- chmod /etc/rsyncd.conf #设置文件所有者读取、写入权限
- chmod /etc/rsync.pass #设置文件所有者读取、写入权限
7、启动rsync
- /etc/init.d/xinetd start #启动
- service xinetd stop #停止
- service xinetd restart #重新启动
二.源服务器配置
1.关闭selinux
同上
2.防火墙开放873端口
同上
3.修改优化内核参数
- vi /etc/sysctl.conf #内核参数修改
- fs.inotify.max_queued_events =
- fs.inotify.max_user_instances =
- fs.inotify.max_user_watches =
- sysctl -p #初始化内核参数
参数说明:
max_queued_events:
inotify队列最大长度,如果值太小,会出现"** Event Queue Overflow **"错误,导致监控文件不准确
max_user_watches:
要同步的文件包含多少目录,可以用:find /home/benjamindata -type d | wc -l 统计,必须保证max_user_watches值大于统计结果(这里/home/benjamindata为同步文件目录)
max_user_instances:
每个用户创建inotify实例最大值
4.编译安装 inotify-tools工具
- wget http://github.com/downloads/rvoicilas/inotify-tools/inotify-tools-3.14.tar.gz
- tar xzvf inotify-tools-3.14.tar.gz
- cd inotify-tools-3.14./configure --prefix=/usr/local/inotify
- make
- make install
5、设置系统环境变量,添加软连接
- echo "PATH=/usr/local/inotify/bin:$PATH" >>/etc/profile.d/inotify.sh
- source /etc/profile.d/inotify.sh #使设置立即生效
- echo "/usr/local/inotify/lib" >/etc/ld.so.conf.d/inotify.conf
- ln -s /usr/local/inotify/include /usr/include/inotify
6、创建脚本,实时触发rsync进行同步
- vi /usr/local/inotify/rsync.sh #编辑,添加以下代码
- ======================================
- #!/bin/sh
- srcdir=/home/benjamindata/
- dstdir=benjamindata
- excludedir=/usr/local/inotify/exclude.list
- rsyncuser=benjamin
- rsyncpassdir=/etc/passwd.txt
- dstip="10.0.0.50 10.0.0.60 10.0.0.70"
- for ip in $dstip
- do
- rsync -avH --port= --progress --delete --exclude-from=$excludedir $srcdir $rsyncuser@$ip::$dstdir --password-file=$rsyncpassdir
- done
- /usr/local/inotify/bin/inotifywait -mrq --timefmt '%d/%m/%y %H:%M' --format '%T %w%f%e' -e close_write,modify,delete,create,attrib,move $srcdir | while read file
- do
- for ip in $dstip
- do
- rsync -avH --port= --progress --delete --exclude-from=$excludedir $srcdir $rsyncuser@$ip::$dstdir --password-file=$rsyncpassdir
- echo " ${file} was rsynced" >> /tmp/rsync.log >&
- done
- done
- ======================================
- chmod +x /usr/local/inotify/rsync.sh #添加脚本执行权限
- 脚本参数说明:
- srcdir=/home/benjamindata/ #源服务器同步目录
- dstdir=benjamindata #目标服务器rsync同步目录模块名称
- excludedir=/usr/local/inotify/exclude.list
- #不需要同步的目录,如果有多个,每一行写一个目录,使用相对于同步模块的路径;
- #例如:不需要同步/home/benjamin/目录下的a目录和b目录下面的b1目录,exclude.list文件可以这样写
- a/
- b/b1/
- rsyncuser=benjamin #目标服务器rsync同步用户名
- rsyncpassdir=/etc/passwd.txt #目标服务器rsync同步用户的密码在源服务器的存放路径
- dstip="10.0.0.50 10.0.0.60 10.0.0.70" #目标服务器ip,多个ip用空格分开
- /tmp/rsync.log #脚本运行日志记录
6、设置脚本开机自动执行
- vi /etc/rc.d/rc.local #编辑,在最后添加一行
- sh /usr/local/inotify/rsync.sh & #设置开机自动在后台运行脚本
7、测试inotify实时触发rsync同步脚本是否正常运行
- 在源服务器10.0.0.20上创建目录inotify_test
- mkdir /home/benjamindata/inotify_test
#重新启动源服务器:10.0.0.20
等系统启动之后,查看三台目标服务器10.0.0.50,10.0.0.60,10.0.0.70的/home/benjamindata下是否有inotify_test文件夹
- #手动输命令指定一个主机测试
[root@manager ~]# rsync -avH --port= --progress --delete --exclude-from=/usr/local/inotify/exclude.list /home/benjamindata/ benjamin@10.0.0.50::benjamindata
--password-file=/etc/passwd.txt- sending incremental file list
- ./
- inotify_test/
- sent bytes received bytes 182.00 bytes/sec
- total size is speedup is 0.00
# 使用脚本批量执行。
[root@manager ~]# bash /usr/local/inotify/rsync.sh
sending incremental file list
sent 70 bytes received 9 bytes 52.67 bytes/sec
total size is 0 speedup is 0.00
sending incremental file list
./
inotify_test/
sent 76 bytes received 15 bytes 182.00 bytes/sec
total size is 0 speedup is 0.00
sending incremental file list
./
inotify_test/
sent 76 bytes received 15 bytes 182.00 bytes/sec
total size is 0 speedup is 0.00
在目标服务器查看
- [root@master ~]# ifconfig |awk -F '[ :]+' 'NR==2{print $4}'
- 10.0.0.50
- [root@master ~]# ll /home/benjamindata/
- total
- drwxr-xr-x root root Mar : inotify_test
三.配置安装mutt+msmtp 发送邮件
1.安装
- 分别下载解压msmtp mutt
- [root@manager ~] wget http://downloads.openwrt.org.cn/sources/msmtp-1.4.17.tar.bz2
- [root@manager ~]# tar xf msmtp-1.4..tar.bz2
[root@manager msmtp-1.4.17]# cd msmtp-1.4.17
[root@manager msmtp-1.4.17]# ./configure --prefix=/usr/local/nsmtp- [root@manager msmtp-1.4.17]# make && make install
# mutt安装如上
- [root@manager ~]# wget http://downloads.openwrt.org.cn/sources/mutt-1.5.20.tar.gz
执行 configure 脚本时报configure: error: no curses library found 错误
- [root@manager mutt-1.5.20]# yum install -y ncurses-devel
2.修改配置文件
- [root@manager mutt-1.5.]# cat /root/.msmtprc
account default
port 25
host smtp.163.com
tls off
auth plain
from 13311802282@163.com
user 13311802282
password xxxxx
logfile /var/log/msmtp.log
- [root@manager ~]# vi /usr/local/msmtp/etc/msmtprc
account default- host smtp..com
- from @.com
- auth login
- port
- tls off
- user
- password xxxx
- logfile /usr/local/msmtp/log/msmtp.log
- [root@manager ~] chomod 400
- vi /root/.muttrc
set sendmail="/usr/local/msmtp/bin/msmtp"- set use_from=yes
- set from=@.com
- set envelope_from=yes
- [root@manager ~]# vi /etc/Muttrc
set sendmail="/usr/local/msmtp/bin/msmtp"- set use_from=yes
- set from="13311802282@163.com"
- set realname="13311802282@163.com"
- set editor="vim"
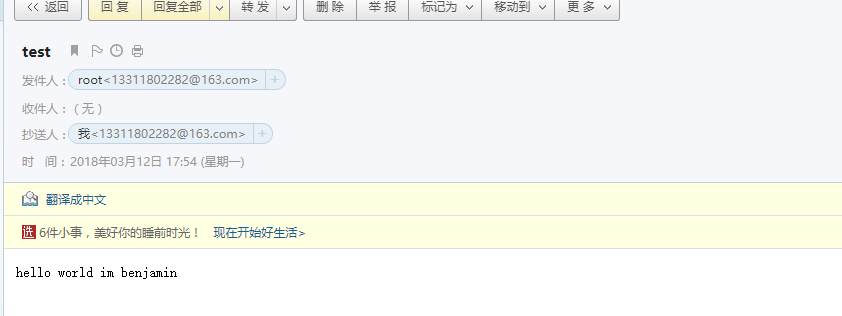
测试发送邮件,自己发给自己
- [root@manager ~]# /usr/local/mutt/bin/mutt -s "test" -c @.com < /tmp/mailtest.txt
监控目录变化脚本
- [root@manager ~]# cat mon.sh
- #!/bin/bash
- src=/home/benjamindata
- dstip="10.0.0.50 10.0.0.60 10.0.0.70"
- /usr/local/inotify/bin/inotifywait -m -r -d -o /tmp/monitor.log --timefmt '%F%T' --format '%T%w%f%e' -e modify,attrib,move,close_write,create,delete,delete_self $src| while read DIRECTORY EVENT FILE
- do
- for ip in $detip
- do
- rsync -vzrtopg --delete --progress benjamin@$ip::static --password-file=/etc/passwd.txt
- echo "${files} was rsynced" >> /tmp/rsync.log >&
- done
- done
- #参数说明
-m, 即--monitor,表示始终保持事件监听状态。
-r, 即--recursive,表示递归查询目录。
-q, 即--quiet,表示打印出监控事件。
-e, 即--event,通过此参数可以指定要监控的事件,常见的事件有modify、delete、create、attrib等
--timefmt:指定时间的输出格式
--format:指定变化文件的详细信息
# 一旦发现文件改变会生成日志
发送邮件脚本
- [root@manager ~]# cat sendmail.sh
- #!/bin/bash
- clear
- path_f=/tmp/monitor.log
- email=@.com
- function mutt_send()
- {
- /usr/local/mutt/bin/mutt -s "WARN" -c ${email}</tmp/monitor.log
- }
- if [ -s $path_f ]; then
- mutt_send
- echo "mail send.......";sleep
- /usr/local/mutt/bin/mutt -s "WARN" -c ${email}</tmp/monitor.log
- fi
- cat /dev/null > $path_f
测试
- cd /home/benjamindata/
touch 123
# 由于定时任务要5分钟才轮询执行一次脚本,我手动触发脚本执行。这个脚本就是检查 monitor.log是否存在内容来判断是否发送邮件,当每次脚本执行以后会清空该日志内容。
sh sendmail.sh- [root@manager ~]# rm -fr /home/benjamindata/*
- [root@manager ~]# cat /tmp/monitor.log
2018-03-1218:27:41/home/benjamindata/123DELETE
2018-03-1218:27:41/home/benjamindata/inotify_testDELETE,ISDIR
2018-03-1218:27:41/home/benjamindata/inotify_test/DELETE_SELF

这里就结束了。
inotify+rsync实现实时同步并邮件通知的更多相关文章
- 【转】inotify+rsync实现实时同步
[转]inotify+rsync实现实时同步 1.1 什么是实时同步:如何实现实时同步 要利用监控服务(inotify),监控同步数据服务器目录中信息的变化 发现目录中数据产生变化,就利用rsync服 ...
- inotify+rsync实现实时同步
第1章 数据实时同步介绍 1.1 什么是实时同步:如何实现实时同步 A. 要利用监控服务(inotify),监控同步数据服务器目录中信息的变化 B. 发现目录中数据产生变化,就利用rsync服务推送到 ...
- inotify+rsync实现实时同步部署
1.1.架构规划 1.1.1架构规划准备 服务器系统 角色 IP Centos6.7 x86_64 NFS服务器端(NFS-server-inotify-tools) 192.168.1.14 Cen ...
- inotify +rsync进行实时同步
1.安装rpm -ivh http://dl.fedoraproject.org/pub/epel/epel-release-latest-6.noarch.rpmyum -y install ino ...
- inotify+rsync文件实时同步
原文转自http://dl528888.blog.51cto.com/2382721/771533/ 之前做了“ssh信任与scp自动传输脚本”的技术文档,此方案是作为公司里备份的方法,但在实际的运行 ...
- lsyncd替代inotify+rsync实现实时同步
因公司业务需要需要实时同步日志文件,刚一开始使用的是inotify+rsync来实现实时同步,但时间久而久之发现同步的速度越来越慢,往往延迟好几个小时.查了一下网上的inotify+rsync方案基本 ...
- inotify+rsync目录实时同步
两台linux服务器系统CentOS7 一台Apache IP:192.168.155.130(发布文件服务器,也可以叫rsync客户端) 一台nginx IP:192.168.155.131(同步镜 ...
- inotify+rsync实现实时同步(附解决crontab中无法执行python脚本的问题)
1.准备环境 # 系统支持的话,下面的目录就会存在 ls /proc/sys/fs/inotify/ rpm -qa inotify-tools yum -y install inotify-tool ...
- inotify+rsync文件实时同步报错:usr/local/bin/inotifywait: error while loading shared libraries: libinotifytools.so.0:
解决办法: ln -sv /usr/local/lib/libinotify* /usr/lib/ /usr/lib64/libinotifytools.so.
随机推荐
- hadoop进阶
Java 多线程安全机制 1.操作系统有两个容易混淆的概念,进程和线程. 进程:一个计算机程序的运行实例,包含了需要执行的指令:有自己的独立地址空间,包含程序内容和数据:不同进程的地址空间是互相隔离的 ...
- 每天一个Linux命令(9):cp命令
cp命令用来将一个或多个源文件或者目录复制到指定的目的文件或目录.它可以将单个源文件复制成一个指定文件名的具体的文件或一个已经存在的目录下.cp命令还支持同时复制多个文件,当一次复制多个文件时,目标文 ...
- Nodejs的那些事
前言: Node.js实际上是算是个前端开发,但是我们要做APP自动化涉及到 node.js ,也需要它来帮我们安装一些 packing 一.Node.js安装 1.安装Node.js:立即下载 2. ...
- [译]13-spring 内部bean
spring基于xml配置元数据的方式下,位于property元素或者contructor-arg元素内的bean元素被称为内部bean,如下: <?xml version="1.0& ...
- 【转载】Unity3D研究院transform.parent = parent坐标就乱了
昨天有朋友问我了一个问题,它将Hierarchy视图里的某个子节点下的GameObject拷贝到另外一个对象的子节点下面,他使用的方法就是 transform.parent = parent 但是拷贝 ...
- bitbucket相关操作
常见命令: git checkout -b develop master 创建Develop分支的命令 git checkout master 切换到Master分支 git merge --no-f ...
- shell之基本语法
转: read 命令从 stdin 获取输入并赋值给 PERSON 变量,最后在 stdout 上输出: #!/bin/bash # Script follows here: echo " ...
- Spring Web MVC 笔记
Spring Web MVC 流程 Dispatcher Servlet 这是一个前端分派 Servlet(前端控制器模式),外部所有的请求都会先到达这里,然后由其将请求分派给其他组件进行实际的处理. ...
- HDU 4725 The Shortest Path in Nya Graph( 建图 + 最短路 )
主要是建图,建好图之后跑一边dijkstra即可. 一共3N个点,1~N是原图中的点1~N,然后把每层x拆成两个点(N+x)[用于连指向x层的边]和(N+N+x)[用于连从x层指出的边]. 相邻层节点 ...
- maven中mapper.xml不发布的问题
在自定义的包中定义了mapper.xml然后利用mybatis的扫描包形式来动态创建mapper 开启工程报错: 说无效的绑定 原因: 发布的war中,工程包中的mapper根本就没有出现在class ...