第十二章 LNMP架构之分离数据库
一、课程回顾
1.搭建LNMP环境
1.配置官方源
2.yum安装依赖
3.yum安装nginx
4.配置nginx
5.创建用户
6.启动并加入开机自启
7.上传安装包
8.解压安装包
9.卸载旧版本PHP
10.安装新版本PHP
11.配置
12.启动并加入开机自启
13.yum安装mariadb-server
14.启动并加入开机自启
15.连接验证
16.设置登陆密码
17.使用密码登录
2.搭建WordPress、知乎、交作业平台
1.上传代码包
2.解压
3.授权代码
4.配置nginx
5.配置本地hosts文件
6.重启访问测试
7.数据库建库
8.根据页面提示操作
二、搭建LNMP
1.配置官方源
[root@web01 ~]# vim /etc/yum.repos.d/nginx.repo
[nginx-stable]
name=nginx stable repo
baseurl=http://nginx.org/packages/centos/7/$basearch/
gpgcheck=1
enabled=1
gpgkey=https://nginx.org/keys/nginx_signing.key
module_hotfixes=true
2.yum安装依赖
3.yum安装nginx
[root@web01 ~]# yum install -y nginx
4.配置nginx
[root@web01 ~]# vim /etc/nginx/nginx.conf
user  www;
... ...
http {
    ... ...
    client_max_body_size 200m;
    ... ...
}
5.创建用户
[root@web01 ~]# groupadd www -g 666

[root@web01 ~]# useradd www -u 666 -g 666 -s /sbin/nologin -M
6.启动并加入开机自启
[root@web01 ~]# systemctl start nginx

[root@web01 ~]# systemctl enable nginx

#验证

[root@web01 ~]# ps -ef | grep nginx
7.上传PHP安装包
[root@web01 ~]# mkdir /package

[root@web01 ~]# cd /package/

[root@web01 /package]# rz
8.解压安装包
[root@web01 /package]# tar xf php.tar.gz
9.卸载旧版本PHP
[root@web01 /package]# yum remove php-mysql-5.4 php php-fpm php-common
10.安装新版本PHP
[root@web01 /package]# yum localinstall -y *.rpm
11.配置
[root@web01 ~]# vim /etc/php-fpm.d/www.conf
user = www
group = www
[root@web01 ~]# vim /etc/php.ini
post_max_size = 100M
upload_max_filesize = 100M
#如果nginx和php不在一台机器,需要额外配置
[root@web01 ~]# vim /etc/php-fpm.d/www.conf
listen = 172.16.1.7:9000
listen.allowed_clients = 172.16.1.8
12.启动并加入开机自启
[root@web01 ~]# systemctl start php-fpm
[root@web01 ~]# systemctl enable php-fpm
13.yum安装mariadb-server
[root@web01 ~]# yum install -y mariadb-server
14.启动并加入开机自启
[root@web01 ~]# systemctl start mariadb
[root@web01 ~]# systemctl enable mariadb
15.连接验证
[root@web01 ~]# mysql
16.设置登录密码
[root@web01 ~]# mysqladmin -uroot password 'Linhd@123'
17.使用密码登录
[root@web01 ~]# mysql -u root -pLinhd@123
三、搭建WordPress、知乎、edusoho
1.上传代码包
[root@web01 ~]# mkdir /code
[root@web01 ~]# cd /code/
[root@web01 /code]# rz
[root@web01 /code]# ll
total 86372
-rw-r--r-- 1 root root 68889387 Aug 26 21:41 edusoho-8.3.36.tar.gz
-rw-r--r-- 1 root root  8451194 Aug 26 21:40 WeCenter_3-2-1.zip
-rw-r--r-- 1 root root 11098483 Mar 22 22:41 wordpress-5.0.3-zh_CN.tar.gz
2.解压
[root@web01 /code]# tar xf edusoho-8.3.36.tar.gz
[root@web01 /code]# tar xf wordpress-5.0.3-zh_CN.tar.gz
[root@web01 /code]# yum install -y unzip
[root@web01 /code]# unzip WeCenter_3-2-1.zip
[root@web01 /code]# mv WeCenter_3-2-1 zh
3.授权代码
[root@web01 /code]# chown -R www.www /code/
4.配置nginx
1.wordpress的nginx配置
[root@web01 /code]# vim /etc/nginx/conf.d/linux.blog.com.conf

server {

    listen 80;

    server_name linux.blog.com;

    root /code/wordpress;

    location / {

        index index.php;

    }

    location ~* \.php$ {

        fastcgi_pass 127.0.0.1:9000;

        fastcgi_param SCRIPT_FILENAME $document_root$fastcgi_script_name;

        include fastcgi_params;

    }

}
2.wecenter的nginx配置
[root@web01 /code]# vim /etc/nginx/conf.d/linux.zh.com.conf

server {

    listen 80;

    server_name linux.zh.com;

    root /code/zh;

    location / {

        index index.php;

    }

    location ~* \.php$ {

        fastcgi_pass 127.0.0.1:9000;

        fastcgi_param SCRIPT_FILENAME $document_root$fastcgi_script_name;

        include fastcgi_params;

    }

}
3.edusoho的nginx配置
server {

    listen 80;

    server_name linux.edu.com;

    root /code/edusoho/web;

    location / {

        index app.php;

        try_files $uri @rewriteapp;

    }

    location @rewriteapp {

        rewrite ^(.*)$ /app.php/$1 last;

    }

    location ~ ^/udisk {

        internal;

        root /var/www/edusoho/app/data/;

    }

    location ~ ^/(app|app_dev)\.php(/|$) {

        fastcgi_pass   127.0.0.1:9000;

        fastcgi_split_path_info ^(.+\.php)(/.*)$;

        include fastcgi_params;

        fastcgi_param  SCRIPT_FILENAME    $document_root$fastcgi_script_name;

        fastcgi_param  HTTPS              off;

        fastcgi_param HTTP_X-Sendfile-Type X-Accel-Redirect;

        fastcgi_param HTTP_X-Accel-Mapping /udisk=/code/edusoho/app/data/udisk;

        fastcgi_buffer_size 128k;

        fastcgi_buffers 8 128k;

    }

    # 配置设置图片格式文件

    location ~* \.(jpg|jpeg|gif|png|ico|swf)$ {

        # 过期时间为3年

        expires 3y;

        # 关闭日志记录

        access_log off;

        # 关闭gzip压缩,减少CPU消耗,因为图片的压缩率不高。

        gzip off;

    }

    # 配置css/js文件

    location ~* \.(css|js)$ {

        access_log off;

        expires 3y;

    }

    # 禁止用户上传目录下所有.php文件的访问,提高安全性

    location ~ ^/files/.*\.(php|php5)$ {

        deny all;

    }

    # 以下配置允许运行.php的程序,方便于其他第三方系统的集成。

    location ~ \.php$ {

        # [改] 请根据实际php-fpm运行的方式修改

        fastcgi_pass   127.0.0.1:9000;

        fastcgi_split_path_info ^(.+\.php)(/.*)$;

        include fastcgi_params;

        fastcgi_param  SCRIPT_FILENAME    $document_root$fastcgi_script_name;

        fastcgi_param  HTTPS              off;

    }

}
5.配置本地hosts文件
10.0.0.7 linux.blog.com

10.0.0.7 linux.zh.com

10.0.0.7 linux.edu.com
6.重启访问测试
#检查配置

[root@web01 /code]# nginx -t

nginx: the configuration file /etc/nginx/nginx.conf syntax is ok

nginx: configuration file /etc/nginx/nginx.conf test is successful

#重启

[root@web01 /code]# systemctl restart nginx
7.数据库建库
[root@web01 /code]# mysql -uroot -pLinhd@123
Welcome to the MariaDB monitor. Commands end with ; or \g.
Your MariaDB connection id is 8
Server version: 5.5.65-MariaDB MariaDB Server
Copyright (c) 2000, 2018, Oracle, MariaDB Corporation Ab and others.
Type 'help;' or '\h' for help. Type '\c' to clear the current input statement.
MariaDB [(none)]> show databases;
+--------------------+
| Database |
+--------------------+
| information_schema |
| mysql |
| performance_schema |
| test |
+--------------------+
4 rows in set (0.01 sec)
MariaDB [(none)]> create database wordpress;
Query OK, 1 row affected (0.00 sec)
MariaDB [(none)]> create database zh;
Query OK, 1 row affected (0.00 sec)
8.根据页面提示操作
http://linux.blog.com

http://linux.zh.com

http://linux.edu.com
四、拆分数据库
1.为什么要拆分数据库
由于单台服务器运行LNMP架构会导致网站访问缓慢,当内存被占满时,
很容易导致系统出现oom从而kill掉MySQL数据库,所以要将web和数据库进行独立部署。
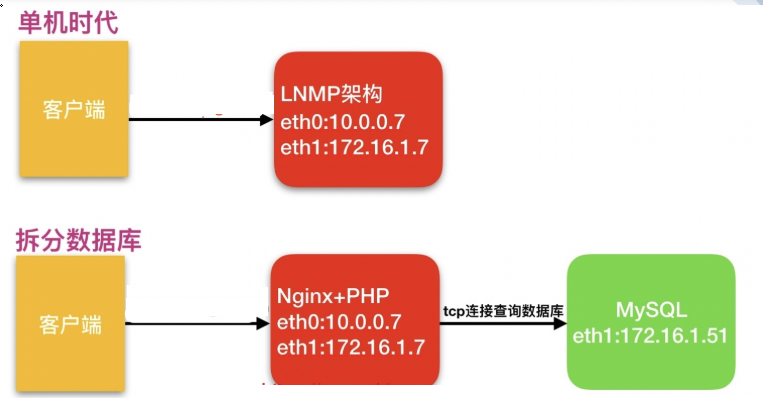
2.数据库拆分解决问题
1.缓解网站压力
2.增强数据库读写性能
3.提高用户访问速度
3.环境准备
| 主机 | IP | 服务 |
|---|---|---|
| web01 | 172.16.1.7 | nginx、php |
| db01 | 172.16.1.51 | mariadb |
4.在新的服务器上搭建数据库(盖新房子)
[root@db01 ~]# yum install -y mariadb-server
5.配置启动(装修)
[root@db01 ~]# systemctl start mariadb
[root@db01 ~]# systemctl enable mariadb
6.配置密码(换锁)
[root@db01 ~]# mysqladmin -uroot password "Linhd@123"
7.连接测试(尝试居住)
#本机连接

[root@db01 ~]# mysql -uroot -pLinhd@123

#远程连接测试

[root@web01 ~]# mysql -uroot -pLinhd@123 -h172.16.1.51

ERROR 1130 (HY000): Host '172.16.1.7' is not allowed to connect to this MariaDB server

mysql 			#命令

-u				#指定用户

root 			#数据库用户

-p				#指定密码

Linhd@123 		#数据库用户的密码

-h				#指定主机

172.16.1.51		#远端数据库的主机地址
8.授权远程连接数据库(想办法住)
#连接数据库

[root@db01 ~]# mysql -uroot -pLinhd@123

#授权

MariaDB [(none)]> grant all on *.* to root@'172.16.1.%' identified by '123456';

Query OK, 0 rows affected (0.00 sec)

grant 				#授权命令

all 				#所有权限

on 					#在...上

*.* 				#所有库.所有表

to 					#给...

root@'172.16.1.%' 	  #用户   root@'172.16.1.%'   root用户通过172.16.1.0-255连接都允许

identified 			#指定密码

by 					#是

'123456';			#密码
9.再次远程连接(再尝试居住)
[root@web01 ~]# mysql -uroot -p123456 -h172.16.1.51
Welcome to the MariaDB monitor. Commands end with ; or \g.
Your MariaDB connection id is 5
Server version: 5.5.65-MariaDB MariaDB Server
Copyright (c) 2000, 2018, Oracle, MariaDB Corporation Ab and others.
Type 'help;' or '\h' for help. Type '\c' to clear the current input statement.
MariaDB [(none)]> show databases;
+--------------------+
| Database |
+--------------------+
| information_schema |
| mysql |
| performance_schema |
| test |
+--------------------+
4 rows in set (0.00 sec)
10.旧库数据导出(打包般出家门)
[root@web01 ~]# mysqldump -uroot -pLinhd@123 -B wordpress > /tmp/wordpress.sql
[root@web01 ~]# mysqldump -uroot -pLinhd@123 -B zh > /tmp/zh.sql
[root@web01 ~]# mysqldump -uroot -pLinhd@123 -B edusoho > /tmp/edu.sql
11.将数据推送至新库(搬到新家门口)
[root@web01 ~]# scp /tmp/*.sql 172.16.1.51:/tmp
12.将数据导入新库(把物品搬到新家里面)
1)方式一:库外导入
[root@db01 ~]# mysql -uroot -pLinhd@123 < /tmp/wordpress.sql
[root@db01 ~]# mysql -uroot -pLinhd@123 < /tmp/zh.sql
[root@db01 ~]# mysql -uroot -pLinhd@123 < /tmp/edu.sql
2)方式二:库内读取
MariaDB [wordpress]> source /tmp/wordpress.sql;

MariaDB [wordpress]> source /tmp/zh.sql;

MariaDB [wordpress]> source /tmp/edu.sql;
3)方式三:传送门
[root@web01 ~]# mysql -uroot -p123456 -h172.16.1.51 < /tmp/wordpress.sql

[root@web01 ~]# mysql -uroot -p123456 -h172.16.1.51 < /tmp/zh.sql

[root@web01 ~]# mysql -uroot -p123456 -h172.16.1.51 < /tmp/edu.sql
13.查看数据迁移完成(有没有忘记物品)
MariaDB [(none)]> show databases;

+--------------------+

| Database           |

+--------------------+

| information_schema |

| edusoho            |

| mysql              |

| performance_schema |

| test               |

| wordpress          |

| zh                 |

+--------------------+

7 rows in set (0.00 sec)
14.修改项目的数据库地址(告诉亲戚新住址)
1)wordpress数据库地址
[root@web01 ~]# vim /code/wordpress/wp-config.php

/** WordPress数据库的名称 */

define('DB_NAME', 'wordpress');

/** MySQL数据库用户名 */

define('DB_USER', 'root');

/** MySQL数据库密码 */

define('DB_PASSWORD', '123456');

/** MySQL主机 */

define('DB_HOST', '172.16.1.51');
2)wecenter数据库地址
[root@web01 ~]# vim /code/zh/system/config/database.php

<?php

$config['charset'] = 'utf8';^M

$config['prefix'] = 'aws_';^M

$config['driver'] = 'MySQLi';^M

$config['master'] = array (

  'charset' => 'utf8',

  'host' => '172.16.1.51',

  'username' => 'root',

  'password' => '123456',

  'dbname' => 'zh',

);^M

$config['slave'] = false;^M
3)edusoho数据库地址
[root@web01 ~]# vim /code/edusoho/app/config/parameters.yml

parameters:

    database_driver: pdo_mysql

    database_host: 172.16.1.51

    database_port: 3306

    database_name: edusoho

    database_user: root

    database_password: '123456'

#edusoho修改后需要清除cache缓存

[root@web01 ~]# rm -rf /code/edusoho/app/cache/*
15.停止旧库
[root@web01 ~]# systemctl stop mariadb
16.访问页面测试
linux.blog.com

linux.zh.com

linux.edu.com
五、扩展web服务器
1.配置官方源
[root@web03 ~]# vim /etc/yum.repos.d/nginx.repo

[nginx-stable]

name=nginx stable repo

baseurl=http://nginx.org/packages/centos/7/$basearch/

gpgcheck=1

enabled=1

gpgkey=https://nginx.org/keys/nginx_signing.key

module_hotfixes=true
2.yum安装依赖
3.yum安装nginx
[root@web03 ~]# yum install -y nginx
4.配置nginx
[root@web01 ~]# scp -r /etc/nginx/.* 172.16.1.9:/etc/nginx/
5.创建用户
[root@web03 ~]# groupadd www -g 666

[root@web03 ~]# useradd www -u 666 -g 666 -s /sbin/nologin -M
6.启动并加入开机自启
[root@web03 ~]# systemctl start nginx

[root@web03 ~]# systemctl enable nginx

#验证

[root@web01 ~]# ps -ef | grep nginx
7.上传php安装包
[root@web03 ~]# mkdir /package

[root@web03 ~]# cd /package/

[root@web03 /package]# rz
8.解压安装包
[root@web03 /package]# tar xf php.tar.gz
9.卸载旧版本PHP
[root@web03 /package]# yum remove php-mysql-5.4 php php-fpm php-common
10.安装新版本PHP
[root@web03 /package]# yum localinstall -y *.rpm
11.配置
[root@web01 ~]# scp /etc/php-fpm.d/www.conf 172.16.1.9:/etc/php-fpm.d/
[root@web01 ~]# scp /etc/php.ini  172.16.1.9:/etc/
12.启动并加入开机自启
[root@web03 ~]# systemctl start php-fpm
[root@web03 ~]# systemctl enable php-fpm
13.同步站点目录文件
#web01打包
[root@web01 ~]# tar zcf code.tar.gz /code
[root@web01 ~]# scp -r code.tar.gz 172.16.1.9:/
#web03解压
[root@web03 ~]# cd /
[root@web03 /]# tar xf code.tar.gz
14.授权站点目录
[root@web03 ~]# chown -R www.www /code/
15.配置本地hosts
#10.0.0.7 www.zuoye.com linux.blog.com linux.zh.com linux.edu.com

10.0.0.9 www.zuoye.com linux.blog.com linux.zh.com linux.edu.com
16.访问测试
#问题:

web01上传的图片,web02看不到

web02上传的图片,web01看不到
六、文件共享
1.搭建nfs服务端
1)安装
[root@nfs ~]# yum install -y rpcbind nfs-utils
2)规划目录
1.wordpress文件目录:

[root@nfs ~]# mkdir /data/wp -p

2.zh文件目录:

[root@nfs ~]# mkdir /data/zh -p

3.edu文件目录:

[root@nfs ~]# mkdir /data/edu -p
3)配置NFS
[root@nfs ~]# vim /etc/exports

/data/wp 172.16.1.0/24(rw,sync,all_squash,anonuid=666,anongid=666)

/data/zh 172.16.1.0/24(rw,sync,all_squash,anonuid=666,anongid=666)

/data/edu 172.16.1.0/24(rw,sync,all_squash,anonuid=666,anongid=666)
4)创建用户
[root@nfs ~]# groupadd www -g 666

[root@nfs ~]# useradd www -u 666 -g 666
5)授权
[root@nfs ~]# chown -R www.www /data/
6)启动服务
[root@nfs ~]# systemctl start rpcbind nfs

[root@nfs ~]# systemctl enable rpcbind nfs
7)查看配置是否正确
[root@nfs ~]# cat /var/lib/nfs/etab

/data/edu	172.16.1.0/24(rw,sync,wdelay,hide,nocrossmnt,secure,root_squash,all_squash,no_subtree_check,secure_locks,acl,no_pnfs,anonuid=666,anongid=666,sec=sys,rw,secure,root_squash,all_squash)

/data/zh	172.16.1.0/24(rw,sync,wdelay,hide,nocrossmnt,secure,root_squash,all_squash,no_subtree_check,secure_locks,acl,no_pnfs,anonuid=666,anongid=666,sec=sys,rw,secure,root_squash,all_squash)

/data/wp	172.16.1.0/24(rw,sync,wdelay,hide,nocrossmnt,secure,root_squash,all_squash,no_subtree_check,secure_locks,acl,no_pnfs,anonuid=666,anongid=666,sec=sys,rw,secure,root_squash,all_squash)
2.客户端
1)安装nfs
[root@web01 ~]# yum install -y rpcbind nfs-utils

[root@web03 ~]# yum install -y rpcbind nfs-utils
2)启动rpcbind
[root@web01 ~]# systemctl start rpcbind

[root@web03 ~]# systemctl start rpcbind
3)查看挂载点
[root@web01 ~]# showmount -e 172.16.1.31

Export list for 172.16.1.31:

/data/edu 172.16.1.0/24

/data/zh  172.16.1.0/24

/data/wp  172.16.1.0/24
4)先推送目录下文件
[root@web01 ~]# scp -r /code/wordpress/wp-content/uploads/* 172.16.1.31:/data/wp/

[root@web03 ~]# scp -r /code/wordpress/wp-content/uploads/* 172.16.1.31:/data/wp/

[root@web01 ~]# scp -r /code/zh/uploads/* 172.16.1.31:/data/zh/

[root@web03 ~]# scp -r /code/zh/uploads/* 172.16.1.31:/data/zh/
5)挂载
[root@web01 ~]# mount -t nfs 172.16.1.31:/data/wp /code/wordpress/wp-content/uploads
[root@web01 ~]# mount -t nfs 172.16.1.31:/data/zh /code/zh/uploads
[root@web03 ~]# mount -t nfs 172.16.1.31:/data/wp /code/wordpress/wp-content/uploads
[root@web03 ~]# mount -t nfs 172.16.1.31:/data/zh /code/zh/uploads
[root@web01 ~]# df -h
172.16.1.31:/data/wp 98G 1.9G 96G 2% /code/wordpress/wp-content/uploads
172.16.1.31:/data/zh 98G 1.9G 96G 2% /code/zh/uploads
七、LNMP+数据库+nfs+实时备份
1.需求
1.搭建两台nginx
2.数据库单独部署
3.搭建博客和知乎
4.文件实现共享
2.环境准备
| 主机 | 角色 | IP |
|---|---|---|
| webo1 | ngixn服务器 | 10.0.0.7 |
| web02 | nginx服务器 | 10.0.0.8 |
| db01 | 数据库服务器 | 10.0.0.51 |
| nfs01 | 文件共享服务器 | 10.0.0.61 |
| backup | 备份服务器 | 10.0.0.41 |
3.web01搭建nginx服务器
1.配置官方源
[root@web01 ~]# vim /etc/yum.repos.d/nginx.repo
[nginx-stable]
name=nginx stable repo
baseurl=http://nginx.org/packages/centos/7/$basearch/
gpgcheck=1
enabled=1
gpgkey=https://nginx.org/keys/nginx_signing.key
module_hotfixes=true
2.安装依赖包
[root@web01 ~]# yum install -y gcc gcc-c++ autoconf pcre pcre-devel make automake wget httpd-tools vim tree
3.安装nginx
[root@web01 ~]# yum -y install nginx
4.配置nginx
[root@web01 ~]# vim /etc/nginx/nginx.conf
user www;
worker_processes 1;
error_log /var/log/nginx/error.log warn;
pid /var/run/nginx.pid;
events {
worker_connections 1024;
}
http {
include /etc/nginx/mime.types;
default_type application/octet-stream;
log_format main '$remote_addr - $remote_user [$time_local] "$request" '
'$status $body_bytes_sent "$http_referer" '
'"$http_user_agent" "$http_x_forwarded_for"';
access_log /var/log/nginx/access.log main;
sendfile on;
#tcp_nopush on;
client_max_body_size 200m;
keepalive_timeout 65;
#gzip on;
include /etc/nginx/conf.d/*.conf;
}
5.创建统一用户
[root@web01 ~]# groupadd www -g 666
[root@web01 ~]# useradd www -u 666 -g 666
6.启动服务并设置开机自启
[root@web01 ~]# systemctl start nginx
[root@web01 ~]# systemctl enable nginx
Created symlink from /etc/systemd/system/multi-user.target.wants/nginx.service to /usr/lib/systemd/system/nginx.service.
4.web02搭建nginx服务器
1.配置官方源
[root@web02 ~]# vim /etc/yum.repos.d/nginx.repo
[nginx-stable]
name=nginx stable repo
baseurl=http://nginx.org/packages/centos/7/$basearch/
gpgcheck=1
enabled=1
gpgkey=https://nginx.org/keys/nginx_signing.key
module_hotfixes=true
2.安装依赖
[root@web02 ~]# yum install -y gcc gcc-c++ autoconf pcre pcre-devel make automake wget httpd-tools vim tree
3.安装nginx
[root@web02 ~]# yum -y install nginx
4.配置nginx
[root@web02 ~]# vim /etc/nginx/nginx.conf
user www;
worker_processes 1;
error_log /var/log/nginx/error.log warn;
pid /var/run/nginx.pid;
events {
worker_connections 1024;
}
http {
include /etc/nginx/mime.types;
default_type application/octet-stream;
log_format main '$remote_addr - $remote_user [$time_local] "$request" '
'$status $body_bytes_sent "$http_referer" '
'"$http_user_agent" "$http_x_forwarded_for"';
access_log /var/log/nginx/access.log main;
sendfile on;
#tcp_nopush on;
client_max_body_size 200m;
keepalive_timeout 65;
#gzip on;
include /etc/nginx/conf.d/*.conf;
}
5.创建统一用户
[root@web02 ~]# groupadd www -g 666
[root@web02 ~]# useradd www -u 666 -g 666
6.启动服务并设置开机自启
[root@web02 ~]# systemctl start nginx
[root@web02 ~]# systemctl enable nginx
Created symlink from /etc/systemd/system/multi-user.target.wants/nginx.service to /usr/lib/systemd/system/nginx.service.
5.web01配置PHP
1.上传源码包
[root@web01 ~]# mkdir /package
[root@web01 ~]# cd /package/
[root@web01 /package]# rz
[root@web01 /package]# ll
total 19424
-rw-r--r-- 1 root root 19889622 2020-08-27 16:29 php.tar.gz
2.解压源码包
[root@web01 /package]# tar xf php.tar.gz
3.安装php
[root@web01 /package]# yum -y localinstall *.rpm
4.配置php
[root@web01 /package]# vim /etc/php-fpm.d/www.conf
user = www
group = www
[root@web01 /package]# vim /etc/php.ini
post_max_size = 200M
upload_max_filesize = 200M
5.启动PHP并设置开机自启
[root@web01 /package]# systemctl start php-fpm.service
[root@web01 /package]# systemctl enable php-fpm.service
Created symlink from /etc/systemd/system/multi-user.target.wants/php-fpm.service to /usr/lib/systemd/system/php-fpm.service.
6.web02配置PHP
1.上传源码包
[root@web02 ~]# mkdir /package
[root@web02 ~]# cd /package/
[root@web02 ~]# rz
[root@web02 /package]# ll
total 19424
-rw-r--r-- 1 root root 19889622 2020-08-27 16:42 php.tar.gz
2.解压源码包
[root@web02 /package]# tar xf php.tar.gz
3.安装php
[root@web02 /package]# yum -y localinstall *.rpm
4.配置php
[root@web02 /package]# vim /etc/php-fpm.d/www.conf
user = www
group = www
[root@web02 /package]# vim /etc/php.ini
post_max_size = 200M
upload_max_filesize = 200M
5.启动PHP并设置开机自启
[root@web02 /package]# systemctl start php-fpm.service
[root@web02 /package]# systemctl enable php-fpm.service
Created symlink from /etc/systemd/system/multi-user.target.wants/php-fpm.service to /usr/lib/systemd/system/php-fpm.service.
7.webo1安装mariadb-server
1.安装数据库
[root@web01 ~]# yum -y install mariadb-server.x86_64
2.启动数据库并设置开机自启
[root@web01 ~]# systemctl start mariadb.service
[root@web01 ~]# systemctl enable mariadb.service
Created symlink from /etc/systemd/system/multi-user.target.wants/mariadb.service to /usr/lib/systemd/system/mariadb.service.
3.设置数据库密码
[root@web01 ~]# mysqladmin -uroot password root
4.验证数据库密码
[root@web01 ~]# mysql -uroot -proot
Welcome to the MariaDB monitor. Commands end with ; or \g.
Your MariaDB connection id is 3
Server version: 5.5.65-MariaDB MariaDB Server
Copyright (c) 2000, 2018, Oracle, MariaDB Corporation Ab and others.
Type 'help;' or '\h' for help. Type '\c' to clear the current input statement.
MariaDB [(none)]>
5.创建数据库
MariaDB [(none)]> create database wordpress;
Query OK, 1 row affected (0.00 sec)
MariaDB [(none)]> create database zh;
Query OK, 1 row affected (0.00 sec)
8.web01安装WordPress、知乎、eduSOHO
1.新建目录
[root@web01 /package]# mkdir /code
2.上传源代码
[root@web01 /code]# rz -be
[root@web01 /code]# ll
total 86372
-rw-r--r-- 1 root root 68889387 2020-08-27 17:04 1_edusoho-8.3.36.tar.gz
-rw-r--r-- 1 root root  8451194 2020-08-27 17:04 WeCenter_3-2-1.zip
-rw-r--r-- 1 root root 11098483 2020-08-27 17:04 wordpress-5.0.3-zh_CN.tar.gz
3.安装WordPress
1.配置nginx站点目录
[root@web01 /code]# vim /etc/nginx/conf.d/linux.wordpress.com.conf
server {
listen 80;
server_name linux.wordpress.com;
location / {
root /code/wordpress;
index index.php;
}
location ~* \.php$ {
root /code/wordpress;
fastcgi_pass 127.0.0.1:9000;
fastcgi_param SCRIPT_FILENAME $document_root$fastcgi_script_name;
include fastcgi_params;
}
}
2.检查服务并重启
[root@web01 /package]# nginx -t
nginx: the configuration file /etc/nginx/nginx.conf syntax is ok
nginx: configuration file /etc/nginx/nginx.conf test is successful
[root@web01 /package]# systemctl restart nginx
3.解压源码包
[root@web01 /code]# tar xf wordpress-5.0.3-zh_CN.tar.gz
4.安装知乎
1.配置nginx站点目录
[root@web01 /code]# vim /etc/nginx/conf.d/linux.zh.com.conf
server {
listen 80;
server_name linux.zh.com;
root /code/zh;
index index.php;
location ~* \.php$ {
fastcgi_pass 127.0.0.1:9000;
fastcgi_param SCRIPT_FILENAME $document_root$fastcgi_script_name;
include fastcgi_params;
}
}
2.检查服务并重启
[root@web01 /code]# nginx -t
nginx: the configuration file /etc/nginx/nginx.conf syntax is ok
nginx: configuration file /etc/nginx/nginx.conf test is successful
[root@web01 /code]# !sy
systemctl restart nginx
3.解压源码包
[root@web01 /code]# unzip WeCenter_3-2-1.zip
[root@web01 /code]# mv WeCenter_3-2-1 zh
5.安装eduSOHO
1.配置nginx站点目录
[root@web01 /code]# vim /etc/nginx/conf.d/linux.edu.com.conf
server {
listen 80;
server_name linux.edu.com;
root /code/edusoho/web;
location / {
index app.php;
try_files $uri @rewriteapp;
}
location @rewriteapp {
rewrite ^(.*)$ /app.php/$1 last;
}
location ~ ^/udisk {
internal;
root /var/www/edusoho/app/data/;
}
location ~ ^/(app|app_dev)\.php(/|$) {
fastcgi_pass 127.0.0.1:9000;
fastcgi_split_path_info ^(.+\.php)(/.*)$;
include fastcgi_params;
fastcgi_param SCRIPT_FILENAME $document_root$fastcgi_script_name;
fastcgi_param HTTPS off;
fastcgi_param HTTP_X-Sendfile-Type X-Accel-Redirect;
fastcgi_param HTTP_X-Accel-Mapping /udisk=/code/edusoho/app/data/udisk;
fastcgi_buffer_size 128k;
fastcgi_buffers 8 128k;
}
# 配置设置图片格式文件
location ~* \.(jpg|jpeg|gif|png|ico|swf)$ {
# 过期时间为3年
expires 3y;
# 关闭日志记录
access_log off;
# 关闭gzip压缩,减少CPU消耗,因为图片的压缩率不高。
gzip off;
}
# 配置css/js文件
location ~* \.(css|js)$ {
access_log off;
expires 3y;
}
# 禁止用户上传目录下所有.php文件的访问,提高安全性
location ~ ^/files/.*\.(php|php5)$ {
deny all;
}
# 以下配置允许运行.php的程序,方便于其他第三方系统的集成。
location ~ \.php$ {
# [改] 请根据实际php-fpm运行的方式修改
fastcgi_pass 127.0.0.1:9000;
fastcgi_split_path_info ^(.+\.php)(/.*)$;
include fastcgi_params;
fastcgi_param SCRIPT_FILENAME $document_root$fastcgi_script_name;
fastcgi_param HTTPS off;
}
}
2.检查服务并重启
[root@web01 /code]# nginx -t
nginx: the configuration file /etc/nginx/nginx.conf syntax is ok
nginx: configuration file /etc/nginx/nginx.conf test is successful
[root@web01 /code]# systemctl restart nginx
3.解压源码包
[root@web01 /code]# tar xf 1_edusoho-8.3.36.tar.gz
[root@web01 /code]# mv WeCenter_3-2-1 zh
6.授权目录
[root@web01 /code]# chown -R www:www /code/
7.配置本地hosts
C:\Windows\System32\drivers\etc\hosts
10.0.0.7 linux.wordpress.com
10.0.0.7 linux.zh.com
10.0.0.7 linux.edusoho.com
9.web02安装mariadb-server
1.安装数据库
[root@web02 ~]# yum -y install mariadb-server.x86_64
2.启动数据库并设置开机自启
[root@web02 ~]# systemctl start mariadb.service
[root@web02 ~]# systemctl enable mariadb.service
Created symlink from /etc/systemd/system/multi-user.target.wants/mariadb.service to /usr/lib/systemd/system/mariadb.service.
3.设置数据库密码
[root@web02 ~]# mysqladmin -uroot password root
4.验证数据库密码
[root@web02 ~]# mysql -uroot -proot
Welcome to the MariaDB monitor. Commands end with ; or \g.
Your MariaDB connection id is 3
Server version: 5.5.65-MariaDB MariaDB Server
Copyright (c) 2000, 2018, Oracle, MariaDB Corporation Ab and others.
Type 'help;' or '\h' for help. Type '\c' to clear the current input statement.
MariaDB [(none)]>
5.创建数据库
MariaDB [(none)]> create database wordpress;
Query OK, 1 row affected (0.00 sec)
MariaDB [(none)]> create database zh;
Query OK, 1 row affected (0.00 sec)
10.web02安装wordpress、知乎、eduSOHO
1.新建目录
[root@web02 /package]# mkdir /code
2.webo1复制文件到web02
[root@web02 /package]# scp -r root@172.16.1.7:/code/* /code/
[root@web02 /code]# scp -r root@172.16.1.7:/etc/nginx/conf.d/* /etc/nginx/conf.d/
root@172.16.1.7's password:
linux.edu.com.conf 100% 1806 1.1MB/s 00:00
linux.wordpress.com.conf 100% 312 51.4KB/s 00:00
linux.zh.com.conf 100% 292 124.9KB/s 00:00
3.解压源码包并给目录授权
#删除源安装文件
[root@web02 /code]# rm -rf zh/
[root@web02 /code]# rm -rf edusoho/
[root@web02 /code]# rm -rf wordpress/
#重新解压安装包
[root@web02 /code]# tar xf 1_edusoho-8.3.36.tar.gz
[root@web02 /code]# tar xf 1_edusoho-8.3.36.tar.gz
[root@web02 /code]# unzip WeCenter_3-2-1.zip
#授权目录
[root@web02 /code]# chown -R www:www /code/
4.配置本地hosts文件
C:\Windows\System32\drivers\etc\hosts
10.0.0.8 linux.edusoho.com
10.0.0.8 linux.wordpress.com
10.0.0.8 linux.zh.com
11.分离数据库
1.db01安装数据库
[root@db01 ~]# yum -y install mariadb-server.x86_64
2.启动数据库并设置开机自启
[root@db01 ~]# systemctl start mariadb.service
[root@db01 ~]# systemctl enable mariadb.service
Created symlink from /etc/systemd/system/multi-user.target.wants/mariadb.service to /usr/lib/systemd/system/mariadb.service.
3.设置数据库密码
[root@db01 ~]# mysqladmin -uroot password root
4.验证数据库密码
[root@db01 ~]# mysql -uroot -proot
Welcome to the MariaDB monitor. Commands end with ; or \g.
Your MariaDB connection id is 3
Server version: 5.5.65-MariaDB MariaDB Server
Copyright (c) 2000, 2018, Oracle, MariaDB Corporation Ab and others.
Type 'help;' or '\h' for help. Type '\c' to clear the current input statement.
MariaDB [(none)]>
5.导出web01数据库文件
[root@web01 /code]# mysqldump -uroot -proot -B zh >/tmp/zh.sql
You have new mail in /var/spool/mail/root
[root@web01 /code]# mysqldump -uroot -proot -B wordpress >/tmp/wordpress.sql
[root@web01 /code]# mysqldump -uroot -proot -B edusoho >/tmp/edusoho.sql
[root@web01 /code]# ll /tmp/
total 1620
-rw-r--r-- 1 root root 658637 2020-08-27 19:50 edusoho.sql
-rw-r--r-- 1 root root 874200 2020-08-27 19:49 wordpress.sql
-rw-r--r-- 1 root root 121732 2020-08-27 19:49 zh.sql
[root@web01 /code]# scp /tmp/*.sql root@172.16.1.51:/tmp
6.db01导入web01数据
[root@db01 ~]# mysql -uroot -proot </tmp/edusoho.sql
[root@db01 ~]# mysql -uroot -proot </tmp/wordpress.sql
[root@db01 ~]# mysql -uroot -proot </tmp/zh.sql
7.查看数据迁移结果
[root@db01 ~]# mysql -uroot -proot
Welcome to the MariaDB monitor. Commands end with ; or \g.
Your MariaDB connection id is 8
Server version: 5.5.65-MariaDB MariaDB Server
Copyright (c) 2000, 2018, Oracle, MariaDB Corporation Ab and others.
Type 'help;' or '\h' for help. Type '\c' to clear the current input statement.
MariaDB [(none)]> show databases;
+--------------------+
| Database |
+--------------------+
| information_schema |
| edusoho |
| mysql |
| performance_schema |
| test |
| wordpress |
| zh |
+--------------------+
7 rows in set (0.00 sec)
MariaDB [(none)]>
8.授权数据库
MariaDB [(none)]> grant all on *.* to root@'172.16.1.%' identified by 'root';
Query OK, 0 rows affected (0.00 sec)
9.修改web01项目的数据库地址
[root@web01 /code]# vim /code/wordpress/wp-config.php
<?php
/**
* WordPress基础配置文件。
*
* 这个文件被安装程序用于自动生成wp-config.php配置文件,
* 您可以不使用网站,您需要手动复制这个文件,
* 并重命名为“wp-config.php”,然后填入相关信息。
*
* 本文件包含以下配置选项:
*
* * MySQL设置
* * 密钥
* * 数据库表名前缀
* * ABSPATH
*
* @link https://codex.wordpress.org/zh-cn:%E7%BC%96%E8%BE%91_wp-config.php
*
* @package WordPress
*/
// ** MySQL 设置 - 具体信息来自您正在使用的主机 ** //
/** WordPress数据库的名称 */
define('DB_NAME', 'wordpress');
/** MySQL数据库用户名 */
define('DB_USER', 'root');
/** MySQL数据库密码 */
define('DB_PASSWORD', 'root');
/** MySQL主机 */
define('DB_HOST', '172.16.1.51');
[root@web01 /code]# vim /code/zh/system/config/database.php
<?php
$config['charset'] = 'utf8';^M
$config['prefix'] = 'aws_';^M
$config['driver'] = 'MySQLi';^M
$config['master'] = array (
'charset' => 'utf8',
'host' => '172.16.1.51',
'username' => 'root',
'password' => 'root',
'dbname' => 'zh',
);^M
$config['slave'] = false;^M
[root@web01 /code]# vim /code/edusoho/app/config/parameters.yml
parameters:
database_driver: pdo_mysql
database_host: 172.16.1.51
database_port: 3306
database_name: edusoho
database_user: root
database_password: 'root'
mailer_transport: smtp
mailer_host: 127.0.0.1
mailer_user: null
mailer_password: null
locale: zh_CN
secret: pl8ik74jzzks44ko4kcc8084k0skc88
webpack_base_url: http://linux.edu.com
user_partner: none
[root@web01 /code]# rm -rf /code/edusoho/app/cache/*
10.修改web02项目的数据库地址
[root@web02 /code]# vim /code/wordpress/wp-config.php
<?php
/**
* WordPress基础配置文件。
*
* 这个文件被安装程序用于自动生成wp-config.php配置文件,
* 您可以不使用网站,您需要手动复制这个文件,
* 并重命名为“wp-config.php”,然后填入相关信息。
*
* 本文件包含以下配置选项:
*
* * MySQL设置
* * 密钥
* * 数据库表名前缀
* * ABSPATH
*
* @link https://codex.wordpress.org/zh-cn:%E7%BC%96%E8%BE%91_wp-config.php
*
* @package WordPress
*/
// ** MySQL 设置 - 具体信息来自您正在使用的主机 ** //
/** WordPress数据库的名称 */
define('DB_NAME', 'wordpress');
/** MySQL数据库用户名 */
define('DB_USER', 'root');
/** MySQL数据库密码 */
define('DB_PASSWORD', 'root');
/** MySQL主机 */
define('DB_HOST', '172.16.1.51');
[root@web02 /code]# vim /code/zh/system/config/database.php
<?php
$config['charset'] = 'utf8';^M
$config['prefix'] = 'aws_';^M
$config['driver'] = 'MySQLi';^M
$config['master'] = array (
'charset' => 'utf8',
'host' => '172.16.1.51',
'username' => 'root',
'password' => 'root',
'dbname' => 'zh',
);^M
$config['slave'] = false;^M
[root@web02 /code]# vim /code/edusoho/app/config/parameters.yml
parameters:
database_driver: pdo_mysql
database_host: 172.16.1.51
database_port: 3306
database_name: edusoho
database_user: root
database_password: 'root'
mailer_transport: smtp
mailer_host: 127.0.0.1
mailer_user: null
mailer_password: null
locale: zh_CN
secret: pl8ik74jzzks44ko4kcc8084k0skc88
webpack_base_url: http://linux.edu.com
user_partner: none
[root@web02 /code]# rm -rf /code/edusoho/app/cache/*
12.使用nfs01搭建nfs实现服务端文件共享
1.安装nfs
[root@nfs ~]# yum -y install rpcbind nfs-utils
2.创建目录
[root@nfs ~]# mkdir -p /data/wp
[root@nfs ~]# mkdir -p /data/zh
[root@nfs ~]# mkdir -p /data/edu
3.配置nfs
[root@nfs ~]# vim /etc/exports
/data/wp 172.16.1.0/24(rw,sync,all_squash,anonuid=666,anongid=666)
/data/zh 172.16.1.0/24(rw,sync,all_squash,anonuid=666,anongid=666)
/data/edu 172.16.1.0/24(rw,sync,all_squash,anonuid=666,anongid=666)
4.创建统一用户
[root@nfs ~]# groupadd www -g 666
[root@nfs ~]# useradd www -u 666 -g 666
5.授权目录
[root@nfs ~]# chown -R www:www /data/
6.重启服务并设置开机自启
[root@nfs ~]# systemctl restart rpcbind
[root@nfs ~]# systemctl restart nfs
[root@nfs ~]# systemctl enable nfs
[root@nfs ~]# systemctl enable rpcbind
7.检查配置
[root@nfs ~]# cat /var/lib/nfs/etab
/data/edu 172.16.1.0/24(rw,sync,wdelay,hide,nocrossmnt,secure,root_squash,all_squash,no_subtree_check,secure_locks,acl,no_pnfs,anonuid=666,anongid=666,sec=sys,rw,secure,root_squash,all_squash)
/data/zh 172.16.1.0/24(rw,sync,wdelay,hide,nocrossmnt,secure,root_squash,all_squash,no_subtree_check,secure_locks,acl,no_pnfs,anonuid=666,anongid=666,sec=sys,rw,secure,root_squash,all_squash)
/data/wp 172.16.1.0/24(rw,sync,wdelay,hide,nocrossmnt,secure,root_squash,all_squash,no_subtree_check,secure_locks,acl,no_pnfs,anonuid=666,anongid=666,sec=sys,rw,secure,root_squash,all_squash)
13.web01,web02实现nfs客户端配置
1.安装nfs
[root@web01 /code]# yum -y install rpcbind nfs-utils
[root@web02 /code]# yum -y install rpcbind nfs-utils
2.启动nfs
[root@web01 /code]# systemctl start rpcbind nfs
[root@web01 /code]# systemctl enable rpcbind nfs
Created symlink from /etc/systemd/system/multi-user.target.wants/nfs-server.service to /usr/lib/systemd/system/nfs-server.service.
[root@web02 /code]# systemctl start rpcbind nfs
[root@web02 /code]# systemctl enable rpcbind nfs
Created symlink from /etc/systemd/system/multi-user.target.wants/nfs-server.service to /usr/lib/systemd/system/nfs-server.service.
3.查看挂载点
[root@web01 /code]# showmount -e 172.16.1.31
Export list for 172.16.1.31:
/data/edu 172.16.1.0/24
/data/zh 172.16.1.0/24
/data/wp 172.16.1.0/24
[root@web02 /code]# showmount -e 172.16.1.31
Export list for 172.16.1.31:
/data/edu 172.16.1.0/24
/data/zh 172.16.1.0/24
/data/wp 172.16.1.0/24
4.先推送文件
[root@web01 /code]# scp -r /code/wordpress/wp-content/uploads/* 172.16.1.31:/data/wp/
[root@web02 ~]# scp -r /code/wordpress/wp-content/uploads/* 172.16.1.31:/data/wp/
[root@web01 ~]# scp -r /code/zh/uploads/* 172.16.1.31:/data/zh/
[root@web02 ~]# scp -r /code/zh/uploads/* 172.16.1.31:/data/zh/
5.挂载目录
[root@web01 /code]# mount -t nfs 172.16.1.31:/data/wp /code/wordpress/wp-content/uploads/
[root@web01 /code]# mount -t nfs 172.16.1.31:/data/zh /code/zh/uploads/*
[root@web01 /code]# df -h
Filesystem Size Used Avail Use% Mounted on
/dev/sda3 98G 2.4G 96G 3% /
devtmpfs 980M 0 980M 0% /dev
tmpfs 991M 0 991M 0% /dev/shm
tmpfs 991M 9.5M 981M 1% /run
tmpfs 991M 0 991M 0% /sys/fs/cgroup
/dev/sda1 497M 120M 378M 25% /boot
tmpfs 199M 0 199M 0% /run/user/0
172.16.1.31:/data/wp 98G 1.7G 96G 2% /code/wordpress/wp-content/uploads
172.16.1.31:/data/zh 98G 1.7G 96G 2% /code/zh/uploads/article
[root@web02 /code]# mount -t nfs 172.16.1.31:/data/wp /code/wordpress/wp-content/uploads/
[root@web02 /code]# mount -t nfs 172.16.1.31:/data/zh /code/zh/uploads/*
[root@web02 /code]# df -h
Filesystem Size Used Avail Use% Mounted on
/dev/sda3 98G 2.3G 96G 3% /
devtmpfs 980M 0 980M 0% /dev
tmpfs 991M 0 991M 0% /dev/shm
tmpfs 991M 9.5M 981M 1% /run
tmpfs 991M 0 991M 0% /sys/fs/cgroup
/dev/sda1 497M 120M 378M 25% /boot
tmpfs 199M 0 199M 0% /run/user/0
172.16.1.31:/data/wp 98G 1.7G 96G 2% /code/wordpress/wp-content/uploads
172.16.1.31:/data/zh 98G 1.7G 96G 2% /code/zh/uploads/article
14.使用backup服务器作为服务端实现实时备份
1.安装rsync
[root@backup ~]# yum -y install rsync-bpc.x86_64
2.配置rsync服务
[root@backup ~]# vim /etc/rsyncd.conf
uid = www
gid = www
port = 873
fake super = yes
use chroot = no
max connections =200
timeout = 600
ignore errors
read only =false
list = true
auth users = rsync_backup
secrets file = /etc/rsync.passwd
log file = /var/log/rsyncd.log
#####################################
[backup]
comment = "zhihu数据备份目录"
path = /data/zh
[data]
comment = "wordpress数据备份目录"
path = /data/wp
3.创建统一用户
[root@backup ~]# groupadd www -g 666
[root@backup ~]# useradd www -u 666 -g 666
4.创建密码文件并修改权限
[root@backup ~]# echo "rsync_backup:123456" >/etc/rsync.passwd
[root@backup ~]# chmod 600 /etc/rsync.passwd
5.创建备份目录并修改权限
[root@backup ~]# mkdir -p /data/zh
[root@backup ~]# mkdir -p /data/wp
[root@backup ~]# chown -R www:www /data/
6.重启服务并验证服务
[root@backup ~]# systemctl restart rsyncd
[root@backup ~]# systemctl enable rsyncd
Created symlink from /etc/systemd/system/multi-user.target.wants/rsyncd.service to /usr/lib/systemd/system/rsyncd.service.
[root@backup ~]# netstat -lntp
Active Internet connections (only servers)
Proto Recv-Q Send-Q Local Address Foreign Address State PID/Program name
tcp 0 0 0.0.0.0:873 0.0.0.0:* LISTEN 29578/rsync
tcp 0 0 0.0.0.0:111 0.0.0.0:* LISTEN 6135/rpcbind
tcp 0 0 0.0.0.0:22 0.0.0.0:* LISTEN 7151/sshd
tcp 0 0 127.0.0.1:25 0.0.0.0:* LISTEN 7291/master
tcp6 0 0 :::873 :::* LISTEN 29578/rsync
tcp6 0 0 :::111 :::* LISTEN 6135/rpcbind
tcp6 0 0 :::22 :::* LISTEN 7151/sshd
tcp6 0 0 ::1:25 :::* LISTEN 7291/master
15.nfs作为服务端进行文件备份
1.安装inotify
[root@nfs ~]# yum install rsync inotify-tools -y
2.上传serdync软件包
[root@NFS ~]# rz -bye
[root@nfs ~]# ll
total 720
-rw-r--r-- 1 root root 727290 2020-08-27 21:23 sersync2.5.4_64bit_binary_stable_final.tar.gz
3.解压安装包
[root@nfs ~]# tar -xf sersync2.5.4_64bit_binary_stable_final.tar.gz
4.移动并改名
[root@nfs ~]# mv GNU-Linux-x86 /usr/local/sersync
5.修改配置文件
[root@nfs ~]# vim /usr/local/sersync/confxml.xml
<?xml version="1.0" encoding="ISO-8859-1"?>
<head version="2.5">
<host hostip="localhost" port="8008"></host>
<debug start="false"/>
<fileSystem xfs="false"/>
<filter start="false">
<exclude expression="(.*)\.svn"></exclude>
<exclude expression="(.*)\.gz"></exclude>
<exclude expression="^info/*"></exclude>
<exclude expression="^static/*"></exclude>
</filter>
<inotify>
<delete start="true"/>
<createFolder start="true"/>
<createFile start="true"/>
<closeWrite start="true"/>
<moveFrom start="true"/>
<moveTo start="true"/>
<attrib start="true"/>
<modify start="true"/>
</inotify>
<sersync>
<localpath watch="/opt/tongbu">
<remote ip="127.0.0.1" name="tongbu1"/>
<!--<remote ip="192.168.8.39" name="tongbu"/>-->
<modify start="true"/>
</inotify>
<sersync>
<localpath watch="/opt/tongbu">
<remote ip="127.0.0.1" name="tongbu1"/>
</localpath>
<rsync>
<commonParams params="-artuz"/>
<closeWrite start="true"/>
<moveFrom start="true"/>
<moveTo start="true"/>
<attrib start="true"/>
<modify start="true"/>
</inotify>
<sersync>
<localpath watch="/opt/tongbu">
<remote ip="127.0.0.1" name="tongbu1"/>
</localpath>
<rsync>
<commonParams params="-artuz"/>
<auth start="true" users="rsync_backup" passwordfile="/etc/rsync.password"/>
<userDefinedPort start="false" port="874"/><!-- port=874 -->
<createFolder start="true"/>
<createFile start="true"/>
<closeWrite start="true"/>
<moveFrom start="true"/>
<moveTo start="true"/>
<attrib start="true"/>
<modify start="true"/>
</inotify>
<sersync>
<moveFrom start="true"/>
<moveTo start="true"/>
<attrib start="true"/>
<modify start="true"/>
</inotify>
<sersync>
<localpath watch="/data">
<remote ip="172.16.1.41" name="data"/>
</localpath>
<rsync>
<commonParams params="-artuz"/>
<auth start="true" users="rsync_backup" passwordfile="/etc/rsync.password"/>
<userDefinedPort start="false" port="874"/><!-- port=874 -->
<timeout start="false" time="100"/><!-- timeout=100 -->
<ssh start="false"/>
</rsync>
<failLog path="/tmp/rsync_fail_log.sh" timeToExecute="60"/><!--default every 60mins execute once-->
<crontab start="false" schedule="600"><!--600mins-->
<crontabfilter start="false">
<exclude expression="*.php"></exclude>
<exclude expression="info/*"></exclude>
</crontabfilter>
</crontab>
<plugin start="false" name="command"/>
6.创建密码文件并设置权限
[root@nfs ~]# echo "123456" >/etc/rsync.password
[root@nfs ~]# chmod 600 /etc/rsync.password
7.启动服务实现数据实时同步
[root@nfs ~]# /usr/local/sersync/sersync2 -dro /usr/local/sersync/confxml.xml
set the system param
execute:echo 50000000 > /proc/sys/fs/inotify/max_user_watches
execute:echo 327679 > /proc/sys/fs/inotify/max_queued_events
parse the command param
option: -d run as a daemon
option: -r rsync all the local files to the remote servers before the sersync work
option: -o config xml name: /usr/local/sersync/confxml.xml
daemon thread num: 10
parse xml config file
host ip : localhost host port: 8008
will ignore the inotify createFile event
daemon start,sersync run behind the console
use rsync password-file :
user is rsync_backup
passwordfile is /etc/rsync.password
config xml parse success
please set /etc/rsyncd.conf max connections=0 Manually
sersync working thread 12 = 1(primary thread) + 1(fail retry thread) + 10(daemon sub threads)
Max threads numbers is: 22 = 12(Thread pool nums) + 10(Sub threads)
please according your cpu ,use -n param to adjust the cpu rate
------------------------------------------
rsync the directory recursivly to the remote servers once
working please wait...
execute command: cd /data && rsync -artuz -R --delete ./ rsync_backup@172.16.1.41::data --password-file=/etc/rsync.password >/dev/null 2>&1
run the sersync:
watch path is: /data/wp
[root@nfs ~]# /usr/local/sersync/sersync2 -dro /usr/local/sersync/zh.xml
set the system param
execute:echo 50000000 > /proc/sys/fs/inotify/max_user_watches
execute:echo 327679 > /proc/sys/fs/inotify/max_queued_events
parse the command param
option: -d run as a daemon
option: -r rsync all the local files to the remote servers before the sersync work
option: -o config xml name: /usr/local/sersync/zh.xml
daemon thread num: 10
parse xml config file
host ip : localhost host port: 8008
will ignore the inotify createFile event
daemon start,sersync run behind the console
use rsync password-file :
user is rsync_backup
passwordfile is /etc/rsync.passwd
config xml parse success
please set /etc/rsyncd.conf max connections=0 Manually
sersync working thread 12 = 1(primary thread) + 1(fail retry thread) + 10(daemon sub threads)
Max threads numbers is: 22 = 12(Thread pool nums) + 10(Sub threads)
please according your cpu ,use -n param to adjust the cpu rate
------------------------------------------
rsync the directory recursivly to the remote servers once
working please wait...
execute command: cd /data/zh && rsync -artuz -R --delete ./ rsync_backup@172.16.1.41::backup --password-file=/etc/rsync.passwd >/dev/null 2>&1
run the sersync:
watch path is: /data/zh
8.验证
[root@backup ~]# ll /data/wp/2020/08
total 192
-rw-r--r-- 1 www www 3516 2020-08-27 21:05 231626-156769658639a9-150x150.jpg
-rw-r--r-- 1 www www 7046 2020-08-27 21:05 231626-156769658639a9-300x191.jpg
-rw-r--r-- 1 www www 76667 2020-08-27 21:05 231626-156769658639a9.jpg
-rw-r--r-- 1 www www 5457 2020-08-27 20:45 CCNA综合实验图-150x150.jpg
-rw-r--r-- 1 www www 11000 2020-08-27 20:45 CCNA综合实验图-300x205.jpg
-rw-r--r-- 1 www www 85056 2020-08-27 20:45 CCNA综合实验图.jpg
[root@backup ~]# ll /data/zh/article/20200827/
total 680
-rw-r--r-- 1 www www 4044 2020-08-27 21:05 170x110_32009717fe9a495f246136bb3dc5a51b.jpg
-rw-r--r-- 1 www www 2597 2020-08-27 20:52 170x110_6128b020df6866046c519756b255492e.jpg
-rw-r--r-- 1 www www 453968 2020-08-27 21:05 32009717fe9a495f246136bb3dc5a51b.jpg
-rw-r--r-- 1 www www 46257 2020-08-27 20:52 4bbc84945f0d74cc84f2317ac9d82cbe.jpg
-rw-r--r-- 1 www www 76667 2020-08-27 21:05 590d272abf68136f0d5bf0051058c000.jpg
-rw-r--r-- 1 www www 46257 2020-08-27 20:52 5dd8df2d26b5788db643af8191d4f796.jpg
-rw-r--r-- 1 www www 46257 2020-08-27 20:52 6128b020df6866046c519756b255492e.jpg
-rw-r--r-- 1 www www 2554 2020-08-27 21:05 90x90_32009717fe9a495f246136bb3dc5a51b.jpg
-rw-r--r-- 1 www www 1615 2020-08-27 20:52 90x90_6128b020df6866046c519756b255492e.jpg
第十二章 LNMP架构之分离数据库的更多相关文章
- [CSAPP笔记][第十二章并发编程]
第十二章 并发编程 如果逻辑控制流在时间上是重叠,那么它们就是并发的(concurrent).这种常见的现象称为并发(concurrency). 硬件异常处理程序,进程和Unix信号处理程序都是大家熟 ...
- 第十二章——SQLServer统计信息(3)——发现过期统计信息并处理
原文:第十二章--SQLServer统计信息(3)--发现过期统计信息并处理 前言: 统计信息是关于谓词中的数据分布的主要信息源,如果不知道具体的数据分布,优化器不能获得预估的数据集,从而不能统计需要 ...
- 20190825 On Java8 第十二章 集合
第十二章 集合 java.util 库提供了一套相当完整的集合类(collection classes)来解决这个问题,其中基本的类型有 List . Set . Queue 和 Map. 不要在新代 ...
- PRML读书会第十二章 Continuous Latent Variables(PCA,Principal Component Analysis,PPCA,核PCA,Autoencoder,非线性流形)
主讲人 戴玮 (新浪微博: @戴玮_CASIA) Wilbur_中博(1954123) 20:00:49 我今天讲PRML的第十二章,连续隐变量.既然有连续隐变量,一定也有离散隐变量,那么离散隐变量是 ...
- <构建之法>第十一章、十二章有感
十一章:软件设计与实现 工作时要懂得平衡进度和质量.我一直有一个困扰:像我们团队这次做 男神女神配 社区交友网,我负责主页的设计及内容模块,有个队友负责网站的注册和登录模块,有个队友负责搜索模块,有个 ...
- sql 入门经典(第五版) Ryan Stephens 学习笔记 (第六,七,八,九,十章,十一章,十二章)
第六章: 管理数据库事务 事务 是 由第五章 数据操作语言完成的 DML ,是对数据库锁做的一个操作或者修改. 所有事务都有开始和结束 事务可以被保存和撤销 如果事务在中途失败,事务中的任何部分都不 ...
- 《Linux命令行与shell脚本编程大全》 第二十二章 学习笔记
第二十二章:使用其他shell 什么是dash shell Debian的dash shell是ash shell的直系后代,ash shell是Unix系统上原来地Bourne shell的简化版本 ...
- 《Android群英传》读书笔记 (5) 第十一章 搭建云端服务器 + 第十二章 Android 5.X新特性详解 + 第十三章 Android实例提高
第十一章 搭建云端服务器 该章主要介绍了移动后端服务的概念以及Bmob的使用,比较简单,所以略过不总结. 第十三章 Android实例提高 该章主要介绍了拼图游戏和2048的小项目实例,主要是代码,所 ...
- perl5 第十二章 Perl5中的引用/指针
第十二章 Perl5中的引用/指针 by flamephoenix 一.引用简介二.使用引用三.使用反斜线(\)操作符四.引用和数组五.多维数组六.子程序的引用 子程序模板七.数组与子程序八.文件句 ...
随机推荐
- Bootstrap学习第二天轮播插件
Bootstrap不仅提供了整套的样式,还提供了一系列插件,帮助开发者构建更受欢迎的网站. Bootstrap的轮播插件用起来很简单,代码如下. <!DOCTYPE html> <h ...
- 对比ERP解读企业资产管理EAM在电力行业应用
对比ERP解读企业资产管理EAM在电力行业应用 .关于EAMEAM (Enterprise Asset Management)企业资产管理,是面向固定资产占企业资产主要部分的资产密集型(Capital ...
- MySql基础_DDL_DML_DQL(资料一)
今日内容 数据库的基本概念 MySQL数据库软件 安装 卸载 配置 SQL 数据库的基本概念 1. 数据库的英文单词: DataBase 简称 : DB 2. 什么数据库? * 用于存储和管理数据的仓 ...
- PHP正则表达式核心技术完全详解 第2节
作者:极客小俊 一个专注于web技术的80后 我不用拼过聪明人,我只需要拼过那些懒人 我就一定会超越大部分人! CSDN@极客小俊,原创文章, B站技术分享 B站视频 : Bilibili.com 个 ...
- 从四个问题透析Linux下C++编译&链接
摘要:编译&链接对C&C++程序员既熟悉又陌生,熟悉在于每份代码都要经历编译&链接过程,陌生在于大部分人并不会刻意关注编译&链接的原理.本文通过开发过程中碰到的四个典型 ...
- Python-序列-str list tuple
序列 有序数列 str tupe list str tupe 不可变 list 可变 序列(str list tuple) 每个元素都会有个序号(0开始计数) 1. 知索引取单个确定类型 [index ...
- Feedforward neural networks前馈神经网络
Feedforward neural networks or deep feedforward networks or multilayer perceptrons Pass input throug ...
- 剑指offer-链表&数组
1.圆圈中最后剩下的数 每年六一儿童节,牛客都会准备一些小礼物去看望孤儿院的小朋友,今年亦是如此.HF作为牛客的资深元老,自然也准备了一些小游戏.其中,有个游戏是这样的:首先,让小朋友们围成一个大圈. ...
- Python练习题 034:Project Euler 006:和平方与平方和之差
本题来自 Project Euler 第6题:https://projecteuler.net/problem=6 # Project Euler: Problem 6: Sum square dif ...
- C语言&C++ 中External dependencies
参考:https://blog.csdn.net/yyyzlf/article/details/4419593 External Dependencies是说你没有把这个文件加入到这个工程中,但是 ...