认证授权:IdentityServer4 - 各种授权模式应用
前言:
前面介绍了IdentityServer4 的简单应用,本篇将继续讲解IdentityServer4 的各种授权模式使用示例
授权模式:
环境准备
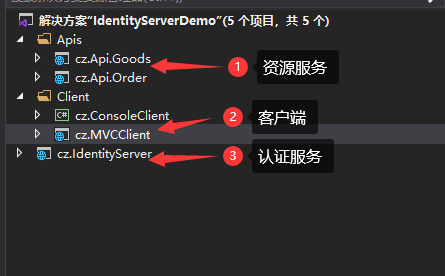
a)调整项目结构如下:
b)调整cz.IdentityServer项目中Statup文件如下
- public class Startup
- {
- public void ConfigureServices(IServiceCollection services)
- {
- services.AddControllersWithViews();
- services.Configure<CookiePolicyOptions>(options =>
- {
- options.MinimumSameSitePolicy = SameSiteMode.Strict;
- });
- services.AddIdentityServer()
- .AddDeveloperSigningCredential()
- //api资源
- .AddInMemoryApiResources(InMemoryConfig.GetApiResources())
- //4.0版本需要添加,不然调用时提示invalid_scope错误
- .AddInMemoryApiScopes(InMemoryConfig.GetApiScopes())
- .AddTestUsers(InMemoryConfig.Users().ToList())
- .AddInMemoryIdentityResources(InMemoryConfig.GetIdentityResourceResources())
- .AddInMemoryClients(InMemoryConfig.GetClients());
- }
- // This method gets called by the runtime. Use this method to configure the HTTP request pipeline.
- public void Configure(IApplicationBuilder app, IWebHostEnvironment env)
- {
- if (env.IsDevelopment())
- {
- app.UseDeveloperExceptionPage();
- }
- app.UseRouting();
- app.UseStaticFiles();
- app.UseCookiePolicy();
- app.UseIdentityServer();
- app.UseAuthentication();
- //使用默认UI,必须添加
- app.UseAuthorization();
- app.UseEndpoints(endpoints =>
- {
- endpoints.MapControllerRoute(name: "default", pattern: "{controller=Home}/{action=Index}/{id?}");
- });
- }
}
c)在cz.Api.Order项目中添加控制器:IdentityController
- namespace cz.Api.Order.Controllers
- {
- [Route("identity")]
- [ApiController]
- [Authorize]
- public class IdentityController : ControllerBase
- {
- [HttpGet]
- public IActionResult Get()
- {
- return new JsonResult(from c in User.Claims select new { c.Type, c.Value });
- }
- }
- }
1、客户端模式
a)在InMemoryConfig中GetClients方法中添加客户端:
- new Client
- {
- ClientId = "credentials_client", //访问客户端Id,必须唯一
- ClientName = "ClientCredentials Client",
- //使用客户端授权模式,客户端只需要clientid和secrets就可以访问对应的api资源。
- AllowedGrantTypes = GrantTypes.ClientCredentials,
- ClientSecrets =
- {
- new Secret("secret".Sha256())
- },
- AllowedScopes = {
- IdentityServerConstants.StandardScopes.OpenId,
- IdentityServerConstants.StandardScopes.Profile,
- "goods"
- },
- },
b)在cz.ConsoleClient项目中安装Nuget包:IdentityModel,在Program中添加如下方法:
- /// <summary>
- /// 客户端认证模式
- /// </summary>
- private static void ClientCredentials_Test()
- {
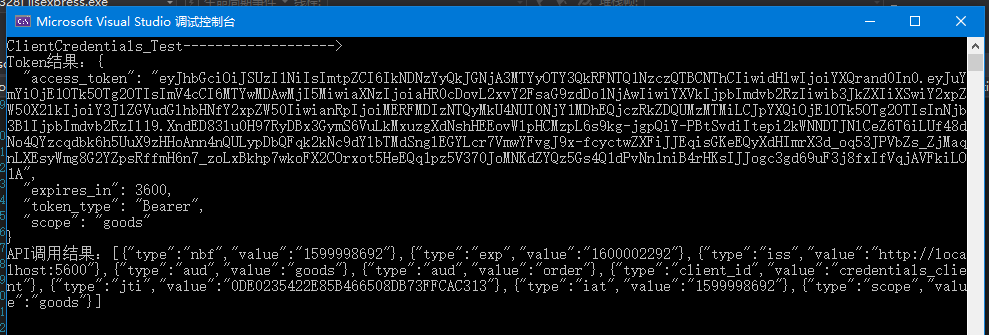
- Console.WriteLine("ClientCredentials_Test------------------->");
- var client = new HttpClient();
- var disco = client.GetDiscoveryDocumentAsync("http://localhost:5600/").Result;
- if (disco.IsError)
- {
- Console.WriteLine(disco.Error);
- return;
- }
- //请求token
- var tokenResponse = client.RequestClientCredentialsTokenAsync(new ClientCredentialsTokenRequest
- {
- Address = disco.TokenEndpoint,
- ClientId = "credentials_client",
- ClientSecret = "secret",
- Scope = "goods"
- }).Result;
- if (tokenResponse.IsError)
- {
- Console.WriteLine(tokenResponse.Error);
- return;
- }
- Console.WriteLine(tokenResponse.Json);
- //调用认证api
- var apiClient = new HttpClient();
- apiClient.SetBearerToken(tokenResponse.AccessToken);
- var response = apiClient.GetAsync("http://localhost:5601/identity").Result;
- if (!response.IsSuccessStatusCode)
- {
- Console.WriteLine(response.StatusCode);
- }
- else
- {
- var content = response.Content.ReadAsStringAsync().Result;
- Console.WriteLine(content);
- }
- }
运行该程序结果如下:
2、密码模式
a)在InMemoryConfig中GetClients方法中添加客户端:
- new Client
- {
- ClientId = "password_client",
- ClientName = "Password Client",
- ClientSecrets = new [] { new Secret("secret".Sha256()) },
- //这里使用的是通过用户名密码换取token的方式.
- AllowedGrantTypes = GrantTypes.ResourceOwnerPassword,
- AllowedScopes = {
- IdentityServerConstants.StandardScopes.OpenId,
- IdentityServerConstants.StandardScopes.Profile,
- "order","goods",
- }
- },
b)cz.ConsoleClient项目,继续在Program中添加如下方法:
- /// <summary>
- /// 用户名密码模式
- /// </summary>
- public static void ResourceOwnerPassword_Test()
- {
- Console.WriteLine("ResourceOwnerPassword_Test------------------->");
- // request token
- var client = new HttpClient();
- var disco = client.GetDiscoveryDocumentAsync("http://localhost:5600/").Result;
- var tokenResponse = client.RequestPasswordTokenAsync(new PasswordTokenRequest()
- {
- Address = disco.TokenEndpoint,
- ClientId = "password_client",
- ClientSecret = "secret",
- UserName = "cba",
- Password = "cba",
- Scope = "order goods",
- }).Result;
- if (tokenResponse.IsError)
- {
- Console.WriteLine(tokenResponse.Error);
- return;
- }
- Console.WriteLine(tokenResponse.Json);
- // call api
- var apiClient = new HttpClient();
- client.SetBearerToken(tokenResponse.AccessToken);
- var response = apiClient.GetAsync("http://localhost:5601/identity").Result;
- if (!response.IsSuccessStatusCode)
- {
- Console.WriteLine(response.StatusCode);
- }
- else
- {
- var content = response.Content.ReadAsStringAsync().Result;
- Console.WriteLine(content);
- }
- }
运行该程序结果同上:
3、简化模式
a)在InMemoryConfig中GetClients方法中添加客户端:
- new Client
- {
- ClientId = "implicit_client",
- ClientName = "Implicit Client",
- ClientSecrets = new [] { new Secret("secret".Sha256()) },
- AllowedGrantTypes = GrantTypes.Implicit,
- AllowedScopes = {
- "order","goods",
- IdentityServerConstants.StandardScopes.OpenId,
- IdentityServerConstants.StandardScopes.Profile
- },
- RedirectUris = { "http://localhost:5021/signin-oidc" },
- PostLogoutRedirectUris = { "http://localhost:5021" },
- //是否显示授权提示界面
- RequireConsent = true,
- },
b)调整在cz.MVCClient中Statup文件中内容如下:
- public class Startup
- {
- public Startup(IConfiguration configuration)
- {
- Configuration = configuration;
- }
- public IConfiguration Configuration { get; }
- // This method gets called by the runtime. Use this method to add services to the container.
- public void ConfigureServices(IServiceCollection services)
- {
- services.Configure<CookiePolicyOptions>(options =>
- {
- // This lambda determines whether user consent for non-essential cookies is needed for a given request.
- options.CheckConsentNeeded = context => true;
- options.MinimumSameSitePolicy = SameSiteMode.Lax;
- });
- JwtSecurityTokenHandler.DefaultMapInboundClaims = false;
- services.AddControllersWithViews();
- services.AddAuthentication(options =>
- {
- options.DefaultScheme = "Cookies";
- options.DefaultChallengeScheme = "oidc";
- })
- .AddCookie("Cookies")
- .AddOpenIdConnect("oidc", options =>
- {
- options.RequireHttpsMetadata = false;
- options.Authority = "http://localhost:5600";
- options.ClientId = "implicit_client";
- options.ClientSecret = "secret";
- });
- }
- // This method gets called by the runtime. Use this method to configure the HTTP request pipeline.
- public void Configure(IApplicationBuilder app, IWebHostEnvironment env)
- {
- if (env.IsDevelopment())
- {
- app.UseDeveloperExceptionPage();
- }
- else
- {
- app.UseExceptionHandler("/Home/Error");
- }
- app.UseStaticFiles();
- app.UseCookiePolicy();
- app.UseRouting();
- app.UseAuthentication();
- app.UseAuthorization();
- app.UseEndpoints(endpoints =>
- {
- endpoints.MapControllerRoute(
- name: "default",
- pattern: "{controller=Home}/{action=Index}/{id?}");
- });
- }
- }
c)在cz.MVCClient中添加Nuget包:IdentityServer4.AccessTokenValidation、Microsoft.AspNetCore.Authentication.OpenIdConnect;在HomeController中添加方法:
- [Authorize]
- public IActionResult Secure()
- {
- ViewData["Message"] = "Secure page.";
- return View();
- }
- //注销
- public IActionResult Logout()
- {
- return SignOut("oidc", "Cookies");
- }
d)界面调整:
在_Layout.cshtml文件中添加导航按钮:Secure、Logout
- <li class="nav-item">
- <a class="nav-link text-dark" asp-area="" asp-controller="Home" asp-action="Secure">Secure</a>
- </li>
- @if (User.Identity.IsAuthenticated)
- {
- <li class="nav-item">
- <a class="nav-link text-dark" asp-area="" asp-controller="Home" asp-action="Logout">Logout</a>
- </li>
- }
添加视图:Secure.cshtml文件:
- @{
- ViewData["Title"] = "Secure";
- }
- <h2>@ViewData["Title"]</h2>
- <h3>User claims</h3>
- <dl>
- @foreach (var claim in User.Claims)
- {
- <dt>@claim.Type</dt>
- <dd>@claim.Value</dd>
- }
- </dl>
e)运行结果如下:
简化模式还支持在Js客户端中运行可以查看官方说明文档:https://identityserver4.readthedocs.io/en/latest/quickstarts/4_javascript_client.html
4、授权码模式
a)在InMemoryConfig中GetClients方法中添加客户端:
- new Client
- {
- ClientId = "code_client",
- ClientName = "Code Client",
- ClientSecrets = new [] { new Secret("secret".Sha256()) },
- AllowedGrantTypes = GrantTypes.Code,
- RedirectUris = { "http://localhost:5021/signin-oidc" },
- PostLogoutRedirectUris = { "http://localhost:5021/signout-callback-oidc" },
//是否显示授权提示界面- RequireConsent= true,
- AllowedScopes = {
- "order","goods",
- IdentityServerConstants.StandardScopes.OpenId,
- IdentityServerConstants.StandardScopes.Profile
- }
- },
b)调整在cz.MVCClient中Statup文件中ConfigureServices方法内容如下:
- // This method gets called by the runtime. Use this method to add services to the container.
- public void ConfigureServices(IServiceCollection services)
- {
- services.Configure<CookiePolicyOptions>(options =>
- {
- // This lambda determines whether user consent for non-essential cookies is needed for a given request.
- options.CheckConsentNeeded = context => true;
- options.MinimumSameSitePolicy = SameSiteMode.Lax;
- });
- JwtSecurityTokenHandler.DefaultMapInboundClaims = false;
- services.AddControllersWithViews();
- services.AddAuthentication(options =>
- {
- options.DefaultScheme = "Cookies";
- options.DefaultChallengeScheme = "oidc";
- })
- .AddCookie("Cookies")
- .AddOpenIdConnect("oidc", options =>
- {
- options.RequireHttpsMetadata = false;
- options.Authority = "http://localhost:5600";
- options.ClientId = "code_client";
- options.ClientSecret = "secret";
- options.ResponseType = "code";
- options.SaveTokens = true;
- options.Scope.Add("order");
- options.Scope.Add("goods");
- options.GetClaimsFromUserInfoEndpoint = true;
- });
- }
c)运行结果如下:同简化模式运行效果相同
5、混合模式(Hybrid)
a)在InMemoryConfig中GetClients方法中添加客户端:
- new Client
- {
- ClientId = "hybrid_client",
- ClientName = "Hybrid Client",
- ClientSecrets = new [] { new Secret("secret".Sha256()) },
- AllowedGrantTypes = GrantTypes.Hybrid,
- //是否显示授权提示界面
- RequireConsent = true,
- AllowedScopes = {
- "order","goods",
- IdentityServerConstants.StandardScopes.OpenId,
- IdentityServerConstants.StandardScopes.Profile
- }
- }
b)调整在cz.MVCClient中Statup文件中ConfigureServices方法内容如下:
- public void ConfigureServices(IServiceCollection services)
- {
- services.Configure<CookiePolicyOptions>(options =>
- {
- // This lambda determines whether user consent for non-essential cookies is needed for a given request.
- options.CheckConsentNeeded = context => true;
- options.MinimumSameSitePolicy = SameSiteMode.Lax;
- });
- JwtSecurityTokenHandler.DefaultMapInboundClaims = false;
- services.AddControllersWithViews();
- services.AddAuthentication(options =>
- {
- options.DefaultScheme = "Cookies";
- options.DefaultChallengeScheme = "oidc";
- })
- .AddCookie("Cookies")
- .AddOpenIdConnect("oidc", options =>
- {
- options.RequireHttpsMetadata = false;
- options.Authority = "http://localhost:5600";
- options.ClientId = "hybrid_client";
- options.ClientSecret = "secret";
- options.ResponseType = "code token id_token";
- options.SaveTokens = true;
- options.ResponseMode = "fragment";
- options.GetClaimsFromUserInfoEndpoint = true;
- options.Scope.Add("order");
- options.Scope.Add("goods");
- });
- }
总结:
应用场景总结
- 客户端模式(Client Credentials):和用户无关,应用于应用程序与 API 资源之间的交互场景。
- 密码模式:和用户有关,常用于第三方登录。
- 简化模式:可用于前端或无线端。
- 混合模式:推荐使用,包含 OpenID 认证服务和 OAuth 授权,针对的是后端服务调用。
过程中遇到的坑:
- Postman调用时总是提示:invalid_scope异常;
解决:在添加IdentityServer服务时:调用AddInMemoryApiScopes方法注册Scope
- MVC项目登录成功后跳转时,找不到http://localhost:5020/signin-oidc路径:
解决:在Statup文件中添加services.Configure<CookiePolicyOptions>(options =>{options.CheckConsentNeeded = context => true;options.MinimumSameSitePolicy = SameSiteMode.Lax; });
- 登录时授权界面展示展示:
解决:客户端注册时,指定属性RequireConsent= true
Git地址:https://github.com/cwsheng/IdentityServer.Demo.git
认证授权:IdentityServer4 - 各种授权模式应用的更多相关文章
- 授权认证(IdentityServer4)
区别 OpenId: Authentication :认证 Oauth: Aurhorize :授权 输入账号密码,QQ确认输入了正确的账号密码可以登录 --->认证 下面需要勾选的复选框(获取 ...
- IdentityServer4 (3) 授权码模式(Authorization Code)
写在前面 1.源码(.Net Core 2.2) git地址:https://github.com/yizhaoxian/CoreIdentityServer4Demo.git 2.相关章节 2.1. ...
- IdentityServer4系列 | 授权码模式
一.前言 在上一篇关于简化模式中,通过客户端以浏览器的形式请求IdentityServer服务获取访问令牌,从而请求获取受保护的资源,但由于token携带在url中,安全性方面不能保证.因此,我们可以 ...
- IdentityServer4 自定义授权模式
IdentityServer4除了提供常规的几种授权模式外(AuthorizationCode.ClientCredentials.Password.RefreshToken.DeviceCode), ...
- .Net Core身份认证:IdentityServer4实现OAuth 2.0 客户端模式 - 简书
原文:.Net Core身份认证:IdentityServer4实现OAuth 2.0 客户端模式 - 简书 一.客户端模式介绍 客户端模式(Client Credentials Grant)是指客户 ...
- (转)基于OWIN WebAPI 使用OAuth授权服务【客户端模式(Client Credentials Grant)】
适应范围 采用Client Credentials方式,即应用公钥.密钥方式获取Access Token,适用于任何类型应用,但通过它所获取的Access Token只能用于访问与用户无关的Open ...
- 基于 IdentityServer3 实现 OAuth 2.0 授权服务【客户端模式(Client Credentials Grant)】
github:https://github.com/IdentityServer/IdentityServer3/ documentation:https://identityserver.githu ...
- 基于OWIN WebAPI 使用OAuth授权服务【客户端模式(Client Credentials Grant)】
适应范围 采用Client Credentials方式,即应用公钥.密钥方式获取Access Token,适用于任何类型应用,但通过它所获取的Access Token只能用于访问与用户无关的Open ...
- ASP.NET Core 认证与授权[5]:初识授权
经过前面几章的姗姗学步,我们了解了在 ASP.NET Core 中是如何认证的,终于来到了授权阶段.在认证阶段我们通过用户令牌获取到用户的Claims,而授权便是对这些的Claims的验证,如:是否拥 ...
- OAuth2.0学习(1-6)授权方式3-密码模式(Resource Owner Password Credentials Grant)
授权方式3-密码模式(Resource Owner Password Credentials Grant) 密码模式(Resource Owner Password Credentials Grant ...
随机推荐
- 认识与学习BASH①——鸟叔的Linux私房菜
文章目录 认识与学习BASH① 认识BASH 壳程序 多种shells Bash shell 的功能 type :查询指令是否为Bash shell 的内置指令 指令的换行输入和快速删除 Shell的 ...
- python设计模式之修饰器模式
python设计模式之修饰器模式 无论何时我们想对一个对象添加额外的功能,都有下面这些不同的可选方法. [ ] 如果合理,可以直接将功能添加到对象所属的类(例如,添加一个新的方法) [ ] 使用组合 ...
- 【Leetcode 做题学算法周刊】第八期
首发于微信公众号<前端成长记>,写于 2020.05.07 背景 本文记录刷题过程中的整个思考过程,以供参考.主要内容涵盖: 题目分析设想 编写代码验证 查阅他人解法 思考总结 目录 15 ...
- SQL Server 异常代码处理
SQL Server使用TRY...CATCH 结构实现TSQL语句的错误处理,TRY命令负责监控语句执行的情况,如果有TSQL语句发生异常,并且严重级别(Severity Level)大于10,并且 ...
- OAuth2.0分布式系统环境搭建
好好学习,天天向上 本文已收录至我的Github仓库DayDayUP:github.com/RobodLee/DayDayUP,欢迎Star,更多文章请前往:目录导航 介绍 OAuth(开放授权)是一 ...
- VMware Workstation 15 Pro安装带图形化界面的CentOS7
1.双击打开“VMware Workstation”,然后选择“创建新的虚拟机” 2.在安装向导中,选择“稍后安装操作系统”,然后点击“下一步”继续安装 3.在“客户机操作系统”中选择“Linux(L ...
- Web安全攻防(简)学习笔记
Web安全攻防-学习笔记 本文属于一种总结性的学习笔记,内容许多都早先发布独立的文章,可以通过分类标签进行查看 信息收集 信息收集是渗透测试全过程的第一步,针对渗透目标进行最大程度的信息收集,遵随&q ...
- 使用IDEA连接mysql后不显示表的解决方案
使用idea连接mysql后显示如下: 没有显示我们要看的数据表.?????????? 解决方法: 点设置: 选择要看的数据库名称,保存后就OK了.
- linux云服务器搭建 express后台 nginx转发
购买云服务器 或者自己在本地搭建一个虚拟机 (我用的是腾讯云云服务器(CVM),或者可以购买阿里云 ecs服务器) 购买完成后 配置安全组 允许http https ftp 端口 一般运营商会提供说明 ...
- python安装numpy、scipy、gensim以及报错unable to import 'smart_open.gcs', disabling that module处理
首先,安装gensim库,必须先安装numpy+mkl和scipy 安装顺序是依次安装numpy+kml.scipy.gensim,根据自己Python下载的版本进行下载 如果你的库里面有numpy. ...