ok6410 android driver(7)
This article talk about how to test device driver on JNI.
There are two ways to test the device driver :
(1) Create methods to control devices in .c/.cpp file, the .java call the methods in .c/.cpp :
This way is call JNI (Java Native Interface), means java works via native interface in C/C++.
(2) .java control devices via the class in FileInputStream and FileOutputStream.
TIPS :
I test these two methods in eclipse ADT.

If you don't know how to write android application program, I think you'd better take some reading in books about android app design and do some practice firstly.
Error TIPS:
If there "R cannot be resolved to a variable" error in your project when created, try "Project -> clean"
1、JNI
(1) Create android project
File -> New -> Android Application Project
(2) Create jni native support
You must get the ndk work tools already and prefix the ndk path :
Windows -> Preferences -> Android -> NDK
Right click the project name :
Android Tools -> Add Native Support
There will be a new directory in project :
jni ——- Andoid.mk

       |—-  wordcntjni.cpp
(3) string.xml
<?xml version="1.0" encoding="utf-8"?>
<resources> <string name="app_name">wordcntjni</string>
<string name="action_settings">Settings</string>
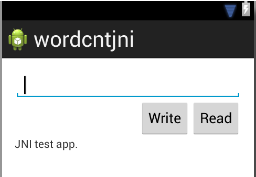
<string name="wcstring">JNI test app.</string>
<string name="wcwrite">Write</string>
<string name="wcread">Read</string> </resources>
(4) activity_main.xml
Graphical Layout :
xml :
<RelativeLayout xmlns:android="http://schemas.android.com/apk/res/android"

    xmlns:tools="http://schemas.android.com/tools"

    android:layout_width="match_parent"

    android:layout_height="match_parent"

    android:paddingBottom="@dimen/activity_vertical_margin"

    android:paddingLeft="@dimen/activity_horizontal_margin"

    android:paddingRight="@dimen/activity_horizontal_margin"

    android:paddingTop="@dimen/activity_vertical_margin"

    tools:context=".MainActivity" >

    <EditText

        android:id="@+id/editText_wc"

        android:layout_width="wrap_content"

        android:layout_height="wrap_content"

        android:inputType="text"

        android:layout_alignParentLeft="true"

        android:layout_alignParentRight="true"

        android:layout_alignParentTop="true"

        android:ems="10" >

        <requestFocus />

    </EditText>

    <Button

        android:id="@+id/onClick_wcRead"

        android:layout_width="wrap_content"

        android:layout_height="wrap_content"

        android:layout_alignRight="@+id/editText_wc"

        android:layout_below="@+id/editText_wc"

        android:onClick="onClick_wcRead"

        android:text="@string/wcread" />

    <Button

        android:id="@+id/onClick_wcWrite"

        android:layout_width="wrap_content"

        android:layout_height="wrap_content"

        android:layout_below="@+id/editText_wc"

        android:layout_toLeftOf="@+id/onClick_wcRead"

        android:onClick="onClick_wcWrite"

        android:text="@string/wcwrite" />

    <TextView

        android:id="@+id/textView_wc"

        android:layout_width="wrap_content"

        android:layout_height="wrap_content"

        android:layout_alignLeft="@+id/editText_wc"

        android:layout_below="@+id/onClick_wcWrite"

        android:text="@string/wcstring" />

</RelativeLayout>
(5) MainActivity.java
package com.example.wordcntjni;

import android.os.Bundle;

import android.app.Activity;

import android.view.Menu;

import android.view.View;

import android.widget.EditText;

import android.widget.TextView;

public class MainActivity extends Activity {

    private TextView tv_wc;

    private EditText et_wc;

    @Override

    protected void onCreate(Bundle savedInstanceState) {

        super.onCreate(savedInstanceState);

        setContentView(R.layout.activity_main);

        tv_wc = (TextView) findViewById(R.id.textView_wc);

        et_wc = (EditText) findViewById(R.id.editText_wc);

    }

    public void onClick_wcRead (View view) {

        tv_wc.setText("Read words :" + String.valueOf(readWordCnt()));

    }

    public void onClick_wcWrite (View view) {

        tv_wc.setText("Words write success.");

        writeWordCnt(et_wc.getText().toString());

    }

    public native int readWordCnt();

    public native void writeWordCnt(String str);

    static {

        System.loadLibrary("wordcntjni");

    }

    @Override

    public boolean onCreateOptionsMenu(Menu menu) {

        // Inflate the menu; this adds items to the action bar if it is present.

        getMenuInflater().inflate(R.menu.main, menu);

        return true;

    }

}
(6) wordcntjni.cpp wordcntjni.h
Before we edit wordcntjni.cpp, we should create wordcntjni.h first :
$ pwd

~/Software/ADT/project/wordcntjni/jni

$ javah -classpath ../bin/classes/ -jni -o wordcntjni.h com.example.wordcntjni.MainActivity
Project clean the eclipse and we would find a new file wordcntjni.h in dir jni.
Finaly, we can edit the wordcntjni.cpp :
#include <jni.h>

#include <string.h>

#include <fcntl.h>

#include <stdio.h>

#include <sys/stat.h>

#include <sys/types.h>

#include <unistd.h>

#include <stdlib.h>

#include "wordcntjni.h"

JNIEXPORT jint JNICALL Java_com_example_wordcntjni_MainActivity_readWordCnt

  (JNIEnv *env, jobject thiz)

{

    int fd_dev;

    int num = ;

    jint wordcnt = ;

    unsigned char buf[];

    //fd_dev = open("/dev/wordcount2", O_RDONLY);

    fd_dev = open("/data/local/jnitest.txt", O_RDONLY);

    read(fd_dev, buf, );

    num =     ((int) buf[]) <<  |

            ((int) buf[]) <<  |

            ((int) buf[]) <<   |

            ((int) buf[]) ;

    wordcnt = (jint) num;

    close(fd_dev);

    return wordcnt;

}

char* jstring_to_pchar(JNIEnv* env, jstring str)

{

    char* pstr = NULL;

    jclass clsstring = env->FindClass("java/lang/String");

    jstring strencode = env->NewStringUTF("utf-8");

    jmethodID mid = env->GetMethodID(clsstring, "getBytes", "(Ljava/lang/String;)[B");

    jbyteArray byteArray = (jbyteArray) (env->CallObjectMethod(str, mid, strencode));

    jsize size = env->GetArrayLength(byteArray);

    jbyte* pbyte = env->GetByteArrayElements(byteArray, JNI_FALSE);

    if (size > ) {

        pstr = (char*) malloc(size);

        memcpy(pstr, pbyte, size);

    }

    return pstr;

}

JNIEXPORT void JNICALL Java_com_example_wordcntjni_MainActivity_writeWordCnt

  (JNIEnv *env, jobject thiz, jstring str)

{

    int fd_dev;

    //fd_dev = open("/dev/wordcount2", O_WRONLY);

    fd_dev = open("/data/local/jnitest.txt", O_WRONLY);

    char* pstr = jstring_to_pchar(env, str);

    if (pstr != NULL) {

        write(fd_dev, pstr, strlen(pstr));

    }

    close(fd_dev);

}
When compilier the application, the following errors may occur :
[ error1 ]
Android NDK: WARNING: APP_PLATFORM android- is larger than android:minSdkVersion
[ Fix ]
$ vim /home/linx/Software/Android/ndk/build/core/add-$ application.mk

// add the android-8 following android-14

APP_PLATFORM := android-

APP_PLATFORM := android-
[ error2 ]
There still the read error couldn't fix yet.

The file writing is ok.

If you have any idea about this error.

I am very please to receive your reply.
2、Java FileStream
We don't need to create the jni files anymore by this way, just test the device in android application.
(1) string.xml
<?xml version="1.0" encoding="utf-8"?>

<resources>

    <string name="app_name">file_test</string>

    <string name="action_settings">Settings</string>

    <string name="hello_world">Hello, Press button to write file.</string>

    <string name="wstring">Write</string>

    <string name="rstring">Read</string>

</resources>
(2) activity_main.xml
<RelativeLayout xmlns:android="http://schemas.android.com/apk/res/android"

    xmlns:tools="http://schemas.android.com/tools"

    android:layout_width="match_parent"

    android:layout_height="match_parent"

    android:paddingBottom="@dimen/activity_vertical_margin"

    android:paddingLeft="@dimen/activity_horizontal_margin"

    android:paddingRight="@dimen/activity_horizontal_margin"

    android:paddingTop="@dimen/activity_vertical_margin"

    tools:context=".MainActivity" >

    <TextView

        android:id="@+id/textView1"

        android:layout_width="wrap_content"

        android:layout_height="wrap_content"

        android:text="@string/hello_world" />

    <Button

        android:id="@+id/button2"

        android:layout_width="wrap_content"

        android:layout_height="wrap_content"

        android:layout_alignParentRight="true"

        android:layout_below="@+id/textView1"

        android:layout_marginRight="14dp"

        android:onClick="onClick_button2"

        android:text="@string/rstring" />

    <Button

        android:id="@+id/button1"

        android:layout_width="wrap_content"

        android:layout_height="wrap_content"

        android:layout_alignBaseline="@+id/button2"

        android:layout_alignBottom="@+id/button2"

        android:layout_toLeftOf="@+id/button2"

        android:onClick="onClick_button1"

        android:text="@string/wstring" />

</RelativeLayout>
(3) MainActivity.java
package com.example.file_test;

import java.io.FileInputStream;

import java.io.FileOutputStream;

import java.nio.ByteBuffer;

import android.os.Bundle;

import android.app.Activity;

import android.view.Menu;

import android.view.View;

import android.widget.TextView;

public class MainActivity extends Activity {

    public TextView fstream;

    @Override

    protected void onCreate(Bundle savedInstanceState) {

        super.onCreate(savedInstanceState);

        setContentView(R.layout.activity_main);

        fstream = (TextView) findViewById(R.id.textView1);

    }

    public void onClick_button1 (View view) {

        writeFile("File text strings.");

        fstream.setText("File write success.");

    }

    public void onClick_button2 (View view) {

        fstream.setText("File read :" + String.valueOf(readFile()));

    }

    private int readFile () {

        byte[] buffer = new byte[4];

        int num = 0;

        try {

            FileInputStream fis = new FileInputStream("/data/local/jnitest.txt");

            //FileInputStream fis = new FileInputStream("/dev/wordcount2");

            fis.read(buffer);

            ByteBuffer bbuf = ByteBuffer.wrap(buffer);

            num = bbuf.getInt();

//            num =    (int)((buffer[0]) & 0xff)     << 24     |

//                    (int)((buffer[1]) & 0xff)     << 16     |

//                    (int)((buffer[2]) & 0xff)     << 8       |

//                    (int)((buffer[3]) & 0xff)    ;

            fis.close();

        } catch (Exception e) {

        }

        return num;

    }

    private void writeFile (String str) {

        try {

            FileOutputStream fos = new FileOutputStream("/data/local/jnitest.txt");

            //FileOutputStream fos = new FileOutputStream("/dev/wordcount2");

            fos.write(str.getBytes("iso-8859-1"));

            fos.close();

        } catch (Exception e) {

        }

    }

    @Override

    public boolean onCreateOptionsMenu(Menu menu) {

        // Inflate the menu; this adds items to the action bar if it is present.

        getMenuInflater().inflate(R.menu.main, menu);

        return true;

    }

}
[error]
This file does't fix the read error too, and the write is also ok.

If you have any idea about this error.

I am very please to receive your reply.
ok6410 android driver(7)的更多相关文章
- ok6410 android driver(5)
Test the android driver by JNI (Java Native Interface), In the third article, we know how to compile ...
- ok6410 android driver(11)
This essay, I go to a deeply studying to android HAL device driver program. According to the android ...
- ok6410 android driver(9)
In this essay, I will write the JNI to test our leds device. If you don't know how to create a jni p ...
- ok6410 android driver(8)
In the past, we know how to create and run a simple character device driver on pc, goldfish and ok64 ...
- ok6410 android driver(3)
This article discusses the Makefile and how to port the module to different platform (localhost and ...
- ok6410 android driver(12)
In this essay, I will talk about how to write the service libraries. TIPS : I won't discuss the name ...
- ok6410 android driver(10)
From this essay, we go to a new discussion "Android Hardware Abstraction Layer". In this e ...
- ok6410 android driver(6)
This is a short essay about the mistakes in compiling ok6410 android-2.3 source codes. If there is n ...
- ok6410 android driver(1)
target system : Android (OK6410) host system : Debian Wheezy AMD64 1.Set up android system in ok6410 ...
随机推荐
- 使用ClipboardUtils兼容API LEVEL 11以下实现复杂粘贴
实现功能:复杂粘贴内容 问题描述:android.content.ClipboardManager在APILevel 11之后才可以使用,而我们目前还要兼容API Level 10(2.3.3) 解决 ...
- 【原创】从零开始学SpagoBI5.X源码汉化编译
从零开始学SpagoBI5.X源码汉化编译 一.新建Tomact Server 服务器并配置测试1.文件-新建-其他-过滤server-服务类型选择Tomact V7.0 Server2.根据需要修改 ...
- 我的常用mixin 之 lines
/** * 最多显示 $lineCount 行 * lines * * example: * @include lines; * @include lines(3); */ @mixin lines( ...
- ffrpc相关文章列表
ffrpc 是异步c++通信库.可以说是传统rpc模式和zeromq模式的一个结合,采用broker模式封装client和server之间的拓扑关系,而client和server的通信仍然按照请求应答 ...
- LoadRunner场景参数文件部分参数说明(我在某银行的整理)
由于场景中脚本繁多,同时设置60个脚本的“运行时设置”会提示个数限制信息,这时可以考虑通过场景的参数文件配置来批量解决这些事情,主要是提高工作效率. 选中自己保存的controller场景,鼠标右键点 ...
- Python Base HTTP Server
import BaseHTTPServer import cgi, random, sys MESSAGES = [ "That's as maybe, it's still a frog. ...
- (笔记)Linux内核学习(十)之虚拟文件系统概念
虚拟文件系统 虚拟文件系统:内核子系统VFS,VFS是内核中文件系统的抽象层,为用户空间提供文件系统相关接口: 通过虚拟文件系统,程序可以利用标准Linux文件系统调用在不同的文件系统中进行交互和操作 ...
- Rhino -- 基于java的javascript实现
http://www.cnblogs.com/cczw/archive/2012/07/16/2593957.html
- fast-framework – 基于 JDK 8 实现的 Java Web MVC 框架
摘要: 原创出处:www.bysocket.com 泥瓦匠BYSocket 希望转载,保留摘要,谢谢! fast-framework 轻量级 Java Web 框架 – https://github. ...
- IIS出现The specified module could not be found解决方法
打开IIS 信息服务,在左侧找到自己的计算机,点右键,选择属性,在主属性中选编辑,打开“目录安全性”选项卡,单击“匿名访问和验证控制”里的“编辑”按钮,在弹出的对话框中确保只选中了“匿名访问”和“集成 ...